
오늘은 Linux 배우는 날~
Preview
- Linux OS 시스템
- Ubuntu
- Vim
Linux OS 시스템
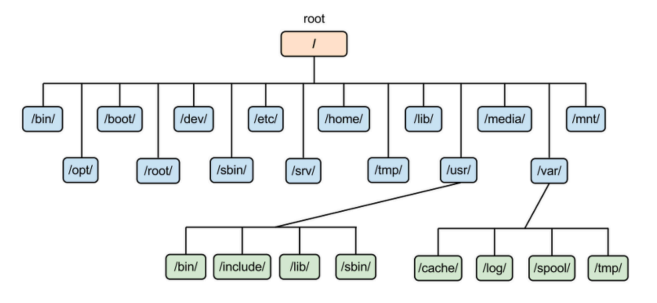
- lib: 라이브러리들이 설치되어있음.
- bin: 윈도우의 .exe 파일같은 실행파일들이 저장되어있음.
- sbin: 시스템의 실행파일들이 저장되어있음. (건들 ㄴㄴ)
Linux 명령어
기본 명령어
cd
- cd: 대충 경로 이동하는 명령어임.
- /: root 경로로 이동.
- .: 현재 경로로 이동. 제자리임.
- ..: 하위 경로로 이동.
- ~: 해당 계정의 home 디렉토리로 이동.
보통 root 계정의 home 디렉토리인 /root 경로에서 작업하긴함.
ls
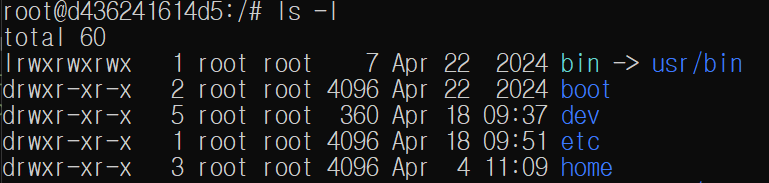
- ls: 현재 경로의 파일, 디렉토리 목록을 보여줌.
- -l: long, 자세히 보여줌.
- 맨 앞의 l, d ,- 는 파일의 종류를 나타냄.(링크, 디렉토리, 파일)
- -a: all, 숨김파일도 보여줌.
- 리눅스에서는 이름의 맨 앞에 .을 붙이면 숨김파일 처리됨.
- -l: long, 자세히 보여줌.
cat
- cat: 대충 file의 내용을 출력하는 명령어임.
- cat [파일명]: 현재 경로의 파일 내용을 출력함.
cat /root/.profile: /root/.profile 경로의 파일 내용을 출력함.
mkdir
- mkdir: 디렉토리를 생성함. ls 했을때 파란색 글씨임.
- -p: parents, mkdir -p 경로에 디렉토리가 존재하지 않는다면 생성함.
ex)mkdir -p test/test1/test2: test, test1 디렉토리를 자동으로 생성함.
touch
- touch: 파일을 생성함. ls 했을때 그냥 글씨임.
ex)touch test.txt
mv
- mv: 파일을 이동하거나, 이름을 바꿔줌.
ex)my test.txt sample/test.txt: 현재 경로의 test.txt를 sample 디렉토리로 이동
ex)mv sample/test.txt sample/sample.txt: sample/ 경로의 test.txt를 sample.txt로 이름 변경.
cp
- cp: 대충 파일 복사함.
rm
- rm: 대충 파일 삭제함.
- -r: 디렉토리를 삭제함.
- rmdir 이런것도 있음.
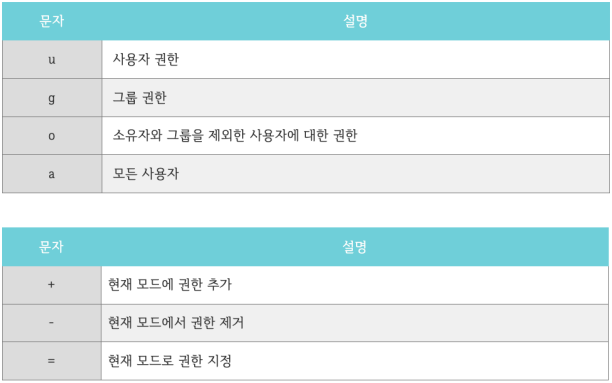
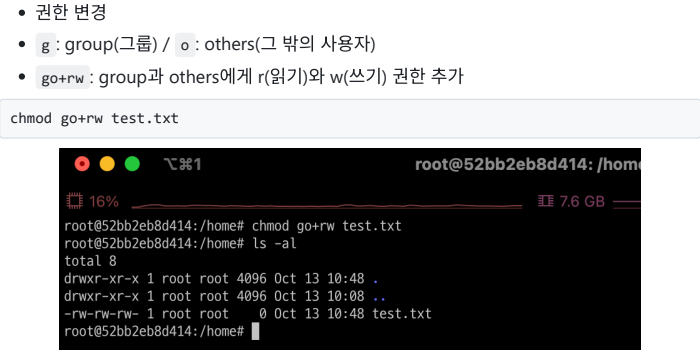
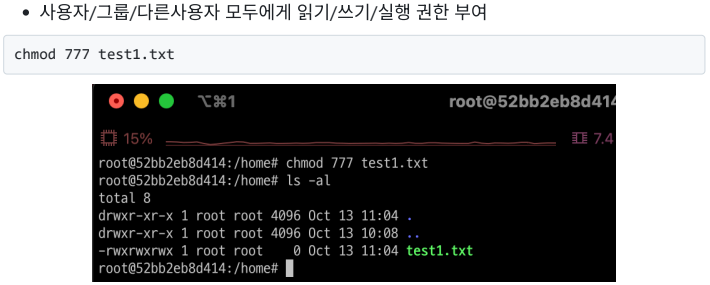
권한 명령어
chmod
- chmod : 파일과 디렉토리의 권한을 변경할 수 있음.
Ubuntu
Ubuntu는 Linux 기반의 OS 임.
docker pull ubuntu
docker images
ubuntu 이미지 다운로드
docker run -it `
>> --name ubuntu-container `
>> ubuntu `
>> /bin/bash
컨테이너 생성.
바로 /bin/bash를 적었기 때문에 ubuntu 환경에 바로 접속하게 됨.
whoami접속한 계정 확인.
apt-get updateapt-get의 update 해야하는 목록 확인.
apt-get upgradeapt-get의 update 목록을 실제로 upgrade.
apt-get dist-upgrade설치된 모든 패키지를 최신 버전으로 업그레이드.
apt-get install -y sudo vim권한 문제를 해결하기 위한 sudo, 문서 작업을 위한 vim 설치.
계정
sudo passwd root대충 root 계정의 비밀번호를 재설정함.
apt-get install -y adduser
adduser student
student라는 계정을 새로 만듦.
su - studentstudent 계정에 접속함.
mkdir test
touch test/test.txt
echo "HelloWorld" > test/test.txt
cat test/test.txt
대충 .txt 파일 하나 만들어줌.
adduser student현재 상태에서 위 코드는 오류남.
users 그룹의 student 계정은 새로운 계정을 생성할 권한이 없음.
su - root
adduser tutorial
su - tutorial
다시 root 계정으로 접속하고 생성하고 접속하면 됨.
tutorial@d436241614d5:~$ cat ../student/test/test.txt
cat: ../student/test/test.txt: Permission denied
tutorial 계정으로 student 계정에서 만든 test.txt 파일을 실행하려고 하니까 권한 거부됨.
su - student

chmod 755 ../student

ls -l
chmod 755 test
ls -l

cd test
ls -l
chmod 755 test.txt
ls -l

su - tutorial
student 계정으로 접속해서 권한 좀 바꿔주고 toturial 계정으로 돌아옴.
cat ../student/test/test.txt이제 tutorial 계정으로 student 계정의 test.txt를 실행해서 "HelloWorld"라는 글자가 출력되는 것을 볼 수 있음.
Vim
root 계정의 home 경로에서 실행.
vim .vimrcvim 에디터의 설정파일을 만들어줌.
set smartindent
set tabstop=4
set expandtab
set shiftwidth=4
.vimrc에 indent, 탭 설정을 해줌.
입력 후 esc -> :wq!
cat .vimrc변경사항이 저장된 것을 볼 수 있음.