아직 스프링이 익숙하지 않아서, 연습 겸 간단하게 게시판 기능을 구현해봤다.
MySQL을 연결하는 것까지.
깃허브 주소: https://github.com/SihyeonHong/demo
구조
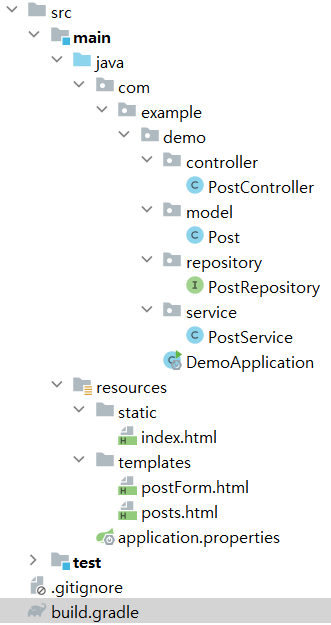
- java
- controller - PostController.java
- model - Post.java
- repository - PostRepository.java
- service - PostService.java
- DemoApplication.java : main 메서드.
- resources
- static - index.html : localhost:8080 초기 페이지
- templates
- postForm.html : /posts/new. 사용자에게 폼 형태로 데이터 입력받는 페이지.
- posts.html : /posts. DB에서 데이터 가져와 테이블 형태로 보여주는 페이지.
상세보기
환경설정
build.gradle
plugins {
   id 'java'
   id 'org.springframework.boot' version '3.1.0'
   id 'io.spring.dependency-management' version '1.1.0'
}

group = 'com.example'
version = '0.0.1-SNAPSHOT'

java {
   sourceCompatibility = '17'
}

repositories {
   mavenCentral()
}

dependencies {
   implementation 'org.springframework.boot:spring-boot-starter-thymeleaf'
   implementation 'org.springframework.boot:spring-boot-starter-web'
   testImplementation 'org.springframework.boot:spring-boot-starter-test'
   implementation 'org.springframework.boot:spring-boot-starter-data-jpa'
   implementation 'mysql:mysql-connector-java:8.0.33'
}

tasks.named('test') {
   useJUnitPlatform()
}
사용한 라이브러리는 Thymeleaf, Spring Web, 그리고 JPA.
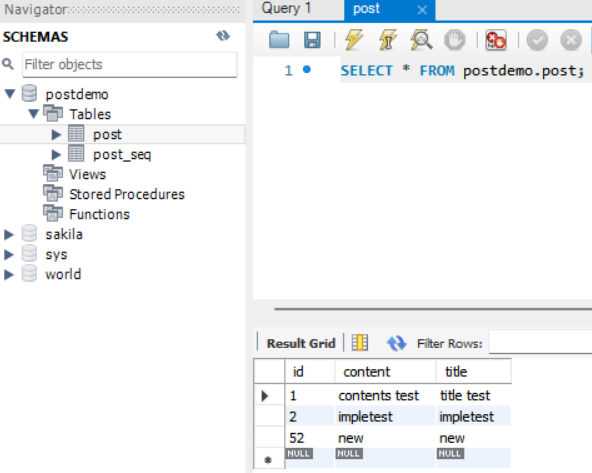
데이터베이스는 MySQL 사용했다.
발생했던 문제
Could not find mysql:mysql-connector-java:.
dependencies {
	...
	implementation 'mysql:mysql-connector-java'
	runtimeOnly 'mysql:mysql-connector-java:8.0.33'
}
MySQL의 버전을 제대로 입력하지 않아서 발생한 오류.
...라고 해서 밑에 이렇게 한 줄을 추가했더니 이번에는 mysql이 두 번 등장하고 있다고 문제가 됐다.
그래서 찾아봤다.
implementation과 runtimeOnly의 차이
- Implementation: 컴파일 단계와 런타임 모두 dependency(종속성)가 필요하다.
- runtimeOnly: 컴파일 단계에서는 필요하지 않지만 런타임에서만 필요한 dependency를 선언할 때 사용.
MySQL Connector/J의 경우,
implementation설정을 사용하면 MySQL Connector/J 라이브러리의 클래스를 코드에서 사용할 수 있으며, 이를 컴파일하고 실행할 수 있습니다. 그러나runtimeOnly를 사용하면 코드에서 클래스를 사용할 수 없지만 코드를 실행할 때 클래스가 포함됩니다. 이는 일반적으로 클래스가 반영을 통해서만 접근되거나 코드가 사용하는 프레임워크에 의해 필요로 하는 경우에 사용됩니다. Spring Boot 애플리케이션의 맥락에서는 애플리케이션 코드가 커넥터 라이브러리의 클래스를 직접 사용하므로implementation을 사용하는 것이 더 합리적입니다.
(ChatGPT)
runtimeOnly로 했을 때도 내 간단한 게시판 기능은 잘 돌아가긴 했는데, implementation을 쓰는 게 맞는 것 같아서 바꿨다.
application.properties
spring.datasource.url=jdbc:mysql://localhost:3306/postdemo
spring.datasource.username=root
spring.datasource.password=1234
spring.jpa.hibernate.ddl-auto=update
postdemo는 schema의 이름.
schema는 MySQL에 따로 들어가서 만들어 줬다.
마지막 줄은 Hibernate가 schema를 자동으로 생성하거나 변경하는 방식을 지정한다. update로 설정하면, 엔티티 클래스의 변경 사항을 schema에 반영한다.
프로그램
model - Post
package com.example.demo.model;

import jakarta.persistence.Entity;
import jakarta.persistence.GeneratedValue;
import jakarta.persistence.GenerationType;
import jakarta.persistence.Id;

@Entity
public class Post {
    @Id
    @GeneratedValue(strategy = GenerationType.AUTO)
    private int id;

    private String title;
    private String content;

    public Post() {
    }

    public Post(String title, String content) {
        this.title = title;
        this.content = content;
    }

    // getter and setter ...
}
JPA의 Entity
- JPA에서 Entity란: DB 데이블의 한 row를 표현하는 Java 객체.
id,title,content가 column들.
- 클래스 레벨에
@Entitiyannotation 달고, id 필드에@Id달아서 id를 primary key로 정의. @GeneratedValue(strategy = GenerationType.AUTO): id 자동 생성을 데이터베이스에 위임.- 빈 생성자 필요: JPA는 엔티티 인스턴스를 만들기 위해 기본 생성자를 사용하므로, 빈 생성자가 반드시 필요하다.
public또는protected이어야 한다.
repository - PostRepository
package com.example.demo.repository;

import com.example.demo.model.Post;
import org.springframework.data.jpa.repository.JpaRepository;
import org.springframework.stereotype.Repository;

@Repository
public interface PostRepository extends JpaRepository<Post, Long> {
}- 인터페이스로 만들고 JpaRepository를 extends하면 된다.
JpaRepository<Post, Long>:Post타입의 Entity를 대상으로 데이터 접근 작업을 할 것이며, 그 Entity의 ID 필드가Long타입이다.- 이제 기본적인 CRUD 작업을 하는 메서드들을 사용할 수 있다. PostService 참고.
service - PostService
import org.springframework.stereotype.Service;

import java.util.ArrayList;
import java.util.List;

@Service
public class PostService {
    private List<Post> posts = new ArrayList<>();

    @Autowired
    private PostRepository postRepository;

    public List<Post> getAllPosts() {
        return postRepository.findAll();
    }

    public void addPost(Post post) {
        postRepository.save(post);
    }
}- Spring에서 Service는 주로 비즈니스 로직을 수행한다. 일반적으로 Controller와 Repository 사이에 있다.
- JPA에서 제공하는 기본 CRUD 메서드들
findAll(): 모든 데이터 조회save(post): post가 새로운 entity면 create, 이미 존재하는 entity면 update.- 이외에도
findById(ID id),deleteById(ID id),count(),existsById(ID id)등 있는데 그때그때 찾아 쓰자.
controller - PostController
package com.example.demo.controller;

import com.example.demo.model.Post;
import com.example.demo.service.PostService;
import org.springframework.beans.factory.annotation.Autowired;
import org.springframework.stereotype.Controller;
import org.springframework.ui.Model;
import org.springframework.web.bind.annotation.GetMapping;
import org.springframework.web.bind.annotation.ModelAttribute;
import org.springframework.web.bind.annotation.PostMapping;

import java.util.List;

@Controller
public class PostController {
    @Autowired
    private PostService postService;

    @GetMapping("/posts")
    public String getAllPosts(Model model) {
        List<Post> posts = postService.getAllPosts();
        model.addAttribute("posts", posts);
        return "posts";
    }
    @GetMapping("/posts/new")
    public String getNewPostForm(Model model) {
        model.addAttribute("post", new Post() );
        return "postForm";
    }

    @PostMapping("/posts")
    public String addPost(@ModelAttribute Post post) {
        postService.addPost(post);
        return "redirect:/posts";
    }
}@Autowired: Spring bean 주입받아 와라.- 여기에서
new post()해야 해서 Post에 빈 생성자가 필요했다.
DemoApplication
package com.example.demo;

import org.springframework.boot.SpringApplication;
import org.springframework.boot.autoconfigure.SpringBootApplication;

@SpringBootApplication
public class DemoApplication {

   public static void main(String[] args) {
      SpringApplication.run(DemoApplication.class, args);
   }

}@SpringBootApplication: 이게 붙어있는 메인 클래스를 기준으로 하위 패키지들을 스캔한다.
*@Repository,@Service,@Controller등은 Spring의 Stereotype이므로, 저 annotation 붙어있으면 자동으로 Spring Bean으로 등록된다.
html
posts.html
<!DOCTYPE html>
<html xmlns:th="http://www.thymeleaf.org">
<head>
    <title>Simple Board</title>
</head>
<body>
<h1>Post List</h1>
<table>
    <tr>
        <th>ID</th>
        <th>Title</th>
        <th>Content</th>
    </tr>
    <tr th:each="post : ${posts}">
        <td th:text="${post.id}"></td>
        <td th:text="${post.title}"></td>
        <td th:text="${post.content}"></td>
    </tr>
</table>
</body>
</html>
postForm.html
<!DOCTYPE html>
<html xmlns:th="http://www.thymeleaf.org">
<head>
    <title>New Post</title>
</head>
<body>
<h1>New Post</h1>
<form action="#" th:action="@{/posts}" th:object="${post}" method="post">
    <p>Title: <input type="text" th:field="*{title}" /></p>
    <p>Content: <textarea th:field="*{content}"></textarea></p>
    <p><input type="submit" value="Submit" /></p>
</form>
</body>
</html>