MongoDB는 관계형 데이터베이스(RDBMS)처럼 직접적으로 모델 간의 관계를 설정할 수 없습니다. 하지만 Mongoose를 사용하면 다른 문서(Document)들을 참조(Reference)하여 관계를 표현할 수 있습니다.
이번 글에서는 Post(게시글) 와 Author(작성자) 모델, 그리고 Profile(프로필) 사용하여 관계를 설정하고, populate()를 활용하여 데이터를 조회하는 방법을 살펴보겠습니다.
1. Mongoose로 MongoDB에서 관계 설정하기: Post와 Author 예제
아래 코드에서는:
- Post(게시글) 모델은 authorId를 통해 Author(작성자)를 참조합니다.
- Author(작성자) 모델은 profileId를 통해 Profile(프로필)을 참조합니다.
- 즉, Post → Author → Profile 형태의 중첩된 관계를 가진 예제입니다.
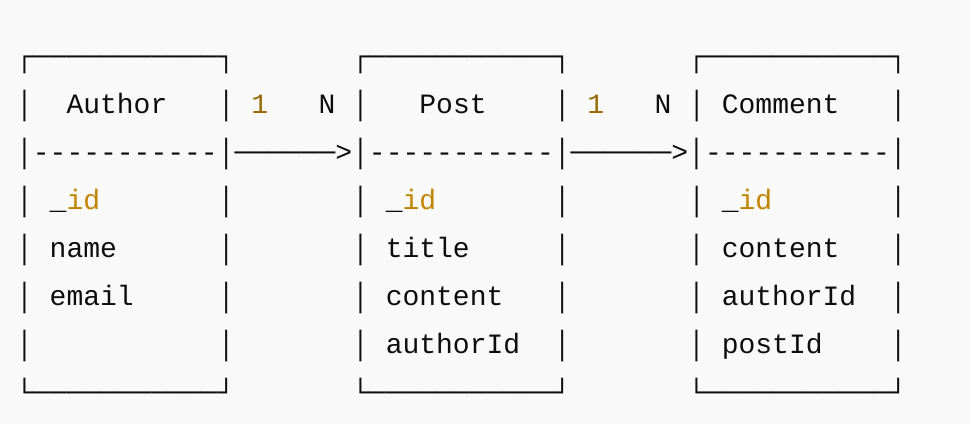
Post 모델 (작성자 정보 참조)
authorId 필드를 통해 작성자 정보를 참조하게 합니다.
const mongoose = require("mongoose");
const Schema = mongoose.Schema;

const postSchema = new Schema({
  _id: Schema.Types.ObjectId,
  title: { type: String, required: true },
  content: { type: String, required: true },
  authorId: { type: Schema.Types.ObjectId, ref: "Author", required: true }
});

module.exports = mongoose.model("Post", postSchema);
Author 모델 (작성자 프로파일 참조)
작성자의 정보를 저장하는 모델입니다. 작성자의 세부 사항은 별도의 프로파일 모델을 참조합니다.
const mongoose = require("mongoose");
const Schema = mongoose.Schema;

const authorSchema = new Schema({
  _id: Schema.Types.ObjectId,
  name: { type: String, required: true },
  email: { type: String, required: true },
  profileId: { type: Schema.Types.ObjectId, ref: "Profile" }
});

module.exports = mongoose.model("Author", authorSchema);
Profile 모델
작성자의 추가 프로필 정보를 저장하는 모델입니다.
const mongoose = require("mongoose");
const Schema = mongoose.Schema;

const profileSchema = new Schema({
  _id: Schema.Types.ObjectId,
  bio: { type: String, required: true },
  website: { type: String }
});

module.exports = mongoose.model("Profile", profileSchema);
데이터 생성하기
이제 Author, Profile, Post 데이터를 생성하여 MongoDB에 저장해 보겠습니다.
....
const profile = new Profile({
  _id: new mongoose.Types.ObjectId(),
  bio: "web developer",
  website: "https://example.com"
});

const author = new Author({
  _id: new mongoose.Types.ObjectId(),
  name: "jason",
  email: "jason@example.com",
  profileId: profile._id
});

const post = new Post({
  _id: new mongoose.Types.ObjectId(),
  title: "post title",
  content: "post content",
  authorId: author._id
});
populate() 없이 조회하기
populate()를 사용하지 않으면 authorId 필드에는 단순히 ObjectId만 포함됩니다
...
app.get("/", async (req, res) => {
  const posts = await Post.find();
  res.send(posts);
});
posts 에 담긴 내용
[
  {
    "_id": "65f6e9788677062e69814c2a4",
    "title": "post title",
    "content": "post content",
    "authorId": "65f6e9788677062e69814c2a3",
  }
]
populate()를 사용하여 데이터 조회하기
이제 authorId 필드에 작성자 정보가 포함됩니다.
...
app.get("/", async (req, res) => {
  const posts = await Post.find().populate("authorId");
  res.send(posts);
});
posts 에 담긴 내용
[
  {
    "_id": "65f6e9788677062e69814c2a4",
    "title": "post title",
    "content": "post content",
    "authorId": {
      "_id": "65f6e9788677062e69814c2a3",
      "name": "jason",
      "email": "jason@example.com",
      "profileId": "65f6e9788677062e69814c2a2",
    }
  }
]
populate() 중첩 사용
만약 작성자의 프로필(Profile) 정보까지 가져오려면 populate()를 중첩해서 호출하면 됩니다. 이제 profileId 필드에 작성자의 프로필 정보도 포함된 것을 확인할 수 있습니다.
...
app.get("/", async (req, res) => {
  const posts = await Post.find()
    .populate({
      path: "authorId",
      populate: { path: "profileId" }
    });
  res.send(posts);
posts 에 담긴 내용
[
  {
    "_id": "65f6e9788677062e69814c2a4",
    "title": "post title",
    "content": "post content",
    "authorId": {
      "_id": "65f6e9788677062e69814c2a3",
      "name": "jason",
      "email": "jason@example.com",
	  "profileId": {
        "_id": "65f6e9788677062e69814c2a2",
        "bio": "web developer",
        "website": "https://example.com",
    }
  }
]
2. populate()의 한계점
-
쿼리 성능 문제
populate()는 내부적으로 추가적인 쿼리 실행을 발생시킵니다.
중첩된 populate()가 많아질수록 성능이 저하됩니다. -
데이터 일관성 문제
중복된 데이터 저장(denormalization)으로 해결해야 합니다.
3. 정리
- Mongoose에서는 ref 옵션을 사용하여 다른 문서를 참조할 수 있습니다.
- 중첩된 populate()를 사용할 경우 성능 저하를 주의해야 합니다.
- 관계가 깊어질 경우 데이터 정규화보다는 필요한 데이터만 포함하는 방법을 고려해야 합니다.
4 참고한 글
