Spring Security란?
스프링 시큐리티는 인증 (Authentication) ,권한(Authorize) 부여 및 보호 기능을 제공하는 프레임워크다.
Java / Java EE 프레임워크
개발을 하면서 보안 분야는 시간이 많이 소요되는 활동들 중 하나다. Spring Security를 사용함으로써 짜여진 내부 로직을 통해 인증, 권한 확인에 필요한 기능과 옵션들을 제공한다.
인증(Authentication) , 인가(Authorization)
인증과 인가란 무엇일까? 보통 인증 절차를 거친 후 인가 절차를 진행한다.
- 인증: 해당 사용자가 본인이 맞는지를 확인하는 절차.
- 인가: 인증된 사용자가 요청된 자원에 접근가능한가를 결정하는 절차
인증 방식
1. credential 방식: username, password를 이용하는 방식
2. 이중 인증(twofactor 인증): 사용자가 입력한 개인 정보를 인증 후, 다른 인증 체계(예: 물리적인 카드)를 이용하여 두가지의 조합으로 인증하는 방식이다.
3. 하드웨어 인증: 자동차 키와 같은 방식
이중 Spring Security는 credential 기반의 인증을 취합니다.
- principal: 아이디 (username)
- credential: 비밀번호 (password)
특정 자원에 대한 접근을 제어하기 위해서는 권한을 가지게 된다.
특정 권한을 얻기 위해서는 유저는 인증정보(Authentication)가 필요하고 관리자는 해당 정보를 참고해 권한을 인가(Authorization)한다.
보편적으로 username - password 패턴의 인증방식을 거치기 때문에 스프링 시큐리티는 principal - credential 패턴을 가지게 된다.
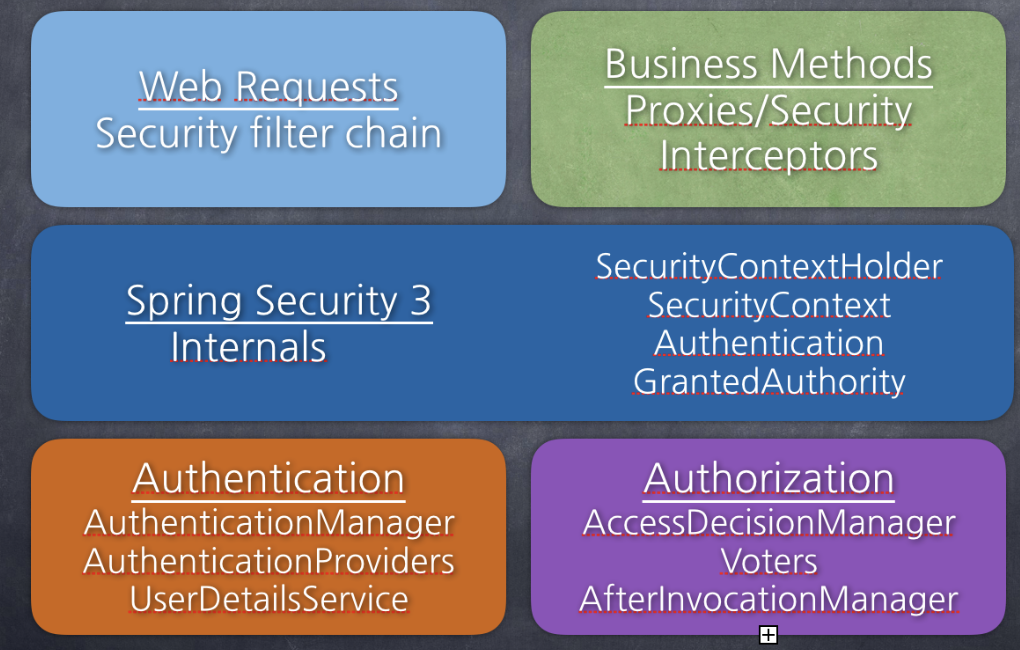
Spring Security의 특징
- Filter를 기반으로 동작한다.
- Spring MVC와 분리되어 관리하고 동작할 수 있다.
- Bean으로 설정할 수 있다.
- Spring Security 3.2부터는 XML설정을 하지 않아도 된다.
Spring Security Architecture(구조)
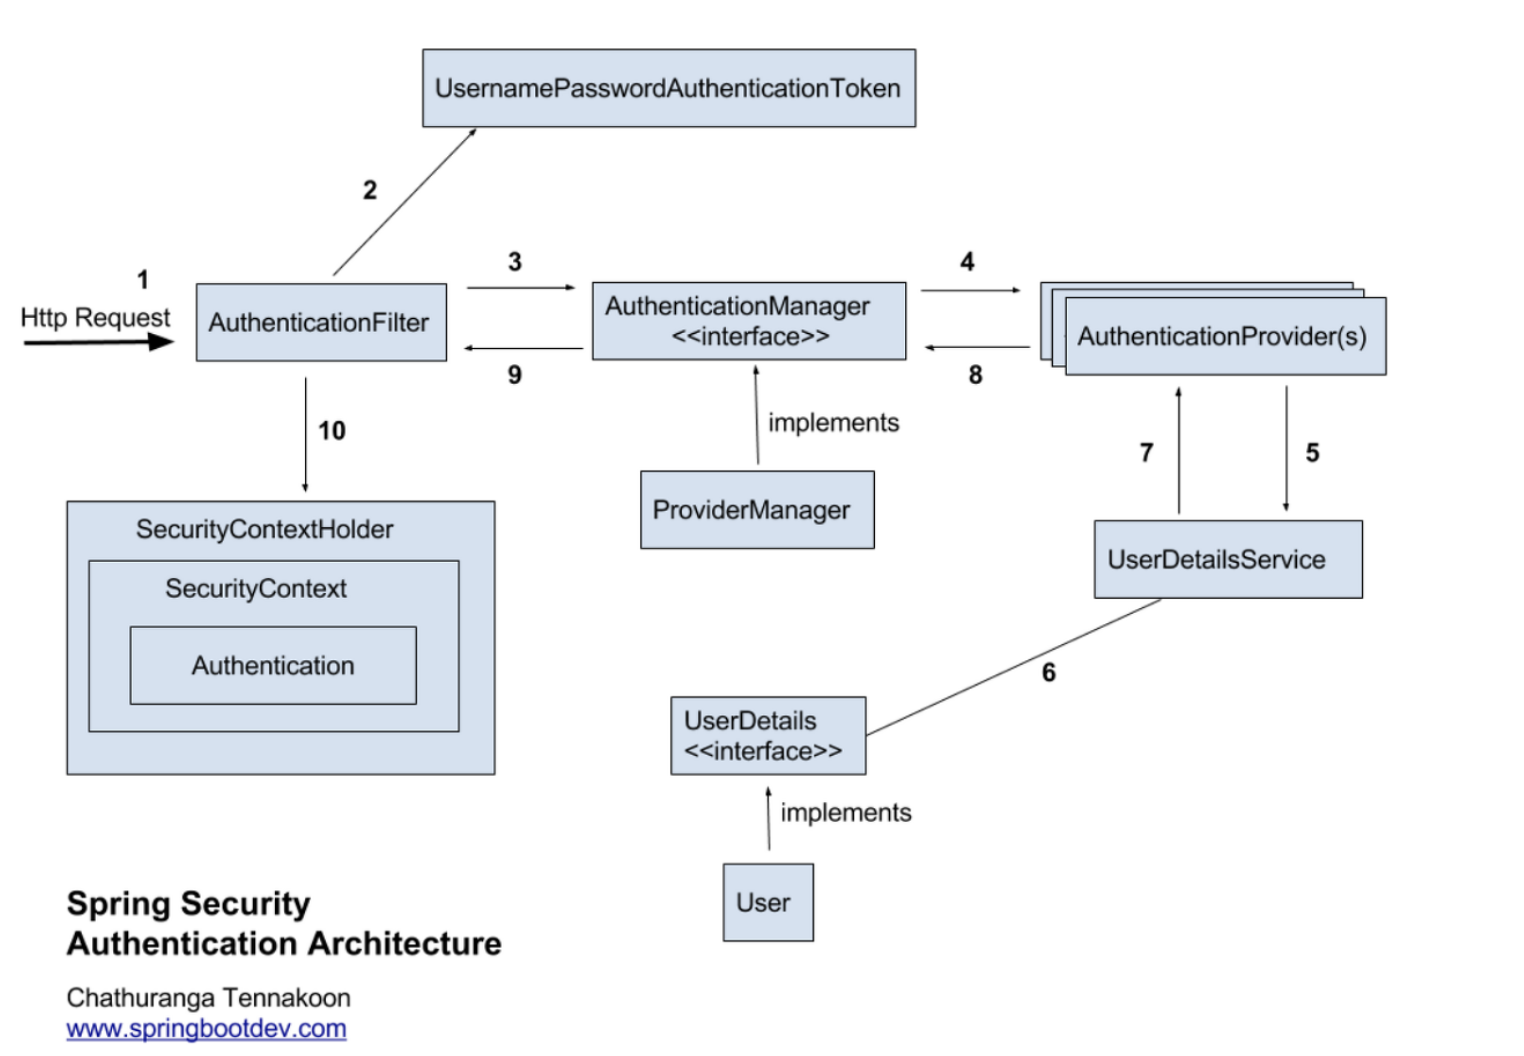
이 사진은 스프링 시큐리티의 아키텍처 사진이고 스프링 시큐리티의 흐름은 아래와 같다.
1. Http Request 수신
-> 사용자가 로그인 정보와 함께 인증 요청을 한다.
2. 유저 자격을 기반으로 인증토큰 생성
-> AuthenticationFilter가 요청을 가로채고, 가로챈 정보를 통해 UsernamePasswordAuthenticationToken의 인증용 객체를 생성한다.
3. FIlter를 통해 AuthenticationToken을 AuthenticationManager로 위임
-> AuthenticationManager의 구현체인 ProviderManager에게 생성한 UsernamePasswordToken 객체를 전달한다.
4. AuthenticationProvider의 목록으로 인증을 시도
-> AutenticationManger는 등록된 AuthenticationProvider들을 조회하며 인증을 요구한다.
5. UserDetailsService의 요구
-> 실제 데이터베이스에서 사용자 인증정보를 가져오는 UserDetailsService에 사용자 정보를 넘겨준다.
6. UserDetails를 이용해 User객체에 대한 정보 탐색
-> 넘겨받은 사용자 정보를 통해 데이터베이스에서 찾아낸 사용자 정보인 UserDetails 객체를 만든다.
7. User 객체의 정보들을 UserDetails가 UserDetailsService(LoginService)로 전달
-> AuthenticaitonProvider들은 UserDetails를 넘겨받고 사용자 정보를 비교한다.
8. 인증 객체 or AuthenticationException
-> 인증이 완료가되면 권한 등의 사용자 정보를 담은 Authentication 객체를 반환한다.
9. 인증 끝
-> 다시 최초의 AuthenticationFilter에 Authentication 객체가 반환된다.
10. SecurityContext에 인증 객체를 설정
-> Authentication 객체를 Security Context에 저장한다.
최종적으로는 SecurityContextHolder는 세션 영역에 있는 SecurityContext에 Authentication 객체를 저장한다. 사용자 정보를 저장한다는 것은 스프링 시큐리티가 전통적인 세선-쿠키 기반의 인증 방식을 사용한다는 것을 의미한다.
Spring Security의 주요 모듈
1) SecurityContextHolder, SecurityContext, Authentication
세가지 클래스는 스프링 시큐리티의 주요 컴포넌트로, 각 컴포넌트의 관계를 간단히 표현하자면 다음과 같다.
유저의 아이디와 패스워드 사용자 정보를 넣고 실제 가입된 사용자인지 체크한 후 인증에 성공하면 우리는 사용자의 principal과 credential정보를 Authentication안에 담는다. 스프링 시큐리티에서 방금 담은 Authentication을 SecurityContext에 보관한다. 이 SecurityContext를 SecurityContextHolder에 담아 보관하게 되는 것이다.
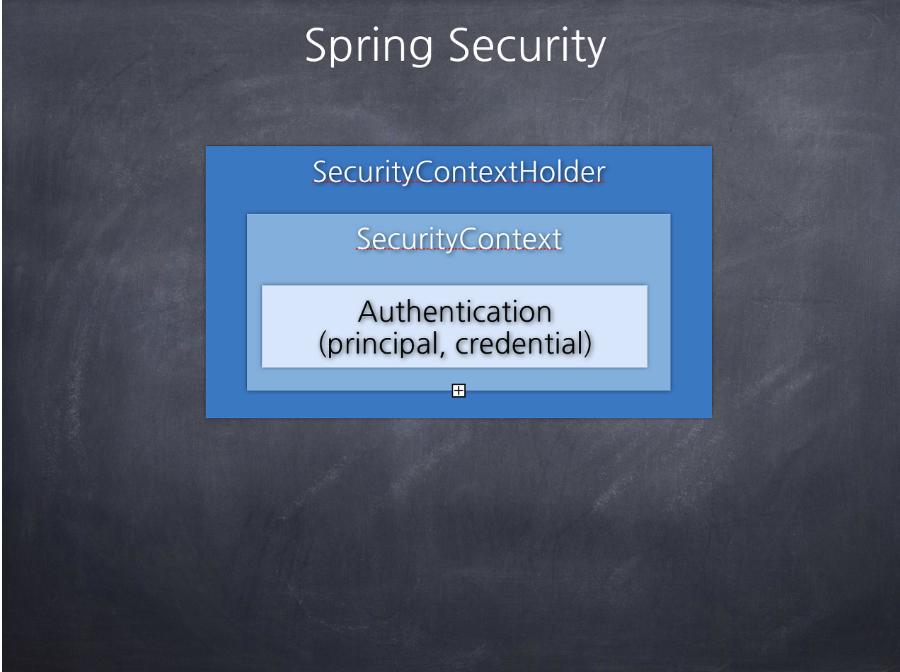
Authentication 클래스는 현재 접근하는 주체의 정보와 권한을 담는 인터페이스고 SecurityContext 저장되며 SecurityContextHolder를 통해 SecurityContext에 접근하고, SecurityContext를 통해 Authentication에 접근할 수 있다.
public interface Authentication extends Principal, Serializable {

	Collection<? extends GrantedAuthority> getAuthorities();

	Object getCredentials();

	Object getDetails();

	Object getPrincipal();

	boolean isAuthenticated();

	void setAuthenticated(boolean isAuthenticated) throws IllegalArgumentException;

}
우리가 로그인한 사용자의 정보를 얻기 위해서는
SecurityContextHolder.getContext().getAuthentication().getPrincipal();
이 구문을 사용하여 가져왔었는데 왜 이렇게 가져올 수 있는지 잘 모르는 분들이 많을 것이다.
하지만 위의 코드를 보면서 이제 이런식으로 동작하는구나 하고 이해할 수 있을 것이다.
2) UsernamePasswordAuthenticationToken
이 클래스는 Autentication을 구현한 AbstractAuthenticationToken의 하위의 하위클래스로, 유저의 ID가 Principal의 역할을 하고 유저의 Password가 Credential의 역할을 한다. UserPasswordAuthenticationToken의 첫번째 생성자는 인증 전에 객체를 생성하고, 두번째는 인증이 완료된 객체를 생성한다.
public abstract class AbstractAuthenticationToken implements Authentication, CredentialsContainer {
}

public class UsernamePasswordAuthenticationToken extends AbstractAuthenticationToken {

	private static final long serialVersionUID = SpringSecurityCoreVersion.SERIAL_VERSION_UID;

	private final Object principal;

	private Object credentials;

	// 인증 완료 전의 객체 생성
	public UsernamePasswordAuthenticationToken(Object principal, Object credentials) {
		super(null);
		this.principal = principal;
		this.credentials = credentials;
		setAuthenticated(false);
	}

	// 인증 완료 후의 객체 생성
	public UsernamePasswordAuthenticationToken(Object principal, Object credentials,
			Collection<? extends GrantedAuthority> authorities) {
		super(authorities);
		this.principal = principal;
		this.credentials = credentials;
		super.setAuthenticated(true); // must use super, as we override
	}
3) AuthenticationManager
인증에 대한 부분은 이 클래스를 통해서 처리가 된다. 실질적으로는 AuthenticationManager에 등록된 AuthenticationProvider에 의해서 처리가 된다. 인증에 성공하면 두번째 생성자를 이용해 생성한 객체를 SecurityContext에 저장한다.
public interface AuthenticationManager {

	Authentication authenticate(Authentication authentication) throws AuthenticationException;

}
4) AuthenticationProvider
이 클래스는 실제 인증에 대한 부분을 처리하는 작업을 치룬다. 인증 전에 Authentication 객체를 받아 인증이 완료된 객체를 반환하는 역할을 하고 아래와 같은 인터페이스를 구현해 Custom한 AuthenticationProvider를 작성하고 AuthenticationManger에 등록하면 된다.
public interface AuthenticationProvider {

	Authentication authenticate(Authentication authentication) throws AuthenticationException;

	boolean supports(Class<?> authentication);

}
5) ProviderManager
AuthenticationManager를 구현한 ProviderManager은 AuthenticationProvider를 구성하는 목록을 갖는다.
public class ProviderManager implements AuthenticationManager, MessageSourceAware, InitializingBean {

    public List<AuthenticationProvider> getProviders() {
		return this.providers;
	}

    public Authentication authenticate(Authentication authentication) throws AuthenticationException {
		Class<? extends Authentication> toTest = authentication.getClass();
		AuthenticationException lastException = null;
		AuthenticationException parentException = null;
		Authentication result = null;
		Authentication parentResult = null;
		int currentPosition = 0;
		int size = this.providers.size();

        // for문으로 모든 provider를 순회하여 처리하고 result가 나올때까지 반복한다.
		for (AuthenticationProvider provider : getProviders()) { ... }
	}
}
6) UserDetailsService
이 클래스는 UserDetails 객체를 반환하는 하나의 메서드만을 가지고 있는데, 일반적으로 이를 구현한 클래스에서 UserRepository를 주입받아 DB와 연결하여 처리한다.
public interface UserDetailsService {

	UserDetails loadUserByUsername(String username) throws UsernameNotFoundException;

}
7) UserDetails
인증에 성공하여 생성된 UserDetails클래스는 Authentication 객체를 구현한 UsernamePasswordAuthenticationToken을 생성하기 위해 사용됩니다. UserDetails를 구현하여 처리할 수 있습니다.
public interface UserDetails extends Serializable {

	Collection<? extends GrantedAuthority> getAuthorities();

	String getPassword();

	String getUsername();

	boolean isAccountNonExpired();

	boolean isAccountNonLocked();

	boolean isCredentialsNonExpired();

	boolean isEnabled();

}
8) SecurityContextHolder
SecurityContextHolder는 보안 주체의 세부 정보를 포함하여 응용 프로그램의 현재 보안 컨텍스트에 대한 세부 정보가 저장됩니다.
9) SecurityContext
Authentication을 보관하는 역할을 하며, SecurityContext를 통해 Authentication을 저장하거나 꺼내올 수 있습니다.
SecurityContextHolder.getContext().set or get Authentication(authenticationObject);
10) GrantedAuthority
GrantedAuthority는 현재 사용자(Pricipal)가 가지고 있는 권한을 의미하며 ROLE_ADMIN, ROLE_USER와 같이 ROLE_* 형태로 사용합니다. GrantedAuthority객체는 UserDetailsService에 의해 불러올 수 있고, 특정 자원에 대한 권한이 있는지 없는지를 검사해 접근 허용 여부를 결정합니다.
마무리 총총
내부 구조를 모르고 사용하는 스프링 시큐리티는 언젠가 터지게될 이슈에 대응하기 힘들어집니다. 내부 구조와 동작과 같은 개념을 잡아가야 실무에 더욱 효율적으로 적용할 수 있고 이슈가 발생했을때 유연하게 대처가 가능해집니다. 꼭 이 개념들을 잘 갖추도록 합시다


설명 폼 뮈쳐따