👩💻 수업
📂 TableView 내 CollectionView 삽입 후 사용하는 법

- 먼저 HomeViewController 내에 TableView 추가 후 TableViewCell에 Label과 CollectionView를 추가함
- 이때 HomeTableViewCell의 코드는 아래와 같다.
class HomeTableViewCell: UITableViewCell {

    static let identifier = "HomeTableViewCell"

    @IBOutlet weak var categoryLabel: UILabel!
    @IBOutlet weak var collectionView: UICollectionView!

    override func awakeFromNib() {
        super.awakeFromNib()
    }

    override func setSelected(_ selected: Bool, animated: Bool) {
        super.setSelected(selected, animated: animated)
    }

}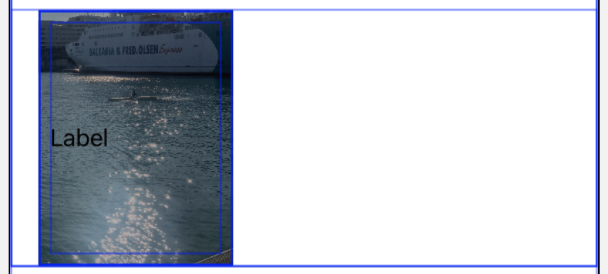
- 위의 사진과 같이 CollectionView 내부에는 ImageView와 Label을 추가해준 상태
- HomeCollectionViewCell 파일을 생성 후 연결시켜주고 IBOutlet까지 연결시켜주었다.
class HomeCollectionViewCell: UICollectionViewCell {
    static let identifier = "HomeCollectionViewCell"

    @IBOutlet weak var imageView: UIView!
    @IBOutlet weak var contentLabel: UILabel!
}- extension을 통해 TableView와 관련된 코드를 작성해주었다.
- TableView 내의 collectionView의 delegate와 datasource 연결을 cellForRowAt 메서드 내부에 작성해주었다.(내일 이 부분 관련하여 코드 수정할 예정!)
- 테이블뷰 내부의 CollectionView에 indexPath.row를 활용하여 tag를 추가해주었다.
- 첫번째 행의 collectionView에 isPagingEnabled에 true값을 할당하여 페이지 넘기듯 셀을 스크롤할 수 있도록 설정하였다.
extension HomeViewController: UITableViewDelegate, UITableViewDataSource {
    func tableView(_ tableView: UITableView, numberOfRowsInSection section: Int) -> Int {
        return 10
    }

    func tableView(_ tableView: UITableView, cellForRowAt indexPath: IndexPath) -> UITableViewCell {
        guard let cell = tableView.dequeueReusableCell(withIdentifier: HomeTableViewCell.identifier, for: indexPath) as? HomeTableViewCell else {
            return UITableViewCell()
        }
        cell.categoryLabel.backgroundColor = .yellow
        cell.collectionView.backgroundColor = .lightGray
        cell.collectionView.tag = indexPath.row
        cell.collectionView.delegate = self
        cell.collectionView.dataSource = self

        if indexPath.row == 0 {
            cell.collectionView.isPagingEnabled = true
        }

        return cell
    }

    func tableView(_ tableView: UITableView, heightForRowAt indexPath: IndexPath) -> CGFloat {
        return indexPath.row == 1 ? 300 : 170
    }
}- 또 다른 extension을 통해 collectionView 관련 코드를 작성해주었다.
- 위의 TableView cellForRowAt 메서드 내에서 설정해준 tag값을 활용하여 sizeForItemAt 메서드를 통해 첫번째 행의 collectionView의 폭만 현재 화면의 폭과 동일하게 설정해주었다.
- insetForSectionAt 메서드를 활용해 첫번째 행의 collectionView의 inset을 모두 0으로 초기화시켜서 paging 기능을 정확하게 사용할 수 있도록 구현했다.
extension HomeViewController: UICollectionViewDelegate, UICollectionViewDataSource, UICollectionViewDelegateFlowLayout {
    func collectionView(_ collectionView: UICollectionView, numberOfItemsInSection section: Int) -> Int {
        return 20
    }

    func collectionView(_ collectionView: UICollectionView, cellForItemAt indexPath: IndexPath) -> UICollectionViewCell {
        guard let cell = collectionView.dequeueReusableCell(withReuseIdentifier: HomeCollectionViewCell.identifier, for: indexPath) as? HomeCollectionViewCell else {
            return UICollectionViewCell()
        }

        return cell
    }

    func collectionView(_ collectionView: UICollectionView, layout collectionViewLayout: UICollectionViewLayout, sizeForItemAt indexPath: IndexPath) -> CGSize {
        if collectionView.tag == 0 {
            return CGSize(width: UIScreen.main.bounds.width, height: 100)
        } else {
            return CGSize(width: 150, height: 100)
        }
    }

    func collectionView(_ collectionView: UICollectionView, layout collectionViewLayout: UICollectionViewLayout, insetForSectionAt section: Int) -> UIEdgeInsets {
        if collectionView.tag == 0 {
            return UIEdgeInsets(top: 0, left: 0, bottom: 0, right: 0)
        } else {
            return UIEdgeInsets(top: 0, left: 20, bottom: 0, right: 0)
        }
    }

    func collectionView(_ collectionView: UICollectionView, layout collectionViewLayout: UICollectionViewLayout, minimumLineSpacingForSectionAt section: Int) -> CGFloat {
        return collectionView.tag == 0 ? 0 : 10
    }
}
📂 Class & Struct Initialization
Struct Initialization
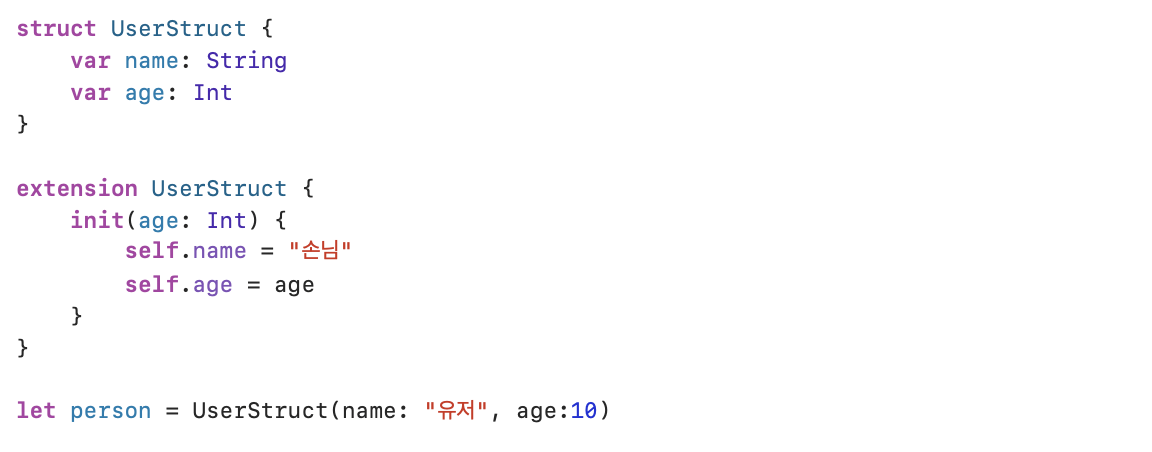
구조체는 기본적으로 멤버와이즈 초기화 구문이 제공되기 때문에 추가적으로 초기화문을 작성하는 것이 필수는 아니다. 하지만 프로퍼티들 중 default값이 제공되어있는 초기화 구문 및 멤버와이즈 초기화 구문 모두를 사용하고 싶은 경우에는 extension을 사용하는 것이 좋다! (그렇지 않으면 다른 멤버와이즈 초기화구문을 직접 작성해서 준비해야하기 때문)
import Foundation
import UIKit
class User {
var name: String = ""
var age: Int = 0
}
let a = User() // 초기화 구문, 초기화 메서드 -> 기본적으로 생성된다고 해서 Default Initializer라고 불림
// let a = User.init()
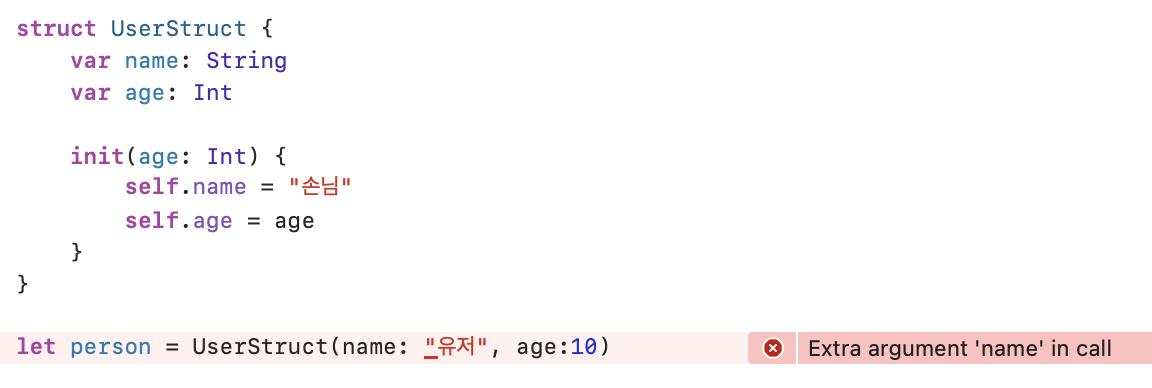
struct UserStruct {
var name: String = ""
var age: Int = 0
}
let b = UserStruct(name: "name", age: 0) // -> Memberwise Initializer
let c = UserStruct() // 초기화가 이미 선언과 동시에 완료돼있다면 class처럼 default initalizer 사용할 수 있음// 초기화 메서드를 사용할 수 있는 방법
// 아래 둘은 동일한 초기화 구문
let color = UIColor(red: 0.5, green: 0.5, blue: 1.0, alpha: 1)
let color2 = UIColor.init(red: 0.5, green: 0.5, blue: 1.0, alpha: 1)편의생성자(Convenience Initializer)
- 초기화를 일부 값만으로도 할 수 있도록 해주는 초기화구문
- init 앞에 convenience를 붙여서 사용한다.
- 편의생성자 내부에서 지정생성자를 호출하여 초기화를 진행하는 것이기 때문에 편의 생성자 사용 전에 지정 생성자가 이미 선언돼있어야함!
- 아래 코드에서는 편의생성자를 활용해서 menu값만 주어도 초기화를 할 수 있음
class Coffee {
    let shot: Int
    let size: String
    let menu: String
    let mind: String

    // Designated initializer(지정)
    init(shot: Int, size: String, menu: String, mind: String) {
        self.shot = shot
        self.size = size
        self.menu = menu
        self.mind = mind
    }

    // 기본값 설정(2, tall)
    // 여기서 다른 init 불러야돼서 미리 정의해놔야함
    convenience init(value: String) {
        self.init(shot: 2, size: "보통", menu: value, mind: "대략정성")
    }
}

let coffee = Coffee(shot: 2, size: "tall", menu: "americano", mind: "듬뿍")
let coffee2 = Coffee(value: "latte")
편의생성자 extension 활용
- UIColor Class 내부에는 이미 많은 초기화구문들이 선언돼있는데 이를 활용하여 편의생성자를 extension에 선언할 수 있다.
- UIColor의 기존 초기화 구문은 값을 작성할 때
값/255과 같이 작성해줘야하는데 다음과 같이 편의생성자를 선언해주면 255라는 값을 생략하여 작성할 수 있어 한층 더 편리하다.
extension UIColor {
    convenience init(red: CGFloat, green: CGFloat, blue: CGFloat) {
        self.init(red: red/255, green: green/255, blue: blue/255, alpha: 1)
    }
}

let customColor = UIColor(red: 20, green: 20, blue: 20)👩💻 실습
📂 평가과제 실습 중 공부한 부분들
Navigation Controller large title progrmatically
navigationController?.navigationBar.prefersLargeTitles = true메모앱 검색바 같은 검색바 : UISearchController
first launch detect 하는 법: UserDefault 사용
tableView swipe Action
https://developer.apple.com/forums/thread/131056
https://velog.io/@dlskawns96/UITableViewCell에-커스텀-Swipe-action-적용하기-Swift
https://furang-note.tistory.com/12
toolbar programtically
https://stackoverflow.com/questions/35106022/adding-buttons-to-toolbar-programmatically-in-swift