JDBC를 사용한jsp와 데이터베이스의 연동 단계
1.java.sql.*패키지 임포트
2.JDBC드라이버 로딩
3. 데이터베이스 접속을 위한Connection객체 생성
4. 쿼리문을 실행하기위한 Statement/PreparedStatement객체 생성
5.쿼리문 실행
6.쿼리실행의 결과 값(int,ResultSet)사용 - 결과값을 받아오는 select문사용시
7.사용된 객체종료
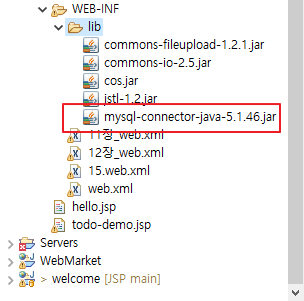
1.라이브러리 추가
jdbc mysql driver검색하면 다운받을수있음

2~3.
<%@ page contentType="text/html; charset=utf-8"%>
<%@ page import="java.sql.*"%> // 패키지 임포트
<html>
<head>
<title>Database SQL</title>
</head>
<body>
	<%
		Connection conn = null;
		try {
			//변수선언 : 주소,사용자,비번
			String url = "jdbc:mysql://localhost:3306/JSPBookDB?useSSL=false";
			String user = "root";
			String password = "1234";
			//1.드라이브파일->lib폴더에 넣기
			//2.드라이버로딩
			Class.forName("com.mysql.jdbc.Driver");
			//3.커넥션 객체(mysql서버에 접속하기위해 주소,유저,비번)
			conn = DriverManager.getConnection(url, user, password);
			out.println("데이터베이스 연결이 성공되었습니다.");
		} catch (SQLException ex) {
			out.println("데이터베이스 연결이 실패되었습니다.<br>");
			out.println("SQLException: " + ex.getMessage());
		} finally {
			if (conn != null)
				conn.close();
		}
	%>
</body>
</html>

위아래 둘다 DB연결함 단,try-catch문을 쓴것가 안쓴것


<%@ page import="java.sql.*"%>
<%
	Connection conn = null;

	String url = "jdbc:mysql://localhost:3306/JSPBookDB?useSSL=false";
	String user = "root";
	String password = "1234";
	//1.드라이브파일->lib폴더에 넣기
	//2.드라이버로딩
	Class.forName("com.mysql.jdbc.Driver");
	//3.커넥션 객체(mysql서버에 접속하기위해 주소,유저,비번)
	conn = DriverManager.getConnection(url, user, password);
%>
4~6.insert 문
<%@ page contentType="text/html; charset=utf-8"%>
<%@ page import="java.sql.*"%>
<html>
<head>
<title>Database SQL</title>
</head>
<body>
<%@ include file="dbconn.jsp" %> // dbconn인폴트
<%
	request.setCharacterEncoding("utf-8");

	String id = request.getParameter("id");
	String passwd = request.getParameter("passwd");
	String name = request.getParameter("name");

	PreparedStatement pstmt = null;

	try {
		String sql = "insert into member(id, passwd, name) values(?,?,?)";
		//pstmt는 conn객체에 sql문으 넣어서 준비한다.
		pstmt = conn.prepareStatement(sql);
		pstmt.setString(1, id);//1번째물음표
		pstmt.setString(2, passwd);//2번째 물음표
		pstmt.setString(3, name);//3번째 물음표
		pstmt.executeUpdate(); //실행
		out.println("Member 테이블  삽입이 성공했습니다.");
	} catch (SQLException ex) {
		out.println("Member 테이블 삽입이 실패했습니다.<br>");
		out.println("SQLException: " + ex.getMessage());
	} finally {
		if (pstmt != null)
			pstmt.close();
		if (conn != null)
			conn.close();
	}
%>
</body>
</html>
select문 ResultSet사용
<%@ include file="dbconn.jsp" %>
<%
PreparedStatement pstmt =null;
ResultSet rs = null;
String sql ="select * from product";
pstmt = conn.prepareStatement(sql);
rs = pstmt.executeQuery();
while(rs.next()){
%>
<div class="col-md-4">
<img style="width:100%;" src="/upload/<%=rs.getString("p_fileName")%>">
<h3><%=rs.getString("p_name")%></h3>
<p><%=rs.getString("p_description")%></p>
<p><%=rs.getString("p_unitPrice")%>원</p>
<!-- id를 products페이지로 보냄 -->
<p><a href="./products.jsp?id=<%=rs.getString("p_id")%>"
class="btn btn-secondary">상세 정보»</a>
</div>
<%
}
%>