처음에 스프링 시큐리티 적용을 하지 않고 프로젝트를 만들다보니
규모가 너무 커진 상황에서 시큐리티를 적용해야 하는 문제가 생겼다.
이제 진짜로 시큐리티를 적용해보자.
우선, 의존성은
implementation "org.springframework.boot:spring-boot-starter-security"를 사용한다.
사실 스프링 시큐리티만 사용안했을 뿐이지
회원가입 시 암호화를 하고, JWT 토큰을 사용하는 코드를 직접 만들어서 사용했기에 설정만 연결해주며 될 것 같다.
JWT 동작 원리
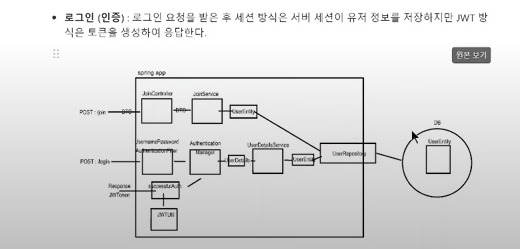
JWT 로직은
- ID/Password를 확인하는 필터를 거쳐서
- DB에서 ID/Password를 검증한 뒤에
- JWT 토큰을 만들어서 응답한다. (세션 방식은 회원 정보를 서버에 저장한다)
추후에 로그인을 할 시
- 필터들을 거친 뒤 JWT 토큰 필터를 거쳐서 토큰을 검증하고
- 일시적으로 세션을 만들어서 저장한 뒤에 요청이 끝날 때까지 보관
- 요청이 끝나면 세션을 소멸시킨다.
Stateless 방식이라서 요청마다 세션을 새로 만든다
Spring Security Config
@EnableWebSecurity
@Configuration
public class SecurityConfig {

    @Bean
    public BCryptPasswordEncoder passwordEncoder() {

    //비밀번호 암호화용
        return new BCryptPasswordEncoder();
    }


    @Bean
    public SecurityFilterChain securityFilterChain(HttpSecurity http) throws Exception {

        http.csrf(AbstractHttpConfigurer::disable);

        //Form 로그인 disable
        http.formLogin(AbstractHttpConfigurer::disable);

        //Http basic 인증방식 disable
        http.httpBasic(AbstractHttpConfigurer::disable);
        http
                .authorizeHttpRequests(auth ->
                        auth.requestMatchers("/api/v1/auth/create-user", "/api/v1/auth/login").permitAll()
                                .requestMatchers("/admin").hasRole("ADMIN")
                                .anyRequest().authenticated()
                );


        //세션 설정
        http.sessionManagement((session -> session
                .sessionCreationPolicy(SessionCreationPolicy.STATELESS)));

        return http.build();
    }
}
우선 간단하게 위처럼 요청에 대해서 권한을 나누어주었다.
로그인 필터를 만들자
지금은 스프링 시큐리티의 디폴트 설정인 formLogin을 disable시켰기에
UserNamePassword AuthenticationFilter와 Authentication Manager를 커스터마이즈해서 스프링 시큐리티에 설정해주어야 한다.
UserNamePassword AuthenticationFilter에서 아이디와 비밀버호를 꺼내 뒤, Authentication Manager에서 검증작업을 한다.
필터는 어떻게 작동할까?

스프링 부트 어플리케이션은 톰캣이라는 서블릿 컨테이너 위에서 작동한다. 클라이언트 요청은 서블릿 필터를 다 통과한 뒤에, 스프링 부트 컨트롤러로 전달된다.
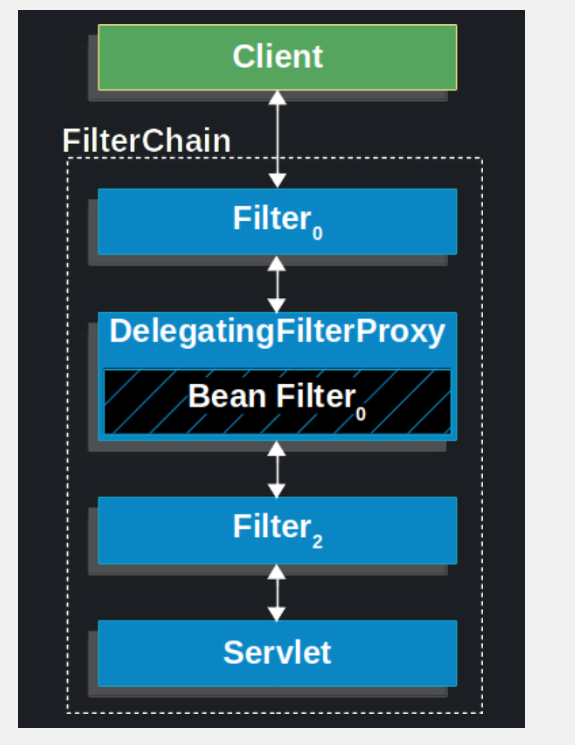
스프링 컨테이너 필터 체인에 DelegatingFilter를 등록돼 있는데 이 필터가 모든요청을 가로챈다.
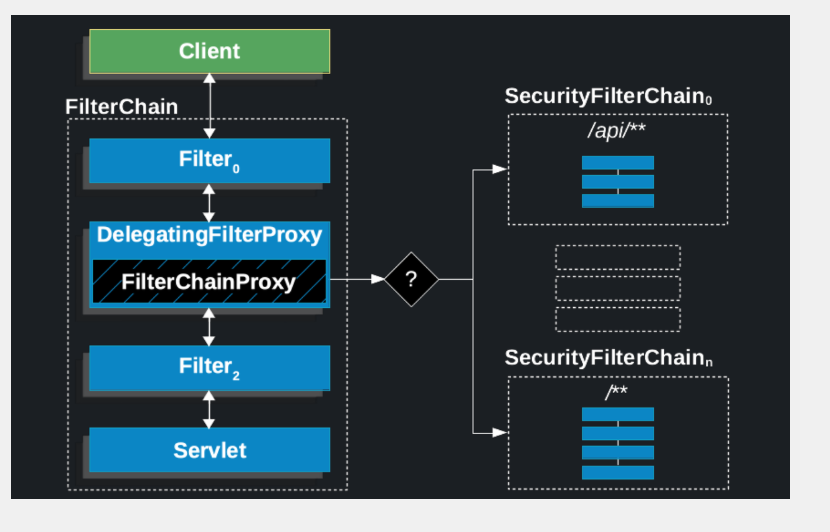
이렇게 가져온 요청들을 스프링 시큐리티 필터 체인에 전달하는 것이다.
form 로그인 방식에서는 UsernamePasswordAuthenticationFilter 회원 검증을 진행한다.
따라서 로그인을 진행하기 위해서 이 필터를 커스텀하여 등록해야 한다.
UsernamePasswordAuthenticationFilter
@RequiredArgsConstructor
public class LoginFilter extends UsernamePasswordAuthenticationFilter {

    private final AuthenticationManager authenticationManager;

    @Override
    public Authentication attemptAuthentication(HttpServletRequest request, HttpServletResponse response) throws AuthenticationException {

        String userName = obtainUsername(request);
        String password = obtainPassword(request);

        //Authentication Mangager에 던지기 전에 DTO에 담아줘야 한다.

        UsernamePasswordAuthenticationToken authToken = new UsernamePasswordAuthenticationToken(userName, password, null);

        return authenticationManager.authenticate(authToken);
    }

    //로그인 성공 시 실행하는 메소드
    @Override
    protected void successfulAuthentication(HttpServletRequest request, HttpServletResponse response, FilterChain chain, Authentication authentication) {

    }

    //로그인 실패시 실행하는 메소드
    @Override
    protected void unsuccessfulAuthentication(HttpServletRequest request, HttpServletResponse response, AuthenticationException failed) {

    }

}
@EnableWebSecurity
@Configuration
public class SecurityConfig {
//AuthenticationManager가 인자로 받을 AuthenticationConfiguraion 객체 생성자 주입
private final AuthenticationConfiguration authenticationConfiguration;
public SecurityConfig(AuthenticationConfiguration authenticationConfiguration) {
this.authenticationConfiguration = authenticationConfiguration;
}
//AuthenticationManager Bean 등록
@Bean
public AuthenticationManager authenticationManager(AuthenticationConfiguration configuration) throws Exception {
return configuration.getAuthenticationManager();
}
@Bean
public SecurityFilterChain securityFilterChain(HttpSecurity http) throws Exception {
http.csrf(AbstractHttpConfigurer::disable);
//Form 로그인 disable
http.formLogin(AbstractHttpConfigurer::disable);
//Http basic 인증방식 disable
http.httpBasic(AbstractHttpConfigurer::disable);
http
.authorizeHttpRequests(auth ->
auth.requestMatchers("/api/v1/auth/create-user", "/api/v1/auth/login").permitAll()
.requestMatchers("/admin").hasRole("ADMIN")
.anyRequest().authenticated()
);
http.addFilterAt(new LoginFilter(authenticationManager(authenticationConfiguration)), UsernamePasswordAuthenticationFilter.class);
//세션 설정
http.sessionManagement((session -> session
.sessionCreationPolicy(SessionCreationPolicy.STATELESS)));
return http.build();
}
}