지금까지는 서버오류를
"어? 페이지가 작동을 안하네?"
라는 문제를 인식하고 개발자도구에서 API가 어떤 응답을 주는지 확인하고서 인지해왔다.
이런 걸 좀 자동화할 수는 없을까?
특정한 예외가 반복해서 발생한다거나
서버가 다운됐거나
혹은 서킷브레이커가 오픈 상태로 변환됐을 때
현재 Plaything에서 소통창구로 사용하는 디스코드에 메시지를 보낼준다면 좋을 것이다.
이를 한번 구현해보자.
FeignClient vs RestTemplate
지금까지는 특정 url로 단순히 요청을 보낼 때 RestTemplate를 써왔다. 이게 추상화가 잘 돼 있어서 사용이 편했다.
이번에 디스코드 메시지 레퍼런스를 보니
FeignClient를 사용하는 사례들이 좀 보였다.
이번에 새롭게 인지한 것인데 Spring 5.0 이후부터 RestTemplate는 depreacate됐다고 한다.
참고:Feign vs. RestTemplate: Picking Your Spring Client
resttemplate는 동기식, webclient는 비동기식인 방식이다.
Feign는 좀더 선언적인 스타일을 강조한다고 한다. 인터페이스를 활용해서, 특정 서비스의 api와 맵핑해줄 수 있다는 뜻이다. 좀더 가독성이 좋아진다고 한다.
이는 선언적 방식의 특징인데
특정한 api를 구현하기 위한 세부사항을 구구절절 적어놓는 방식이 아니라 무언가를 해라. 라고 선언적으로 코드만 작성해주는 방식으로 보인다(람다, 스트림처럼)
RestTemplate는 좀더 세밀한 컨트롤이 가능하다고 한다. 그만큼 코드가 복잡해질 수 있다.
스택오버플로우:What are the advantages and disadvantages of using feign over RestTemplate
Feign allows you to abstract the mechanics of calling a REST service. Once you configure and annotate the Feign interface, you can call a REST service by making a simple Java function call. The actual implementation of making a REST call is handled at runtime by Feign. This means that the implementation can be configured without changing your business logic code.
By just changing the Feign configuration in Java or using properties you can add encoding/decoding, logging, and change the REST call implementation library. All this is done through configuration only, while the business logic that calls the service remains unchanged.
Since Feign uses standard Java interfaces, it's also easy to mock them during unit tests.
One of the advantages of using Feign over RestTemplate is that, we do not need to write any implementation to call the other services. So there is no need to write any unit test as there is no code to test in the first place. However, it is advised that we write Integration tests.
코드 구현이 없으니(Fegin이 런타임에 알아서 해준다)
유닛테스트를 하지 않아도 되고 비즈니스 로직을 변경할 필요가 없다는 것이 Feign의 장점인 것으로 보인다.
Feign을 쓰지 않을 이유가 없어 보인다.
좀더 세밀한 조정이 필요할 것 같으면 RestTemplate를 써도 될 것이다.
구현을 해보자
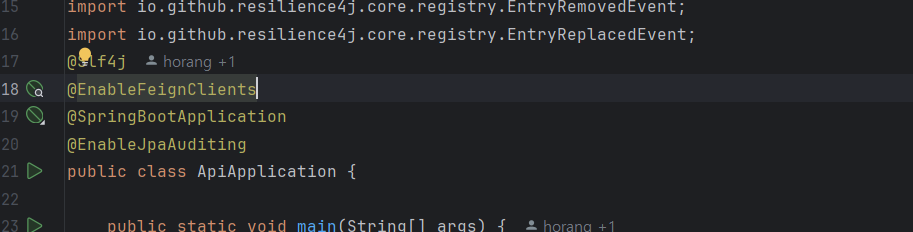
@EnableFeignClients가 @FeignClient를 찾아서 구현체를 만들어준다.
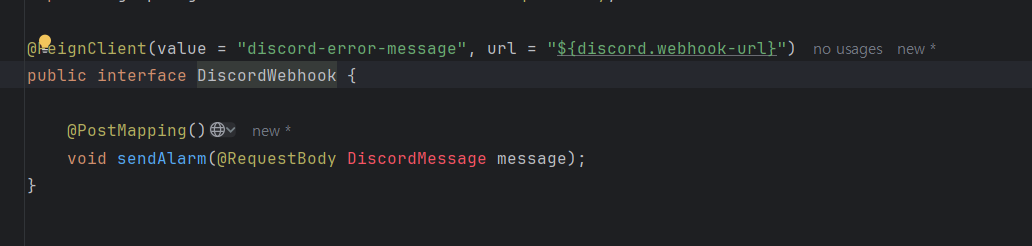
그리고 이렇게 만들어주기만 하면 된다. url은 디스코드 웹훅을 넣어주면 된다. 메시지 양식은 디스코드에서 제공하는 폼을 따랐다.
확실히 RestTemplate보다 더 사용하기 쉽고 코드도 깔끔하다.
관심사도 명확하게 분리된다는 점이 마음에 든다.
 @Bean
    public RegistryEventConsumer<CircuitBreaker> myRegistryEventConsumer() {
        return new RegistryEventConsumer<CircuitBreaker>() {
            @Override
            public void onEntryAddedEvent(EntryAddedEvent<CircuitBreaker> entryAddedEvent) {
                entryAddedEvent.getAddedEntry().getEventPublisher()
                        .onStateTransition(event -> {
                            log.warn("CircuitBreaker {} state changed from {} to {}",
                                    event.getCircuitBreakerName(),
                                    event.getStateTransition().getFromState(),
                                    event.getStateTransition().getToState());

                            if (event.getStateTransition().getFromState() == CircuitBreaker.State.CLOSED &&
                                    event.getStateTransition().getToState() == CircuitBreaker.State.OPEN) {
                                discordAlarm.sendAlarm(
                                        CIRCUIT_OPEN,
                                        OPEN_TITLE,
                                        OPEN_BODY+ LocalDateTime.now().format(DateTimeFormatter.ofPattern("yyyy-MM-dd HH:mm:ss")));
                            }
                            if (event.getStateTransition().getFromState() == CircuitBreaker.State.HALF_OPEN
                                    && event.getStateTransition().getToState() == CircuitBreaker.State.CLOSED) {
                                discordAlarm.sendAlarm(
                                        CIRCUIT_CLOSED,
                                        CLOSED_TITLE,
                                        CLOSED_BODY+ LocalDateTime.now().format(DateTimeFormatter.ofPattern("yyyy-MM-dd HH:mm:ss")));

                            }

                        }).onFailureRateExceeded(event -> log.error("CircuitBreaker {} failure rate exceeded: {}",
                                event.getCircuitBreakerName(),
                                event.getFailureRate()));
            }
이렇게 현재 서킷브레이커의 상태를 감지해서 로그를 찍는 부분과 연동을 시켜주었다.
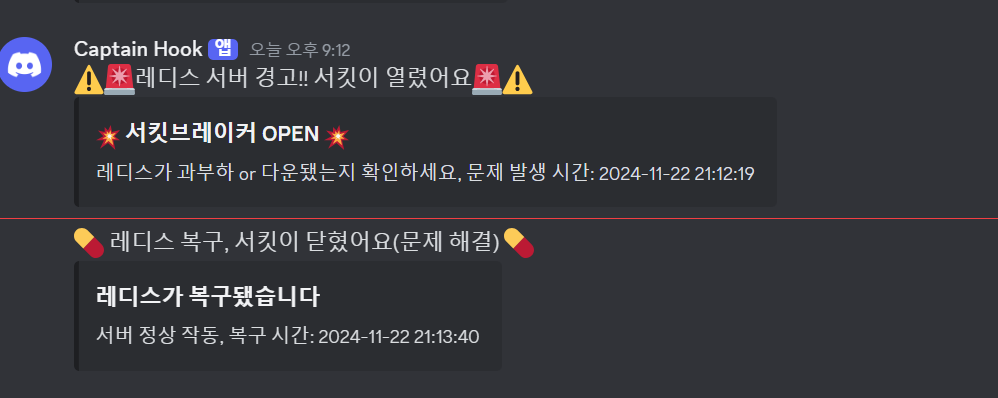
우선은 현재 이정도의 정보만을 디스코드 채널에 보내고 있다.
앞으로 사용하면서 더 커스터마이징을 해야겠다.
서버 500에러도 메시지 전송을 하자
내가 CustomException으로 설정해놓지 않은
의도치 않은 500에러들이 있다. 이런 경우는 클라이언트에서 원인을 파악하기 어려워서
내가 매번 서버 로그를 확인해서 이유를 알려줘야 한다.

이렇게 500 에러가 발생하는 경우 디스코드 채널로 메시지가 가도록 했다.
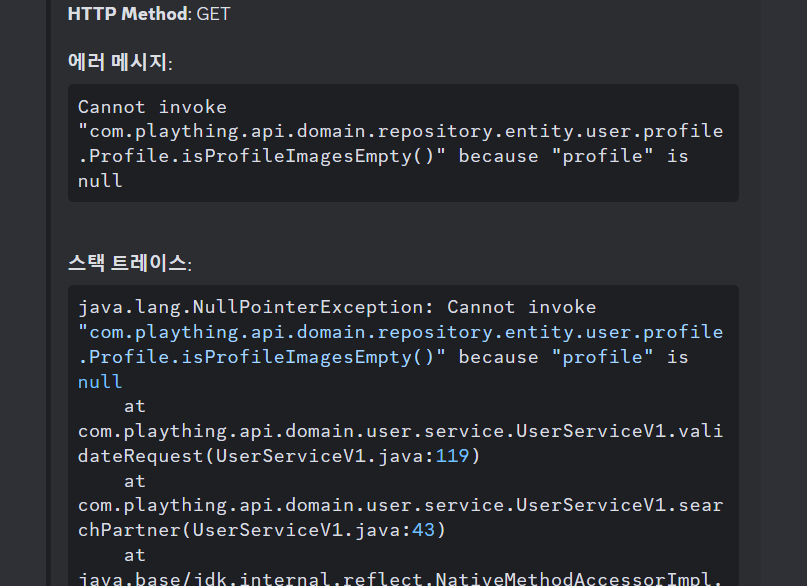
그럼 이렇게 스택 트레이스 정보가 담겨져 있기 때문에
원인파악을 빠르게 할 수 있다.
로컬 서버에서는 알림을 끄자
로컬에서 테스트할 때마다 알림이 가면 다른 팀원들에게 민폐다.
discord.alarm.enabled:false이렇게 설정파일로 값을 관리하기로 했다.
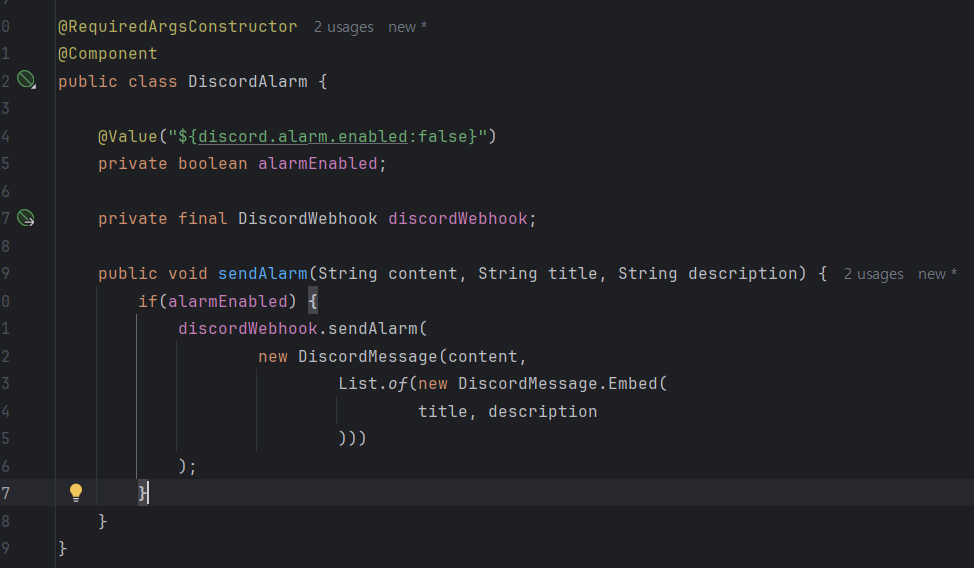
이렇게 해두면 개발서버에서 발생하는 서킷브레이커의 상태변화는
알림으로 가지 않는다.
