시리즈: ... · tb_top · agent_cfg/agent/env · base_test
전체 그림 — UVM 계층의 조립
이 세 파일은 UVM 컴포넌트들을 계층으로 묶는 골격이다. 개별 부품(driver, monitor, scoreboard)이 여기서 조립된다.
                    Test (다음 편)
                       │ 생성
                       ↓
        ┌──────────── env ────────────┐
        │                             │
     agent                    scoreboard + coverage
        │                             ↑
  ┌─────┼─────┐                       │
  sqr  drv   mon ───── ap.connect ────┘
  │     │     │
  └─sequencer │
     driver   monitor

cfg (설정 객체) → 모든 컴포넌트에 전달되어 "어떻게 동작할지" 지시
Part 1: axi4_agent_cfg — 설정 객체
역할
"이 agent가 어떻게 동작해야 하는지"를 담은 작은 설정 상자
부품에 붙이는 "사용 설명서" 같은 것
코드
class axi4_agent_cfg extends uvm_object;

    virtual axi4_if         vif;
    uvm_active_passive_enum is_active = UVM_ACTIVE;
    int unsigned max_outstanding = 1;

    `uvm_object_utils(axi4_agent_cfg)

    function new(string name = "axi4_agent_cfg");
        super.new(name);
    endfunction
endclass
3개의 설정값(knob)
1. vif — 하드웨어 핸들
virtual axi4_if vif;DUT 핀에 접근하는 virtual interface 핸들
tb_top의 config_db::set으로 넘어온 axi 인터페이스가 결국 여기 vif에 담김
→ driver가 cfg.vif로 꺼내서 신호 구동
→ monitor가 cfg.vif로 꺼내서 관찰2. is_active — 능동/수동 선택
uvm_active_passive_enum is_active = UVM_ACTIVE;UVM_ACTIVE → sequencer + driver + monitor 생성 (버스 구동 + 관찰)
UVM_PASSIVE → monitor만 생성 (관찰만)
언제 PASSIVE?
이미 다른 마스터가 버스를 구동하고 있고 우리는 지켜보기만 할 때
(예: 실제 CPU가 구동하는 버스를 모니터링)
기본값 UVM_ACTIVE = 우리가 직접 구동3. max_outstanding — 파이프라인 깊이
int unsigned max_outstanding = 1;드라이버에서 봤던 그 값!
1 → 직렬 (한 번에 하나씩) = 안전한 기본값
write-then-read-back 순서 보장
>1 → 파이프라인 (여러 개 동시)
axi_ram_v2의 outstanding 지원을 검증하려면 필요
driver의 item_thread가 이 값으로 throttle:
while (n_inflight >= cfg.max_outstanding) @(vif.master_cb);왜 cfg 객체로 묶나
// Passing knobs via a cfg object (instead of many config_db entries)
// is the standard, scalable UVM style.
❌ 나쁜 방법: 설정마다 config_db 따로
config_db::set(..., "vif", axi)
config_db::set(..., "is_active", ...)
config_db::set(..., "max_outstanding", ...)
→ set/get 호출 폭발, 관리 어려움
✅ 좋은 방법: cfg 객체 하나에 다 담아서 전달
cfg.vif = ...
cfg.is_active = ...
cfg.max_outstanding = ...
config_db::set(..., "cfg", cfg) ← 한 번만!
→ 설정 추가해도 cfg에 필드만 늘리면 됨 (확장성)Part 2: axi4_agent — 컴포넌트 컨테이너
역할
하나의 AXI 인터페이스를 담당하는 UVM 컴포넌트 묶음
sequencer + driver + monitor를 한 상자에 담고 서로 연결
typedef — 시퀀서 정의
typedef uvm_sequencer #(axi4_seq_item) axi4_sequencer;시퀀서는 특별할 게 없음 → uvm_sequencer를 그대로 사용
우리 아이템 타입(axi4_seq_item)만 지정하면 끝
typedef = 짧은 별명 붙이기 → 따로 클래스 작성 불필요, 한 줄로 해결
왜 driver/monitor는 직접 만드는데 sequencer는 안 만드나?
driver/monitor: 프로토콜별 로직 필요 → 직접 구현
sequencer: 아이템을 driver로 전달만 함 → 기본 기능으로 충분멤버
class axi4_agent extends uvm_agent;
    axi4_agent_cfg cfg;
    axi4_sequencer sqr;
    axi4_driver    drv;
    axi4_monitor   mon;
build_phase — 자식 생성
function void build_phase(uvm_phase phase);
    super.build_phase(phase);
    if (!uvm_config_db#(axi4_agent_cfg)::get(this, "", "cfg", cfg))
        `uvm_fatal("NOCFG", "axi4_agent_cfg not found for agent")

    // 자식에게 cfg 전달
    uvm_config_db#(axi4_agent_cfg)::set(this, "drv", "cfg", cfg);
    uvm_config_db#(axi4_agent_cfg)::set(this, "mon", "cfg", cfg);

    // 모니터는 항상, 시퀀서/드라이버는 active일 때만
    mon = axi4_monitor::type_id::create("mon", this);
    if (cfg.is_active == UVM_ACTIVE) begin
        sqr = axi4_sequencer::type_id::create("sqr", this);
        drv = axi4_driver::type_id::create("drv", this);
    end
endfunction
단계별
1. cfg 받기 (env가 넣어준 것)
   없으면 fatal (설정 없이 동작 불가)

2. 자식(drv, mon)에게 cfg 다시 전달
   "drv" → 이 agent 밑의 drv에게만
   "mon" → 이 agent 밑의 mon에게만
   → driver/monitor의 build_phase에서 get으로 받는 그 cfg!

3. 컴포넌트 생성
   모니터: 항상 (관찰은 언제나 필요)
   시퀀서+드라이버: UVM_ACTIVE일 때만 (구동할 때만)
   → PASSIVE 모드면 모니터만 존재 → 순수 관찰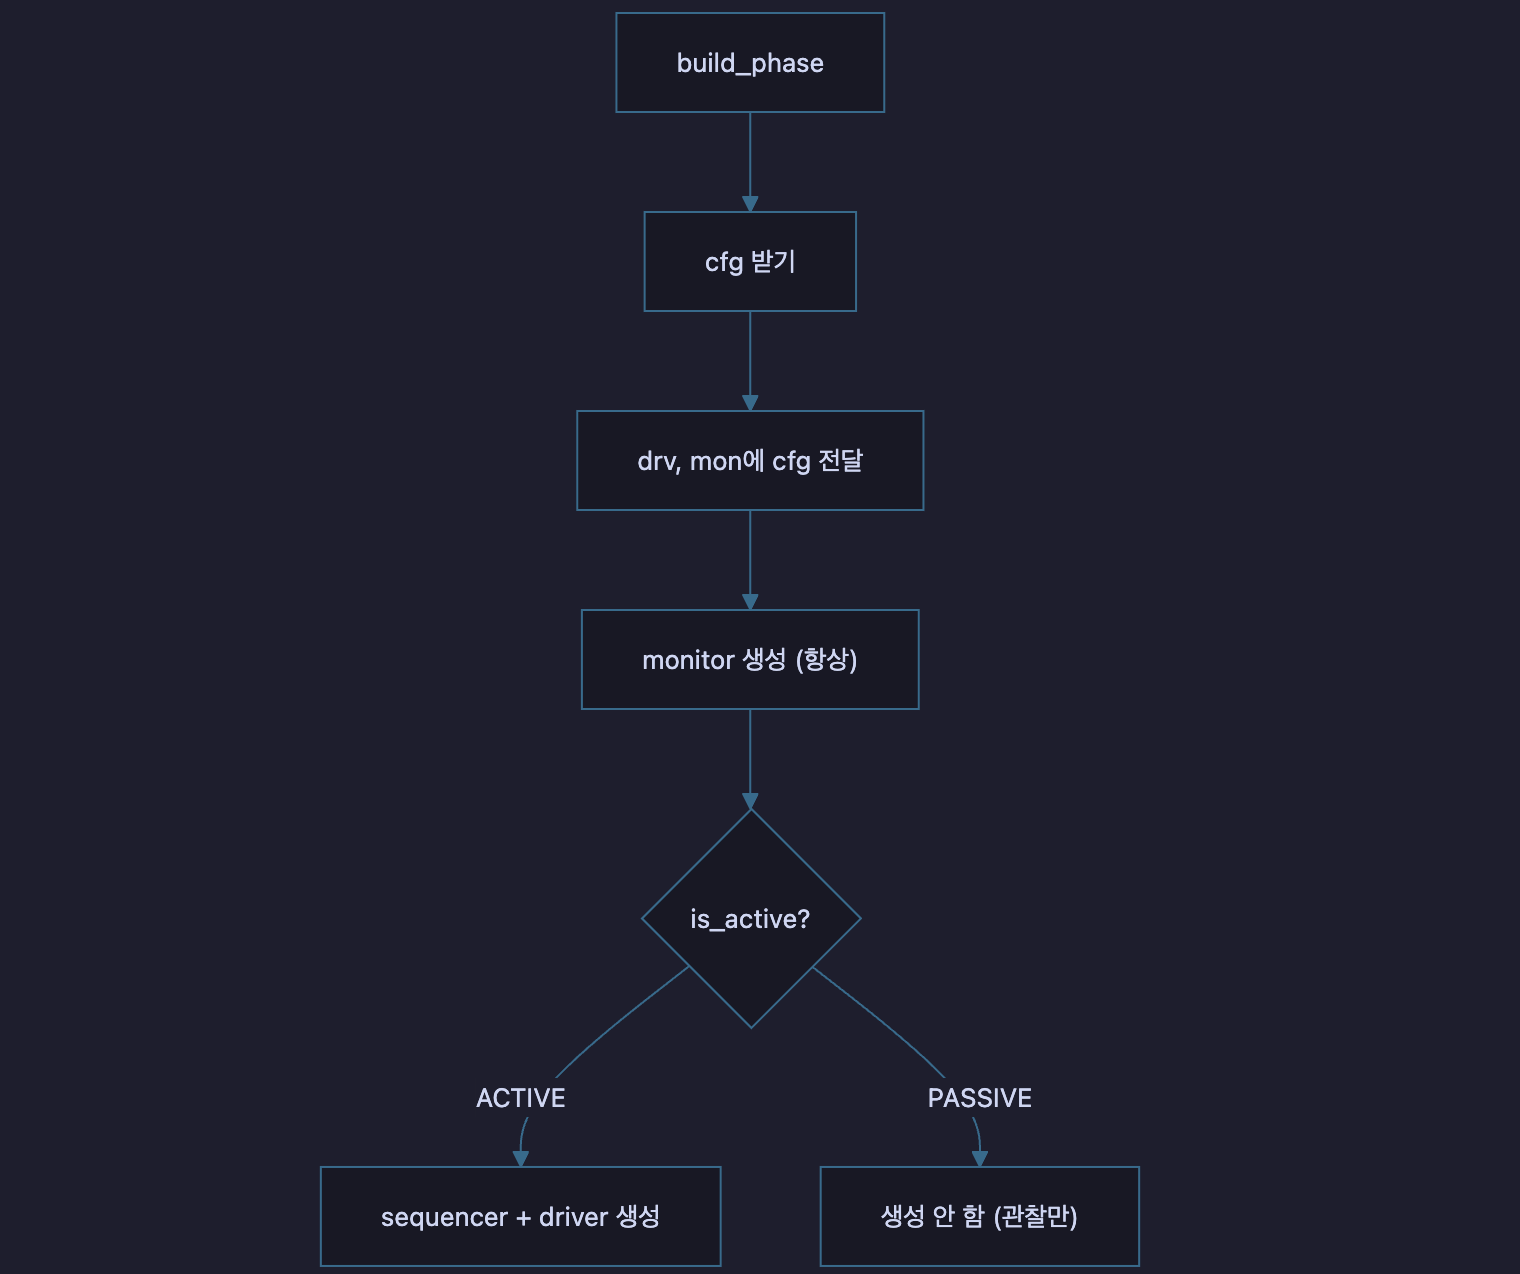
connect_phase — 드라이버↔시퀀서 연결
function void connect_phase(uvm_phase phase);
    super.connect_phase(phase);
    if (cfg.is_active == UVM_ACTIVE)
        drv.seq_item_port.connect(sqr.seq_item_export);
endfunction
드라이버와 시퀀서를 TLM 포트로 연결
drv.seq_item_port → 드라이버의 "아이템 달라" 요청 포트
sqr.seq_item_export → 시퀀서의 "아이템 줄게" 제공 포트
connect로 이 둘을 연결
→ driver의 seq_item_port.get_next_item()이 동작하는 근거!
연결 그림:
Sequence → Sequencer ──seq_item_export──┐
│ connect
Driver ──seq_item_port──────────────────┘
get_next_item() → 시퀀서에서 아이템 받음
item_done() → 완료 알림
왜 connect_phase에서?
build_phase: 컴포넌트 생성 / connect_phase: 생성된 것들을 연결
→ UVM phase 순서 (build 다음 connect)Part 3: axi4_env — 최상위 환경
역할
agent + scoreboard + coverage를 담는 최상위 컨테이너
모니터가 관찰한 걸 scoreboard와 coverage에 뿌리는 연결까지 담당
멤버
class axi4_env extends uvm_env;
    axi4_agent      agent;
    axi4_scoreboard sb;
    axi4_coverage   cov;
    axi4_agent_cfg  cfg;
build_phase — 자식 생성 & cfg 전달
function void build_phase(uvm_phase phase);
    super.build_phase(phase);
    if (!uvm_config_db#(axi4_agent_cfg)::get(this, "", "cfg", cfg))
        `uvm_fatal("NOCFG", "axi4_agent_cfg not found for env")

    uvm_config_db#(axi4_agent_cfg)::set(this, "agent", "cfg", cfg);
    agent = axi4_agent::type_id::create("agent", this);
    sb    = axi4_scoreboard::type_id::create("sb", this);
    cov   = axi4_coverage::type_id::create("cov", this);
endfunction
1. test가 넣어준 cfg 받기
2. agent에게 cfg 전달 (set with "agent" 경로)
3. agent, scoreboard, coverage 생성
cfg 전달 체인:
test → env → agent → driver/monitor (계층을 따라 내려가며 전달)connect_phase — 브로드캐스트 연결 (핵심)
function void connect_phase(uvm_phase phase);
    super.connect_phase(phase);
    agent.mon.ap.connect(sb.ap_imp);
    agent.mon.ap.connect(cov.analysis_export);
endfunction
monitor의 ap.write(tr)가 어디로 가는지의 답이 여기다.
모니터의 analysis port(ap)를 두 곳에 연결:

agent.mon.ap → sb.ap_imp              (스코어보드)
agent.mon.ap → cov.analysis_export    (커버리지)

→ 모니터가 ap.write(tr) 하면 스코어보드와 커버리지 둘 다 동시에 받음! (브로드캐스트)

주석 설명:
  checker (is it correct?)  → 스코어보드: 맞는지 검사
  coverage (did we exercise it?) → 커버리지: 뭘 실행했나 기록
  한 트랜잭션 → 두 관점으로 동시 분석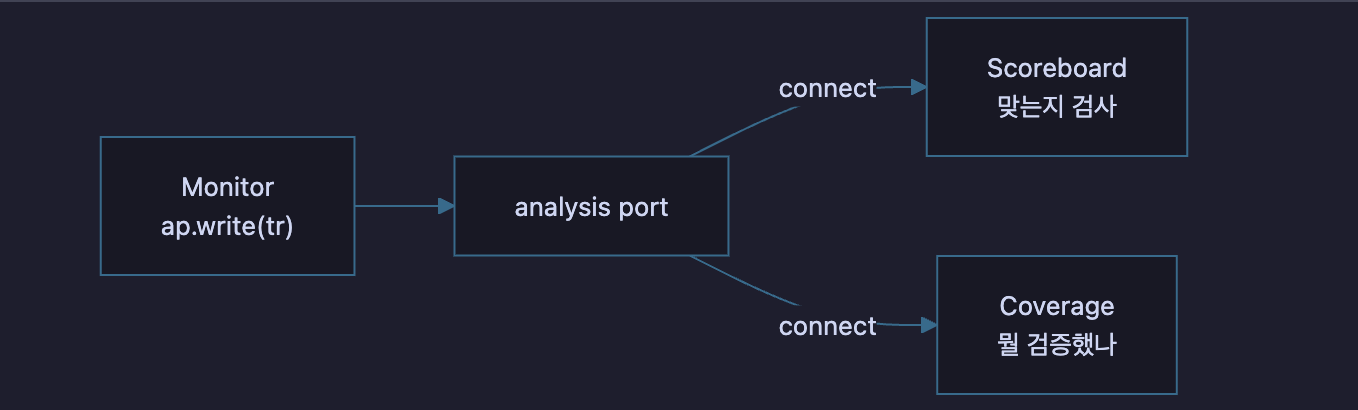
전체 계층 & cfg 흐름
컴포넌트 계층
env
├── agent
│   ├── sequencer (active only)
│   ├── driver    (active only)
│   └── monitor   (always)
├── scoreboard
└── coverage
cfg 전달 체인
tb_top: config_db::set(vif=axi)
   ↓
test: cfg 생성, cfg.vif 채움, config_db::set(cfg)
   ↓
env: get(cfg) → set(agent, cfg)
   ↓
agent: get(cfg) → set(drv, cfg), set(mon, cfg)
   ↓
driver/monitor: get(cfg) → cfg.vif로 하드웨어 접근!
두 방향의 흐름
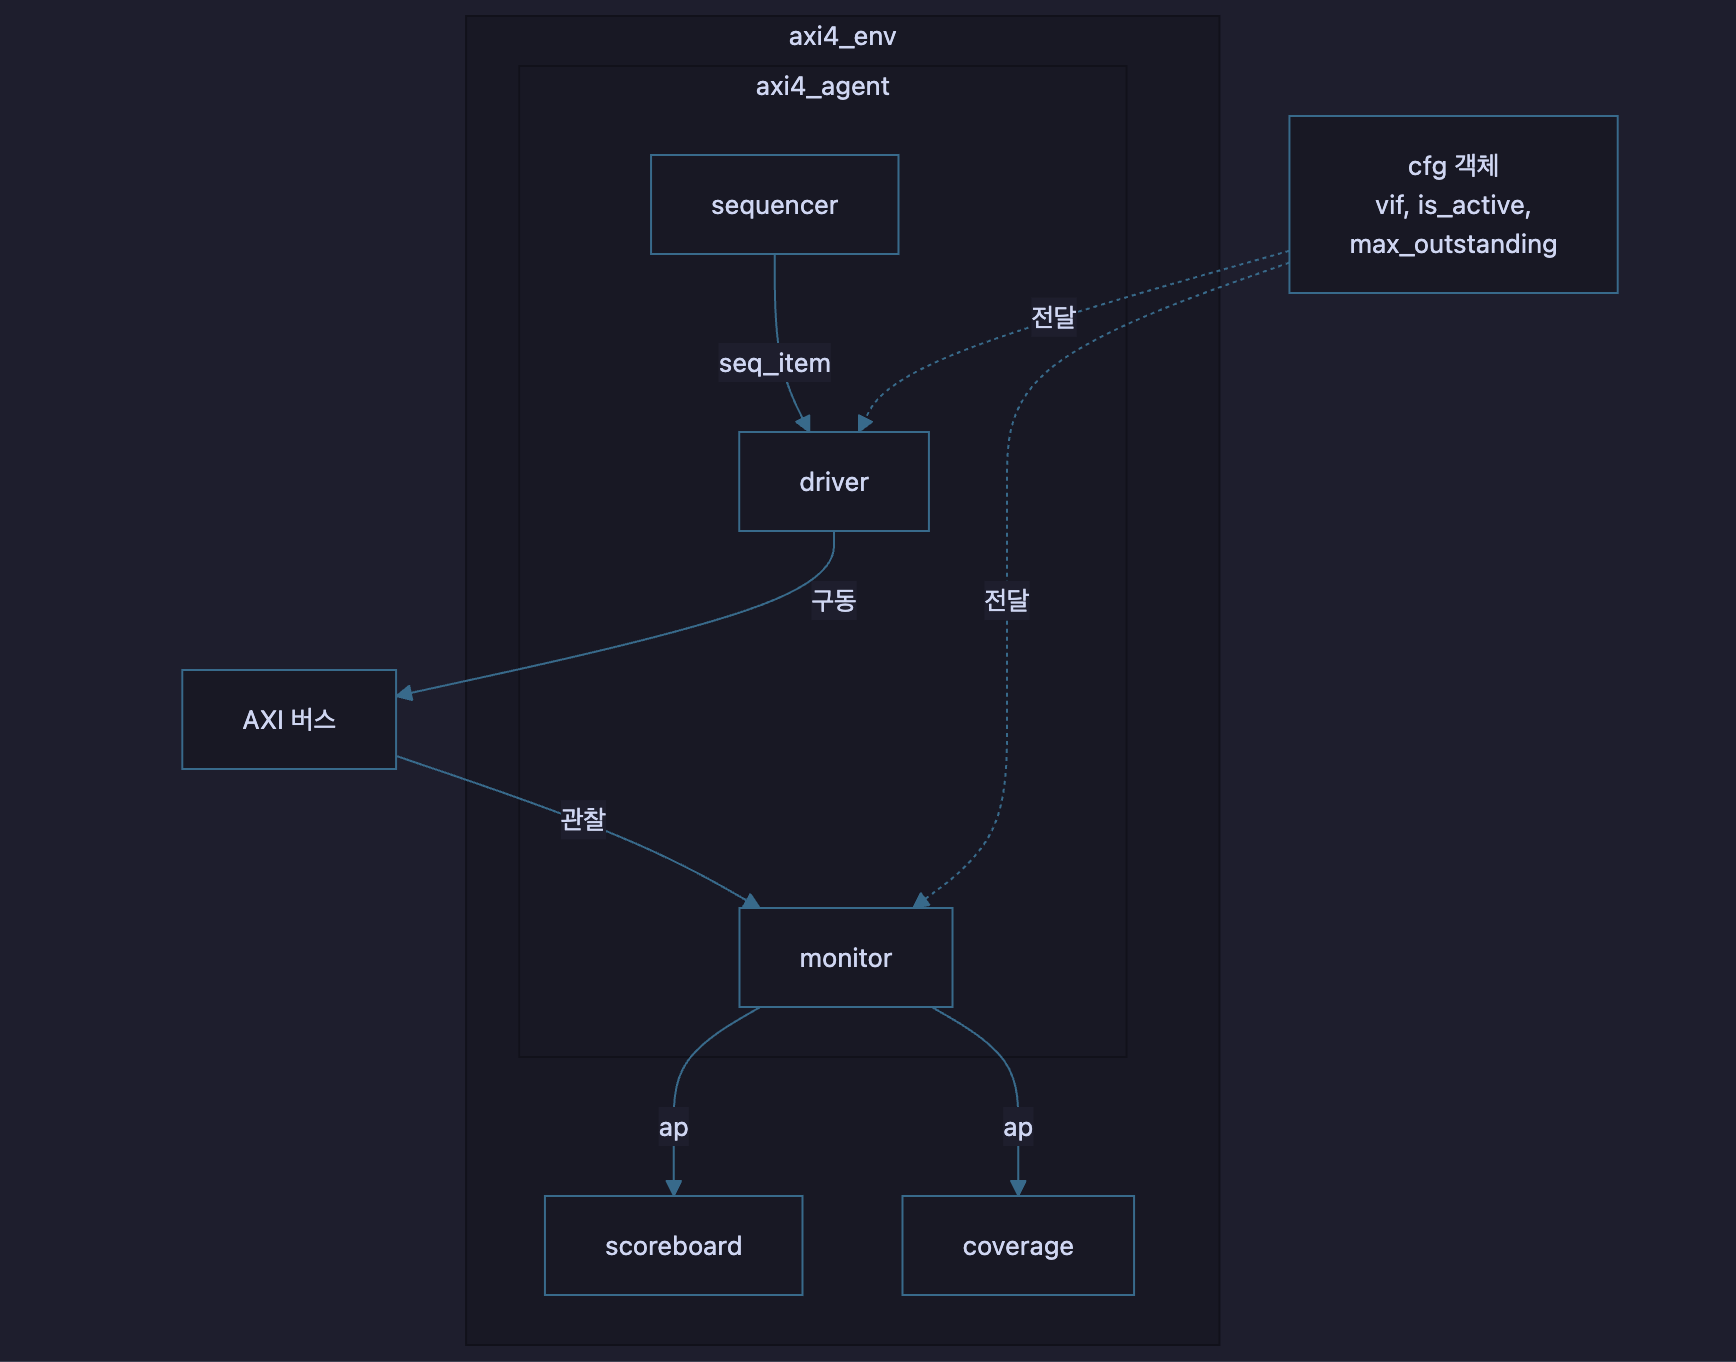
cfg는 위→아래로 전달 (test→env→agent→driver/monitor)
데이터는 아래→위로 흐름 (monitor→ap→scoreboard/coverage)
한 줄 요약
axi4_agent_cfg = "어떻게 동작할지" 담은 설정 상자
                 (vif, is_active, max_outstanding)

axi4_agent = sqr+drv+mon 묶음
             cfg를 자식에 전달, driver↔sequencer 연결
             active면 전부, passive면 monitor만

axi4_env = agent+scoreboard+coverage 묶음
           monitor의 ap를 SB와 cov에 브로드캐스트 연결

핵심 흐름:
  cfg는 위→아래로 전달 (test→env→agent→driver/monitor)
  데이터는 아래→위로 흐름 (monitor→ap→scoreboard/coverage)
Design Verification engineer