1. 공유 자원 보호 (Critical Resource Protection)
멀티스레딩 환경에서 가장 중요한 문제 중 하나는 여러 스레드가 하나의 자원(전역 변수, I/O 포트 등)을 공유할 때 발생하는 충돌입니다. 이를 방지하기 위한 보호 메커니즘이 필수적입니다.
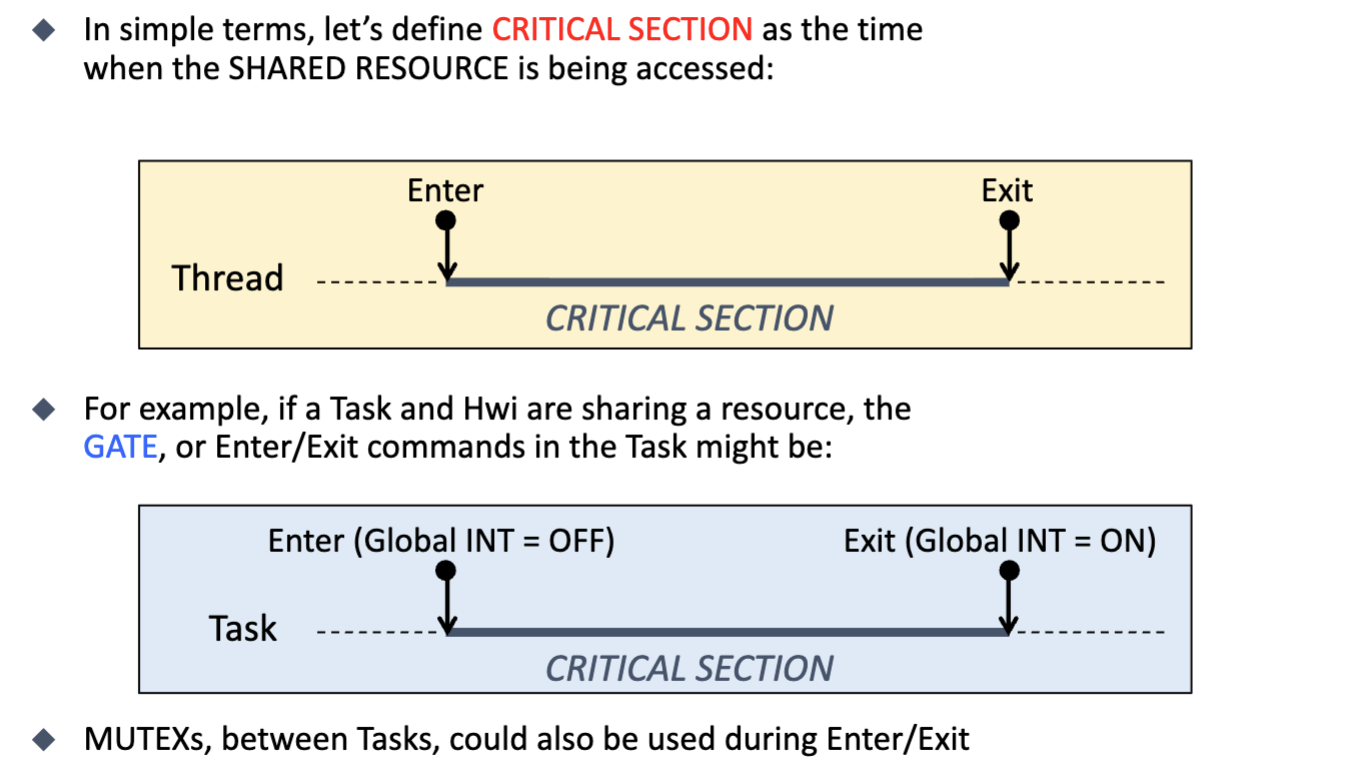
- Critical Section:
- 정의: 공유 자원에 접근하는 코드의 특정 구간을 의미합니다.
- 이 구간에서 스레드 실행이 중단되거나(Preempted) 다른 스레드가 끼어들면 데이터가 깨질 수 있습니다.
- Gate / Enter & Exit:
- 임계 영역에 들어가기 전에 문을 잠그고(Enter), 나올 때 문을 여는(Exit) 동작이 필요합니다.
- Task와 Hwi(하드웨어 인터럽트)가 공유할 때:
가장 단순하고 강력한 방법은 인터럽트를 비활성화(Disable Interrupts)하는 것입니다.
Enter: DisableInterrupts(); (아무도 못 건드리게 함)
... 공유 자원 접근 ... (Critical Section)
Exit: EnableInterrupts(); (다시 원래대로)
2. 스레드의 종류
RTOS 환경에서 스레드는 크게 메인 스레드(Main Threads)와 이벤트 스레드(Event Threads) 두 가지로 나뉩니다.
A. 메인 스레드 (Main Threads)
특징:
- 무한 루프: 절대 종료되지 않고(return 없음) 계속 실행됩니다.
- 구조: 초기화(Initialization)를 한 번 수행한 후, while(1) 루프 내에서 특정 작업을 반복합니다.
OS 유무에 따른 차이:
- OS 없을 때: 시스템에는 단 하나의 main() 함수만 존재하며, 이것이 유일한 메인 스레드 역할을 합니다.
- RTOS 사용 시: 여러 개의 메인 스레드를 가질 수 있습니다. 스케줄러가 이들을 번갈아 가며 실행시켜 마치 동시에 도는 것처럼 보이게 합니다.
void mainThread(void){
  int();
   while(1){
   Body();
    }
   }
B. 이벤트 스레드 (Event Threads)
특징:
- 하드웨어 연동: 센서 값 변경, 버튼 입력 등 하드웨어 상태 변화에 반응합니다.
- 짧고 한정적: 실행 시간이 짧아야 하며, 반드시 작업을 마치고 리턴(Return)해야 합니다. (무한 루프 아님)
- 형태: 주로 입력 인자와 리턴값이 없는 void-void 함수 형태입니다.
void inputThread(void){
  data = ReadInput();
  Send(data);
  }

void outputThread(void){
  data = Recv();
  WriteOutput(data);
  }

 void periodicThread(void){
  PerformTask();
  }
종류:
- 주기적 스레드(Periodic): 타이머에 의해 일정 시간마다 실행 (예: 마이크, 가속도 센서 측정).
- 입력 스레드(Input): 외부 입력이 있을 때 실행 (예: 버튼 눌림).
- 출력 스레드(Output): 출력 장치가 준비되었을 때 실행.
OS 유무에 따른 차이:
- OS 없을 때: 이벤트 스레드는 곧 ISR(인터럽트 서비스 루틴)입니다. 하드웨어가 직접 함수를 호출합니다.
- RTOS 사용 시: OS가 하드웨어 인터럽트를 먼저 받고(Manage), 적절한 이벤트 스레드(사용자가 작성한 함수)를 호출해 줍니다. 즉, OS가 중재자 역할을 합니다.
3. 스레드 제어 블록 (TCB, Thread Control Block)
이전내용 복습
Special Registers: R13-R15
이 레지스터들은 시스템의 흐름을 제어하는 핵심적인 역할을 합니다.
R13: Stack Pointer (SP)
현재 스택의 주소를 가리킵니다.
Cortex-M은 MSP(Main Stack Pointer)와 PSP(Process Stack Pointer) 두 가지를 가집니다.
RTOS 관점: 커널이나 ISR은 MSP를 사용하고, 각 태스크(Thread)는 독립적인 PSP를 사용하여 시스템의 안정성을 높입니다.
R14: Link Register (LR)
함수 호출(BL 명령어) 시, 함수가 끝난 후 돌아갈 복귀 주소를 저장합니다.
ISR 실행 시에는 특별한 값(EXC_RETURN)이 저장되어 예외 처리가 끝난 후 올바른 모드로 복구되도록 돕습니다.
R15: Program Counter (PC)
다음에 실행할 명령어의 주소를 가리킵니다.
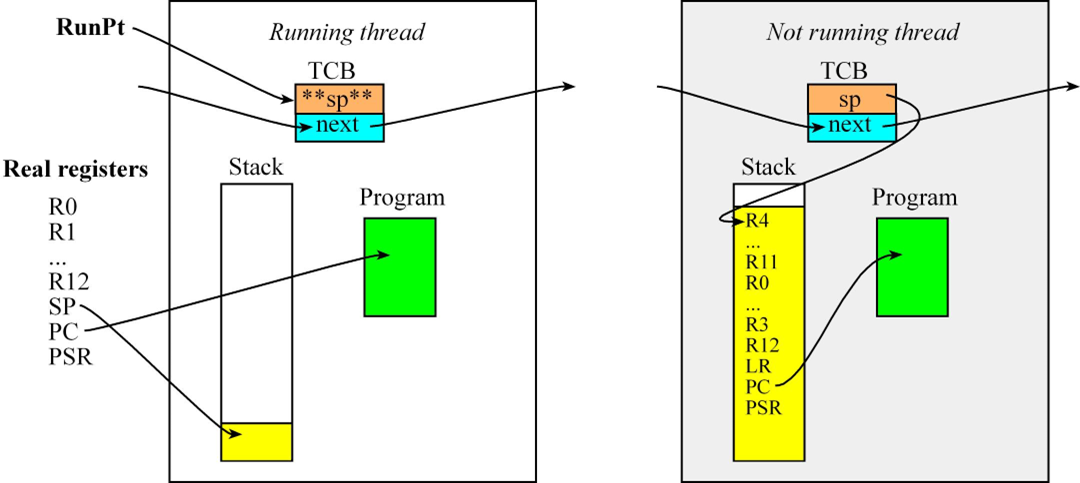
Cortex-M의 파이프라인 구조 때문에 실제 실행 중인 명령어보다 몇 단계 앞선 주소를 가리키는 특징이 있습니다.🟢 왼쪽: 활활 타오르는 '현재 실행 중인 스레드 (Running thread)'
이 스레드는 지금 당장 CPU의 주인공입니다. VIP 대접을 받고 있죠.
-
Real Registers (진짜 CPU 레지스터): R0~R12, SP, PC, PSR 같은 하드웨어 레지스터들이 이 스레드의 명령어를 처리하느라 쉴 새 없이 빙글빙글 돌고 있습니다.
-
PC (Program Counter): 화살표를 보세요! 현재 실행 중인 프로그램 코드(초록색 박스)의 특정 위치를 정확히 가리키고 있습니다. "나 지금 이 줄 읽고 있어!"라는 뜻입니다.
-
SP (Stack Pointer): 스택 메모리의 맨 위(노란색 끝부분)를 가리키며 짐을 넣을 준비를 하고 있습니다.
-
핵심 포인트: 이때 TCB 안에 있는 sp 변수는 별로 안 중요합니다. 진짜 하드웨어 CPU의 SP 레지스터가 알아서 일하고 있기 때문입니다. (그래서 그림에서도 화살표가 없습니다)
🔴 오른쪽: 처참하게 쫓겨난 '기절한 스레드 (Not running thread)'
타이머 인터럽트(SysTick)가 "땡!" 하고 울려서 CPU 마이크를 빼앗기고 강제로 대기열로 쫓겨난 스레드입니다.
-
Stack (노란색으로 꽉 찬 보따리): 쫓겨나기 직전에 CPU에서 쓰던 모든 레지스터 값들을 자기만의 개인 스택 메모리에 몽땅 쑤셔 넣었습니다(Push).
-
시험 핵심: 밑에 깔린 PSR, PC, LR, R12, R3~R0는 타이머가 울리는 순간 하드웨어가 자동으로(자동 반사로) 밀어 넣은 짐입니다.
-
그 위에 있는 R11~R4는 회원님이 직접 어셈블리 파일에 PUSH {R4-R11}이라고 써서 손으로 싸맨 짐입니다. (기억나시죠?)
-
TCB의 sp (가장 중요!): 짐 보따리를 다 싼 다음, "다음에 나 깨울 때 내 짐 보따리 입구가 여기 스택 주소니까 잘 기억해 둬!" 하고 TCB의 sp 변수에 짐의 꼭대기 주소를 적어놓고(STR SP, [R1]) 기절한 겁니다. (화살표가 스택 맨 위를 가리키고 있죠!)
-
스택 안의 PC (Program Counter): 스택 안쪽에 저장된 PC의 화살표를 보세요. 초록색 박스의 중간을 가리키고 있죠? "나 아까 여기까지 실행하다 끊겼어..." 하고 기억해 둔 이정표입니다.
중간고사 실전 요약
결국 이 그림은 "스레드가 교체될 때 어떤 마법이 일어나는가?"를 보여줍니다.
스케줄러가 빙글빙글 돌다가 오른쪽의 '기절한 스레드'를 다시 RunPt로 지목하면 어떻게 될까요?
역순으로 TCB의 sp에 적힌 주소를 진짜 CPU의 SP 레지스터로 가져온 뒤(LDR SP, [R1]), 노란색 보따리를 풀어헤쳐서(POP {R4-R11}) 레지스터를 복구하고 왼쪽의 'Running thread' 상태로 부활시킵니다.
4. Creation of Thread
- 스레드 제어 블록(TCB) 및 전역 변수 설정
가장 먼저 메모리 상단에 스레드들이 사용할 스택 공간과 관리 명부(TCB)를 정의합니다.
#include <stdint.h>

#define NUMTHREADS 3    // Maximum number of threads
#define STACKSIZE  100  // Number of 32-bit words in each stack

// Thread Control Block (TCB) structure definition
struct tcb {
    int32_t *sp;        // Pointer to stack (valid for threads not running)
    struct tcb *next;   // Linked-list pointer to the next thread
};

typedef struct tcb tcbType;

//==================================LAB2================================
// Global variables for OS
tcbType tcbs[NUMTHREADS];               // Array of TCBs for 3 threads
tcbType *RunPt;                         // Pointer to the currently running thread
int32_t Stacks[NUMTHREADS][STACKSIZE];  // 2D Array for stacks (3 threads, 400 bytes each)
//======================================================================


// External/Hardware specific definitions (Assuming they exist in BSP/Hardware headers)
extern void DisableInterrupts(void);
extern void StartCritical(void);
extern void EndCritical(int32_t status);
extern void StartOS(void);
extern void Profile_Toggle0(void);
extern void Profile_Toggle1(void);
extern void Profile_Toggle2(void);- 가짜 스택 초기화 함수 (SetInitialStack)
스레드가 처음 실행될 때 마치 인터럽트에서 복구되는 것처럼 CPU를 속이기 위해, 초기 스택에 레지스터 값들을 미리 채워 넣는 함수입니다.
// Initialize the stack for a specific thread to simulate a context switch
void SetInitialStack(int i) {
    // Set the stack pointer to point to the top of the simulated stack frame
    tcbs[i].sp = &Stacks[i][STACKSIZE-16];

    // Fill the simulated stack with dummy values and necessary initial states
    Stacks[i][STACKSIZE-1]  = 0x01000000;  // xPSR: Set Thumb bit (Mandatory for Cortex-M)
    // Stacks[i][STACKSIZE-2] will be set to the Program Counter (PC) in OS_AddThreads
    Stacks[i][STACKSIZE-3]  = 0x14141414;  // R14 (LR) dummy value
    Stacks[i][STACKSIZE-4]  = 0x12121212;  // R12 dummy value
    Stacks[i][STACKSIZE-5]  = 0x03030303;  // R3 dummy value
    Stacks[i][STACKSIZE-6]  = 0x02020202;  // R2 dummy value
    Stacks[i][STACKSIZE-7]  = 0x01010101;  // R1 dummy value
    Stacks[i][STACKSIZE-8]  = 0x00000000;  // R0 dummy value
    Stacks[i][STACKSIZE-9]  = 0x11111111;  // R11 dummy value
    Stacks[i][STACKSIZE-10] = 0x10101010;  // R10 dummy value
    Stacks[i][STACKSIZE-11] = 0x09090909;  // R9 dummy value
    Stacks[i][STACKSIZE-12] = 0x08080808;  // R8 dummy value
    Stacks[i][STACKSIZE-13] = 0x07070707;  // R7 dummy value
    Stacks[i][STACKSIZE-14] = 0x06060606;  // R6 dummy value
    Stacks[i][STACKSIZE-15] = 0x05050505;  // R5 dummy value
    Stacks[i][STACKSIZE-16] = 0x04040404;  // R4 dummy value
}- 스레드 등록 및 연결 함수 (OS_AddThreads)
사용자가 만든 3개의 함수(Task)를 가져와서 TCB를 원형으로 연결하고 PC(Program Counter) 값을 설정합니다.
// Add three tasks to the OS and configure them as a circular linked list
int OS_AddThreads(void(*task0)(void), void(*task1)(void), void(*task2)(void)) {
    int32_t status;

    // 중요!! Lock the door (start of Critical Section)
    status = StartCritical(); // Disable interrupts during configuration


    // 중요!! TCB 포인터가 다음 스레드로 넘어가는 지점
    // 1. Link the TCBs in a circular manner for Round-Robin scheduling
    tcbs[0].next = &tcbs[1]; // Thread 0 points to Thread 1
    tcbs[1].next = &tcbs[2]; // Thread 1 points to Thread 2
    tcbs[2].next = &tcbs[0]; // Thread 2 points back to Thread 0


    // 중요!! 스택에 pc를 집어 넣는 지점
    // 가짜 스택에 내가 만든 함수 주소 몰래 넣기
    // 2. Initialize stacks and set the Program Counter (PC) for each thread
    SetInitialStack(0);
    Stacks[0][STACKSIZE-2] = (int32_t)(task0); // Set PC to Task0 address

    SetInitialStack(1);
    Stacks[1][STACKSIZE-2] = (int32_t)(task1); // Set PC to Task1 address

    SetInitialStack(2);
    Stacks[2][STACKSIZE-2] = (int32_t)(task2); // Set PC to Task2 address


    // 3. Set the first thread to run
    RunPt = &tcbs[0];


    //중요!! Unlock the door (end of critical section)
    EndCritical(status); // Restore interrupt state
    return 1;            // Return success
}- OS 초기화 및 실행 (OS_Init, OS_Launch)
하드웨어 타이머(SysTick)를 설정하고 어셈블리어로 작성된 StartOS를 호출해 멀티태스킹을 시작합니다.
// Basic OS Initialization
void OS_Init(void) {
    DisableInterrupts();
    BSP_Clock_InitFastest(); // Set processor clock to maximum speed
}

// Hardware Registers for SysTick (Usually defined in tm4c123gh6pm.h)
#define STCTRL      (*((volatile uint32_t *)0xE000E010))
#define STRELOAD    (*((volatile uint32_t *)0xE000E014))
#define STCURRENT   (*((volatile uint32_t *)0xE000E018))
#define SYSPRI3     (*((volatile uint32_t *)0xE000ED20))

// Configure SysTick and launch the OS
void OS_Launch(uint32_t theTimeSlice) {
    STCTRL = 0;             // Disable SysTick during setup
    STCURRENT = 0;          // Clear current value

    // Set SysTick priority to 7 (Lowest priority) to avoid blocking hardware interrupts
    SYSPRI3 = (SYSPRI3 & 0x0FFFFFFF) | 0xE0000000;

    STRELOAD = theTimeSlice - 1; // Set reload value for the time slice
    STCTRL = 0x00000007;         // Enable SysTick, core clock, and interrupts

    StartOS(); // Trigger the first context switch (Assembly function)
}- 사용자 태스크 및 메인 함수 (User Tasks & main)
OS 위에서 돌아갈 실제 작업들입니다.
uint32_t Count0 = 0;
uint32_t Count1 = 0;
uint32_t Count2 = 0;

// User Task 0
void Task0(void) {
    Count0 = 0;
    while(1) {
        Count0++;
        Profile_Toggle0(); // Toggle bit for debugging/profiling
    }
}

// User Task 1
void Task1(void) {
    Count1 = 0;
    while(1) {
        Count1++;
        Profile_Toggle1();
    }
}

// User Task 2
void Task2(void) {
    Count2 = 0;
    while(1) {
        Count2++;
        Profile_Toggle2();
    }
}

#define THREADFREQ 500 // Time slice frequency in Hz

int main(void) {
    OS_Init();       // Initialize OS and disable interrupts
    Profile_Init();  // Initialize digital I/O for profiling

    // Register the three user tasks to the OS
    OS_AddThreads(&Task0, &Task1, &Task2);

    // Launch the OS with the calculated time slice
    OS_Launch(BSP_Clock_GetFreq() / THREADFREQ);

    return 0; // The program should never reach this point
}
5. OS 초기화 및 SysTick
OS_Init():
- OS를 시작하기 전 필수적인 하드웨어 설정을 합니다.
- 인터럽트를 끄고(DisableInterrupts), 클럭을 설정(BSP_Clock_InitFastest)하는 등 시스템의 기본 상태를 잡습니다.
void OS_Init(void){
  DisableInterrupts();
  BSP_Clock_InitFastest();// set processor clock to fastest speed
  // initialize any global variables as needed
}
SysTick의 역할:
- RTOS에서 선점형 스케줄링(Preemptive Scheduling)을 구현하는 핵심 타이머입니다.
- 주기적으로 인터럽트를 발생시켜 OS가 강제로 실행 흐름을 가져오게(Context Switch) 합니다.
- 중요: SysTick 인터럽트의 우선순위는 가장 낮게 설정합니다. 이는 중요한 하드웨어 인터럽트(Event Thread) 처리를 방해하지 않고, 오직 메인 스레드(Main Thread)들 사이의 전환만 담당하기 위함입니다.
AREA |.text|, CODE, READONLY, ALIGN=2
        THUMB
        REQUIRE8
        PRESERVE8

        ; Import the global variable from OS.c
        EXTERN  RunPt

        ; Export the functions so C code can call them
        EXPORT  StartOS
        EXPORT  SysTick_Handler

; ***************** StartOS *******************
; Starts the first thread by restoring its initial stack
StartOS
        LDR     R0, =RunPt       ; 1) R0 = address of RunPt pointer
        LDR     R1, [R0]         ; 2) R1 = current RunPt (points to the first TCB)
        LDR     SP, [R1]         ; 3) Load initial SP (SP = RunPt->sp)

        POP     {R4-R11}         ; 4) Restore R4-R11 (dummy values)
        POP     {R0-R3}          ; 5) Restore R0-R3 (dummy values)
        POP     {R12}            ; 6) Restore R12 (dummy value)
        ADD     SP, SP, #4       ; 7) Discard LR from initial stack (skip 4 bytes)
        POP     {LR}             ; 8) Restore PC into LR (This is the thread's start address!)
        ADD     SP, SP, #4       ; 9) Discard xPSR (skip 4 bytes)

        CPSIE   I                ; 10) Enable interrupts
        BX      LR               ; 11) Jump to the first thread's starting address


; ---------------------------------------------------------
; SysTick_Handler: Performs the preemptive thread switch
; 1) Hardware automatically saves R0-R3, R12, LR, PC, xPSR
; ---------------------------------------------------------
SysTick_Handler
    ; --- Step 1: Suspend current thread ---
    CPSID   I                   ; 2) Disable interrupts to make context switch atomic
    PUSH    {R4-R11}            ; 3) Save remaining registers R4-R11 to the stack

    LDR     R0, =RunPt          ; 4) R0 = address of the RunPt pointer
    LDR     R1, [R0]            ;    R1 = current RunPt (points to the old TCB)
    STR     SP, [R1]            ; 5) Save current SP into the 'sp' field of the old TCB

    ; --- Step 2: Choose next thread (Round-Robin) ---
    LDR     R1, [R1, #4]        ; 6) R1 = RunPt->next (Load the address of the next TCB)
    STR     R1, [R0]            ;    Update RunPt to point to the new TCB

    ; --- Step 3: Launch new thread ---
    LDR     SP, [R1]            ; 7) Load the new thread's SP (SP = RunPt->sp)

    POP     {R4-R11}            ; 8) Restore remaining registers R4-R11 from the new stack
    CPSIE   I                   ; 9) Enable interrupts so the new thread can run
    BX      LR                  ; 10) Return from interrupt: Hardware restores R0-R3, R12, LR, PC, xPSR
PUSH {R4-R11}
STR SP, [R1]
LDR R1, [R1, #4]
POP {R4-R11}
StartOS: OS.c에서 RunPt에 첫 번째 스레드를 지정해 두었죠? 이 함수는 그 첫 번째 스레드의 가짜 스택을 열어서 쓰레기값들을 차례대로 버리고(ADD SP, SP, #4), 함수의 시작 주소를 꺼내와서 출발(BX LR)시키는 역할을 합니다.
SysTick_Handler: 1ms마다 타이머가 울릴 때마다 실행되며, 현재 하던 일을 스택에 밀어 넣고(PUSH), 다음 스레드의 스택 포인터를 가져와서(LDR SP, [R1]), 짐을 풀고(POP) 다시 출발(BX LR)시키는 가장 중요한 문맥 전환(Context Switch) 마법입니다.