chaincode ?
체인코드란 일종의 API 같은 것이다. 트랜잭션은 체인코드에 명시된 내용을 통해 합의를 도출한다.
Chaincode is a program, written in Go, node.js, or Java that implements a prescribed interface. Chaincode runs in a secured Docker container isolated from the endorsing peer process. Chaincode initializes and manages ledger state through transactions submitted by applications.
by hyperledger-fabric document
튜토리얼 프로젝트를 통해 확인을 해본 결과 스프링의 MVC 패턴과 유사하다고 생각하였다.
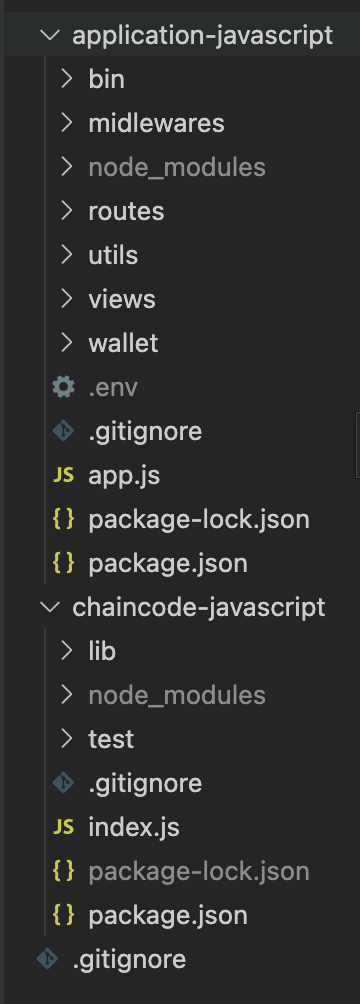
그림에 보이는 것과 같이 상단에 application 폴더와 chaincode 폴더 두 개가 존재한다.
이 때 views -> views / routes -> controller / chaincode -> repository
로 이해하면 편할 것 같다. (다시 보니까 service 부분이 안 들어갔는데 mvc 이라 해도 되는지 의문이네..)
어쨌든 중요한 점은 튜토리얼에서 chaincode만 분산 DB에 접근할 수 있게 구현을 해놓은 것을 확인할 수 있다. routes는 비즈니스 로직을 처리하고 데이터를 가공하여 Front와 Blockchain의 중간다리 역할을 수행한다.
Chaincode vs Smart contract
A chaincode typically handles business logic agreed to by members of the network, so it may be considered as a “smart contract”. by fabric docs
이유는 잘 모르겠으나 퍼블릭 블록체인에서 사용하던 smart contract 를 chaincode 라고 부르는 것 같다. 이건 내 예상이지만, 퍼블릭 블록체인의 주된 목적은 'P2P의 거래' 이기 때문에 계약서라는 용어를 쓰고 프라이빗 블록체인은 조직 내부 시스템 개발을 목적으로 하는 경우가 많아서 일 것 같다.
Chaincode Deploy
참고로 현재 나의 상태는 이미 어플리케이션과 체인코드를 개발 중인 상태이다. 초기 상태에서는 test-network/network.sh 의 deployCC command 를 사용해서 배포할 수 있는거 같은데... 초기에만 잘 작동이 되고 그 후로는 잘 되지 않았다.
시작하기 전, $""가 velog string 포멧 때문에 $ ""로 기제 되어있다. 꼭 공백을 빼고 입력해야한당.
환경변수 설정
cd fabric-samples/test-network
export PATH = $ {PWD}/../bin:$PATH
export FABRIC_CFG_PATH = $PWD/../config/
새로운 chaincode 아카이빙
peer lifecycle chaincode package basic.tar.gz --path ../asset-transfer-basic/chaincode-javascript/ --lang node --label basicx.x
x.x에는 현재 버전을 입력 해주세요
본인의 프로젝트에 맞는 디렉토리를 경로로 지정하고 사용한 언어와 아카이빙 할 압축파일의 이름을 입력한다. 그럼 test-network/basic_x.x 라는 zip파일이 생성될 것이다.
각 피어에 chaincode 설치
현재 본인의 프로젝트는 두 개의 ORG와 두 개의 Peer로 이루어져 있다. 때문에 각 환경에 맞는 환경변수를 세팅 해서 체인코드 설치를 진행한다.
export CORE_PEER_TLS_ENABLED=true
export CORE_PEER_LOCALMSPID="Org1MSP"
export CORE_PEER_TLS_ROOTCERT_FILE=$ {PWD}/organizations/peerOrganizations/org1.example.com/peers/peer0.org1.example.com/tls/ca.crt
export CORE_PEER_MSPCONFIGPATH=${PWD}/organizations/peerOrganizations/org1.example.com/users/Admin@org1.example.com/msp
export CORE_PEER_ADDRESS=localhost:7051
peer lifecycle chaincode install basic.tar.gz
export CORE_PEER_LOCALMSPID="Org2MSP"
export CORE_PEER_TLS_ROOTCERT_FILE=$ {PWD}/organizations/peerOrganizations/org2.example.com/peers/peer0.org2.example.com/tls/ca.crt
export CORE_PEER_MSPCONFIGPATH=$ {PWD}/organizations/peerOrganizations/org2.example.com/users/Admin@org2.example.com/msp
export CORE_PEER_ADDRESS=localhost:9051
$ peer lifecycle chaincode install basic.tar.gz
chaincode definition 합의
$ peer lifecycle chaincode queryinstalled
output -
Installed chaincodes on peer:
$ Package ID: basic_x.x:69de748301770f6ef64b42aa6bb6cb291df20aa39542c3ef94008615704007f
생성된 패키지 아이디를 통해 모든 Org들의 합의를 도출한다. 마지막으로 환경변수를 ORG2 로 설정했기 때문에 ORG2 에 합의를 먼저 받는다. 이 때, 버전과 sequnce를 맞춰줘야 한다. 버전은 아까 basicx.x 에 설정한 내용을 입력하면 된다.
_ex) {integer.integer} -> 1.1
sequence 는 네트워크가 켜진 이후 체인코드를 몇 번째 배포인지 표시하는 것이다.
ex 초기 ) {integer} -> 1
ex 두 번째 ) {integer} -> 2
ORG 2
$ export CC_PACKAGE_ID=basic_x.x:69de748301770f6ef64b42aa6bb6cb291df20aa39542c3ef94008615704007f
$ peer lifecycle chaincode approveformyorg -o localhost:7050 --ordererTLSHostnameOverride orderer.example.com --channelID mychannel --name basic --version {integer.integer} --package-id $ CC_PACKAGE_ID --sequence {Integer} --tls --cafile "$ {PWD}/organizations/ordererOrganizations/example.com/orderers/orderer.example.com/msp/tlscacerts/tlsca.example.com-cert.pem"
ORG 1
$ export CORE_PEER_LOCALMSPID="Org1MSP"
$ export CORE_PEER_MSPCONFIGPATH=$ {PWD}/organizations/peerOrganizations/org1.example.com/users/Admin@org1.example.com/msp
$ export CORE_PEER_TLS_ROOTCERT_FILE=$ {PWD}/organizations/peerOrganizations/org1.example.com/peers/peer0.org1.example.com/tls/ca.crt
$ export CORE_PEER_ADDRESS=localhost:7051
ORG1 과 동일한 command 입력.
$ peer lifecycle chaincode approveformyorg -o localhost:7050 --ordererTLSHostnameOverride orderer.example.com --channelID mychannel --name basic --version {integer.integer} --package-id $ CC_PACKAGE_ID --sequence {Integer} --tls --cafile "$ {PWD}/organizations/ordererOrganizations/example.com/orderers/orderer.example.com/msp/tlscacerts/tlsca.example.com-cert.pem"
peer들의 합의가 끝났으면 합의 알고리즘에 의한 최종 결정을 진행한다.
peer lifecycle chaincode checkcommitreadiness --channelID mychannel --name basic --version {int.int} --sequence {int} --tls --cafile "${PWD}/organizations/ordererOrganizations/example.com/orderers/orderer.example.com/msp/tlscacerts/tlsca.example.com-cert.pem" --output json
-> output
"Approvals": {
    "Org1MSP": true,
    "Org2MSP": true
}
Hyperledger-fabric의 합의는 전체 피어의 2/3가 동의하면 합의를 한다. 따라서 현재 피어 두 개가 승인 하였으니 합의가 이뤄질 수 있다.
peer lifecycle chaincode commit -o localhost:7050 --ordererTLSHostnameOverride orderer.example.com --channelID mychannel --name basic --version {int.int} --sequence {int} --tls --cafile "$ {PWD}/organizations/ordererOrganizations/example.com/orderers/orderer.example.com/msp/tlscacerts/tlsca.example.com-cert.pem" --peerAddresses localhost:7051 --tlsRootCertFiles "$ {PWD}/organizations/peerOrganizations/org1.example.com/peers/peer0.org1.example.com/tls/ca.crt" --peerAddresses localhost:9051 --tlsRootCertFiles "${PWD}/organizations/peerOrganizations/org2.example.com/peers/peer0.org2.example.com/tls/ca.crt"
이제 변경 사항을 내 채널에 적용한다.
peer lifecycle chaincode querycommitted --channelID mychannel --name basic --cafile "${PWD}/organizations/ordererOrganizations/example.com/orderers/orderer.example.com/msp/tlscacerts/tlsca.example.com-cert.pem"
-> output
Committed chaincode definition for chaincode 'basic' on channel 'mychannel':
Version: 1.0, Sequence: 1, Endorsement Plugin: escc, Validation Plugin: vscc, Approvals: [Org1MSP: true, Org2MSP: true]
invoke test
peer chaincode invoke -o localhost:7050 --ordererTLSHostnameOverride orderer.example.com --tls --cafile "$ {PWD}/organizations/ordererOrganizations/example.com/orderers/orderer.example.com/msp/tlscacerts/tlsca.example.com-cert.pem" -C mychannel -n basic --peerAddresses localhost:7051 --tlsRootCertFiles "$ {PWD}/organizations/peerOrganizations/org1.example.com/peers/peer0.org1.example.com/tls/ca.crt" --peerAddresses localhost:9051 --tlsRootCertFiles "$ {PWD}/organizations/peerOrganizations/org2.example.com/peers/peer0.org2.example.com/tls/ca.crt" -c '{"function":"InitLedger","Args":[]}'
해당 커맨드가 정상적으로 동작한다면 체인코드가 잘 설치 된 것이다.
체인코드를 배포하면서 알 수 있는 점
- 체인코드는 각각의 피어에서 독립적으로 실행된다.
- 체인코드는 그냥 적용할 수 있는 게 아니라 일정 수 이상의 피어가 승인을 해야 가능하다.