document object
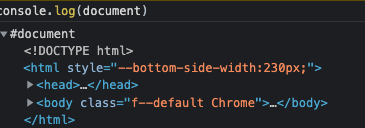
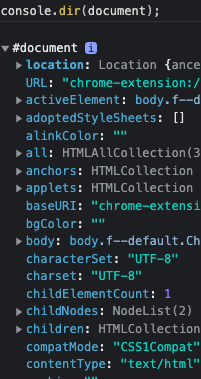
document는 브라우저가 불러온 웹페이지를 나타냄.
document로부터 모든 것이 시작하며 자바스크립트로 html element를 가져와서 변경할 수 있음.
document를 log로 객체를 출력하면 html 태그 내용이 나오고

dir로 출력하면 객체의 속성을 계층구조로 출력한다.

searching for elements
- getElementsByClassName() : 많은 element를 가져올때 씀(array를 반환)
- getElementsByTagName() : 태그이름으로 가져옴.(array를 반환)
- getElementById(): 하나의 값 가져옴.
- querySelector : element를 CSS selector방식으로 검색할 수 있음 (ex. h1:first-child)
단 하나의 element를 return해줌
=> hello란 class 내부에 있는 h1을 가지고 올 수 있다(id도 가능함)
=> 첫번째 element만 가져옴 - 조건에 맞는 세개 다 가져오고 싶으면 querySelectorAll
=> 세개의 h1이 들어있는 array를 가져다 줌 - querySelector("#hello); 와 getElementById("hello"); 는 같은 일을 하는 것임
하지만 후자는 하위요소 가져오는 것을 못함.
event
-
element의 내부를 보고 싶으면 console.dir()
기본적으로 object로 표시한 element를 보여줌(전부 js object임)
그 element 중 앞에 on이 붙은 것들은 event임 -
title.addEventListener("click") : 누군가가 title을 click하는 것을 listen할 거임 → 무언가를 해줘야함
document의 body,head,title 이런것들은 중요하기 때문에
document.body.style~의 명령이 허용되지만, div같은것들은 호출이 안됨
나머지 element들은 querySelector나 getElementById로 불러와야됨
title.onclick = handleMouseEnter;
title.addEventListener(“mouseenter” , handleMouseEnter);

위에 두 코드는 동일하나 addEventListener를 선호하는 이유는
removeEventListener을 통해서 event listener을 제거할수있기 때문이다.
const title = document.querySelector(".hello:first-child h1");
function handleTitleClick(){
title.style.color = "blue";
}
function handleMouseEnter(){
title.innerText = "mouse is here!";
}
function handleMouseLeave(){
title.innerText = "mouse is gone!";
}
function handleWindowResize(){
document.body.style.backgroundColor = “tomato”;
}
function handleWindowCopy(){
alert(“copier”);
}
title.addEventListener("click",handleTitleClick);
title.addEventListener("mouseenter", handleMouseEnter);
title.addEventListener("mouseleave", handleMouseLeave);
window.addEventListener(“resize”, handleWindowResize);
window.addEventListener(“copy”, handleWindowCopy);css in javascript
function handleTitleClick(){
//현재 색상을 변수로 지정
const currentColor = h1.style.color;
//변화 후!! 색상을 변수로 지정
let newColor
if(currentColor === 'blue'){
newColor = 'tomato';
} else {
newColor = 'blue';
}
//조건문을 통한 newColor를 색상으로 지정
h1.style.color = newColor;
}
css파일에
h1 {
color: cornflowerblue;
}
.clicked {
color: tomato;
}
를 적고
js파일에
const h1 = document.querySelector("div.hello:first-child h1");
function handleTitleClick() {
if(h1.className === "clicked") {
h1.className = "";
} else {
h1.className = "clicked";
}
}
h1.addEventListener("click", handleTitleClick);
적음.
여기서 JS는 HTML을 변경할거고, CSS는 HTML을 바라보고 style을 변경한다.
이게 js에서 직접 style을 변경하는 것 보다 좋음.
function handleTitleClick() {
//raw value를 그대로 입력하다 오타가 발생할 수 있으므로 변수로 지정
const clickedClass = "clicked";
if(h1.className === clickedClass) {
h1.className = "";
} else {
h1.className = clickedClass;
}
}
이전의 class들은 상관없이 className은 모든걸 교체.
classList를 사용하면 class를 목록으로 작업할 수 있음.
classList에는 function들이 있는데,
constains라는 function은 우리가 명시한 class가 HTML element의 class에 포함되어 있는지 체크.
remove라는 function은 명시한 class name을 제거.
add라는 function은 명시한 class name을 추가.
function handleTitleClick() {
const clickedClass = "clicked";
if(h1.classList.contains(clickedClass)) {
h1.classList.remove(clickedClass);
} else {
h1.classList.add(clickedClass);
}
}
더 좋은 function이 존재한다. toggle function은 class name이 존재하는지 확인.
class name이 존재하면 toggle은 class name을 제거하고, class name이 존재하지 않으면 toggle은 class name을 추가한다.
function handleTitleClick() {
h1.classList.toggle("clicked");
}
toggle은 켜고끄는 버튼같은거.
function onLoginSubmit(event){
// 브라우저가 기본 동작을 실행하지 못하게 막기
// event object는 preventDefault함수를 기본적으로 갖고 있음
event.preventDefault();
console.log(event);
}

// submit 이벤트가 발생한다면, onLoginSubmit함수를 실행시킨다는 의미
// JS는 onLoginSubmit함수 호출시 인자를 담아서 호출함. 해당 인자는 event object를 담은 정보들
loginForm.addEventListener("submit", onLoginSubmit);
form을 submit하면 브라우저는 기본적으로 페이지를 새로고침 하도록 되어있다. << 우리가 원하는 것이 아님
innerText가 차이 innerHTML
둘 다 작동하지만 브라우저에서 실행될 HTML을 포함하려면 innerHTML을 사용해야 합니다.
localstorage에 저장하는법
localStorage.setItem("key이름", "값"); // 저장
localStorage.getItem("KEY이름"); // 얻기
setInterval,setTimeout,date
const clock = document.querySelector('#clock');

function getClock() {
  //호출하는 당시의 현재날짜랑 시간을 알려줌.
  const date = new Date();
  clock.innerText = `${date.getHours()}:${date.getMinutes()}:${date.getSeconds()}`;
}
// 바로 실행(setTimeout,setInterval은 바로 실행 안하므로 getClock 함수 작성)
getClock();
// 1초 기다렸다 한번만 실행
//setTimeout(getClock, 1000);
// 1초 마다 실행.
setInterval(getClock, 1000);
date앞에 new를 쓰는 이유.
// 요약: new는 새로운 객체 만드는거(새로운 날짜 객체 만듬)
console에 typeof Date; 를 입력해보시면 function 이라고 알려줌.
JavaScript에는 생성자 함수라는 것이 있음.
new 를 선두에 쓰고 생성자 함수를 호출하면 instance object를 반환.
이는 생성자 함수로 객체를 생성할 때 하기로 한 약속(문법)입니다.
생성자 함수는 arguments를 받을 수 있음..
console 에 const date = new Date(); 를 입력하여 date 변수를 선언하시고,
typeof date; 를 입력해보시면 object를 반환하는 것을 볼 수 있음.
이렇게 생성한 date 객체를 우리는 이전시간에 배웠던대로 object.property와 같은 형식으로 사용할 수 있음.
padStart
현재 문자열의 시작을 다른 문자열로 채워, 주어진 길이를 만족하는 새로운 문자열을 반환합니다. 채워넣기는 대상 문자열의 시작(좌측)부터 적용됩니다.
//padStart는 앞에 붙고 padEnd는 뒤에 붙음.
// 첫번째 인자는 만족해야할 자릿수, 두번째 인자는 자릿수를 채우지 못하면 사용되어지는 인자
"1".padStart(2,'0');
const clock = document.querySelector('#clock');
function getClock() {
const date = new Date();
const housrs = String(date.getHours()).padStart(2, '0');
const minutes = String(date.getMinutes()).padStart(2, '0');
const seconds = String(date.getSeconds()).padStart(2, '0');
clock.innerText = `${housrs}:${minutes}:${seconds}`;
}
getClock();
setInterval(getClock, 1000);
math
const quotes = [
  {
    quote: 'Anyone who has ever made anything of importance was disciplined.',
    author: 'Andrew Hendrixson',
  },
  {
    quote:
      'Don’t spend time beating on a wall, hoping to transform it into a door.',
    author: 'Coco Chanel',
  },
  {
    quote: 'Creativity is intelligence having fun.',
    author: 'Albert Einstein',
  },
  {
    quote:
      'Optimism is the one quality more associated with success and happiness than any other.',
    author: 'Brian Tracy',
  },
  {
    quote:
      'Always keep your eyes open. Keep watching. Because whatever you see can inspire you.',
    author: 'Grace Coddington',
  },
  {
    quote:
      'What you get by achieving your goals is not as important as what you become by achieving your goals.',
    author: 'Henry David Thoreau',
  },
  {
    quote: 'If the plan doesn’t work, change the plan, but never the goal.',
    author: 'Author Unknown',
  },
  {
    quote: 'I destroy my enemies when I make them my friends.',
    author: 'Abraham Lincoln',
  },
  {
    quote: 'Don’t live the same year 75 times and call it a life.',
    author: 'Robin Sharma',
  },
  {
    quote: 'You cannot save people, you can just love them.',
    author: 'Anaïs Nin',
  },
];

const quote = document.querySelector('#quote span:first-child');
const author = document.querySelector('#quote span:last-child');

const todaysQuote = quotes[Math.floor(Math.random() * quotes.length)];
quote.innerText = todaysQuote.quote;
author.innerText = todaysQuote.author;
Math.floor : 소수점 내림
Math.ceil : 소수점 올림
Math.round : 소수점 반올림.
createElement
const images = ['0.jpeg', '1.jpeg', '2.jpeg'];

const chosenImage = images[Math.floor(Math.random() * images.length)];

const bgImage = document.createElement('img');

bgImage.src = `img/${chosenImage}`;

document.body.appendChild(bgImage);
to do list
const toDoForm = document.getElementById('todo-form');
const toDoInput = document.querySelector('#todo-form input');
const toDoList = document.getElementById('todo-list');

const TODOS_KEY = 'todos';
let toDos = [];

function saveToDos() {
// JSON.stringify: object나 array나 어떤 것이든 string으로 바꿔줌
// JSON.parse: string을 원래 상태로 바꿈
// localstorage에서는 string만 저장할 수 있기 때문에
// stringify로 Array 자체를 문자열로 만들고
// 나중에 localstorage에서 가지고 온 다음 parse로 문자열을 Array로 만들어서 불러들임.
// db는 누구나 볼수 있는 것이고 LocalStorage는 오직 당신의 브라우저를 위해서.
  localStorage.setItem(TODOS_KEY, JSON.stringify(toDos));
}

function deleteToDo(event) {
  const li = event.target.parentElement;
  li.remove();
  // filter는 기본 array를 변경하지 않고 새로운 array를 반환.
  toDos = toDos.filter((toDo) => toDo.id !== parseInt(li.id));
  saveToDos();
}

function paintToDo(newTodo) {
  const li = document.createElement('li');
  li.id = newTodo.id;
  const span = document.createElement('span');
  const button = document.createElement('button');
  span.innerText = newTodo.text;
  button.innerText = '❌';
  button.addEventListener('click', deleteToDo);
  li.appendChild(span);
  li.appendChild(button);
  toDoList.appendChild(li);
}

function handleToDoSubmit(event) {
  event.preventDefault();
  const newTodo = toDoInput.value;
  toDoInput.value = '';
  // newTodoObj를 만든이유는 newtoDo에서는 localStorage에서는 어떤 것을 지워야 할 지 모름.
 // deletetodo는 html에서 어떤 요소를 지워야 하는지 알지만
 // newTodo의 array는 예를 들어 a가 두개 있다면 어느 a인지 알수 없음.
 // 그렇기 때문에 newTodoObj를 만들어서 id를추가한 객체를 만들어서 배열에 넣음.
  const newTodoObj = {
    text: newTodo,
    id: Date.now(),
  };
  toDos.push(newTodoObj);
  paintToDo(newTodoObj);
  saveToDos();
}

toDoForm.addEventListener('submit', handleToDoSubmit);

const savedToDos = localStorage.getItem(TODOS_KEY);

if (savedToDos !== null) {
  const parsedToDos = JSON.parse(savedToDos);
  toDos = parsedToDos;
  // array.foreach는 받아온 array를 for 반복문 없이 item 하나씩 function에 넣을 수 있음.
  parsedToDos.forEach(paintToDo);
}
geolocation
const API_KEY = 'apikey';

function onGeoOk(position) {
  const lat = position.coords.latitude;
  const lon = position.coords.longitude;
  const url = `https://api.openweathermap.org/data/2.5/weather?lat=${lat}&lon=${lon}&appid=${API_KEY}&units=metric`;
  fetch(url)
    .then((response) => response.json())
    .then((data) => {
      const weather = document.querySelector('#weather span:first-child');
      const city = document.querySelector('#weather span:last-child');
      city.innerText = data.name;
      weather.innerText = `${data.weather[0].main} / ${data.main.temp}`;
    });
}
function onGeoError() {
  alert("Can't find you. No weather for you.");
}
navigator.geolocation.getCurrentPosition(onGeoOk, onGeoError);
