Paging은 무엇일까?
사용자에게 정보를 표시하는 일반적인 방법 중 하나는 list다. 하지만 list는 전체 콘텐츠를 보기 위한 일부의 작은 창과 같다. 사용자는 list에서 제공되는 정보를 스크롤할 때 더 많은 데이터가 있을 거라고 확신한다. 이게 무슨 말인지는 다음 이미지를 보면 이해가 갈 것이다.
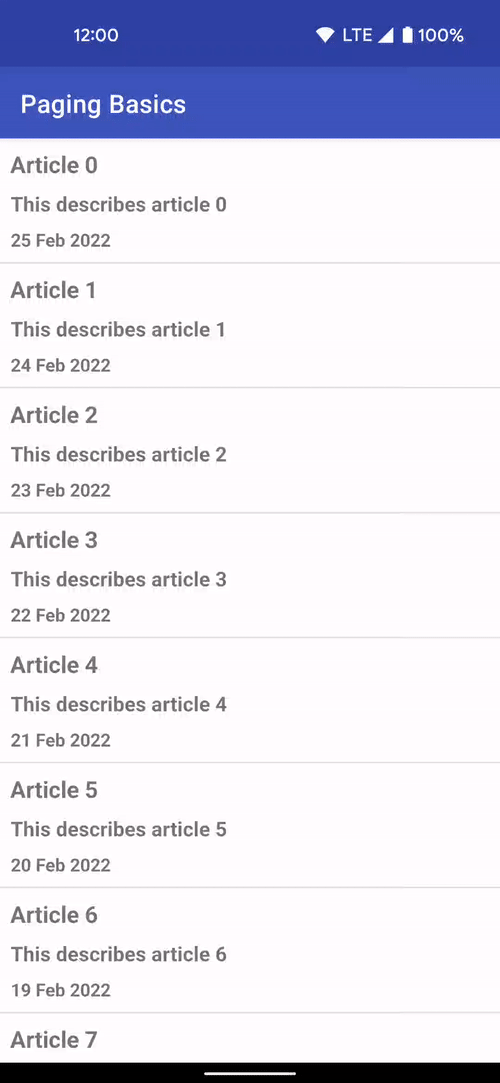
이렇게 정보를 점진적으로 가져오는 프로세스를 Paging이라 한다. 각 페이지는 데이터 청크에 상응한다. 페이지를 요청하려면 paging되는 데이터 소스에 필요한 정보를 정의하는 쿼리가 필요하다.
이런 paging을 효율적으로 구현하기 위해 사용하는 것이 Jetpack에서 제공하는 Paging이다. Paging 라이브러리는 로컬이나 네트워크를 통해 데이터를 로드하고 화면에 표시한다. Paging을 사용하면 네트워크 대역폭과 시스템 리소스를 효율적으로 사용할 수 있다.
왜 사용할까?
공식문서는 Paging라이브러리를 사용했을 때 이점을 다음과 같이 정리한다.
- 페이징된 데이터 메모리 캐싱 → 효율적인 리소스 관리가 가능해진다.
- 중복된 데이터 요청 제거로 시스템 리소스를 효율적으로 사용 가능하다.
- 사용자가 로드된 데이터의 끝까지 스크롤했을 때, RecyclerView 어댑터에 자동으로 데이터를 요청한다.
- coroutine, LiveData, RxJava를 최고 수준으로 지원한다.
- 새로고침과 재시도와 같이 에러 처리 방식을 지원한다.
핵심 컴포넌트(구성요소)
PagingSource
특정 페이지 쿼리의 데이터 청크를 로드하는 기본 클래스. 데이터 레이어의 일부로, 일반적으로는 DataSource 클래스에서 확인할 수 있으며 이후에는 ViewModel에서 사용하기 위해 Repository에서 사용된다. PagingSource 객체는 네트워크 소스 및 로컬 데이터베이스를 포함한 단일 소스에서 데이터를 로드할 수 있다.
PagingConfig
페이징 동작을 결정하는 매개변수를 정의하는 클래스. 페이지 크기, placeholder의 사용여부 등이 포함된다.
Pager
PagingData를 생성하는 클래스. PagingSource에 따라 다르게 실행되고, ViewModel에서 생성되어야 한다.
PagingData
페이지로 나눈 데이터의 스냅샷을 가지고 있는 컨테이너. 데이터를 새로고침할 때마다 자체 PagingSource로 지원되는 상응 PagingData가 별도로 생성된다. PagingSource 객체를 쿼리해 결과를 저장한다는 말이다.
PagindDataAdpater
RecyclerView.Apdater의 서브 클래스로 RecyclerView에 PagingData를 출력한다. factory 메서드를 사용해 Kotlin Flow, LiveData, RxJava Flowable, RxJava Observable, 혹은 정적 목록에도 연결할 수 있다. 내부 PagingData 로드 이벤트를 수신하고, 페이지가 로드될 때 UI를 효율적으로 업데이트한다.
라이브러리 아키텍쳐
paging 라이브러리는 Android가 권장하는 앱 아키텍처 가이드를 따른다. 라이브러리의 구성요소는 앱의 세 가지 레이어에서 작동한다.
윗단에서 알아본 구성요소를 아키텍쳐를 통해 한 방에 정리해보자.
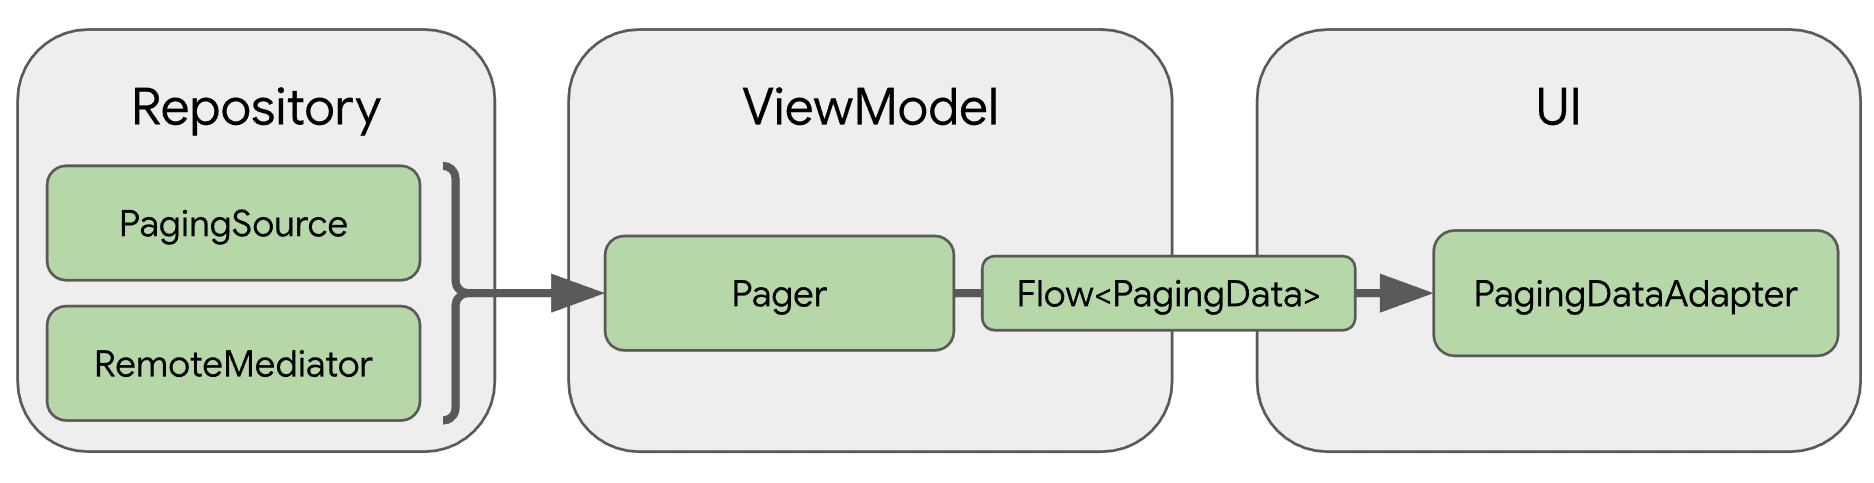
- Repository
- PagingSource → 데이터 소스와 이 소스에서 데이터를 검색하는 방법 정의
- RemoteMediator → 로컬 데이터베이스 캐시가 있는 네트워크 데이터 소스와 같은 계층화된 데이터 소스의 페이징 처리
- ViewModel
- Pager →
PagingSource객체 및PagingConfig객체를 바탕으로 반응형 스트림에 출력되는PagingData인스턴스를 구성하기 위해 공개 API를 제공 - PagingData로 ViewModel 레이어를 UI에 연결
- Pager →
- UI
- PagignDataAdapter → 페이지로 나눈 데이터를 처리
- AsyncPagingDataDiffer를 사용해 고유한 맞춤 어댑터 빌드도 가능
만들면서 알아보자!
1. 환경설정 (dependencies)
// 22.09.12 ver

dependencies {
  val paging_version = "3.1.1"

  implementation("androidx.paging:paging-runtime:$paging_version")

  // alternatively - without Android dependencies for tests
  testImplementation("androidx.paging:paging-common:$paging_version")

  // optional - RxJava2 support
  implementation("androidx.paging:paging-rxjava2:$paging_version")

  // optional - RxJava3 support
  implementation("androidx.paging:paging-rxjava3:$paging_version")

  // optional - Guava ListenableFuture support
  implementation("androidx.paging:paging-guava:$paging_version")

  // optional - Jetpack Compose integration
  implementation("androidx.paging:paging-compose:1.0.0-alpha16")
}
2. 데이터 소스(PagingSource) 정의
paging을 구현할 때는 다음 조건을 충족해야 한다.
- UI의 데이터 요청을 올바르게 처리한다. → 동일한 쿼리에 여러 요청이 동시에 트리거되지 않도록 해야하기 때문이다.
- 관리 가능한 양의 데이터를 메모리에 유지한다.
- 이미 가져온 데이터에 붙이기 위해 추가 데이터를 가져오라는 요청을 트리거 한다.
위 작업들을 실행하기 위해 PagingSource를 사용한다. PagingSource는 incremental 청크로 데이터를 가져오는 방법을 지정해 데이터 소스를 정의한다. 이를 통해 데이터 소스를 식별할 수 있다. 그렇게 되면 PagingData 객체는 사용자가 RecyclerView에서 스크롤할 때 생성되는 힌트가 로드될 때 PagingSource에서 데이터를 가져온다.
PagingSource를 빌드하려면 다음 항목을 정의해야 한다.
- paging 키 타입 → 추가 데이터를 요청하는 데 사용하는 페이지 쿼리 유형 정의.
- 로드된 데이터 타입
- 데이터를 가져오는 위치 → 일반적으로는 데이터베이스, 네트워크 리소스, paging한 데이터의 다른 소스.
아무튼 우선 데이터 소스를 식별하기 위해 **PagingSource를 정의**하자.
class ArticlePagingSource : PagingSource<Int, Article>() {
    override suspend fun load(params: LoadParams<Int>): LoadResult<Int, Article> {
        TODO("Not yet implemented")
    }
    override fun getRefreshKey(state: PagingState<Int, Article>): Int? {
        TODO("Not yet implemented")
    }
}load(), getRefreshKey() 두 가지 메서드는 필수로 구현해야 한다. 세부적으로 알아보자!
**load()** - 개념
사용자가 스크롤할 때 출력할 데이터를 비동기식으로 가져오기 위해 사용한다. 상응하는 데이터 소스에서 paging된 데이터를 검색하는 방법을 나타내기 위해 재정의 해야한다.
- 매개변수
LoadParams: 로드 작업과 관련된 정보가 저장된다.- Key of the page to be loaded→
load()가 처음 호출되는 경우에는 null. 위 예시 코드에서는 초기 페이지 키를 정의해야 한다. - load size → 로드 요청된 아이템의 수
- Key of the page to be loaded→
- 반환값
LoadResult- LoadResult.Page → 로드 성공
필수인자 data 가져온 데이터 prevKey 현재 페이지 앞에 아이템을 가져와야 하는 경우 nextKey 현재 페이지 뒤에 아이템을 가져와야 하는 경우 선택인자 itemsBefore 로드된 데이터 앞에 표시할 placeholder의 수 itemsAfter 로드된 데이터 뒤에 표시할 placeholder의 수 - LoadResult.Error → 오류 발생
- LoadResult.Invalid → PagingSource가 더 이상 결과의 무결성을 보장할 수 없어 무효화되는 경우
- LoadResult.Page → 로드 성공
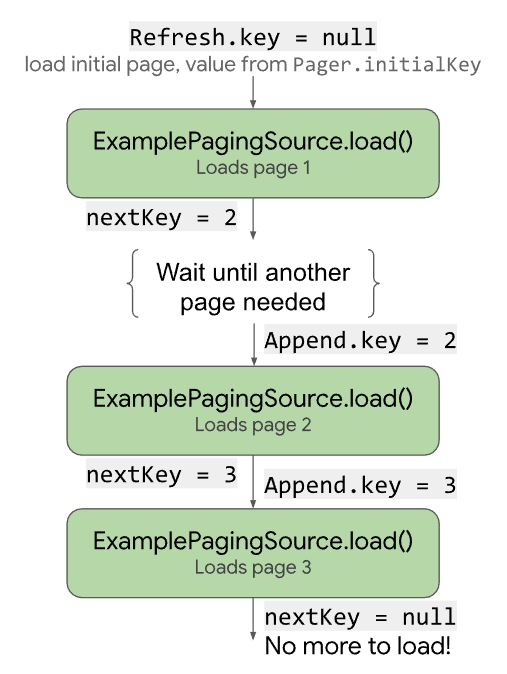
아래 그림은 load() 메서드가 각 load의 key를 수신하고 후속 load key를 제공하는 방법을 도식화한 것이다.
load() - 예제를 통한 정리
- 로드 key는
Article.id로 한다. 기사의 id값이 키로 사용될 수 있는 이유는 기사마다 ID가 1씩 증가하기 때문이다. 즉, 연속적으로 일정하게 증가하는 정수여서다. - 상응하는 방향으로 로드할 데이터가 없을 때는
nextKey나prevKey가 null이다.
prevKey의 경우 다음과 같다.
- startKey가 STARTING_KEY와 같은 경우 null이 반환된다. 이 키 앞 데이터를 더 로드할 수 없기 때문이다.
prevKey = when (start) { STARTING_KEY -> null else -> ensureValidKey(key = range.first - params.loadSize) } - 그 외의 경우에는 list의 첫 번째 데이터를 가져와 앞에
LoadParams.loadsize를 로드해 STARTING_KEY보다 작은 키가 반환되지 않도록 한다. 이를 위해 paging 키가 유효한지 확인하는ensureValidKey()메서드를 정의한다.class ArticlePagingSource : PagingSource<Int, Article>() { ... /** * paging key가 [STARTING_KEY]보다 작지 않은지 확인 */ private fun ensureValidKey(key: Int) = max(STARTING_KEY, key) }
nextKey는 다음과 같다.
- 무한 로드를 해야 하기 때문에
range.last + 1을 전달한다.val range = start.until(start + params.loadSize) nextKey = range.last + 1
여기까지 알아봤다면 이제 **load()**를 구현할 수 있다. 전체 코드로 보자.
import kotlin.math.max
...

private const val STARTING_KEY = 0
// 기사가 생성된 시간
private val firstArticleCreatedTime = LocalDateTime.now()

class ArticlePagingSource : PagingSource<Int, Article>() {
   override suspend fun load(params: LoadParams<Int>): LoadResult<Int, Article> {
        // 첫 번째 로드인 경우 STARTING_KEY
        val start = params.key ?: STARTING_KEY
        // params.loadSize가 암시하는 만큼 데이터 로드
        val range = start.until(start + params.loadSize)

        return LoadResult.Page( // 로드를 성공했을 때
            data = range.map { number ->
                Article(
                    // 연속적으로 증가사는 정수인 값이 기사의 id가 됨
                    id = number,
                    title = "Article $number",
                    description = "This describes article $number",
                    created = firstArticleCreatedTime.minusDays(number.toLong())
                )
            },

            // STARTING_KEY 뒤가 로드되지 않도록
            prevKey = when (start) {
                STARTING_KEY -> null
                else -> ensureValidKey(key = range.first - params.loadSize)
            },
            nextKey = range.last + 1
        )
    }

    ...
}
**getRefreshKey() - 개념**
PagingState 객체를 매개변수로 취급하고, 데이터가 첫 로드된 후 새로고침되거나 무효화되었을 때 키를 반환해 load()로 전달한다. Paging 라이브러리가 UI를 새로고침해야 할 때 호출된다는 말이다. 사용자가 새로고침 후 목록에서 현재 위치를 잃지 않도록 새 PagingSource가 로드를 시작 해야 하는 키를 제공해야하기 때문이다.
💡 PagingSource의 기본 데이터가 변경되었으며 UI에서 업데이트 해야 하는 상황을 무효화라고 한다. 무효화되면 paging 라이브러리가 데이터를 새로고침할 때 새 PagingSource를 만들고 새 PagingData를 내보내 UI에 알린다.
paging 라이브러리에서 무효화가 발생하는 이유는 두 가지가 있다.
PagingAdapter에서refresh()를 호출PagingSource에서invalidate()를 호출
반환된 key는 LoadParams 인수를 통해 새 PagingSource의 다음 load() 메서드에 전달된다. 무효화 후 데이터가 이동하지 않도록 하려면 반환된 key가 화면을 채울 만큼 충분한 데이터를 로드해야 한다. 이러면 새 데이터 집합에 무효화된 데이터가 포함될 가능성이 커지므로 현재 스크롤 위치를 유지할 수 있다.
**getRefreshKey() - 예제를 통한 정리**
PagingState.anchorPosition을 활용해 getRefreshKey()를 구현해 보자. 다음 상황을 가정하자.
- UI가
PagingData에서 특정 색인으로 데이터를 읽은 경우 이 데이터가 UI에 표시된다. - 하지만 데이터가 없으면 paging 라이브러리는 실패한 읽기 요청을 처리하기 위해 데이터를 가져와야 하고,
- 이때 데이터를 성공적으로 가져온 마지막 색인이
anchorPosition이다. - 새로고침할 때는
anchorPosition에 가장 가까운 Article의 key를 가져와 로드 key로 사용한다.
위와 같이 하면 새 PagingSource에서 로드를 다시 시작할 때 가져온 데이터 집합에 이미 로드된 데이터가 포함되기 때문에 원활하고 일관된 사용자 환경을 보장한다.
이제 코드로 옮겨보자!
override fun getRefreshKey(state: PagingState<Int, Article>): Int? {
        // anchorPosition과 가장 가까운 데이터를 가져오자
        // 그 다음 id - (state.config.pageSize / 2)를 버퍼로 반환한다
        val anchorPosition = state.anchorPosition ?: return null
        val article = state.closestItemToPosition(anchorPosition) ?: return null
        return ensureValidKey(key = article.id - (state.config.pageSize / 2))
    }
PagingSource 정의 전체 코드
// ArticlePagingSource.kt

import androidx.paging.PagingSource
import androidx.paging.PagingState
import java.time.LocalDateTime
import kotlin.math.max

private const val STARTING_KEY = 0
private val firstArticleCreatedTime = LocalDateTime.now()

class ArticlePagingSource : PagingSource<Int, Article>() {
    override suspend fun load(params: LoadParams<Int>): LoadResult<Int, Article> {
        // 첫 번째 로드인 경우 STARTING_KEY
        val start = params.key ?: STARTING_KEY
        // params.loadSize가 암시하는 만큼 항목 로드
        val range = start.until(start + params.loadSize)

        return LoadResult.Page( // 로드를 성공했을 때
                data = range.map { number ->
                    Article(
                            // 연속적으로 증가사는 정수인 값이 기사의 id가 됨
                            id = number,
                            title = "Article $number",
                            description = "This describes article $number",
                            created = firstArticleCreatedTime.minusDays(number.toLong())
                    )
                },

                // STARTING_KEY 뒤가 로드되지 않도록
                prevKey = when (start) {
                    STARTING_KEY -> null
                    else -> ensureValidKey(key = range.first - params.loadSize)
                },
                nextKey = range.last + 1
        )
    }

    override fun getRefreshKey(state: PagingState<Int, Article>): Int? {
        // anchorPosition과 가장 가까운 데이터를 가져오자
        // 그 다음 id - (state.config.pageSize / 2)를 버퍼로 반환한다
        val anchorPosition = state.anchorPosition ?: return null
        val article = state.closestItemToPosition(anchorPosition) ?: return null
        return ensureValidKey(key = article.id - (state.config.pageSize / 2))
    }

    private fun ensureValidKey(key: Int) = max(STARTING_KEY, key)
}
3. PagingData 생성
이제는 PagingSource에서 paging된 데이터의 스트림이 필요하다. 일반적으로 ViewModel에서 데이터 스트림을 설정하는데, paging 라이브러리를 사용하면 ViewModel의 Flow<PagingData<Article>>를 대신 노출할 수 있다.
💡 ViewModel은 UI를 노출하기 위해 stateIn 연산자를 사용한다. 이것은 항상 사용할 수 있는 데이터 상태를 유지해준다. statIn 연산자는 이 블로그 글로 공부해보자.
PagingData가 무슨 역할을 하는지 정리해보자.
- 로드된 데이터를 래핑
- 추가 데이터를 가져올 시기를 결정
- 동일 페이지를 두 번 요청하지 않도록 함
그리고 PagingData를 구성하기 위한 빌드 메서드는 다음과 같이 여러 개가 있다.
- Kotlin
Flow-Pager.flow LiveData-Pager.liveData- RxJava
Flowable-Pager.flowable - RxJava
Observable-Pager.observable
하지만 매개변수는 다음 두 가지로 어떤 빌드 메서드를 사용하든 동일하다.
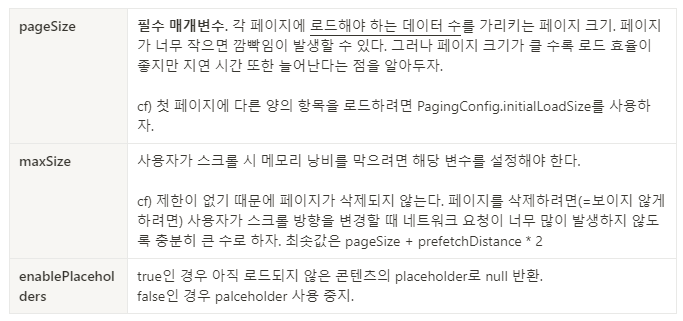
PagingConfig→ 로드 대기 시간, 초기 로드의 크기 요청 등PagingSource에서 콘텐츠를 로드하는 방법에 관한 옵션을 설정하는 클래스.
- PagingSource를 만드는 방법을 정의
이제 Flow를 사용해 ViewModel에 로드된 데이터를 노출시켜보도록 하자.
// ArticleRepository.kt

import androidx.paging.PagingSource

class ArticleRepository {
    fun articlePagingSource() = ArticlePagingSource()
}
// ArticleViewModel.kt
// 페이지 크기를 나타내는 상수
private const val ITEMS_PER_PAGE = 50
class ArticleViewModel(
repository: ArticleRepository,
) : ViewModel() {
val items: Flow<PagingData<Article>> = Pager(
config = PagingConfig(pageSize = ITEMS_PER_PAGE, enablePlaceholders = false),
// ArticlePagingSource의 인스턴스 제공
pagingSourceFactory = { repository.articlePagingSource() }
)
.flow
// 변경사항이 있어도 paging 상태 유지를 위해 androidx.lifecycle.viewModelScope 전달
.cachedIn(viewModelScope)
}💡 pagingSourceFactory는 PagingSource 인스턴스를 재사용할 수 없다. 그래서 호출되는 경우 완전히 새로운 PagingSource를 반환한다.
💡 PagingData Flow와 stateIn()이나 sharedIn()을 함께 사용하면 안 된다. PagingData Flow는 cold 상태가 아니기 때문이다. 블로그를 통해 hot Flow와 cold Flow를 알아보자.
💡 Flow에서 map이나 filter 같은 작업을 실행하면, 작업을 실행한 후 cachedIn을 호출해 작업을 다시 트리거할 필요가 없도록 해야 한다. 터미널 연산자로 cachedIn을 사용하자.
PagingData를 사용할 때 유의사항이 하나 더 있다. RecyclerView에 표시할 데이터를 변경할 수 있는 업데이트 스트림이 포함된 독립된 유형이라는 점을 잊지 말자. 각 PagingData는 완전히 독립적이고, PagingSource가 기본 데이터 세트 변경으로 인해 무효화되는 경우 단일 쿼리에 여러 PagingData 인스턴스를 내보낼 수 있다.
그렇기 때문에 PagingData의 Flow는 독립적으로 노출되어야 한다! shareIn, stateIn 연산자를 쓰거나 다른 Flow와 함께 사용 or 결합하지 말자~!
4. PagingData를 사용하도록 RecyclerView Adapter 설정
기존 RecyclerView Adapter와 동일하지만 PagingDataAdapter를 확장해 구현한다.
import androidx.paging.PagingDataAdapter
...

class ArticleAdapter : PagingDataAdapter<Article, RepoViewHolder>(ARTICLE_DIFF_CALLBACK) {
// body is unchanged
}
전체 코드는 아래와 같다.
// ArticleAdapter.kt

class ArticleAdapter : PagingDataAdapter<Article, ArticleViewHolder>(ARTICLE_DIFF_CALLBACK) {

    override fun onCreateViewHolder(parent: ViewGroup, viewType: Int): ArticleViewHolder =
        ArticleViewHolder(
            ArticleViewholderBinding.inflate(
                LayoutInflater.from(parent.context),
                parent,
                false,
            )
        )

    override fun onBindViewHolder(holder: ArticleViewHolder, position: Int) {
        val tile = getItem(position)
        if (tile != null) {
            holder.bind(tile)
        }
    }

    companion object {
        private val ARTICLE_DIFF_CALLBACK = object : DiffUtil.ItemCallback<Article>() {
            override fun areItemsTheSame(oldItem: Article, newItem: Article): Boolean =
                oldItem.id == newItem.id

            override fun areContentsTheSame(oldItem: Article, newItem: Article): Boolean =
                oldItem == newItem
        }
    }
}
5. UI에서 PagingData 사용
우선 예제 코드로 간단하게 보자.
- PagingDataAdapter 클래스의 인스턴스를 만들자.
- paging된 데이터를 표시할 RecyclerView 목록에 PagingDataAdapter 인스턴스를 전달한다.
PagingData스트림을 확인하고, 생성된 각 값을 Adapter의submitData()에 전달한다.
val viewModel by viewModels<ExampleViewModel>()

val pagingAdapter = UserAdapter(UserComparator)
val recyclerView = findViewById<RecyclerView>(R.id.recycler_view)
recyclerView.adapter = pagingAdapter

// Activities can use lifecycleScope directly, but Fragments should instead use
// viewLifecycleOwner.lifecycleScope.
lifecycleScope.launch {
  viewModel.flow.collectLatest { pagingData ->
    pagingAdapter.submitData(pagingData)
  }
}
전체 코드는 아래와 같다.
// ArticleActivity.kt

import android.os.Bundle
import androidx.activity.viewModels
import androidx.appcompat.app.AppCompatActivity
import androidx.lifecycle.Lifecycle
import androidx.lifecycle.lifecycleScope
import androidx.lifecycle.repeatOnLifecycle
import androidx.recyclerview.widget.DividerItemDecoration
import androidx.recyclerview.widget.LinearLayoutManager
import com.example.android.codelabs.paging.Injection
import com.example.android.codelabs.paging.databinding.ActivityArticlesBinding
import kotlinx.coroutines.flow.collectLatest
import kotlinx.coroutines.launch

class ArticleActivity : AppCompatActivity() {

    override fun onCreate(savedInstanceState: Bundle?) {
        super.onCreate(savedInstanceState)
        val binding = ActivityArticlesBinding.inflate(layoutInflater)
        val view = binding.root
        setContentView(view)

        // Get the view model
        val viewModel by viewModels<ArticleViewModel>(
            factoryProducer = { Injection.provideViewModelFactory(owner = this) }
        )

        val items = viewModel.items
        val articleAdapter = ArticleAdapter()

        binding.bindAdapter(articleAdapter = articleAdapter)

        // Collect from the Article Flow in the ViewModel, and submit it to the
        // PagingDataAdapter.
        lifecycleScope.launch {
            // We repeat on the STARTED lifecycle because an Activity may be PAUSED
            // but still visible on the screen, for example in a multi window app
            repeatOnLifecycle(Lifecycle.State.STARTED) {
                items.collectLatest {
                    articleAdapter.submitData(it)
                }
            }
        }
    }
}

private fun ActivityArticlesBinding.bindAdapter(articleAdapter: ArticleAdapter) {
    list.adapter = articleAdapter
    list.layoutManager = LinearLayoutManager(list.context)
    val decoration = DividerItemDecoration(list.context, DividerItemDecoration.VERTICAL)
    list.addItemDecoration(decoration)
}
여기까지 진행했다면
6. UI에 로드 상태 표시 (로드 상태에 액세스하기)
paging 라이브러리로 UI에 표시할 데이터를 더 많이 가져올 때는, 사용자에게 이 행위 중이라고 표시하는 것이 좋다. 그래서 CombinedLoadStates으로 로드 상태에 액세스하는 방법을 알아보자.
CombinedLoadStates 인스턴스
paging 라이브러리에 있는 모든 컴포넌트의 로드 상태를 설명한다. 위에서 차근차근 예제에서는 ArticlePagingSource의 LoadState에만 관심이 있기 때문에 CombinedLoadStates.source의 LoadStates를 사용하자.
💡 CombinedLoadStates, LoadStates, LoadState 이 세 가지 고유 클래스는 로드 상태를 설명한다. CombinedLoadStates에 LoadStates 인스턴스가 있고, LoadStates는 LoadState 인스턴스를 제공한다.
LoadStatesLoadStates.append 사용자의 현재 위치 후에 가져오는 데이터의 LoadState LoadStates.prepend 사용자의 현재 위치 전에 가져오는 데이터의 LoadState LoadStates.refresh 초기 로드의 LoadState LoadStateLoadState.Loading 데이터 로드 중 LoadState.NotLoading 로드하고 있지 않음 LoadState.Error 오류 발생
일단은 LoadState가 데이터를 로드 중인지 아닌지만 집중하자. 그리고 이걸 이용해서 UI의 상단과 하단에 진행 표시줄을 추가해 양방향으로 데이터를 가져오는 중인지 사용자에게 알려보자!
-
RecyclerView가 있는 xml에
LinearProgressIndicator로 막대 두 개 상하에 추가<androidx.constraintlayout.widget.ConstraintLayout xmlns:android="http://schemas.android.com/apk/res/android" xmlns:app="http://schemas.android.com/apk/res-auto" xmlns:tools="http://schemas.android.com/tools" android:layout_width="match_parent" android:layout_height="match_parent" tools:context=".ui.ArticleActivity"> <androidx.recyclerview.widget.RecyclerView android:id="@+id/list" android:layout_width="0dp" android:layout_height="0dp" android:scrollbars="vertical" app:layout_constraintBottom_toBottomOf="parent" app:layout_constraintEnd_toEndOf="parent" app:layout_constraintStart_toStartOf="parent" app:layout_constraintTop_toTopOf="parent" /> <com.google.android.material.progressindicator.LinearProgressIndicator android:id="@+id/prepend_progress" android:layout_width="0dp" android:layout_height="wrap_content" android:indeterminate="true" app:layout_constraintEnd_toEndOf="parent" app:layout_constraintStart_toStartOf="parent" app:layout_constraintTop_toTopOf="parent" /> <com.google.android.material.progressindicator.LinearProgressIndicator android:id="@+id/append_progress" android:layout_width="0dp" android:layout_height="wrap_content" android:indeterminate="true" app:layout_constraintBottom_toBottomOf="parent" app:layout_constraintEnd_toEndOf="parent" app:layout_constraintStart_toStartOf="parent" /> </androidx.constraintlayout.widget.ConstraintLayout> -
PagingDataAdapter에서 LoadStatesFlow를 수집해 CombinedLoadState에 반응하도록 하자.
// ArticleActivity.kt override fun onCreate(savedInstanceState: Bundle?) { super.onCreate(savedInstanceState) ... lifecycleScope.launch { repeatOnLifecycle(Lifecycle.State.STARTED) { articleAdapter.loadStateFlow.collect { binding.prependProgress.isVisible = it.source.prepend is LoadState.Loading binding.appendProgress.isVisible = it.source.append is LoadState.Loading } } } ... } -
ArticlePagingSource에서 지연시간을 주자.
// ArticlePagingSource.kt

private const val LOAD_DELAY_MILLIS = 3_000L

class ArticlePagingSource : PagingSource<Int, Article>() {

    override suspend fun load(params: LoadParams<Int>): LoadResult<Int, Article> {
        val start = params.key ?: STARTING_KEY
        val range = startKey.until(startKey + params.loadSize)

        if (start != STARTING_KEY) delay(LOAD_DELAY_MILLIS)
        return ...

}
참고자료
http://developer.android.com/codelabs/android-paging-basics
https://developer.android.com/topic/libraries/architecture/paging/v3-overview