ConstraintLayout 호출하기
ConstraintLayout(Modifier.size(width = 200.dp, height = 300.dp)
						 .background(Color.Green)) {
	//자식
}
참조 만들기
- 제약이 존재하지 않으면 ConstraintLayout의 컴포저블 자식은 영역의 왼쪽 위 모서리에 배치된다.
- 다음은 참조를 생성하는 방법이다.
val text1 = createRef()- 또는 createRefs()를 호출해 한 번에 여러 참조를 생성할 수도 있다.
val (button, text1, text2) = createRefs()참조를 컴포저블에 할당하기
ConstraintLayout {
	val text1 = createRef()

    Text("Hello", modifier = Modifier.constraintAs(text1) {
    	//제약들
    })
}- 참조를 만든 뒤에는 constraintAs() 모디파이어 함수를 이용해 참조를 개별 컴포저블에 적용할 수 있다.
- constraintAs() 모디파이어는 후행 람다를 가지며, 이 람다에 제약들이 추가된다.
제약 추가하기
Text("Hello", modifier = Modifier.constrainAs(text1) {
	top.linkTo(parent.top, margin = 16.dp)
    bottom.linkTo(parent.bottom, margin = 16.dp)
})- 위의 코드는 Text 컴포넌트의 위쪽 및 아래쪽 가장자리를 부모 ConstraintLayout 인스턴스의 위쪽 및 아래쪽으로 제한하며, 양쪽 모두 16dp의 여백을 적용한 것이다.
- linkTo() 함수를 이용하면 여러 제약을 파라미터로 전달할 수도 있다.
Text("Hello", modifier = Modifier.constrainAs(mytext) {
	linkTo(parent.top, parent.bottom, bias = 0.8f)
    linkTo(button1.end, button2.start)
})- 위의 코드는 Text 컴포넌트의 시작 및 마지막 가장자리가 button1, button2 컴포넌트의 제약을 받고, 위쪽 및 아래쪽 가장자리가 부모의 위쪽 및 아래쪽 가장자리에 대해 bias 0.8의 제약을 받는다.
Text("text1", modifier = Modifier.constrainAs(text1)) {
	centerVerticallyTo(text2)
	centerVerticallyTo(parent)
}- 위의 예시에서는 text1은 text2의 수직축 중앙, 부모 ConstraintLayout의 수평축 중앙에 배치된다.
Text("text1", modifier = Modifier.constrainAs(text1)) {
	centerAround(text2.end)
    centerAround(text4.top)
}- centerAround() 함수를 이용하면 한 컴포넌트를 다른 컴포넌트의 가장자리를 기준으로 수직 및 수평의 중간에 배치할 수 있다.
- 이 예시에서는 text1은 text2의 끝을 기준으로 수평 중간, text4의 위쪽 가장자리를 기준으로 수직 중간에 배치된다.
ConstraintLayout 라이브러리 추가하기
implementation("androidx.constraintlayout:constraintlayout-compose:1.0.1")- build.gradle.kts 파일에 위의 코드를 추가한다.
커스텀 버튼 컴포저블 추가
@Composable
fun MyButton(text: String, modifier: Modifier = Modifier) {
    Button(
        onClick = {},
        modifier = modifier
    ) {
        Text(text)
    }
}
기본 제약
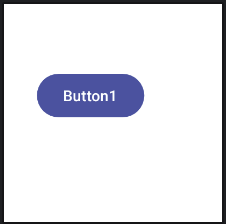
        MyButton(text = "Button1", Modifier.constrainAs(button1) {
            top.linkTo(parent.top, margin = 60.dp)
            start.linkTo(parent.start, margin = 30.dp)
        })
반대 제약
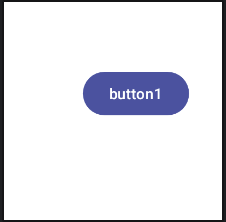
        MyButton(text = "Button1", Modifier.constrainAs(button1) {
            top.linkTo(parent.top, margin = 60.dp)
            start.linkTo(parent.start)
            end.linkTo(parent.end)
        })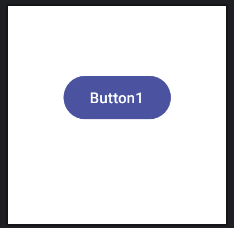
- 반대 제약을 통해 수평으로 중앙 정렬하는 효과를 내었다.
- 반대 제약은 다음과 같이 linkTo() 함수에 제약을 파라미터로 전달해 좀 더 세밀하게 선언할 수 있다.
        MyButton(text = "Button1", Modifier.constrainAs(button1) {
            top.linkTo(parent.top, margin = 60.dp)
            linkTo(parent.start, parent.end)
})- 지금까지는 컴포저블과 부모 사이의 연결과 관련된 것들이다. 다음과 같이 컴포넌트들 사이에도 제약을 적용할 수 있다.
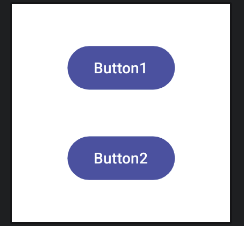
        MyButton(text = "Button1", Modifier.constrainAs(button1) {
            centerHorizontallyTo(parent)
            top.linkTo(parent.top)
            bottom.linkTo(button2.top)
        })

        MyButton(text = "Button2", Modifier.constrainAs(button2) {
            centerHorizontallyTo(parent)
            top.linkTo(button1.bottom)
            bottom.linkTo(parent.bottom)
        })
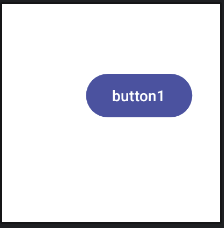
제약 편향
        MyButton(text = "button1", Modifier.constrainAs(button1) {
            top.linkTo(parent.top, margin = 60.dp)
            linkTo(parent.start, parent.end, bias = 0.75f)
        })
제약 마진
- ConstraintLayout 마진은 제약 커넥션 끝에 나타나며, 편향을 조정하거나 사용자 인터페이스의 다른 곳에서 레이아웃을 변경하더라도 버튼을 이동할 수 없는 고정된 간격을 의미한다. 다음 코드에서 오른쪽 제약이 30dp의 마진을 포함하고 있기 때문에, 이 컴포넌트는 편향을 100%로 설정하더라고 그 이상 움직이지 않는다.
        MyButton(text = "button1", Modifier.constrainAs(button1) {
            top.linkTo(parent.top, margin = 60.dp)
            linkTo(parent.start, parent.end, endMargin = 30.dp, bias = 1.0f)
        })
- 이 마진은 부모의 폭이 줄어들거나 button1이 제약된 왼쪽 컴포넌트의 크기가 커지더라도 보존된다.
반대 제약과 편향의 중요성
- 편향은 ConstraintLayout을 이용해 반응형 레이아웃을 디자인하는 기반이다. 반대 제약 커넥션 없이 컴포저블에 제약을 적용하면, 이들은 근본적으로 마진 제약이 된다.
- 마진 제약으로 디자인했을 때 문제점은 기기를 가로 방향으로 회전시키거나 디자인 프로세스를 이용했던 화면보다 크기가 작은 화면을 가진 기기에서 앱을 실행할 때 컴포넌트가 화면 바깥으로 밀리게 되어 보이지 않을 수 있다는 것이다.
- 수직 및 수평 편향 설정은 컴포넌트가 항상 설정된 위치에 표시되도록 할 수 있다. 예를 들어 항상 아래쪽 가장자리에서 90% 거리, 왼쪽 가장자리에서 35% 거리에 배치되도록 설정할 수 있다.
체인 만들기
    ConstraintLayout(Modifier.size(width = 400.dp, height = 200.dp)) {
        val (button1, button2, button3) = createRefs()

        createHorizontalChain(button1, button2, button3)

        MyButton(text = "button1", Modifier.constrainAs(button1) {
            centerVerticallyTo(parent)
        })

        MyButton(text = "button2", Modifier.constrainAs(button2) {
            centerVerticallyTo(parent)
        })

        MyButton(text = "button3", Modifier.constrainAs(button3) {
            centerVerticallyTo(parent)
        })
}- 위의 코드는 3개의 버튼 사이에 수평 체인을 만드는 코드이다.
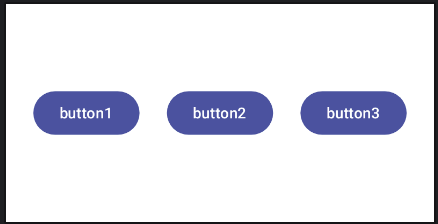
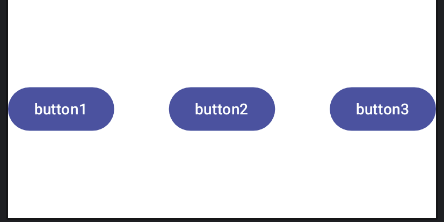
- createHorizontalChain() 함수 호출을 수정해서 기본 스타일(spread)을 SpreadInside 스타일로 바꿔본다.
    ConstraintLayout(Modifier.size(width = 400.dp, height = 200.dp)) {
        val (button1, button2, button3) = createRefs()

        createHorizontalChain(button1, button2, button3,
            chainStyle = ChainStyle.SpreadInside)

        MyButton(text = "button1", Modifier.constrainAs(button1) {
            centerVerticallyTo(parent)
        })

        MyButton(text = "button2", Modifier.constrainAs(button2) {
            centerVerticallyTo(parent)
        })

        MyButton(text = "button3", Modifier.constrainAs(button3) {
            centerVerticallyTo(parent)
        })
    }
가이드라인 이용하기
- 다음은 부모의 시작 가장자리와 평행하며 부모의 콘텐츠 영역 시작 지점으로부터 25% 거리에 위치한 가이드라인을 만드는 코드 예시다.
createGuidelineFromStart(fraction = .25f)- 다음은 부모의 아래쪽 가장자리에서 60dp 거리에 위치한 수평 가이드라인을 만드는 코드 예시다.
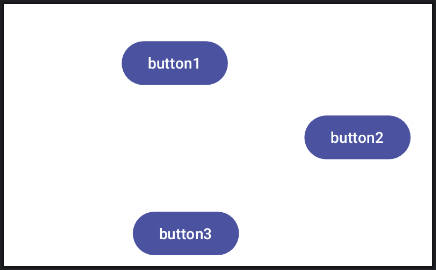
createGuidelineFromBottom(offset = 60.dp)- 다음은 3개의 버튼을 제약하는 하나의 수직 가이드라인을 만드는 코드이다.
    ConstraintLayout(Modifier.size(width = 400.dp, height = 240.dp)) {
        val (button1, button2, button3) = createRefs()

        val guide = createGuidelineFromStart(fraction = .60f)

        MyButton(text = "button1", Modifier.constrainAs(button1) {
            top.linkTo(parent.top, margin = 30.dp)
            end.linkTo(guide, margin = 30.dp)
        })

        MyButton(text = "button2", Modifier.constrainAs(button2) {
            top.linkTo(button1.bottom, margin = 20.dp)
            start.linkTo(guide, margin = 40.dp)
        })

        MyButton(text = "button3", Modifier.constrainAs(button3) {
            top.linkTo(button2.bottom, margin = 40.dp)
            end.linkTo(guide, margin = 20.dp)
        })
    }
배리어 이용하기
- ConstraintLayout 배리어는 하나 이상의 컴포넌트 가장자리를 기준으로 만들어지며, 다음 함수를 이용한다.
- createStartBarrier()
- createEndBarrier()
- createTopBarrier()
- createBottomBarrier()
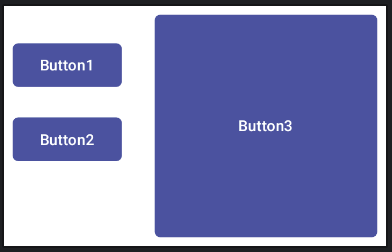
@Composable
fun MainScreen() {
    ConstraintLayout(Modifier.size(width = 350.dp, height = 220.dp)) {
        val (button1, button2, button3) = createRefs()

        MyButton("Button1", Modifier.width(100.dp).constrainAs(button1) {
            top.linkTo(parent.top, margin = 30.dp)
            start.linkTo(parent.start, margin = 8.dp)
        })

        MyButton(text = "Button2", Modifier.width(100.dp).constrainAs(button2) {
            start.linkTo(parent.start, margin = 8.dp)
            top.linkTo(button1.bottom, margin = 20.dp)
        })

        MyButton(text = "Button3", Modifier.constrainAs(button3) {
            linkTo(parent.top, parent.bottom,
                topMargin = 8.dp, bottomMargin = 8.dp)
            linkTo(button1.end, parent.end,
                startMargin = 30.dp, endMargin = 8.dp)
            width = Dimension.fillToConstraints
            height = Dimension.fillToConstraints
        })
    }
}
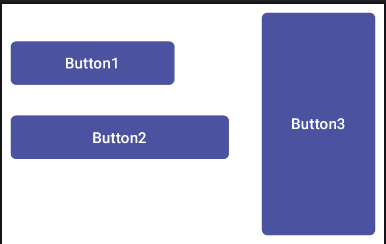
- 이때 button1의 폭을 늘려보자.
        MyButton("Button1", Modifier.width(150.dp).constrainAs(button1) {
            top.linkTo(parent.top, margin = 30.dp)
            start.linkTo(parent.start, margin = 8.dp)
        })
- 다음으로 button2의 폭을 button1보다 크게 늘려본다.
        MyButton(text = "Button2", Modifier.width(200.dp).constrainAs(button2) {
            start.linkTo(parent.start, margin = 8.dp)
            top.linkTo(button1.bottom, margin = 20.dp)
        })
- button3는 button1의 변화에 의한 제약은 받지만, button2의 변화에 의한 영향은 받지 않는다.
- 이 문제를 해결하기 위해 button1, button2의 끝 가장자리에 배리어를 만들어야 한다.
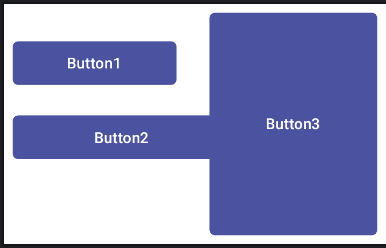
    ConstraintLayout(Modifier.size(width = 350.dp, height = 220.dp)) {
        val (button1, button2, button3) = createRefs()

        val barrier = createEndBarrier(button1, button2)

        MyButton("Button1", Modifier.width(150.dp).constrainAs(button1) {
            top.linkTo(parent.top, margin = 30.dp)
            start.linkTo(parent.start, margin = 8.dp)
        })

        MyButton(text = "Button2", Modifier.width(200.dp).constrainAs(button2) {
            start.linkTo(parent.start, margin = 8.dp)
            top.linkTo(button1.bottom, margin = 20.dp)
        })

        MyButton(text = "Button3", Modifier.constrainAs(button3) {
            linkTo(parent.top, parent.bottom,
                topMargin = 8.dp, bottomMargin = 8.dp)
            linkTo(button1.end, parent.end,
                startMargin = 30.dp, endMargin = 8.dp)
            start.linkTo(barrier, margin = 30.dp)
            width = Dimension.fillToConstraints
            height = Dimension.fillToConstraints
        })
    }
- 위와 같이 코드를 수정하면 button3의 폭은 button1, button2의 폭에 따라 변경된다.
제약 집합을 이용해 제약 연결 끊기
- 지금까지는 모든 제약을 개별 컴포저블에 적용된 모디파이어 안에서 선언했다.
- 컴포즈에서는 제약 집합의 형태로도 제약을 선언할 수 있다. 제약 집합들을 이용하면 여러 기준에 따라 다양한 제약 집합을 유연하게 제공할 수 있게 된다.
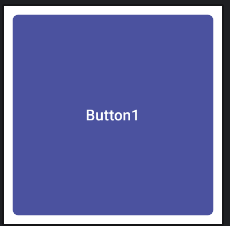
@Composable
fun MainScreen() {
    ConstraintLayout(Modifier.size(width = 200.dp, height = 200.dp)) {
        val button1 = createRef()

        MyButton(text = "Button1", Modifier.constrainAs(button1) {
            linkTo(parent.top, parent.bottom,
                topMargin = 8.dp, bottomMargin = 8.dp)
            linkTo(parent.start, parent.end,
                startMargin = 8.dp, endMargin = 8.dp)
            width = Dimension.fillToConstraints
            height = Dimension.fillToConstraints
        })
    }
}- 제약 집합의 동작을 확인하기 위해 위와 같이 코드를 작성한다.
- 이제 이 제약들을 별도의 제약 집합으로 분리해 본다. 제약 집합의 활용성을 높이기 위해 마진값은 인수로 전달할 수 있게 한다.
private fun myConstraintSet(margin: Dp): ConstraintSet {
    return ConstraintSet {
        val button1 = createRefFor("button1")

        constrain(button1) {
            linkTo(parent.start, parent.end,
                startMargin = margin, endMargin = margin)
            linkTo(parent.top, parent.bottom,
                topMargin = margin, bottomMargin = margin)
            width = Dimension.fillToConstraints
            height = Dimension.fillToConstraints
        }
    }
}- 위의 코드에서는 마진값을 받아 ConstraintSet 객체를 반환하는 새로운 함수를 선언한다.
- 다음으로 createRefFor() 함수를 호출해 이 제약 집합을 적용할 컴포저블의 참조를 만든다. 그리고 constrain() 함수를 호출해 제약 집합을 만든다. 이때 참조를 전달하고 후행 람다에서 제약을 선언한다.
    val constraints = myConstraintSet(8.dp)
    ConstraintLayout(constraints, Modifier.size(width = 200.dp, height = 200.dp)) {
        MyButton(text = "Button1", Modifier.size(200.dp).layoutId("button1"))
}- 제약 집합을 만든 뒤에는 이를 ConstraintLayout에 전달해 button1에 적용할 수 있다. 이를 통해 제약 집합의 인스턴스를 만들고, ConstraintLayout 인스턴스를 통해 전달하고, layout() 모디파이어 함수에서 전달된 제약 집합을 button1 컴포저블과 연결한다.
- 결과는 제약 집합을 사용하기 전과 동일하다.

안녕하세요.