랜덤하게 색상 만들기
필요한 것
- Random() 메소드 사용을 위해 상단에 import 'dart:math'; 추가하기
class UniqueColorGenerator {
static Random random = Random();
static Color getColor() {
return Color.fromARGB(
255, random.nextInt(255), random.nextInt(255), random.nextInt(255));
}
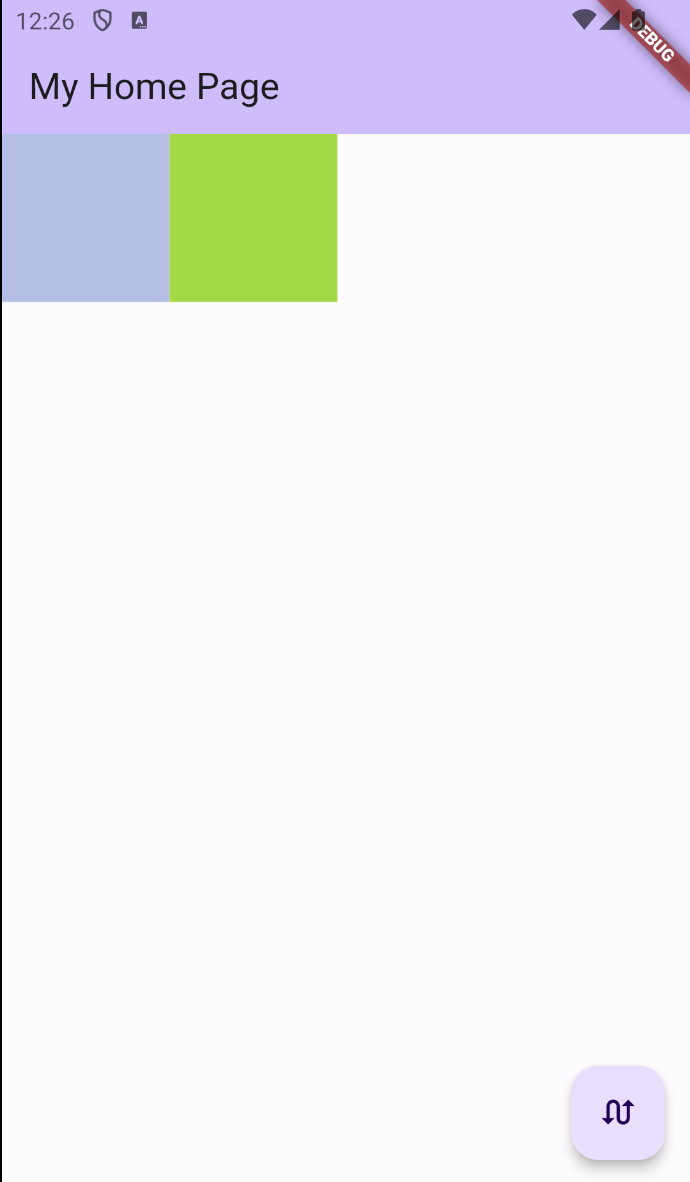
}두 Widget의 색을 랜덤하게 설정 후 Swap 해보기
기능 구현에 사용할 Widget 선언
class MyTile extends StatelessWidget {
MyTile({Key? key}) : super(key: key);
final Color myColor = UniqueColorGenerator.getColor();
Widget build(BuildContext context) {
return Container(
width: 100,
height: 100,
color: myColor,
);
}
}이 Widget을 리스트로 선언하여 body에 추가한다
class _MyHomePageState extends State<MyHomePage> {
List<Widget> myTiles = [ MyTile(), MyTile() ];
Widget build(BuildContext context) {
return Scaffold(
appBar: AppBar(
backgroundColor: Theme.of(context).colorScheme.inversePrimary,
title: Text(widget.title),
),
body: Row(
children: myTiles,
),
);
}
}두 Widget의 색상을 변경하기 위해 floating action button 추가
class _MyHomePageState extends State<MyHomePage> {
List<Widget> myTiles = [ MyTile(), MyTile() ];
Widget build(BuildContext context) {
return Scaffold(
appBar: AppBar(
backgroundColor: Theme.of(context).colorScheme.inversePrimary,
title: Text(widget.title),
),
body: Row(
children: myTiles,
),
floatingActionButton: FloatingActionButton(
child: Icon(Icons.swap_calls),
onPressed: () {
setState(() {
myTiles.insert(1, myTiles.removeAt(0));
});
},
),
);
}
}- 위의 코드에서 myTiles.insert(1, myTiles.removeAt(0));이 의미하는 것은 myTiles.removeAt(0)를 통해 인덱스 0번째의 아이템을 삭제하고 인덱스 1번 위치에 삭제한 아이템을 삽입한다는 것이다. 즉, 0번과 1번의 데이터를 교환하는 코드이다.
기능 구현에 사용한 MyTile 클래스를 StateFulWidget으로 교체해보기
- 전구를 눌러서 StatelessWidget을 StatefulWidget으로 변경.
- 변경 후에 앱을 실행시키면 두 Widget의 색상을 변경하는 것이 안됨.
- 이 경우 리스트로 선언한 각각의 Widget에 key 값을 부여하면 된다.
class _MyHomePageState extends State<MyHomePage> {
List<Widget> myTiles = [ MyTile(key: UniqueKey(),), MyTile(key: UniqueKey(),) ];
Widget build(BuildContext context) {
return Scaffold(
appBar: AppBar(
backgroundColor: Theme.of(context).colorScheme.inversePrimary,
title: Text(widget.title),
),
body: Row(
children: myTiles,
),
floatingActionButton: FloatingActionButton(
child: Icon(Icons.swap_calls),
onPressed: () {
setState(() {
myTiles.insert(1, myTiles.removeAt(0));
});
},
),
);
}
}
class MyTile extends StatefulWidget {
MyTile({Key? key}) : super(key: key);
State<MyTile> createState() => _MyTileState();
}
class _MyTileState extends State<MyTile> {
final Color myColor = UniqueColorGenerator.getColor();
Widget build(BuildContext context) {
return Container(
width: 100,
height: 100,
color: myColor,
);
}
}
리스트로 선언된 Widget을 Padding으로 감싸보기
- Padding으로 감싸게 되면 플로팅 액션 버튼을 눌렀을 때 이전과 다르게 두 위젯의 색상이 교체될 뿐만 아니라 색상 자체가 랜덤하게 변한다.
- 이를 해결하려면 MyTile()의 파라미터에 위치하는 UniqueKey()를 Padding의 파라미터로 옮기면 된다.
class _MyHomePageState extends State<MyHomePage> {
  List<Widget> myTiles = [ Padding(
  	key: UniqueKey(),
    padding: const EdgeInsets.all(8.0),
    child: MyTile(),
  ), Padding(
  	key: UniqueKey(),
    padding: const EdgeInsets.all(8.0),
    child: MyTile(),
  ) ];
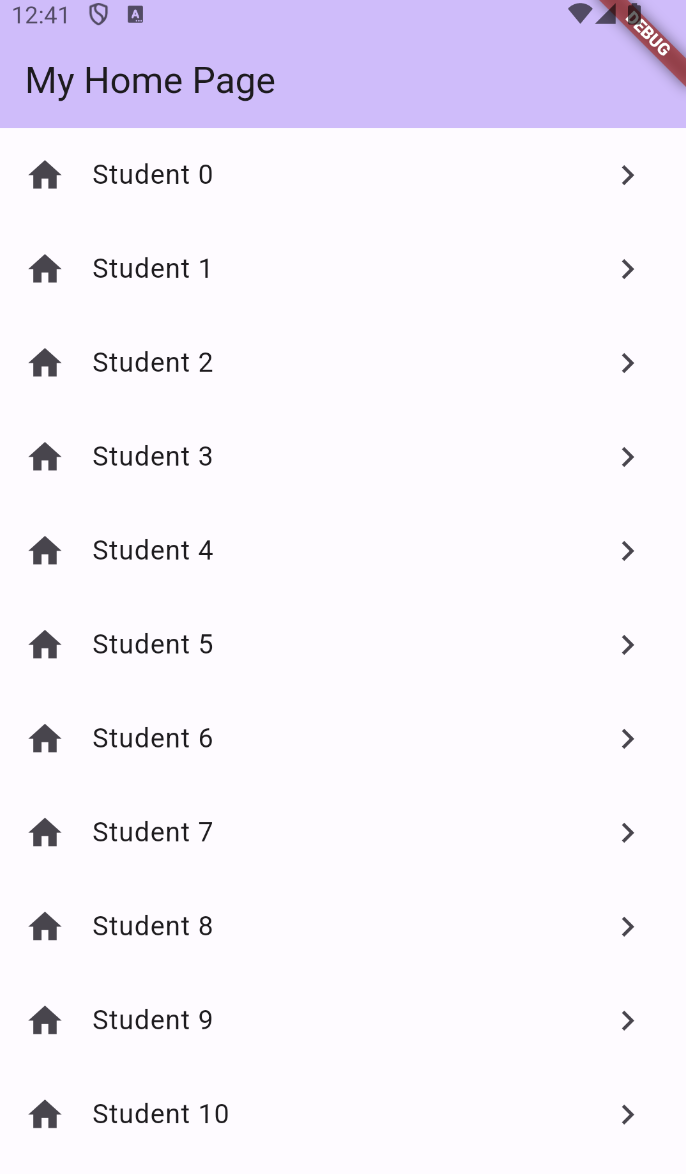
ListView.builder로 뷰를 한번에 여러개 생성하기
구현에 필요한 것
- items 변수에 List.generate로 리스트 만들기
- ListView.builder와 items 변수를 활용하여 자동으로 뷰 생성
- 구체적으로 생성할 뷰를 ListView.builder의 return에 정의하기
class _MyHomePageState extends State<MyHomePage> {
List items = List.generate(20, (i) => i);
Widget build(BuildContext context) {
return Scaffold(
appBar: AppBar(
backgroundColor: Theme.of(context).colorScheme.inversePrimary,
title: Text(widget.title),
),
body: ListView.builder(
itemCount: items.length,
itemBuilder: (c,i) {
return ListTile(
title: Text('Student ${items[i]}'),
leading: const Icon(Icons.home),
trailing: const Icon(Icons.navigate_next),
);
})
);
}
}- 위의 코드에서 c는 컨텍스트 변수
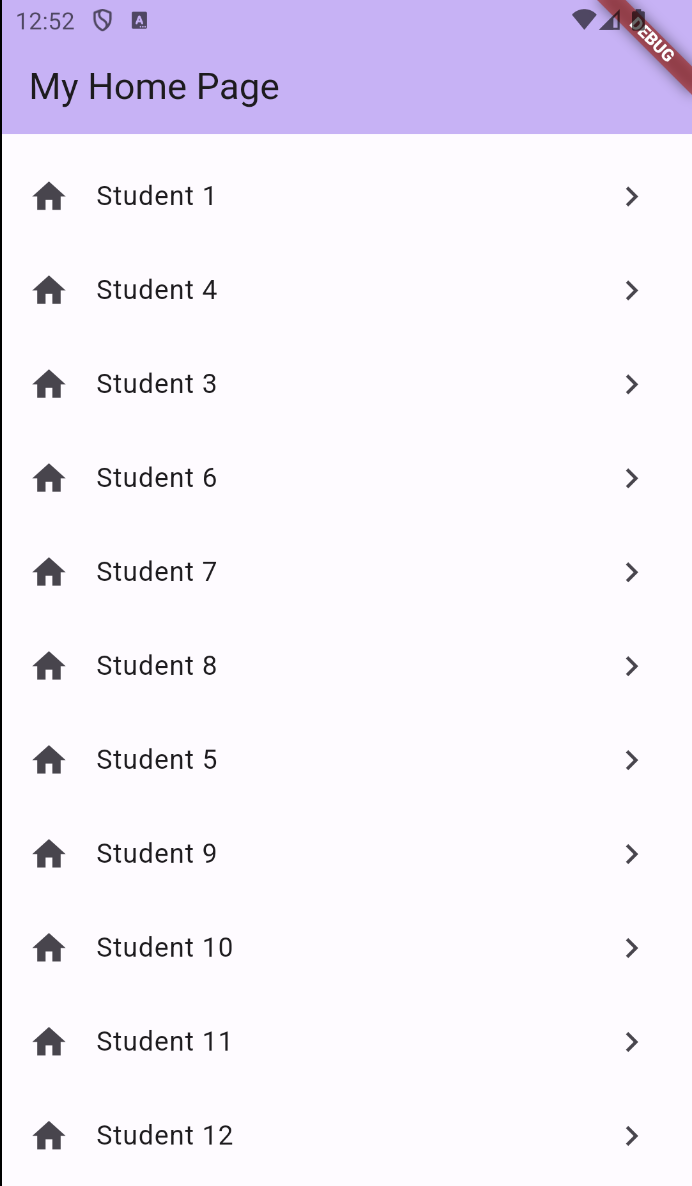
아이템의 순서 변경하기
- ListView.builder를 ReorderableListView.builder로 변경
- 변경 후에는 onReorder 메소드가 추가되어야 함
- 이때 이 상태로 앱을 실행하면 에러가 발생한다 -> 이유는 ReorderableListView에는 key 속성이 반드시 있어야 함
class _MyHomePageState extends State<MyHomePage> {
List items = List.generate(20, (i) => i);
Widget build(BuildContext context) {
return Scaffold(
appBar: AppBar(
backgroundColor: Theme.of(context).colorScheme.inversePrimary,
title: Text(widget.title),
),
body: ReorderableListView.builder(
itemCount: items.length,
itemBuilder: (c,i) {
return ListTile(
key: ValueKey(items[i]),
title: Text('Student ${items[i]}'),
leading: const Icon(Icons.home),
trailing: const Icon(Icons.navigate_next),
);
},
onReorder: (int oldIndex, int newIndex) {
setState(() {
if (oldIndex < newIndex) {
newIndex -= 1;
}
items.insert(newIndex, items.removeAt(oldIndex));
});
},
)
);
}
}
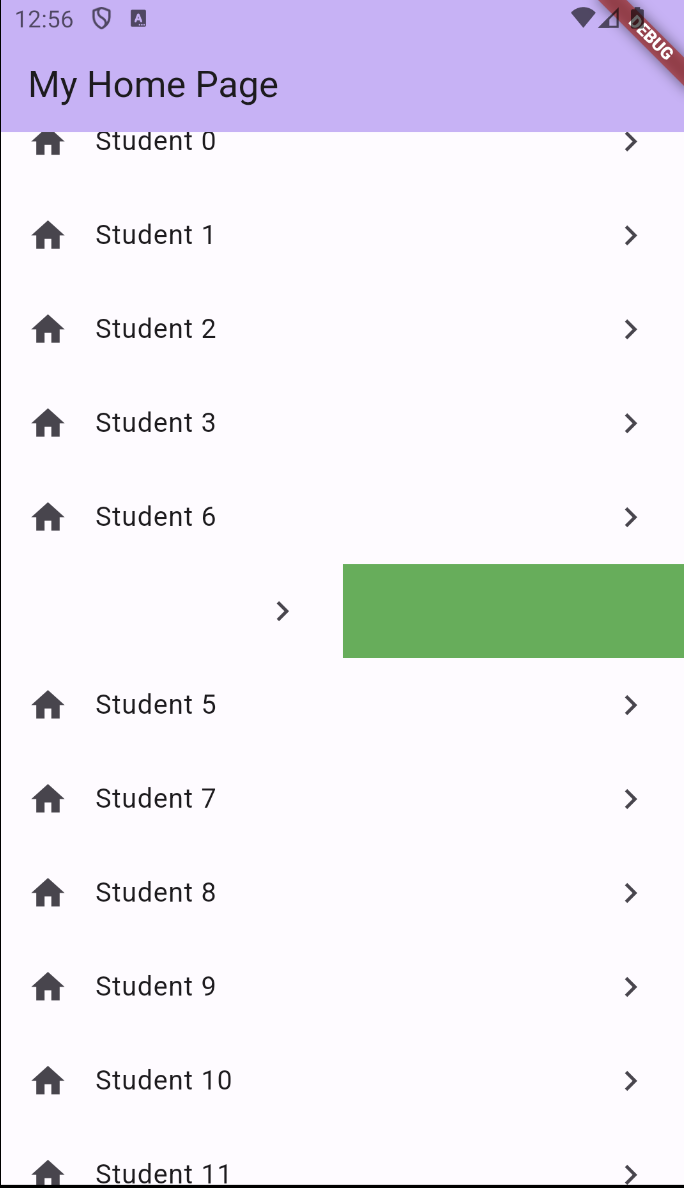
drag 삭제 구현하기
- ListTile을 Widget으로 감싸고 Widget을 Dismissible로 변경 -> ListTile 내에 있던 key를 잘라서 Dismissible 아래에 붙여넣기
- 뷰에서 삭제된 아이템을 실제 items에서도 삭제하기 위해 onDismissed 메소드 추가
- drag 진행 시 백그라운드 색상 초록색 적용
class _MyHomePageState extends State<MyHomePage> {
List items = List.generate(20, (i) => i);
Widget build(BuildContext context) {
return Scaffold(
appBar: AppBar(
backgroundColor: Theme.of(context).colorScheme.inversePrimary,
title: Text(widget.title),
),
body: ReorderableListView.builder(
itemCount: items.length,
itemBuilder: (c,i) {
return Dismissible(
background: Container(color: Colors.green),
key: ValueKey(items[i]),
child: ListTile(
title: Text('Student ${items[i]}'),
leading: const Icon(Icons.home),
trailing: const Icon(Icons.navigate_next),
),
onDismissed: (direction) {
setState(() {
items.removeAt(i);
});
},
);
},
onReorder: (int oldIndex, int newIndex) {
setState(() {
if (oldIndex < newIndex) {
newIndex -= 1;
}
items.insert(newIndex, items.removeAt(oldIndex));
});
},
)
);
}
}

안녕하세요.