
-
Private Subnet에 있는 Resource(EC2 instance)들이 인터넷(외부)에 통신할 수 있게 해주는 장치
- Private Instance의 경우 Public IP를 가지지 않기 때문
- 내부에서 외부는 통신이 가능하지만, 외부에서 내부는 불가능하다.
-
약자 정리
- SG는 Security Group이다.
- IGW : 인터넷 게이트웨이
- NAS GW : NAT 게이트웨이
(1) 3-Tier 구조 관리 대장
- VPC 생성 :
- 이름 : xx-PRD-VPC
- IPv4 CIDR : 10.17.0.0/16
- AZ : 2A
- Subnet :
- xx-PRD-VPC-NGINX-PUB-2A (10.17.0.0/24)
- xx-PRD-VPC-WAS-PRI-2A (10.17.1.0/24)
- xx-PRD-VPC-DB-PRI-2A (10.17.2.0/24)
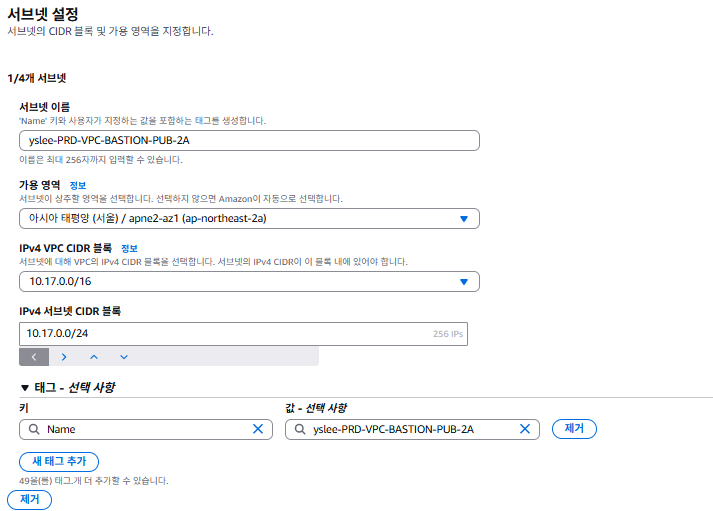
- xx-PRD-VPC-BASTION-PUB-2A (10.17.3.0/24)
- Routing table :
- xx-PRD-RT-PUB : NGINX, BASTION
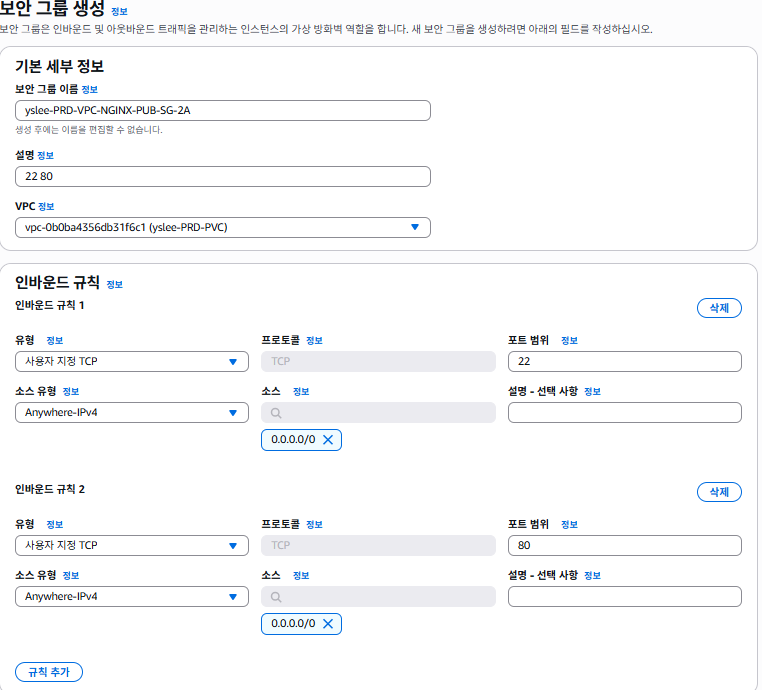
- xx-PRD-VPC-NGINX-PUB-SG-2A
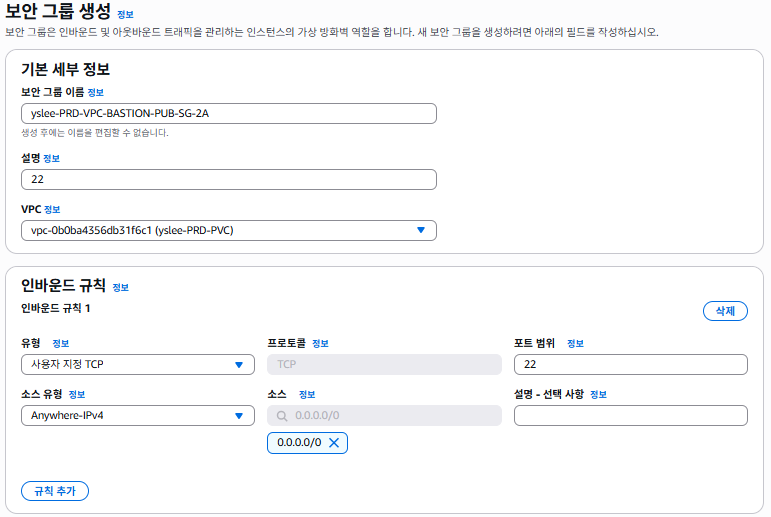
- xx-PRD-VPC-BASTION-PUB-SG-2A
- xx-PRD-RT-PRI : DB, WAS
- xx-PRD-VPC-WAS-PRI-SG-2A
- xx-PRD-VPC-DB-PRI-2A
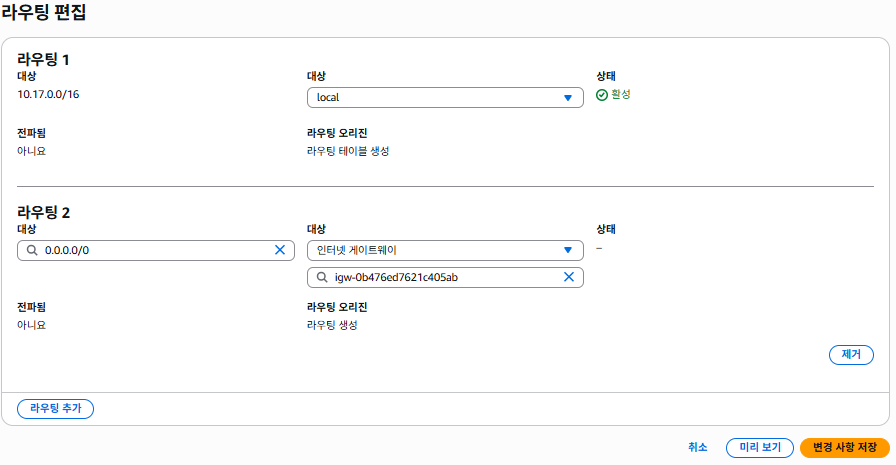
- IGW
- xx-PRD-IGW
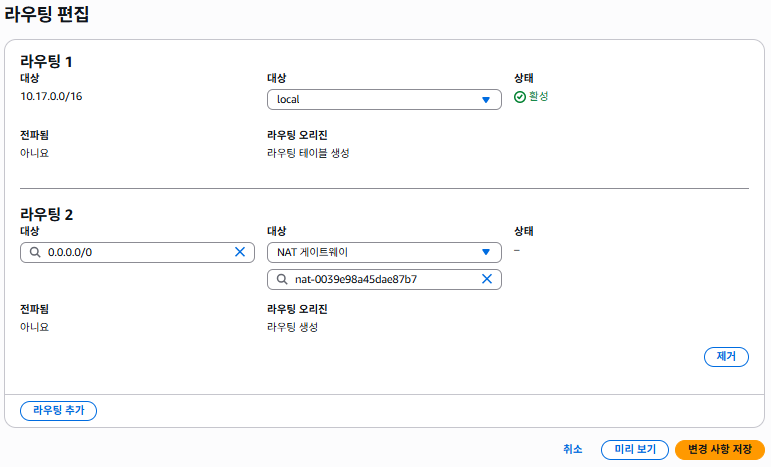
> 0.0.0.0/0 Routing 추가 (PUB)
- SG
- xx-PRD-VPC-NGINX-PUB-SG-2A = 22, 80
- xx-PRD-VPC-BASTION-PUB-SG-2A = 22
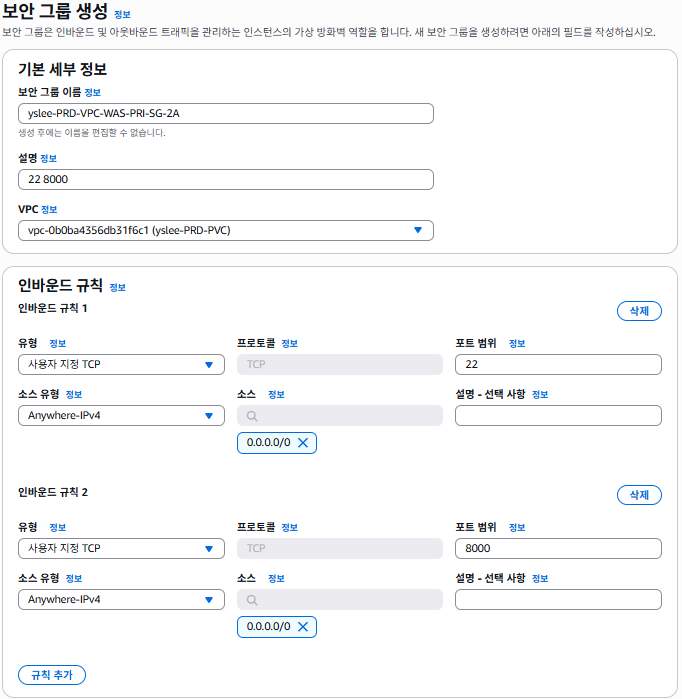
- xx-PRD-VPC-WAS-PRI-SG-2A = 22, 8000
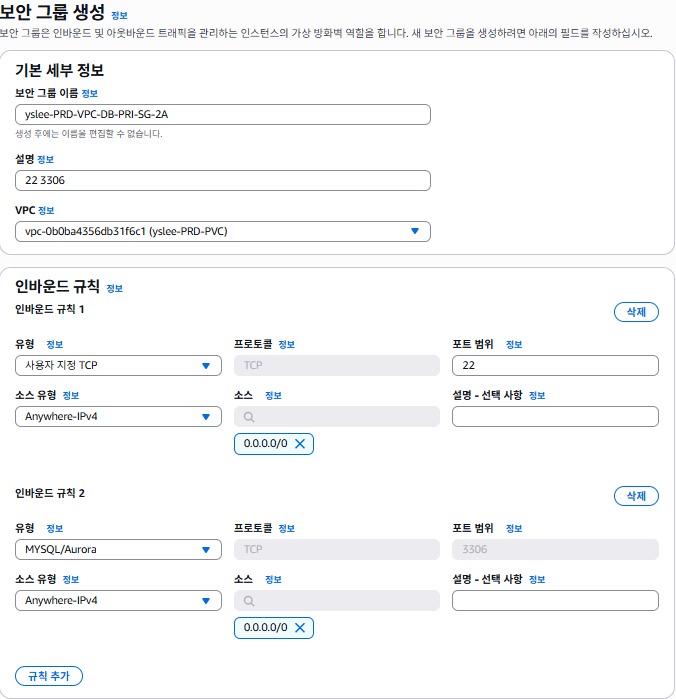
- xx-PRD-VPC-DB-PRI-2A = 22, 3306
- NAT G/W
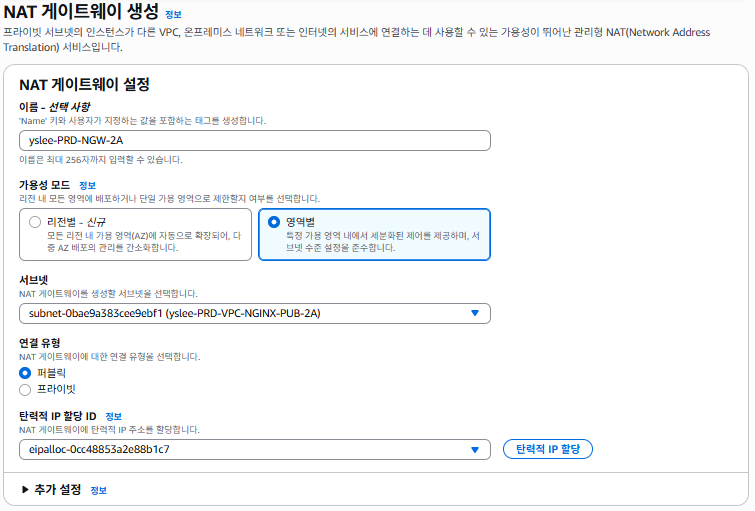
- xx-PRD-NGW-2A
- xx-PRD-VPC-NGINX-PUB-2A
- Public
- Elastic IP 할당(2) PVC 생성
- 관리대장을 보고 PVC를 생성한 후, 서브넷 4개를 만든다. (PUB 2개, PRI 2개)
(3) 라우팅 테이블
- 관리대장을 보고 라우팅 테이블 PUB/PRI를 설정한다.

(4) 인터넷 게이트웨이
- 인터넷 게이트웨이를 생성하고, VPC에 물려놓는다.

(5) 라우팅 테이블 검토 및 수정
- PRI 2개, PUB 2개 각각 물려놓고, 라우팅 편집한다.
(6) 보안 그룹(SG)
- nginx의 보안 그룹 생성, 22, 80 인바운드 규칙 생성한다.
- BASTION의 보안 그룹 생성, 22 인바운드 규칙 생성
- WAS-PRI 보안 그룹 생성, 22, 8000 인바운드 규칙 생성
- DB-PRI 보안 그룹 생성, 22, 3306 인바운드 규칙 생성
- 1개의 VPC 안에 4개의 보안 규칙이 설정되었다.

(7) NAT 게이트웨이
- yslee-PRD-NGW-2A 이름을 작성
- 퍼블릿을 선택하고, 탄력적 IP 할당 ID를 선택한다.
- PRI 부분에 NAT 게이트웨이를 라우팅 테이블에 적용한다.
(8) 인스턴스
- 4개의 인스턴스를 만든다.
yslee-PRD-VPC-BASTION-PUB-2A-00
yslee-PRD-VPC-NGINX-PUB-2A-00
yslee-PRD-VPC-WAS-PRI-2A-00
yslee-PRD-VPC-DB-PRI-2A-00
-
Ubuntu 24.04
-
t3.micro
-
yslee-01
-
퍼블릭 IP를 설정하는거 집중!
-
yslee-PRD-VPC-BASTION-PUB-2A-00 : 퍼블릭 IP 활성화
-
yslee-PRD-VPC-NGINX-PUB-2A-00 : 퍼블릭 IP 활성화
-
yslee-PRD-VPC-WAS-PRI-2A-00 : 퍼블릭 IP 비활성화
-
yslee-PRD-VPC-DB-PRI-2A-00 : 퍼블릭 IP 비활성화

BASTION
Private 10.17.0.180
Public 43.203.224.157
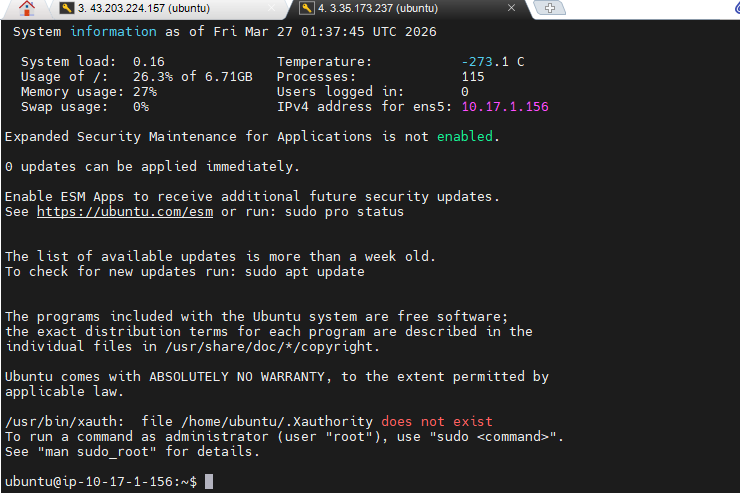
NGINX
Private 10.17.1.156
Public 3.35.173.237
WAS
Private 10.17.2.44
Public -
DB
Private 10.17.3.15
Public -- BASTION에 접속한다.(43.203.224.157)

- NGINX에 접속한다.(3.35.173.237)
- Bastion에 3-tier 예제를 다운 받는다.
sudo passwd root
apt update
apt install -y git

git clone https://github.com/Joes-s/fastapi-3tier.git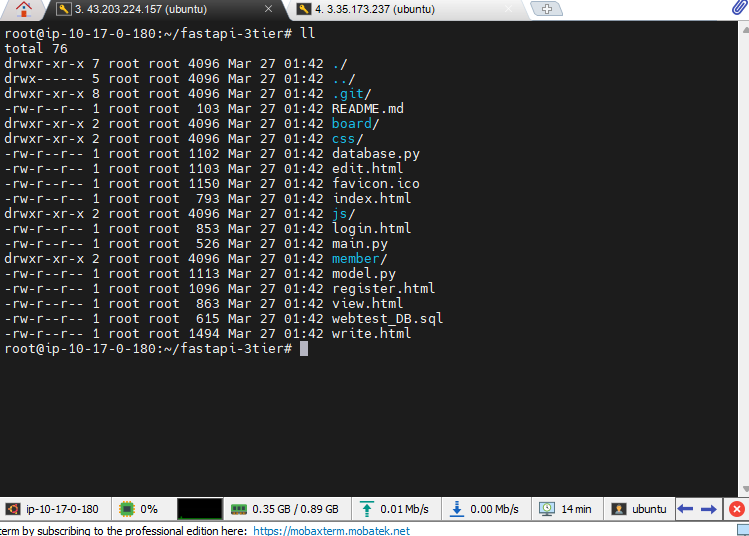
- 현재 상태는 BASTION에서 NGINX 로 ssh 접속을 시도하려고 했지만, 거부될 것이다.
- 이 상태는 pem 파일이 호스트PC(아예 밖)에 있기 때문인데 scp로 BASTION에다가 넣어준다.
scp -i yslee-01.pem yslee-01.pem ubuntu@43.203.224.157:/home/ubuntu

# 거부 당할 경우 권한
icacls.exe yslee-01.pem /grant:r %user
icacls.exe yslee-01.pem /inheritance:r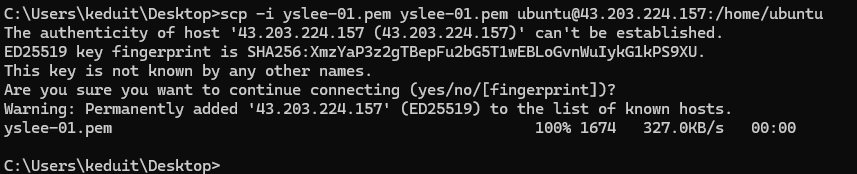
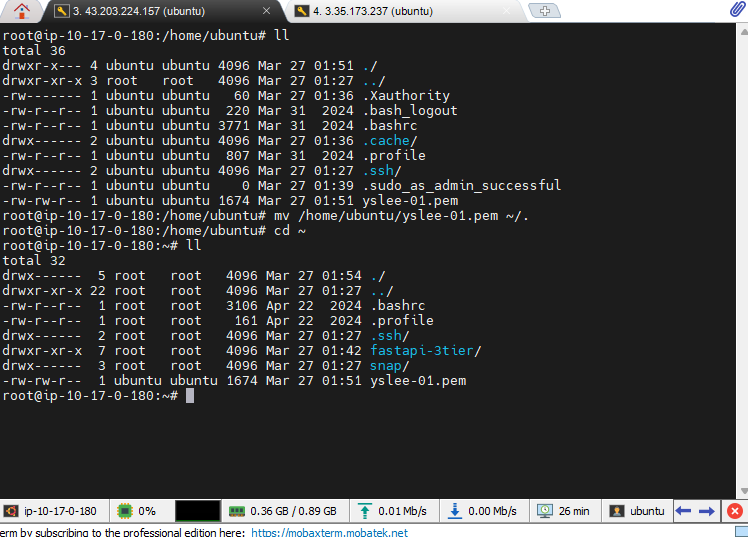
- BASTION 안으로 인증키가 잘 들어왔다. 인증키를 ~으로 옮겨주었다.
- 이제 BASTION에서 NGINX로 갈 수 있을 것이다.
- 이제 BASTION PC에서는 WAS(10.17.2.44), DB(10.17.3.15)까지 들어갈 수 있다.
# NGINX 접속
ssh -i yslee-01.pem ubuntu@10.17.1.156

# WAS 접속
ssh -i yslee-01.pem ubuntu@10.17.2.44

# DB 접속
ssh -i yslee-01.pem ubuntu@10.17.3.15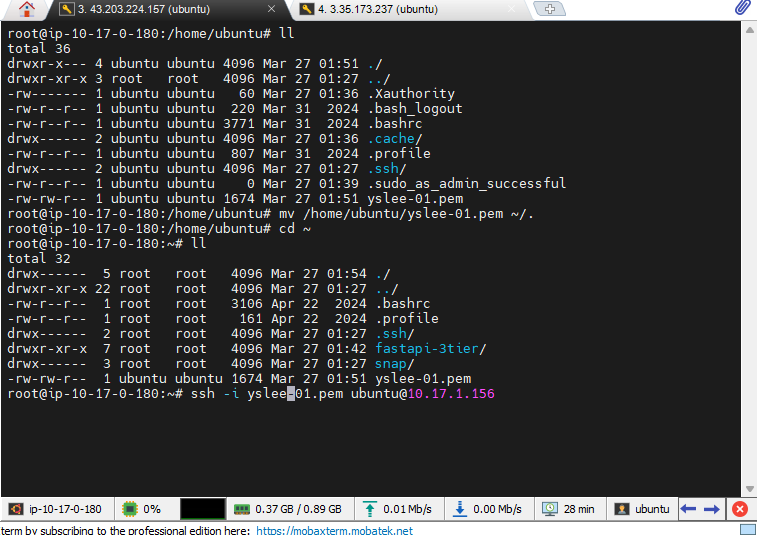
- 3Tier로 할려면 각각 파일들을 옮긴 후 각각 역할 별 작업을 해줘야한다.
# NGINX로 보내기
scp -i yslee-01.pem -r fastapi-3tier ubuntu@10.17.1.156:/home/ubuntu/

# WAS로 보내기
scp -i yslee-01.pem -r fastapi-3tier ubuntu@10.17.2.44:/home/ubuntu/

# DB로 보내기
scp -i yslee-01.pem -r fastapi-3tier ubuntu@10.17.3.15:/home/ubuntu/

# 권한 문제 발생시
chmod 400 yslee-01.pem
(9) WEB
- 가장 중요한 것 : Ubuntu 쓰면 default 파일 위치가 다르다. (Rocky랑 헷갈리지말기)
# 업데이트 하고 nginx를 설치한다.
sudo apt update
sudo apt install nginx -y

# html 파일 부분에 옮긴다.
sudo cp -r ~/fastapi-3tier/* /var/www/html/

# 권한을 부여한다.
sudo chown -R www-data:www-data /var/www/html
sudo chmod -R 755 /var/www/html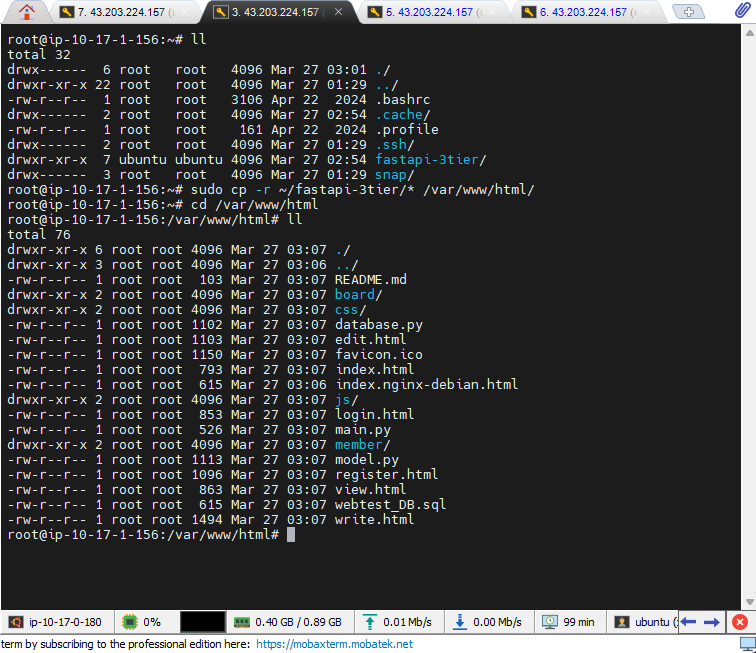
conf.dd에 컨피그 파일을 넣어줘야한다.
cd /etc/nginx/conf.d

vi default.conf

# 작성 내용
upstream was {
    server 10.17.2.44:8000;
}

server {
    listen       80;
    server_name _;

    # 정적 파일 경로 (HTML, CSS, JS, Images)
    root   /var/www/html;
    index  index.html;

    location / {
        try_files $uri $uri/ /index.html;
    }

    location /api/ {
        proxy_pass http://was;
        proxy_http_version 1.1;
        proxy_set_header Upgrade $http_upgrade;
        proxy_set_header Connection 'upgrade';
        proxy_set_header Host $host;
        proxy_set_header X-Real-IP $remote_addr;
        proxy_set_header X-Forwarded-For $proxy_add_x_forwarded_for;
        proxy_set_header X-Forwarded-Proto $scheme;
    }

    location ~* \.(py|sql|md|git|sh)$ {
        deny all;
    }

    error_page  500 502 503 504 /50x.html;
    location = /50x.html {
        root    /usr/share/nginx/html;
    }
}
- 작성한거 검사해줘야 한다.
# 오타 검사
sudo nginx -t

# Reload
sudo systemctl reload nginx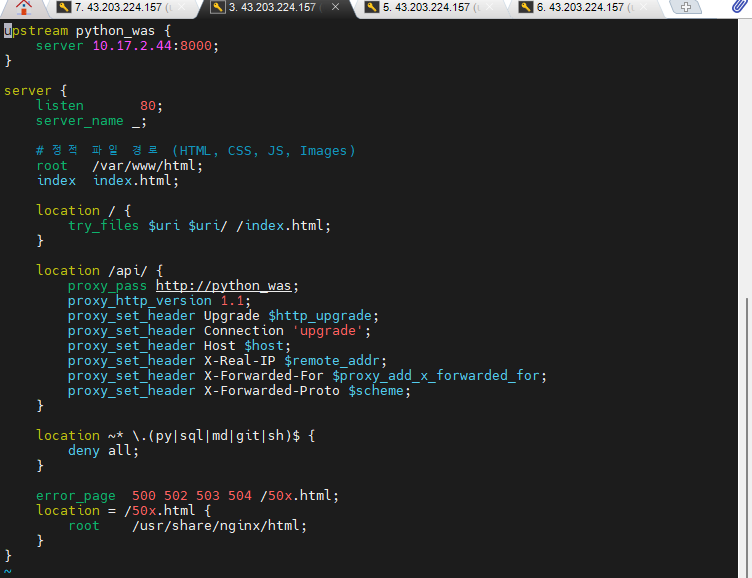
- 오타검사했는데, 80 번포토 인식하는 파일 중복 체크
2026/03/27 07:09:25 [warn] 14797#14797: conflicting server name "_" on 0.0.0.0:80, ignored
nginx: the configuration file /etc/nginx/nginx.conf syntax is ok
nginx: configuration file /etc/nginx/nginx.conf test is successful- Rocky linux와 달리 Ubuntu 쓸 때는 default 위치가 다르다.
# 파일 확인해서 삭제해야함.
sudo rm /etc/nginx/sites-enabled/default
(10) WAS
sudo apt install python3-venv -y
python3 -m venv venv
source venv/bin/activate

# 패키지 설치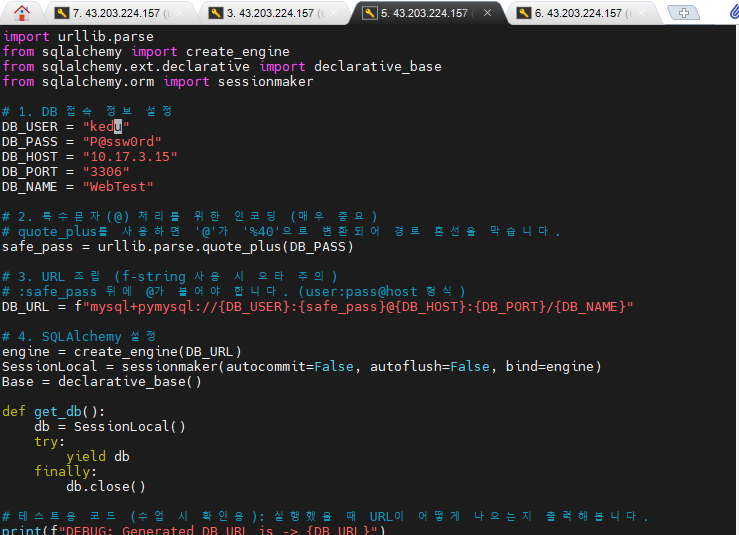
pip install fastapi sqlalchemy pymysql python-multipart uvicorn- DB_HOST IP를 바라볼 수 있도록 수정한다. kedu라는 아이디를 사용해서 10.17.3.15로 DB 요청을 보내는 것이다.
- 웹에서 게시판을 이용하는 회원은 WebTest이고, DB에 접속 권한을 가지는 것은 별도의 테이블에서 관리되는 것이다.
(11) DB
sudo apt install python3-venv -y
python3 -m venv venv
source venv/bin/activate
# mariadb 설치
sudo apt install mariadb-server -y
sudo systemctl start mariadb
sudo systemctl status mariadb
# 접속
mariadb -u root -p -e "CREATE DATABASE IF NOT EXISTS WebTest;"
mariadb -u root -p WebTest < webtest_DB.sql
# 생성 확인
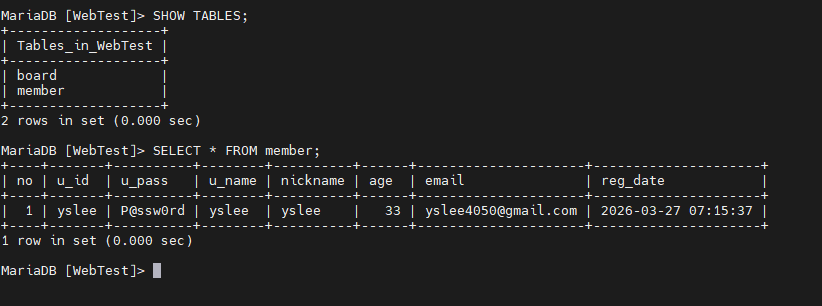
sudo mariadb -u root -p
USE WebTest;
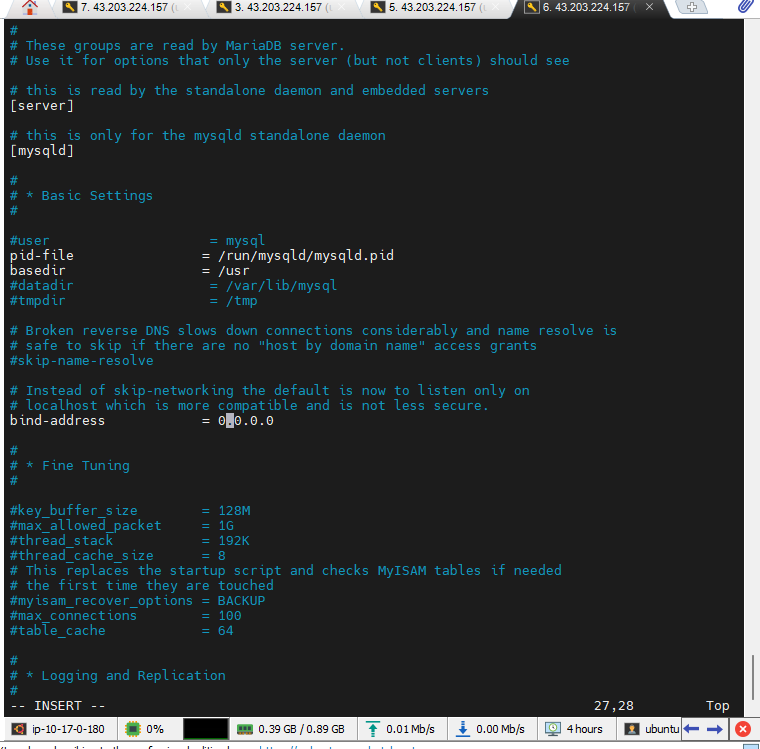
- 계정에 대한 권한을 줘야 한다. Host 부분은 WAS 부분(IP 써야한다.)을 입력한다.
- bind-address 0.0.0.0으로 설정하였다.
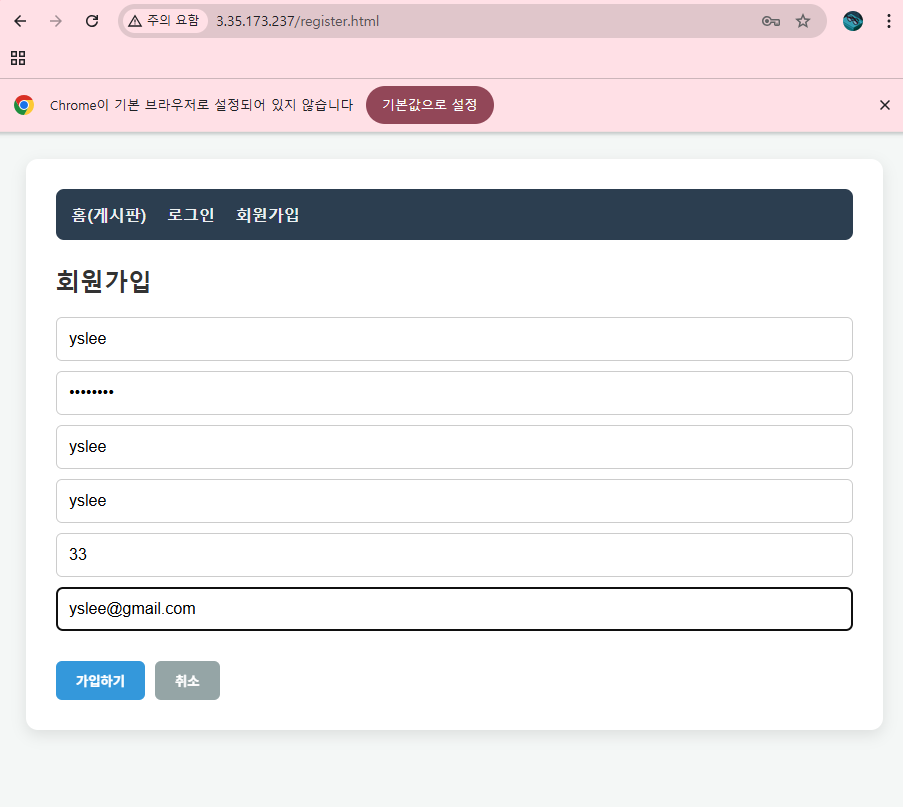
- 서로를 바라보게 설정이 완료되었다면, 밖에서 아래처럼 WEB의 공인 IP로 접속이된다.
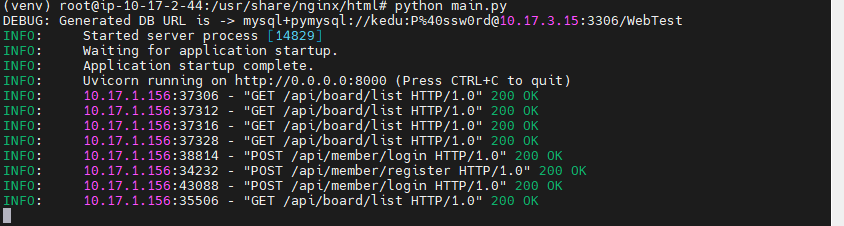
- DB가 WAS랑 올바르게 연결되어 있다면, WEB Proxy 기능이 올바르게 작동할 것이다.
- 가장 중요한 점 !: Default 파일이 있으니까 WAS랑 연결도 안되고, DB랑 연결도 안되고 그렇다.
- 200 코드가 뜨게 된다.
- 깔끔하게 로그인이 되었다.
- WAS 부분에서도 200 코드가 잘 뜬다.
- DB 쪽에서도 로그인이 올바르게 되었다.