Harbor?
내가 직접 관리하는 Docker 이미지 저장소. 도커 Harbor(하버)는 컨테이너 이미지를 안전하게 저장, 관리, 스캔, 복제하는 엔터프라이즈급 오픈소스 컨테이너 이미지 레지스트리이다. Docker Hub 같은 공개 저장소와 달리 기업 내부 서버(Private)에 설치하여 보안(RBAC), 이미지 취약점 검색, 역할 기반 접근 제어 등을 제공하는 핵심 DevOps 도구이다.
- Registry : 대상이 되는 것을 저장·공유하는 저장소
- Harbor는 대표적인 Private registry open source이다. Container Image 저장 외 여러가지 기능을 제공한다.
- Container Image에 대한 보안 및 취약점을 분석해준다.
- RBAC(Role Based Access Control)
- 정책 기반 복제(Replication)
- 여러가지 인증 방식을 제공한다 : LDAP, AD, OIDC
- Image 삭제 등 Garbage collection을 통해 주기적으로 리소스를 확보한다.
- 웹 기반의 GUI를 제공한다.
- 감사(Audit) 기능 제공
- Restful API를 제공한다.
- docker-compose, helm 등 여러가지 배포방식 제공
구성
- docker swarm (docker-00, docker-01, docker-02) + registry
Registry 생성
- 우분투에 하드 디스크에 40 GB로 설정
- IP 겹치지 않게 IP 설정 (10.17.0.160/8)
- Mova로 SSH 접속
# ssh 루트 로그인 설정
vi /etc/ssh/sshd_config
33 PermitRootLogin yes

# ssh 재시작
systemctl restart ssh

#호스트 이름 변경
hostnamectl set-hostname docker-registry
- 쉘을 사용하여 도커를 설치하기
# 도커 설치
wget -O install_docker.sh https://raw.githubusercontent.com/Joes-s/docker-daemon/main/install_docker.sh

# 도커 컴포즈 설치
curl -L "https://github.com/docker/compose/releases/download/1.27.2/docker-compose-$(uname -s)-$(uname -m)" -o /usr/local/bin/docker-compose

# 실행 권한 부여
chmod +x install_docker.sh

# sh 파일 실행
./install_docker.sh
(필요시) 하드디스크 추가
- 디스크 용량이 부족하면 추가해준다.
- fdisk > 파일시스템 적용
# fdisk 설정
fdisk /dev/sdb

# 파일시스템
mkfs.ext4 /dev/sdb1
root@docker-registry:~# fdisk /dev/sdb
Welcome to fdisk (util-linux 2.37.2).
Changes will remain in memory only, until you decide to write them.
Be careful before using the write command.
Device does not contain a recognized partition table.
Created a new DOS disklabel with disk identifier 0x05148de0.
Command (m for help): n
Partition type
p primary (0 primary, 0 extended, 4 free)
e extended (container for logical partitions)
Select (default p):
Using default response p.
Partition number (1-4, default 1):
First sector (2048-83886079, default 2048):
Last sector, +/-sectors or +/-size{K,M,G,T,P} (2048-83886079, default 83886079):
Created a new partition 1 of type 'Linux' and of size 40 GiB.
Command (m for help): p
Disk /dev/sdb: 40 GiB, 42949672960 bytes, 83886080 sectors
Disk model: VMware Virtual S
Units: sectors of 1 * 512 = 512 bytes
Sector size (logical/physical): 512 bytes / 512 bytes
I/O size (minimum/optimal): 512 bytes / 512 bytes
Disklabel type: dos
Disk identifier: 0x05148de0
Device Boot Start End Sectors Size Id Type
/dev/sdb1 2048 83886079 83884032 40G 83 Linux
Command (m for help): w
The partition table has been altered.
Calling ioctl() to re-read partition table.
Syncing disks.
root@docker-registry:~#
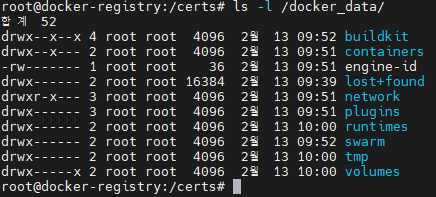
- 마운트 할 저장 공간 생성 후 확인 : /docker_data 디렉토리가 생성되었다.
root@docker-registry:~# mkdir /docker_data
root@docker-registry:~# mount /dev/sdb1 /docker_data/
root@docker-registry:~# df -h
파일 시스템     크기  사용  가용 사용% 마운트위치
tmpfs           387M  1.9M  385M    1% /run
/dev/sda3        20G   13G  5.7G   69% /
tmpfs           1.9G     0  1.9G    0% /dev/shm
tmpfs           5.0M     0  5.0M    0% /run/lock
/dev/sda2       512M  6.1M  506M    2% /boot/efi
tmpfs           387M  100K  387M    1% /run/user/1000
tmpfs           387M   64K  387M    1% /run/user/0
/dev/sdb1        40G   24K   38G    1% /docker_data
root@docker-registry:~#
# UUID를 적용
blkid | grep sdb1
root@docker-registry:~# blkid | grep sdb1
/dev/sdb1: UUID="0c6b44b0-17ed-4434-997f-ee4584c70337" BLOCK_SIZE="4096" TYPE="ext4" PARTUUID="05148de0-01"
# UUID cli로 fstab 파일에 적용하기
echo "UUID=0c6b44b0-17ed-4434-997f-ee4584c70337 /docker_data defaults 0 0" >> /etc/fstab
cat /etc/fstab
# /etc/fstab: static file system information.
#
# Use 'blkid' to print the universally unique identifier for a
# device; this may be used with UUID= as a more robust way to name devices
# that works even if disks are added and removed. See fstab(5).
#
# <file system> <mount point> <type> <options> <dump> <pass>
# / was on /dev/sda3 during installation
UUID=304d31af-9935-4e17-8583-053d96b52597 / ext4 errors=remount-ro 0 1
# /boot/efi was on /dev/sda2 during installation
UUID=6418-E912 /boot/efi vfat umask=0077 0 1
/swapfile none swap sw 0 0
UUID=0c6b44b0-17ed-4434-997f-ee4584c70337 /docker_data defaults 0 0- 디스크 추가에 따른 daemon.json 경로 변경 : 디스크 변경사항 없으면 이 과정을 필요없다.
vi /etc/docker/daemon.json

# 마운트 한 Docker data 경로
{
        "data-root":"/docker_data"
}- /etc/containerd/config.toml 경로를 변경한다.
vi /etc/containerd/config.toml

# 변경한 내용
 17 root = "/docker_date/containerd"

# containerd.service 재시작
systemctl restart docker containerd.service

# 설치된 도커 버전 확인
docker --version

# 실행권한
chmod +x /usr/local/bin/docker-compose
- Multi excute mode로 작업하면 빠르다.

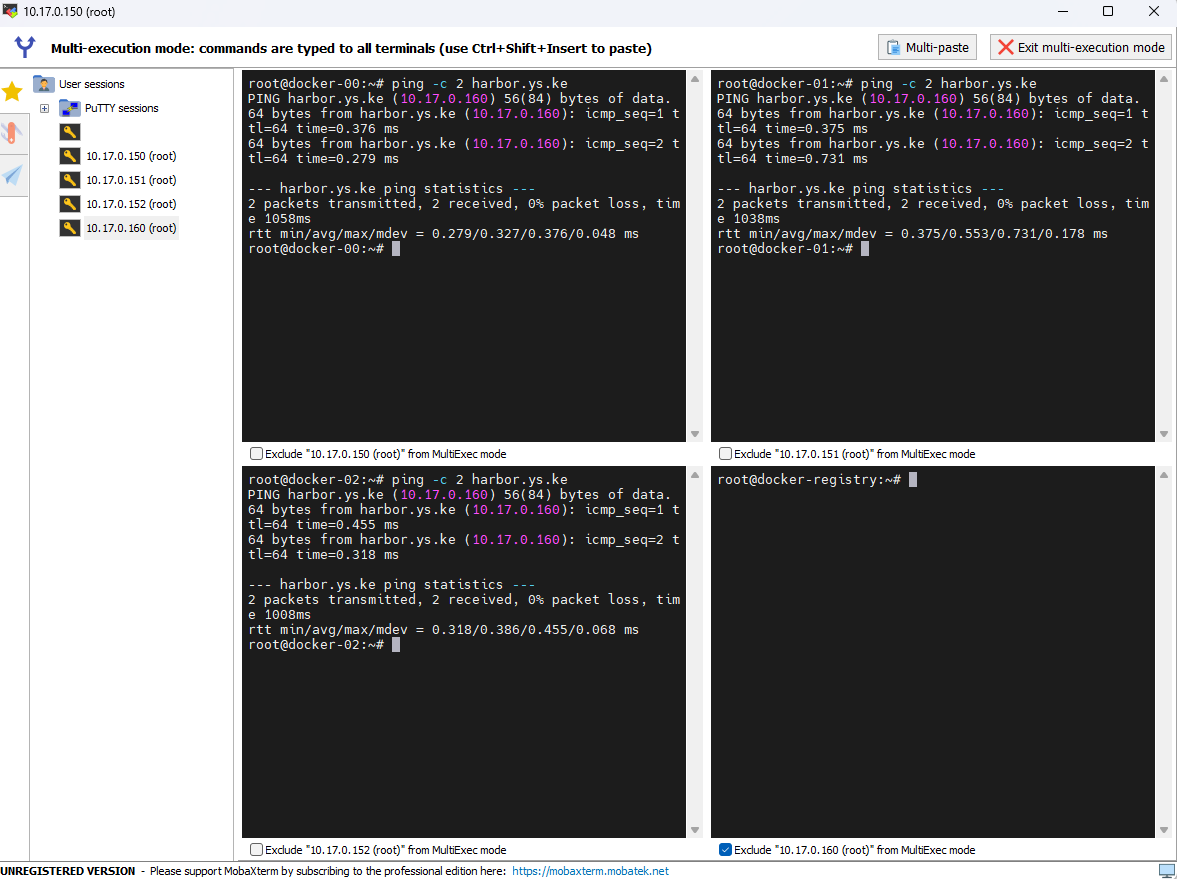
- /etc/hosts에 레지스트리의 도메인을 등록할 수 있다.
vi /etc/hosts

# 작성한 내용
10.17.0.160 harbor.ys.ke

# ping test
ping -c 2 harbor.ys.ke
레지스트리 인증서 작업
- Registry로 가서 인증키 작업을 해야한다.
CA 인증서 생성
# 디렉토리 생성
mkdir /certs
cd /certs

# CA 인증서 생성 (Private key)
openssl genrsa -out ca.key 4096

# CA 인증서 내용 확인 (Private key)
vi ca.key

# CA 인증서 생성 (Public key)
root@docker-registry:/certs# openssl req -x509 -new -nodes -sha512 -days 3650 -subj "/C=KR/ST=SEOUL/L=KWANAK/O=KE/OU=CLOUD/CN=10.17.0.160/emailAddress=yslee4050@gmail.com" -key ca.key -out ca.crt

root@docker-registry:/certs# ll
합계 16
drwxr-xr-x  2 root root 4096  2월 13 10:22 ./
drwxr-xr-x 23 root root 4096  2월 13 10:13 ../
-rw-r--r--  1 root root 2114  2월 13 10:23 ca.crt
-rw-------  1 root root 3272  2월 13 10:15 ca.key
root@docker-registry:/certs#
- 공개키가 있으면 사설키도 있어야 한다.
레지스트리 서버 자체의 인증서
- 서버 인증서 생성(Private key)
openssl genrsa -out harbor.ys.ke.key 4096- 서버 인증서 발급 요청서(csr) 생성
openssl req -sha512 -new \
-subj "/C=KR/ST=SEOUL/L=KWANAK/O=KE/OU=CLOUD/CN=10.17.0.160/emailAddress=yslee4050@gmail.com" -key harbor.ys.ke.key -out harbor.ys.ke.csr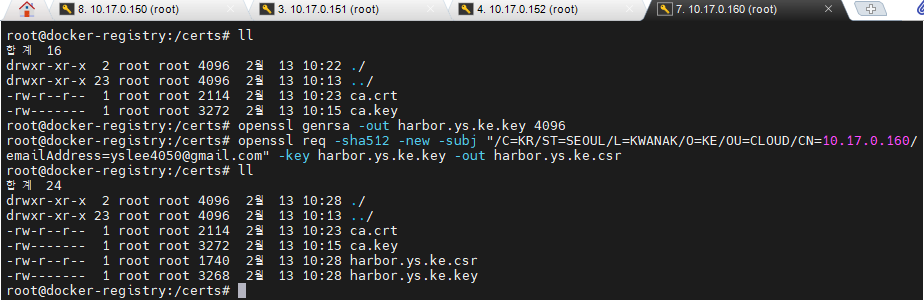
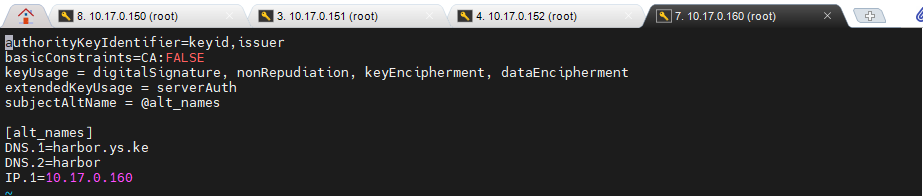
- 서버 인증서 확장 부분 추가 (v3.txt 파일 생성)
# 커멘드에 한번에 작성
cat > v3.ext <<-EOF
authorityKeyIdentifier=keyid,issuer
basicConstraints=CA:FALSE
keyUsage = digitalSignature, nonRepudiation, keyEncipherment, dataEncipherment
extendedKeyUsage = serverAuth
subjectAltName = @alt_names

[alt_names]
DNS.1=harbor.ys.ke
DNS.2=harbor
IP.1=10.17.0.160
EOF

# 작성 내용 확인
vi v3.ext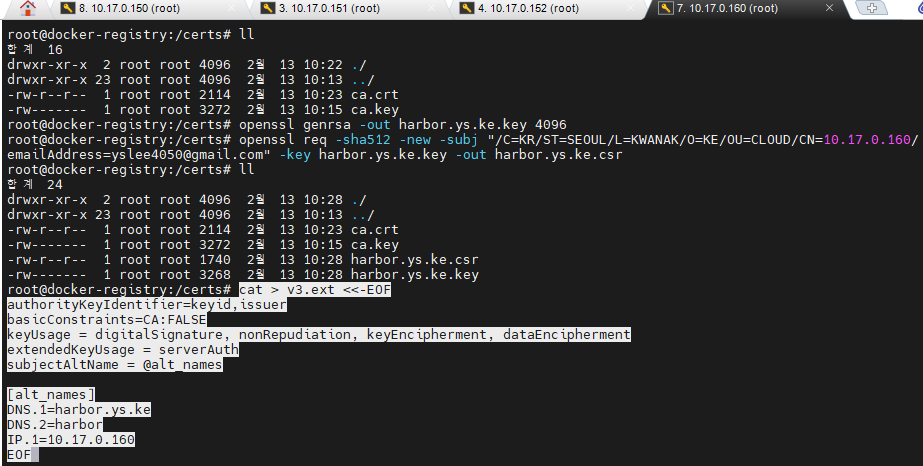
- 서버 인증서 발급 - CA key로 서명된
openssl x509 -req -sha512 -days 3650 \
-extfile v3.ext \
-CA ca.crt -CAkey ca.key -CAcreateserial \
-in harbor.ys.ke.csr \
-out harbor.ys.ke.crt
- 인증서 산출물 리스트

- 인증서 복사
# 저장할 곳
mkdir -p /etc/docker/cert.d/harbor.ys.ke

# 파일 이동
cp harbor.ys.ke.crt /etc/docker/certs.d/harbor.ys.ke/
cp harbor.ys.ke.key /etc/docker/certs.d/harbor.ys.ke/
cp ca.crt /etc/docker/certs.d/harbor.ys.ke/
ls /etc/docker/certs.d/harbor.ys.ke/

# 도커 시작
systemctl restart docker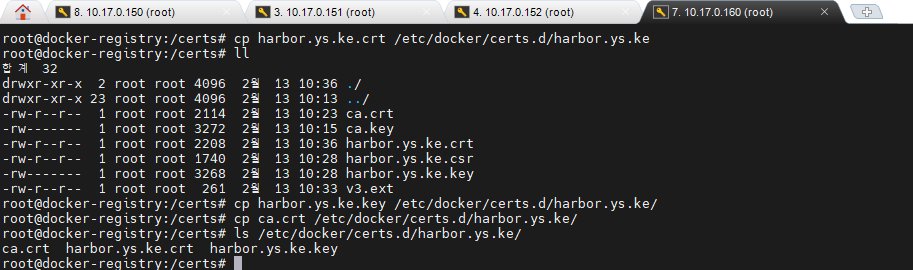
Harbor 설치
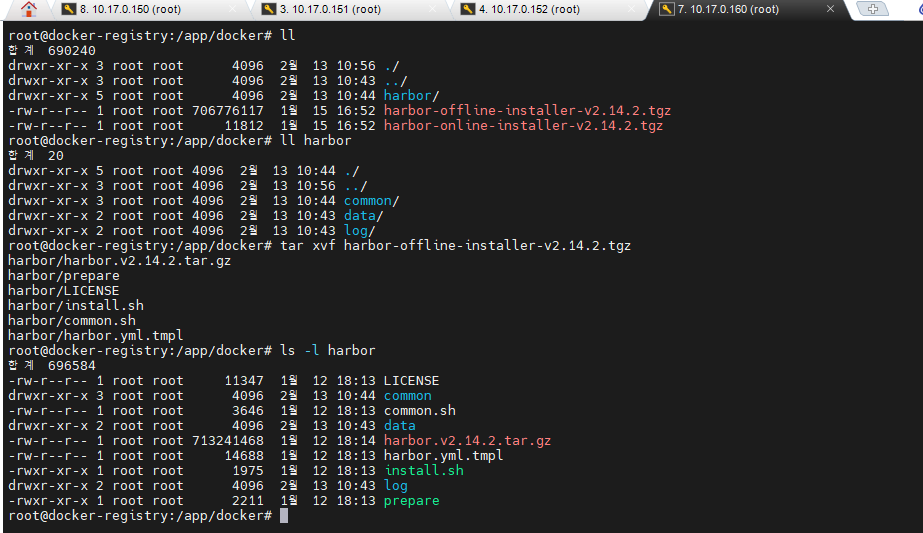
- 디렉토리를 먼저 잡는다.
mkdir -p /app/docker/harbor/data
mkdir -p /app/docker/harbor/log
mkdir -p /app/docker/harbor/common/config
# 경로 이동!!
cd /app/docker
# 설치
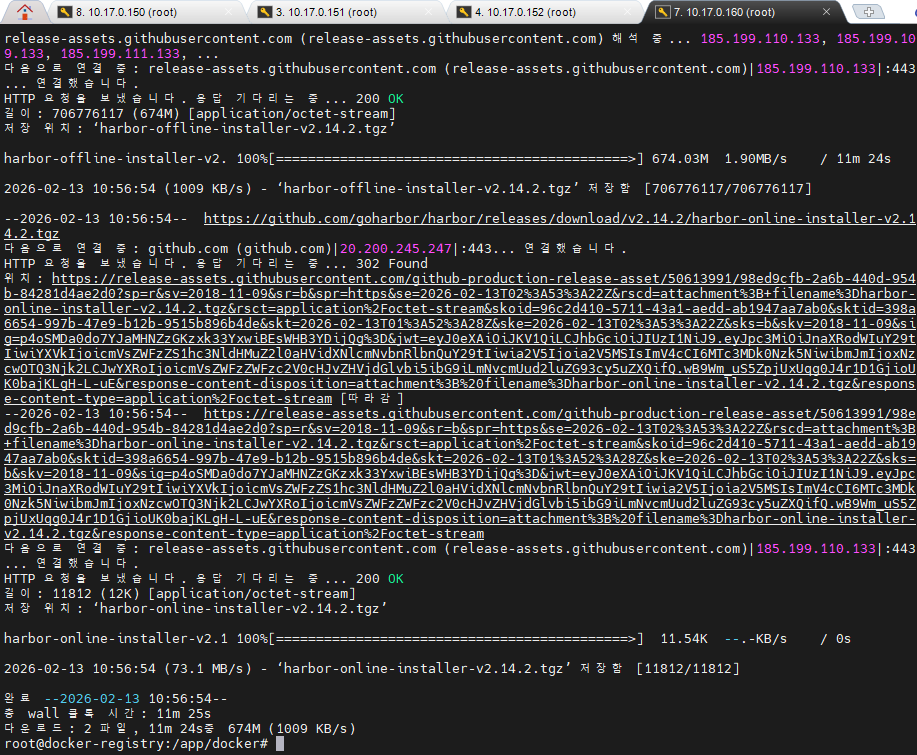
# https://github.com/goharbor/harbor/releases : harbor github 주소
curl -s https://api.github.com/repos/goharbor/harbor/releases/latest | grep browser_download_url | cut -d '"' -f 4 | grep '\.tgz$' | wget -i -
- harbor 폴더 밑으로 압축을 풀어준다.
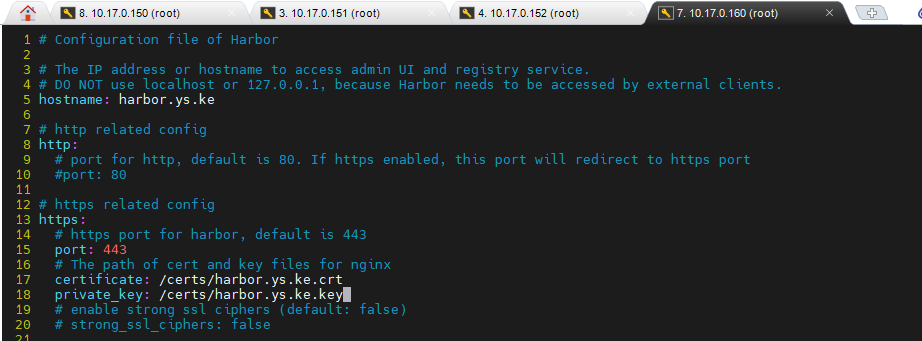
- harbor.yml을 수정한다. (아래 내용을 확인하고, 80번, 443번 포트는 주석처리 했다.)
tar xvf harbor-offline-installer-v2.14.2.tgz
# harbor 안에 있는 tmpl 파일 복사본 만들기
cp harbor.yml.tmpl harbor.yml
# 수정
vi harbor.yml
# 수정 내용
1 # Configuration file of Harbor
2
3 # The IP address or hostname to access admin UI and registry service.
4 # DO NOT use localhost or 127.0.0.1, because Harbor needs to be accessed by external clients.
5 hostname: harbor.ys.ke
6
7 # http related config
8 http:
9 # port for http, default is 80. If https enabled, this port will redirect to https port
10 #port: 80
11
12 # https related config
13 https:
14 # https port for harbor, default is 443
15 #port: 443
16 # The path of cert and key files for nginx
17 certificate: /certs/harbor.ys.ke.crt
18 private_key: /certs/harbor.ys.ke.key
...
52 password: P@ssw0rd # Postgre 비밀번호임
...
66 data_volume: /app/docker/harbor/data
...
167 location: /app/docker/harbor/log
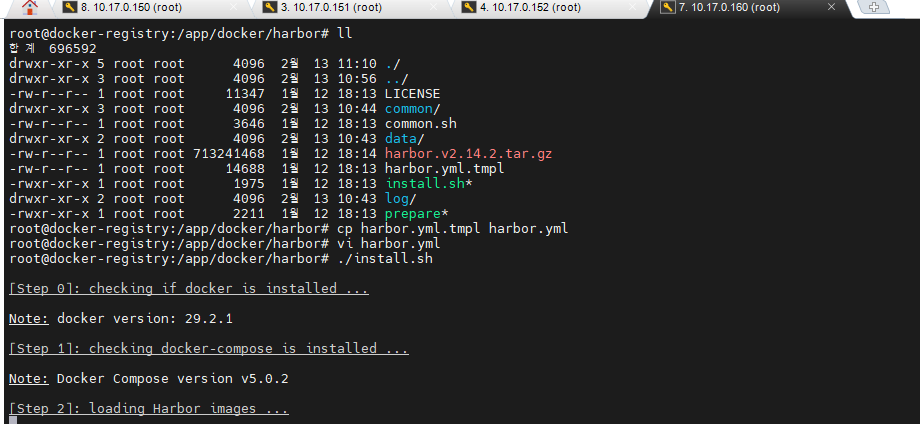
# 작성 완료 후 쉘 파일 실행
./install.sh
# 필요시
docker-compose down --rmi all
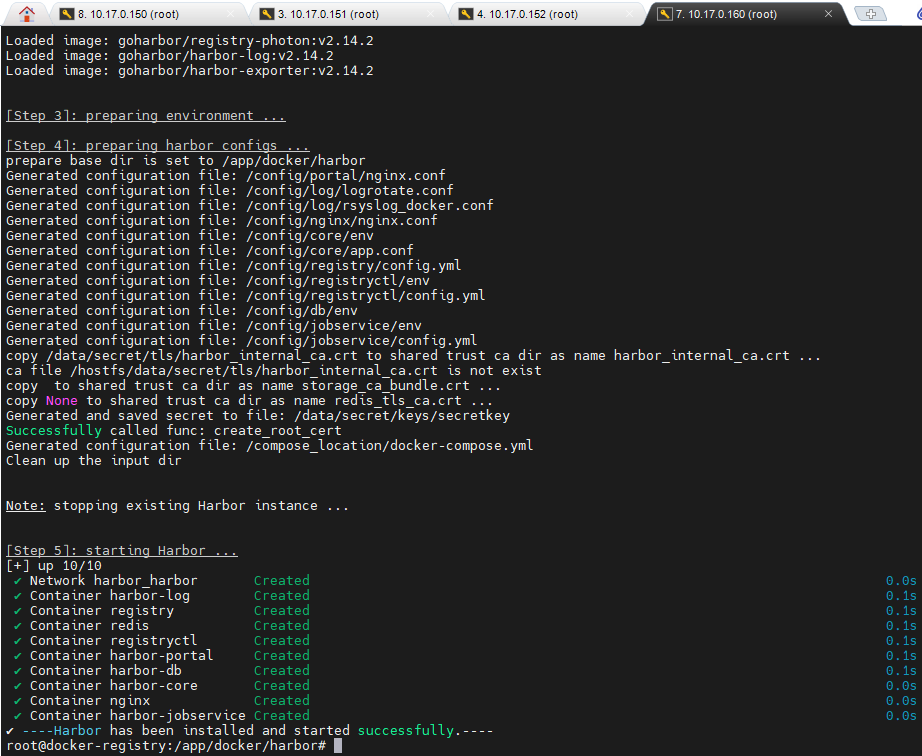
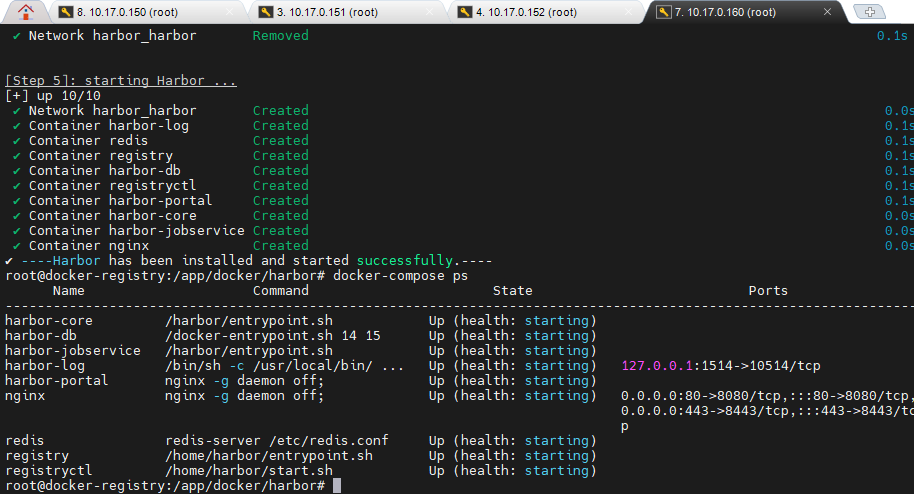
- harbor 설치 완료 메시지
- 설치를 완료 했으므로 Harbor에 접속해본다.
- 위에서 복사본 만들었던 harbor.yml에 들어가보면 비밀번호가 있다.
ID : admin
PW : Harbor12345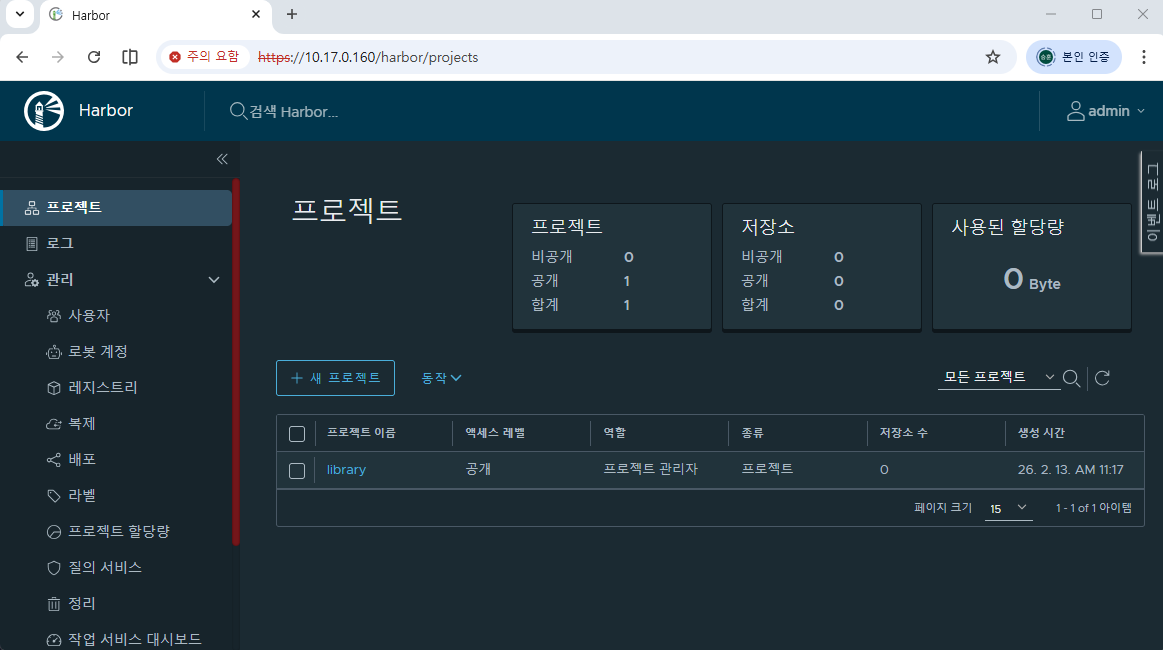
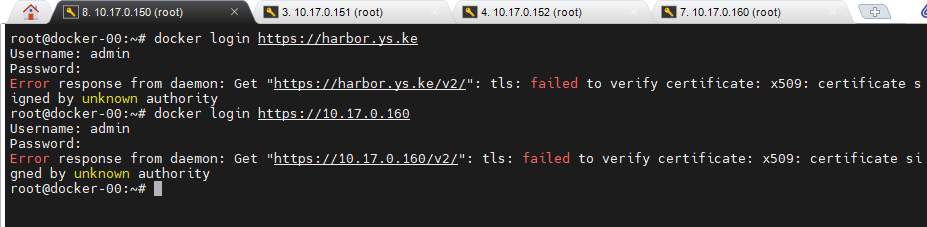
- 매니저 노드에서 작성(10.17.0.150) : 인증서 안옮겨서 못들어가고 있다.
- 다시 레지스트리(10.17.0.160)로 돌아가서 scp로 인증서를 옮긴다.
scp ca.crt harbor.ys.ke.crt harbor.ys.ke.key root@10.17.0.150:/root

cd /certs/

# 인증서 보내주기
scp ca.crt harbor.ys.ke.crt harbor.ys.ke.key root@10.17.0.150:/root
- 다시 매니저 노드(10.17.0.150)로 돌아가서 작업한다.
mkdir -p /etc/docker/certs.d/harbor.ys.ke

# 아래의 3가지 파일을 복사 or 이동
ca.crt
harbor.ys.ke.crt
harbor.ys.ke.key 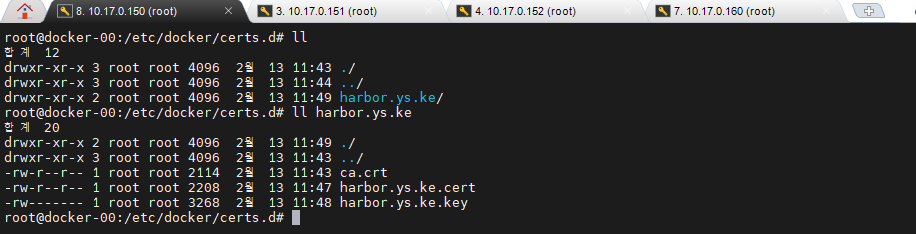
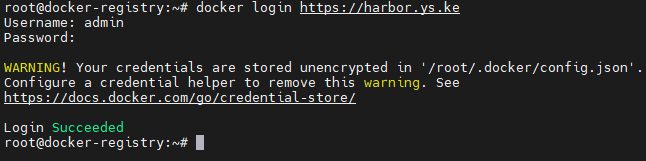
docker login https://harbor.ys.ke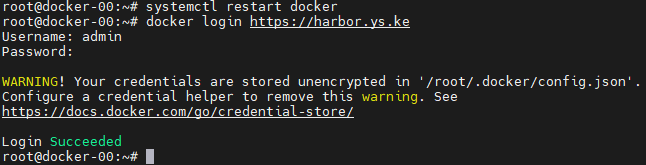
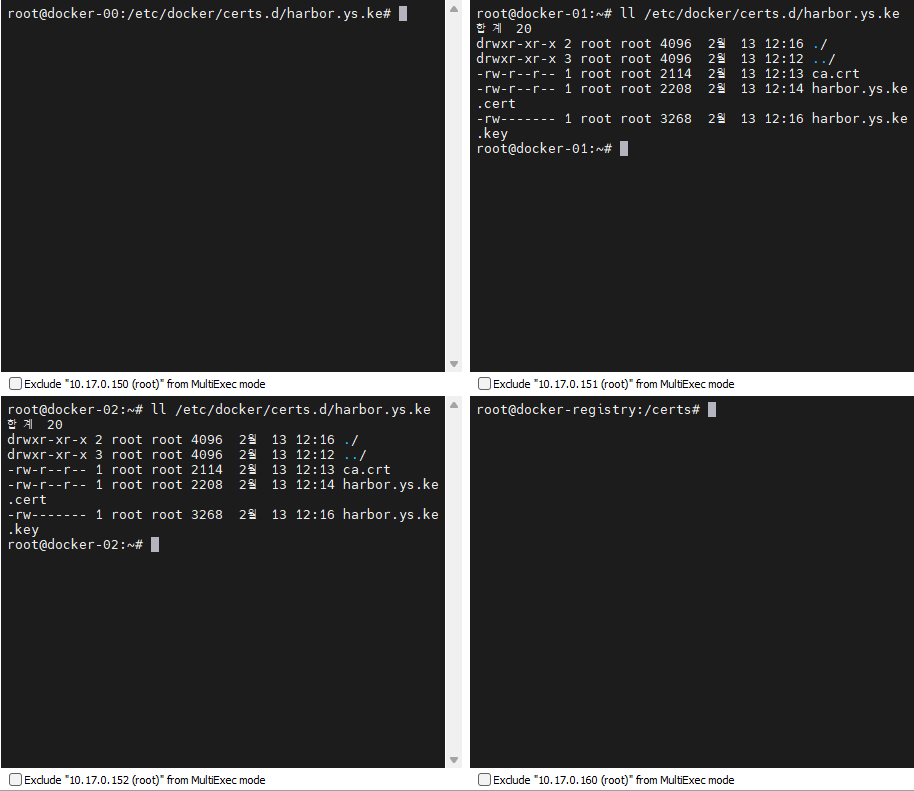
- 151, 152로 인증서 반복으로 옮긴다.
# 151
 scp ca.crt harbor.ys.ke.crt harbor.ys.ke.key root@10.17.0.151:/root

mkdir -p /etc/docker/certs.d/harbor.ys.ke/

cp ca.crt /etc/docker/certs.d/harbor.ys.ke/

cp harbor.ys.ke.crt /etc/docker/certs.d/harbor.ys.ke/harbor.ys.ke.cert

cp harbor.ys.ke.key /etc/docker/certs.d/harbor.ys.ke/


# 152
scp ca.crt harbor.ys.ke.crt harbor.ys.ke.key root@10.17.0.152:/root

mkdir -p /etc/docker/certs.d/harbor.ys.ke/

cp ca.crt /etc/docker/certs.d/harbor.ys.ke/

cp harbor.ys.ke.crt /etc/docker/certs.d/harbor.ys.ke/harbor.ys.ke.cert

cp harbor.ys.ke.key /etc/docker/certs.d/harbor.ys.ke/

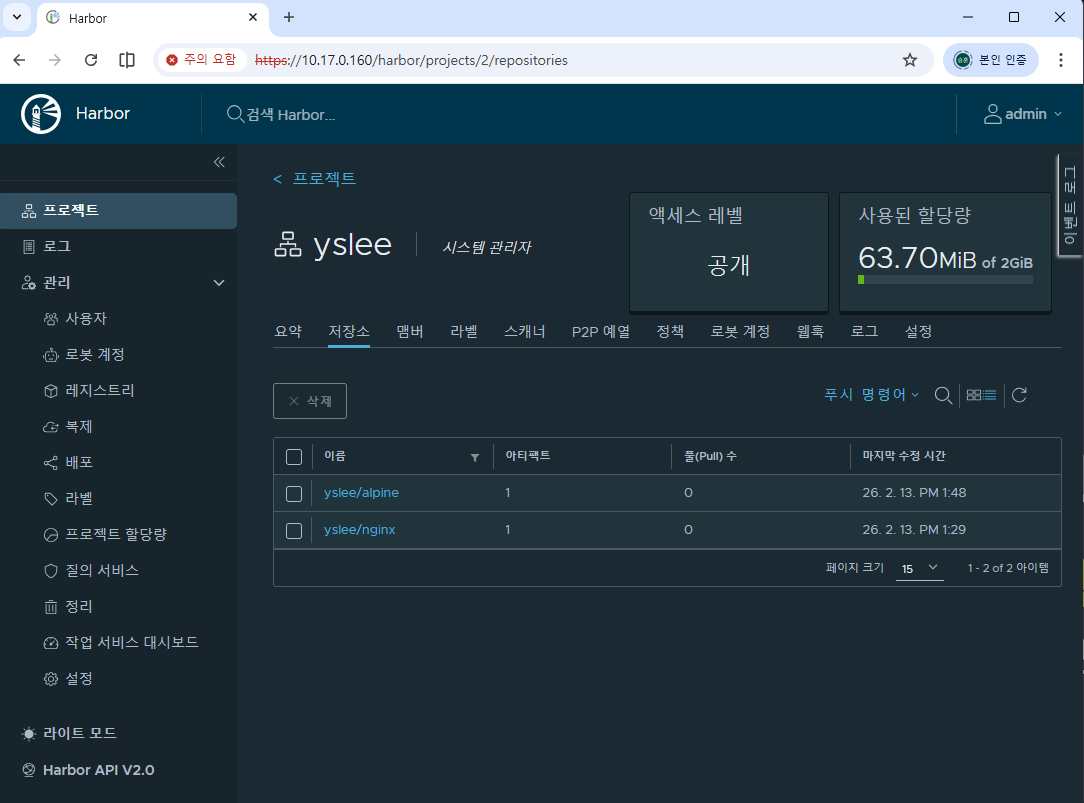
- 새 프로젝트 생성

- 프로젝트 리스트
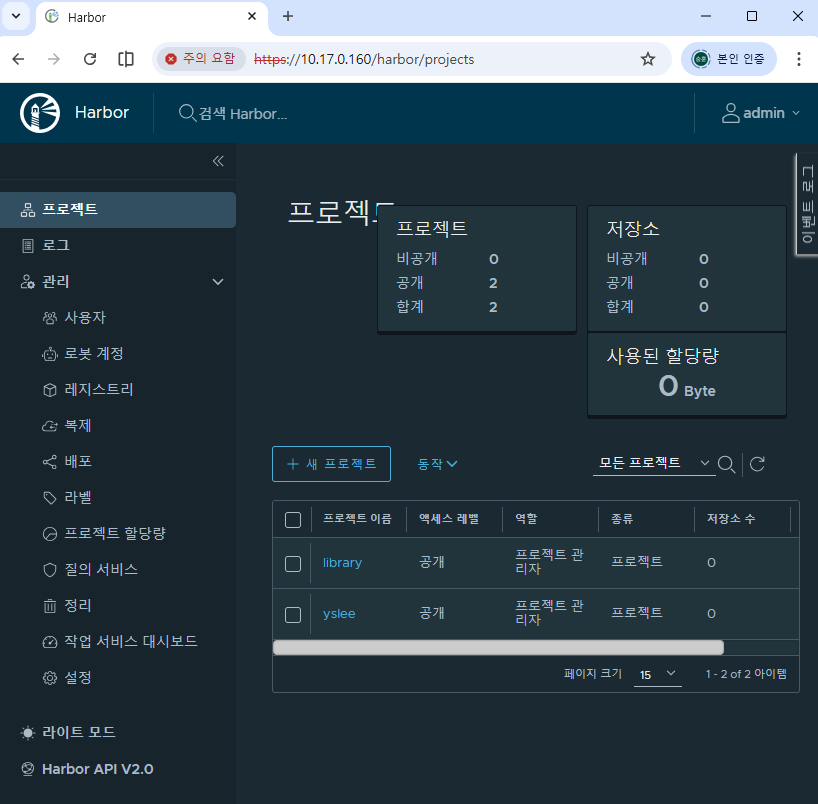
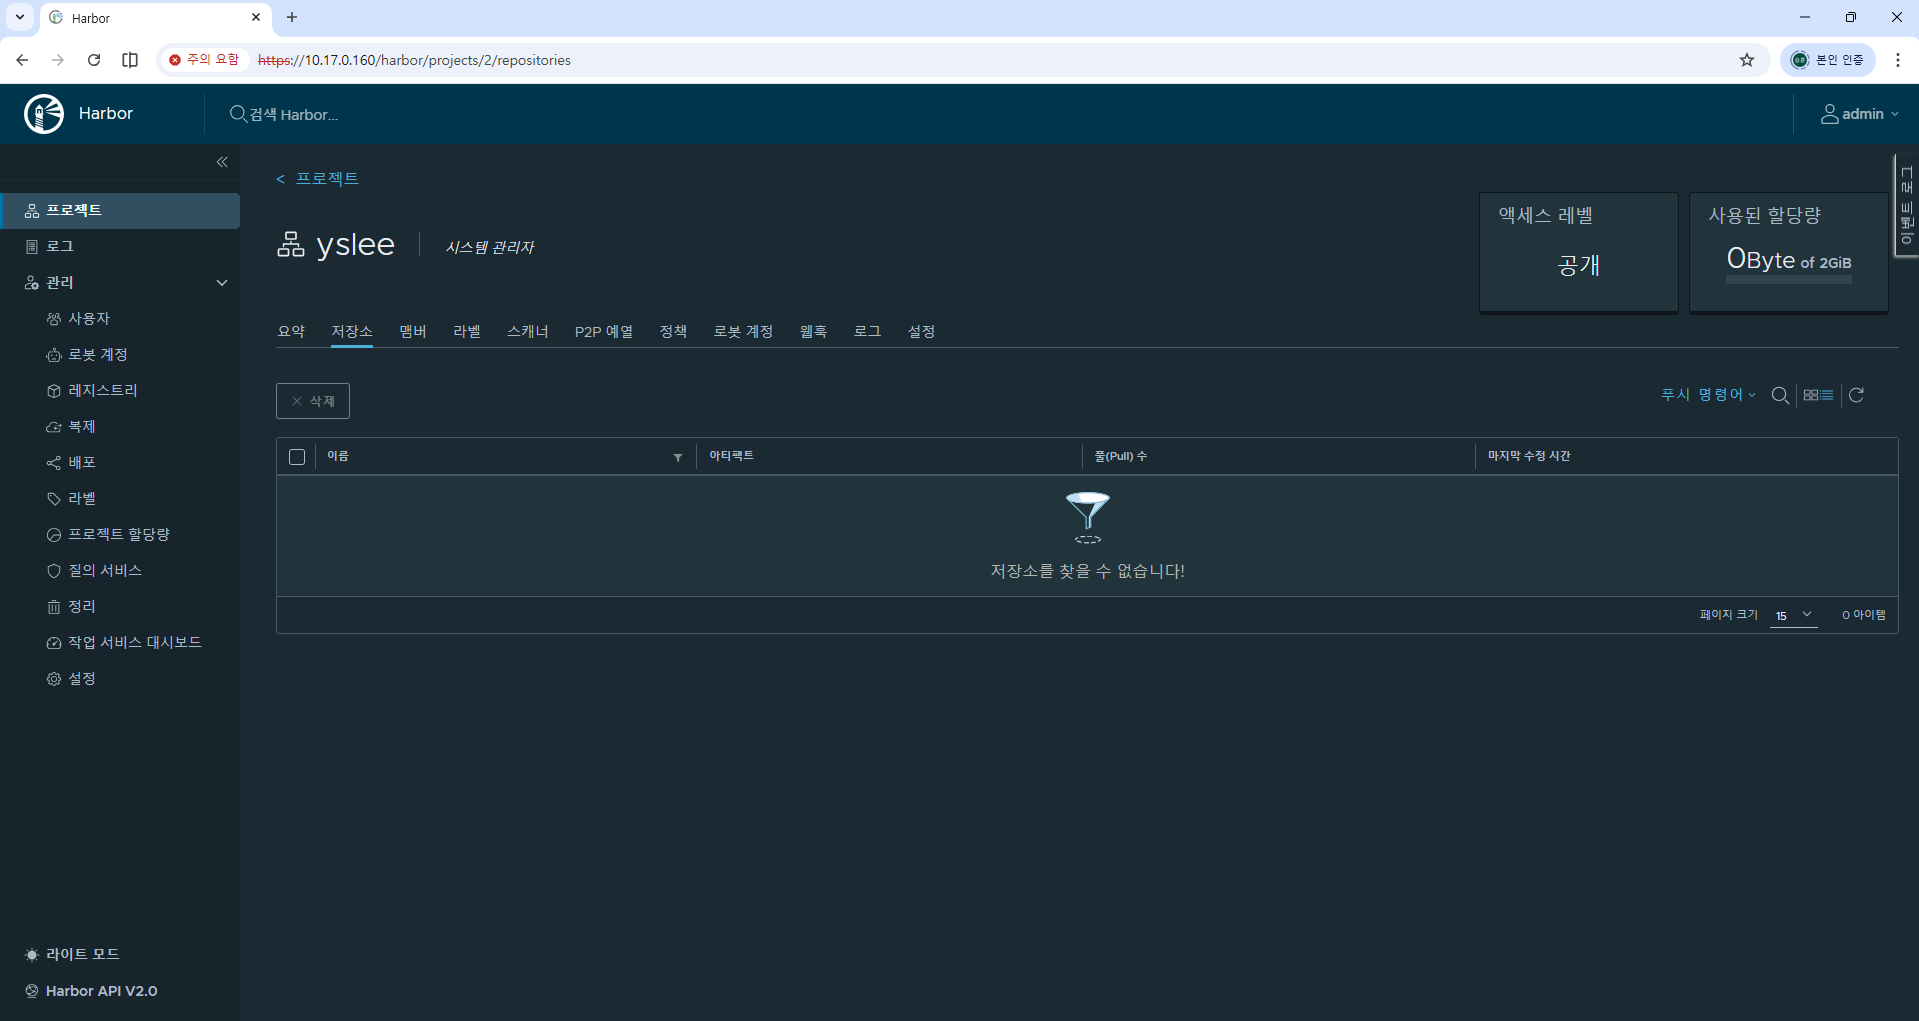
- yslee 레지스트리
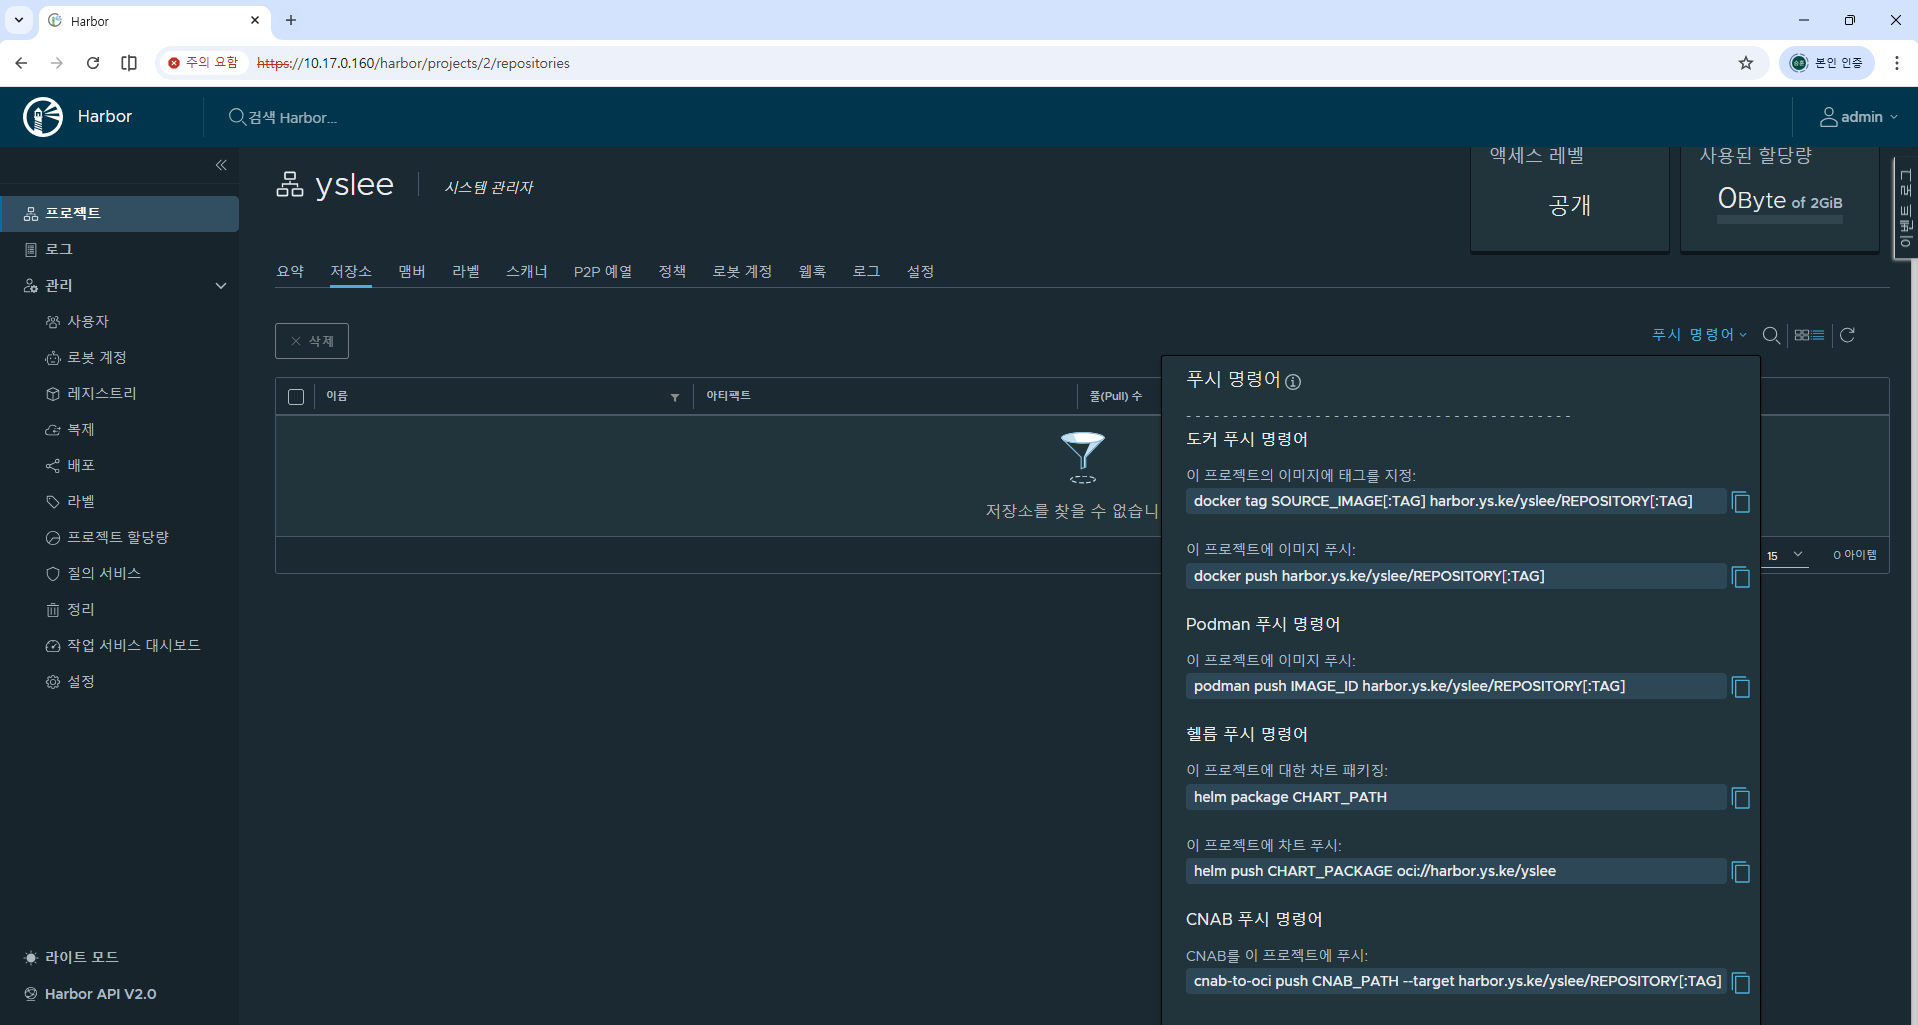
- 다양한 Docker/Podman 명령어를 지원한다.
Harbor 다뤄보기
- 레지스트리(10.17.0.160)에서 alpine 이미지를 받고 태그를 지정해본다.
- 먼저 도메인 정보를 hosts 파일에 설정한다.
# hosts 파일
vi /etc/hosts
# 작성한 내용
10.17.0.160 harbor.ys.ke
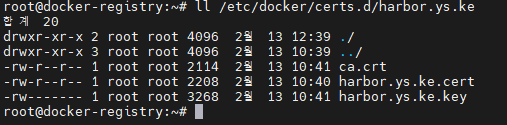
# harbor.ys.ke.cert 이름 오타 확인
mv /etc/docker/certs.d/harbor.ys.ke/harbor.ys.ke.crt /etc/docker/certs.d/harbor.ys.ke/harbor.ys.ke.cert
docker login https://harbor.ys.ke- 도메인 이름 호스트 파일에 등록

- 인증서 파일명 확인
- 레지스트리에서도 로그인 성공
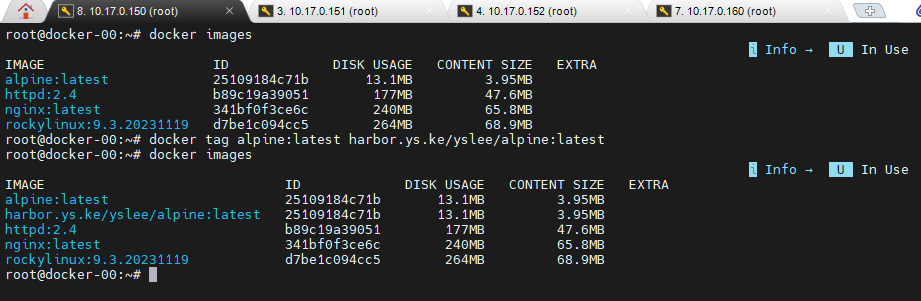
# 도커 허브에서 이미지 내려받기
docker image pull nginx:latest
docker image pull alpine:latest
#내려받은 nginx:latest에 태그 달기
docker tag nginx:latest harbor.ys.ke/yslee/nginx:latest
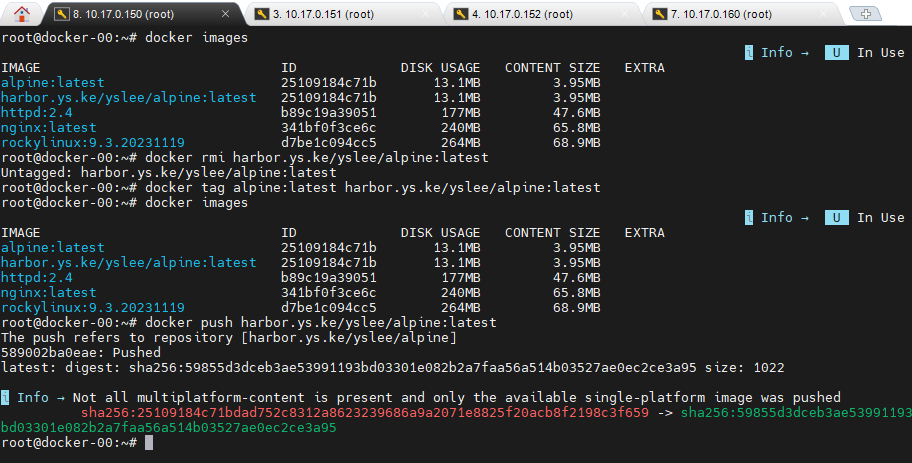
docker tag alpine:latest harbor.ys.ke/yslee/alpine:latest
# 이미지 조회
docker image ls
- 이 인증서가 검증된거야 라고 알려줘야 한다.
# 150, 151, 152, 160
cp /certs/ca.crt /usr/local/share/ca-certificates/
update-ca-certificates
systemctl restart docker
- push했는데 안되는 경우가 있다.
# 작업 위치
cd /app/docker/harbor

# 프로세스 멈춰져 있는지 확인해서
docker-compose ps

# 다시 시작해준다.
./install.sh
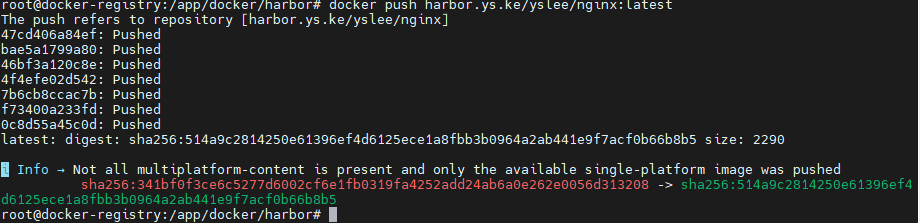
# 배포
docker push harbor.ys.ke/yslee/nginx:latest
docker push harbor.ys.ke/yslee/alpine:latest