
nginx 컨테이터 만들기 및 관련 파일 수정
docker container run --name web_01 -d -p 80:80 nginx:latest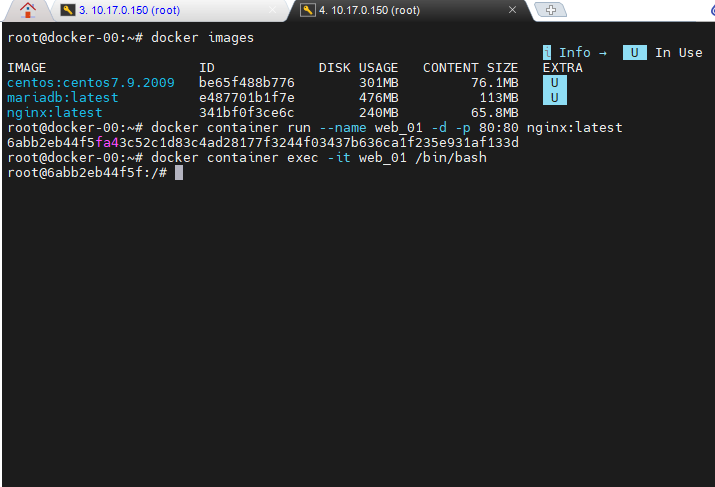
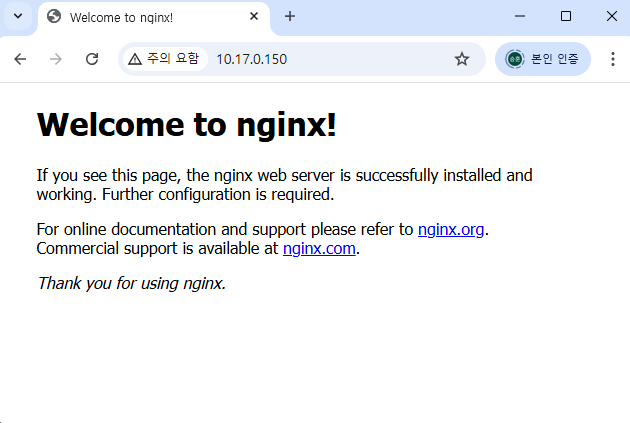
- Docker host pc인 10.17.0.150 으로 외부에서 접속할 수 있다.
# 컨테이서 bash 쉘 실행하면서 접속
docker container exec -it web_01 /bin/bash

cd /usr/share/nginx/html/

ls -l

# 이름 바꿀때 사용됨 > 백업 파일로 바꿔놈
mv index.html index.html.bak

# 새로운 파일 생성
echo web_01 > index.html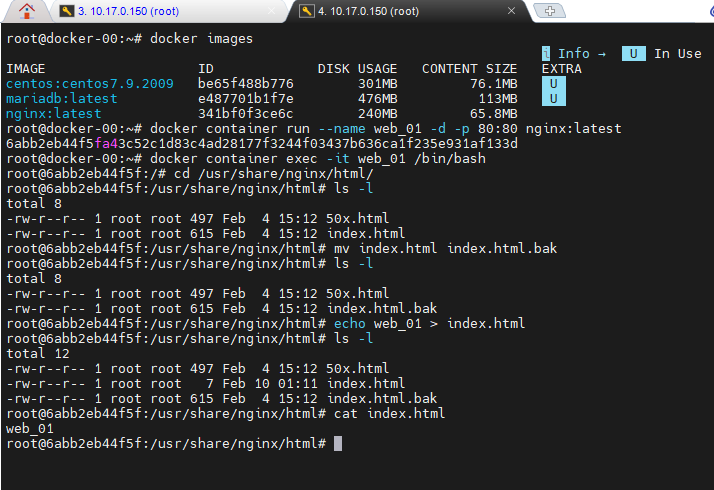
- 계정 정보를 확인하는 것에서 부터 시작한다. 인증 정보를 볼 수 있다.
# 인증정보
vi ~/.docker/config.json

# 계정 정보
system info | grep Username

Username : cition07
- 새로운 버전의 우분투만 생성되었다.\
- "cition07" : 유저 이름
- web_01 : 이미지 이름
# 변경사항을 Commit
docker container commit -a "cition07" web_01 web_01:1.0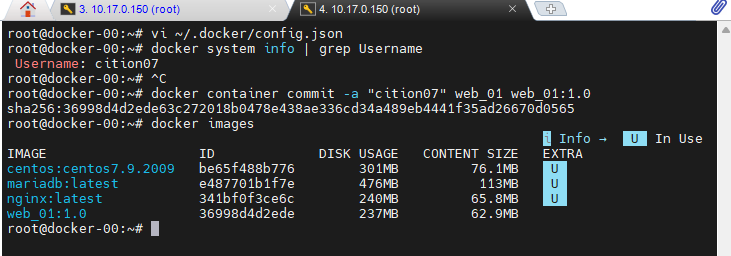
- 네트워크 설정된 것을 보면, 컨테이너 외부 부분에서는 다른 포트로 연결해야 포트 중복이 안일어난다.
netstat -antp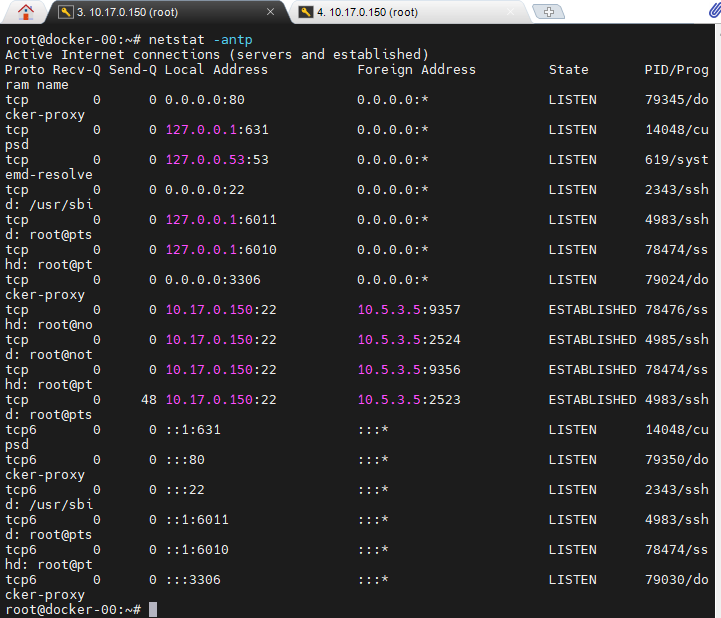
- 포트가 중복되지 않게 컨테이너 하나를 추가한다.
# 새로운 컨테이너 실행 (8080 : 중복 방지)
docker container run --name web_02 -d -p 8080:80 web_01:1.0

# bash 쉘 실행
docker container exec -it web_02 /bin/bash

# html 경로
cd /usr/share/nginx/html/

# 파일 수정 덮어쓰기
echo web_02 > index.html

cat index.html
출력 내용 : web_02
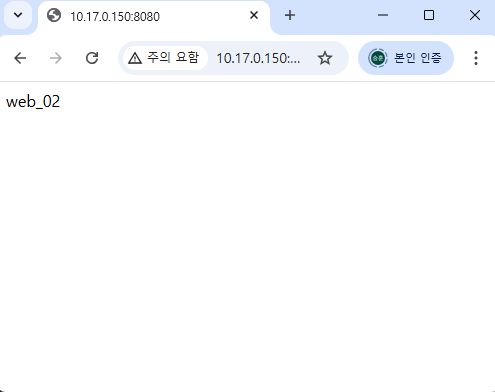
image save, load
- 이미지파일을 밖으로 빼려면 save 명령어를 쓴다.
docker save -o export.tar web_01:1.0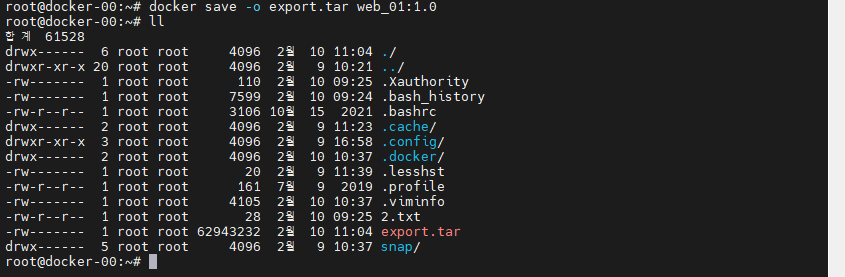
- export.tar v파일을 다시 불러오려면? load 를 사용한다.
# 기존에 있던거 이미지 지우기
docker image rm web_01:1.0

# load
docker image load -i export.tar

# 이미지 조회
docker image ls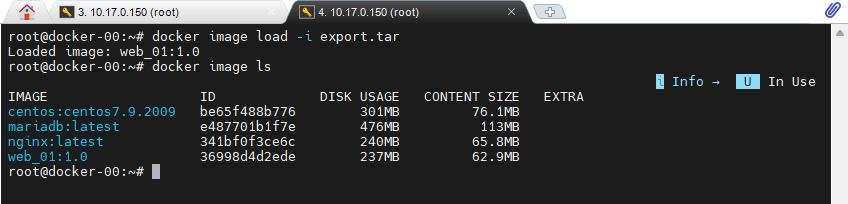
image tag, push
docker container run --name web_01 -d -p 8080:80 web_01:1.0
# 아이디가 다를 경우에는 올바르게 접속한다.
docker logout
docker login -u yslee4050
# Tag
docker tag web_01:1.0 yslee4050/webserver:1.0
# 도커 허브로 push
docker push yslee4050/webserver:1.0
# 확인 방법
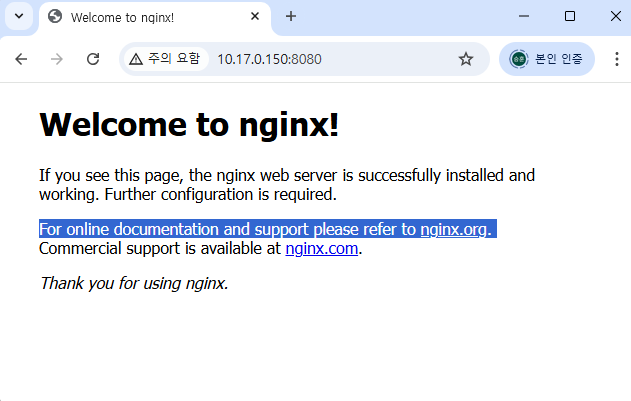
curl 10.17.0.150:8080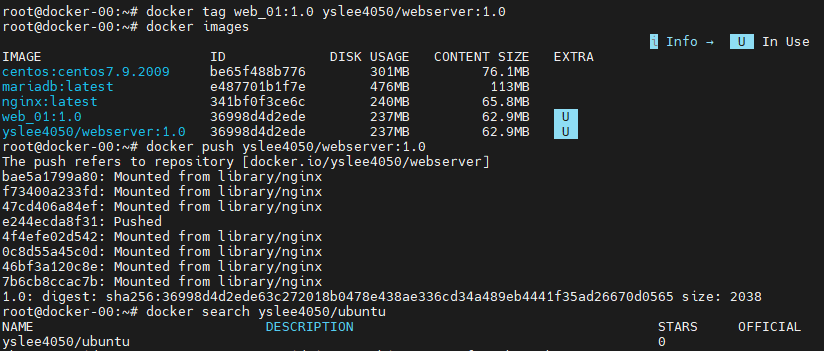
Dockerfile
- Dockerfile을 생성한다.
vi Dockerfile
# 작성한 내용
FROM centos:centos7.9.2009
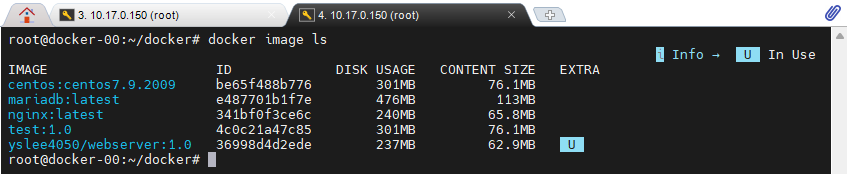
# Build
docker image build -t test:1.0 /root/docker/
- Disk size, Content size가 원본인 centos:centos7.9.2009와 동일하다.
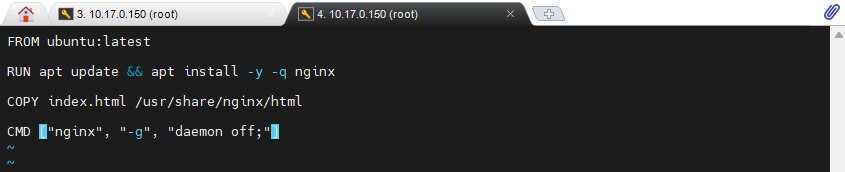
- 기본 우분투에 nginx를 바로 설치하는 방식(이름이 "Dockerfile"이 아닌 경우)
#
vi /root/docker/ubuntu_nginx

# 작성한 내용
FROM ubuntu:latest # 기반 이미지

RUN apt update && apt install -y -q nginx # 이미지 빌드할 때 엔진엑스를 설치한다.

CMD ["nginx", "-g", "daemon off;"] # 컨테이너를 실행할 때 자동으로 실행하도록 하는 것


# 명령어
docker image build -t my_web:1.0 -f /root/docker/ubuntu_nginx
-f : 이름이 Dockfile이 아닌 경우에 불러 오려면 붙이는 옵션


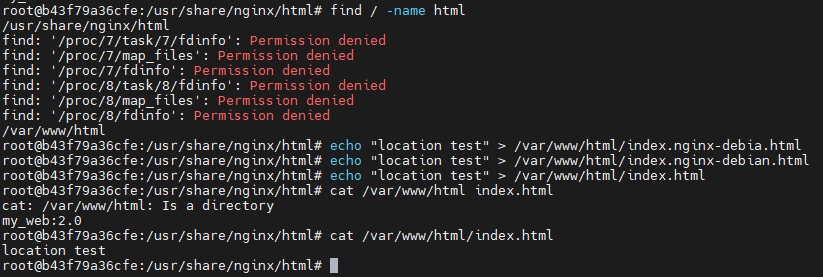
- 파일을 하나 만들어서 COPY를 추가해본다.
echo my_web:2.0 > index.html
cat index.html
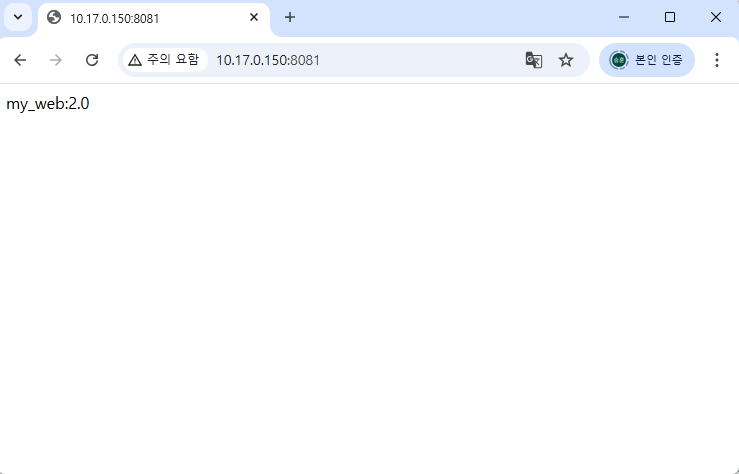
docker container run --name web_02 -d -p 8081:80 my_web:2.0
- 실행했지만 nginx 경로가 /var/www/html으로 잡혀있어서 my_web:2.0 문구가 나오지 않았다.
- Dockerfile에서 COPY에 써놓은 /var/www/html으로 경로를 바꿨다.
# 필요없는 것은 지우고 다시 빌드
docker image build -t my_web:2.0 -f ubuntu_nginx .

# 컨테이너 재실행
docker container run --name web_02 -d -p 8081:80 my_web:2.0
추가 연습
- 먼저 파일을 설명한다.
- 우분투 latest를 사용하고 nginx를 설치한다.
- local에 html 디렉터리를 만든다.
- html 디렉터리 안에 hello.html 생성(내용: hello)
- html 디렉터리를 mount 한다.(Nginx의 Root 경로를 사용한다.)
- nginx 설정을 만들고 컨테이너의 conf.d 아래로 복사 nginx 실행한다
- 내부포트 노출 EXPOSE
- 외부 port80으로 Container 접속한다.
(10.17.0.150/hello)
Dockerfile
- 베이스 이미지는 ubuntu:latest이다.
- Dockerfile은 먼저, 업데이트 후 nginx 파일을 설치해준다.
- /etc/nginx/conf.d/는 컨테이너 내부에서 nginx를 사용하는 경우에 configuration file 경로이다. 복사해서 넣어준다.
- CMD는 컨테이서 실행시 nginx를 실행시킨다.
FROM ubuntu:latest
RUN apt update && apt install -y -q nginx
COPY my_config.conf /etc/nginx/conf.d/
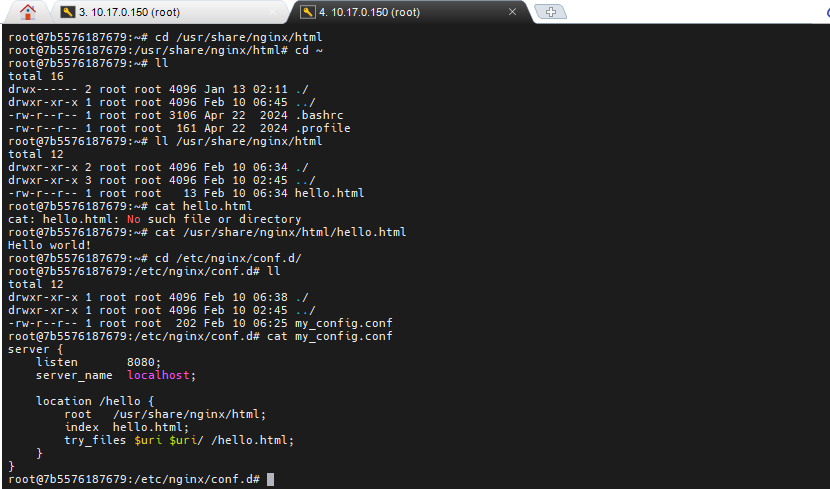
CMD ["nginx", "-g", "daemon off;"]html/hello.html
Hello world!my_config.conf
- /usr/share/nginx/html은 컨테이너 내부에서 hello.html가 위치해야 하는 위치이므로 Volume 설정시에 경로를 맞춰주면 된다.
- /root/webapp/html은 호스트 PC에 html 파일을 위치한 곳이다.
- 컨테이너 내부에서 8080 포트를 열고 있기 때문에 포트옵션은 80:8080으로 준다.
- location은 /hello로 되어 있는데 hello.html을 볼려면 x.x.x.x/hello 형식으로 웹페이지를 호출해야한다.
server {
    listen       8080;
    server_name  localhost;

    location /hello {
        root   /usr/share/nginx/html;
        index  hello.html;
        try_files $uri $uri/ /hello.html;
    }
}
- 컨테이너 빌드/실행/접속 명령어
# 이미지 빌드
docker image build -t hello_web:1.0 .

# 마운트 적용하여 실행
docker container run --name hell_web01 -d -p 80:8080 -v /root/webapp/html:/usr/share/nginx/html hello_web:1.0

# 이미지 접속하여 /bin/bash 실행
docker container exec -it hell_web01 /bin/bash

# confifgure 경로 확인(컨테이너 내부)
cat /etc/nginx/conf.d/my_config.html

# hello.html 확인
cat /usr/share/nginx/html/hello.html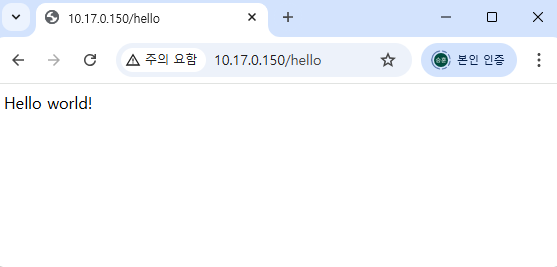
- 다른 방식 : Volume을 Dockerfile에서 먼저 정의하는 방식
# Dockerfile
FROM ubuntu:latest

RUN apt update && apt install -y -q nginx

COPY my_config.conf /etc/nginx/conf.d/my_nginx.conf

VOLUME ["/usr/share/nginx/html"]

EXPOSE 8080

CMD ["nginx", "-g", "daemon off;"]
docker container run --name exam -d -p 80:8080 -v ~/html:/usr/share/nginx/html exam:1.0