230111_TIL
Xcode 키보드가 안 보일 경우
-
IOS App을 만들다가 키보드가 올라오지 않을 때?
Command + K를 눌러주면 터치바가 올러오게 된다. -
영구적으로 적용시켜주려면?
Simulator에서
I/O ➡ Keyboard ➡ Connect Hardware Keyboard
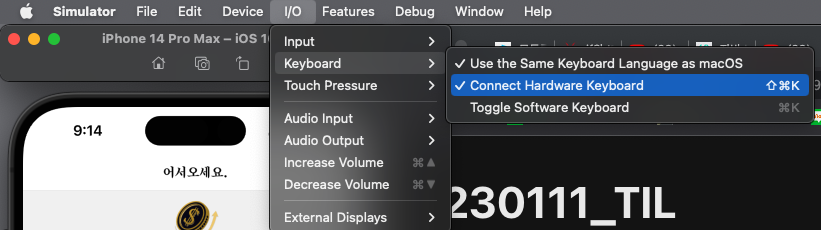
이렇게 간단한데.. 이 분 블로그 아니었으면 엄청 시간 쏟을뻔 했다.
Array.flat()
flat() 메서드는 모든 하위 배열 요소를 지정한 깊이까지 재귀적으로 이어붙인 새로운 배열을 생성한다.
const newArr = arr.flat([depth])depth - 중첩 배열 구조를 평탄화할 때 사용할 깊이 값. 기본값은 1이다.
- 반환값 :
flat( [1, [2,3], [4,5], [6,7] ] )⬅ 안에 여러 배열을 합쳐 하나의 배열로 반환한다.[1,2,3,4,5,6,7]
중첩 배열 평탄화
const arr1 = [1, 2, [3, 4]];
arr1.flat();
// [1, 2, 3, 4]

const arr2 = [1, 2, [3, 4, [5, 6]]];
arr2.flat(); // 기본값 1이라 하나의 배열만 병합하여 새로운 배열을 생성함
// [1, 2, 3, 4, [5, 6]]

const arr3 = [1, 2, [3, 4, [5, 6]]];
arr3.flat(2); // 2개의 배열을 하나로 병합하여 새로운 배열 생성
// [1, 2, 3, 4, 5, 6]

const arr4 = [1, 2, [3, 4, [5, 6, [7, 8, [9, 10]]]]];
arr4.flat(Infinity); // infinity속성으로 모든 배열을 하나로 병합하여 새로운 배열 생성
// [1, 2, 3, 4, 5, 6, 7, 8, 9, 10]
배열 공백 제거
flat()메서드는 배열의 공백을 제거하여 새로운 배열을 반환한다.
const arr5 = [1, 2, , 4, 5];
arr5.flat();
// [1, 2, 4, 5]
Array.reverse()
reverse()메서드는 배열의 순서를 반전시킨다. 첫 번째 요소는 마지막 요소가 되고, 마지막 요소는 첫 번째 요소가 된다.
-
주의 사항
reverse 메서드는 호출한 배열을 반전하고 🔥 원본 배열을 변형하며 그 참조를 반환합니다. -
예시코드
const array1 = ['one', 'two', 'three'];
console.log('array1:', array1);
// expected output: "array1:" Array ["one", "two", "three"]

✅ const reversed = array1.reverse();
✅ console.log('reversed:', reversed);
✅ // expected output: "reversed:" Array ["three", "two", "one"]

🔥 // Careful: reverse is destructive -- it changes the original array.
🔥 // reverse() 메서드는 기존 배열값을 바꿔버리기 때문에 조심해야한다.
console.log('array1:', array1);
// expected output: "array1:" Array ["three", "two", "one"]으로 기존 배열이 reverse되어 바뀌어버림.
옵셔널 체이닝(Optional Chaining)
옵셔널 체이닝의 연산자 개념
?.는 객체 내의 key에 접근할 때, 그 참조가 유효한지 아닌지 직접 명시하지 않고도 접근할 수 있는 연산자입니다.?.앞의 평가대상이 만약nullish (undefined OR null)일 경우, 평가를 멈추고undefined를 반환합니다.- 코드를 짜면서 객체내의 값을 접근하는 경우가 종종 있음. key값이 존재하는 경우보다 없는 경우도 있음.
예시로, 학생들의 점수 데이터를 가진 객체가 있는데, 학생 kim과 park의 영어점수에 접근하려 한다. But, park은 시험을 보지 않아서 점수가 없음.
// 옵셔널 체이닝 연산자 사용 전 코드
const students = {
    kim: {
        age: 20,
    	score: {
            korean: 90,
            english: 80,
            math: 40
        }
    },
    park: {
        age: 20,
    }
}

console.log(students.kim.score.english); // 80;
console.log(students.park.score.english); // TypeError: Cannot read properties of undefined (reading 'english')

// 옵셔널 체이닝을 쓰지않고 줄인 코드 (undefined 도출)
console.log(students.kim.score && students.park.score.english);
// 옵셔널 체이닝을 쓰지않고 줄인 코드 (작동하는 코드)
console.log(students.kim && students.park.score && students.park.score.english);

// 옵셔널 체이닝을 사용하여 줄인 코드
console.log(students.park?.score?.english);
익명함수 (Javascript Anonymous Function)
익명함수는 함수명 대신 ⭐️ 변수명에 함수 코드를 저장하는 구현 방식이다.
익명 함수의 소스 코드는 변수값이므로 끝에 세미콜론;을 대입한다.
익명 함수는 호출시, 변수명을 함수명처럼 사용한다.
익명함수 구조
- 변수에 함수의 코드를 저장
- 때문에 함수명을 사용하지 않음. 변수가 곧 함수 그 자체임.
<script>
  let 변수명 = function( 매개변수 )
  {
    실행문;
  };
</script>


👇

<script>
  //익명 함수 선언 및 변수에 대입
  var hello = function()
  {
    document.write("Hello World!");
  };

  //익명 함수 변수명으로 호출
  hello(); // 변수가 곧 함수 그 자체임. 실행 트리거인 괄호() 꼭 넣어줘야 함.
</script>
React Query (useMutation)
useMutation
useQuery와 다르게mutation은데이터를 생성, 업데이트, 삭제할 때 사용된다.
===insert, update, deleteuseQuery는 데이터를 불러올 때(조회) 사용. ===getuseMutation은 React Query를 이용해 서버에 데이터 변경 작업을 요청할 때 사용된다.
useMutatution 예시 코드
// 1
const savePerson = useMutation(mutationFn);

// 2
const savePerson = useMutation({
    mutationFn: mutationFn
})
➡ mutationFn ???
- mutation Function으로, promise 처리가 이루어지는 함수다.
- axios를 이용해 서버에 API를 요청하는 부분이라고 생각할 수 있음.
- 일반적으로 useMutation을 사용 할 때, 아래와 같이 코드가 작성된다.
// 1
const savePerson = useMutation((person: Iperson) => axios.post('/url', person));

// 2
const savePerson = useMutation({
    mutationFn: (person: Iperson) => axios.post('/url', person)
})
mutate
mutate는useMutation을 이용해 작성한 내용들이 실행될 수 있도록 도와주는trigger역할을 합니다.- ⭐️ 즉,
useMutation을 정의 해둔 뒤이벤트가 발생되었을 때 mutate를 사용해주면 된다.
예시 코드
// 출처_상단 2번째 링크 블로그
import * as React from 'react';
import { useMutation } from 'react-query';
import styled from 'styled-components';
import axios from 'axios';

interface Iperson {
    id: number;
    name: string;
    phone: string;
    age: number;
}

const Mutation = (): JSX.Element => {

    const [person, setPerson] = React.useState<Iperson>({
        id: 0,
        name: '',
        phone: '',
        age: 0,
    })

    const savePerson = useMutation((person: Iperson) => axios.post('http://localhost:8080/savePerson', person)); // useMutate 정의

    const onSavePerson = () => {
✅        savePerson.mutate(person); // 데이터 저장
    }

    return (
        <Wrapper>
            <Person.InputTable>
                <tbody>
                    <tr>
                        <td>
                            <Person.Text>이름</Person.Text>
                        </td>
                        <td>
                            <input type='text' onChange={(e) => setPerson((curPerson) => {
                                return {
                                    ...curPerson,
                                    name: e.target.value
                                }
                            })}/>
                        </td>
                    </tr>

                    <tr>
                        <td>
                            <Person.Text>전화번호</Person.Text>
                        </td>
                        <td>
                            <input type='text' onChange={(e) => setPerson((curPerson) => {
                                return {
                                    ...curPerson,
                                    phone: e.target.value
                                }
                            })}/>
                        </td>
                    </tr>

                    <tr>
                        <td>
                            <Person.Text>나이</Person.Text>
                        </td>
                        <td>
                            <input type='number' onChange={(e) => setPerson((curPerson) => {
                                return {
                                    ...curPerson,
                                    age: Number(e.target.value)
                                }
                            })}/>
                        </td>
                    </tr>
                </tbody>
            </Person.InputTable>

            <Person.SaveButton onClick={onSavePerson}>저장</Person.SaveButton>
        </Wrapper>
    )
}

export default Mutation;

const Wrapper = styled.div`
    max-width: 728px;

    margin: 0 auto;

    text-align: center;
`;

const Person = {
    InputTable: styled.table`
        border-spacing: 18px 0;

        text-align: center;

        margin: 0 auto;
    `,

    Text: styled.h3``,

    SaveButton: styled.button`
        width: 92px;
        height: 32px;

        border: none;
        border-radius: 8px;

        background-color: orange;

        color: #fff;

        cursor: pointer;
    `
}
Option
- option을 포함한 예시 코드
// 1
const savePerson = useMutation((person: Iperson) => axios.post('http://localhost:8080/savePerson', person), {
✅    onSuccess: () => { // 요청이 성공한 경우
        console.log('onSuccess');
    },
✅    onError: (error) => { // 요청에 에러가 발생된 경우
        console.log('onError');
    },
✅    onSettled: () => { // 요청이 성공하든, 에러가 발생되든 실행하고 싶은 경우
        console.log('onSettled');
    }
});

// 2
const savePerson = useMutation({
    mutationFn: (person: Iperson) => axios.post('/savePerson', person),
    onSuccess: () => { // 요청이 성공한 경우
        console.log('onSuccess');
    },
    onError: (error) => { // 요청에 에러가 발생된 경우
        console.log('onError');
    },
    onSettled: () => { // 요청이 성공하든, 에러가 발생되든 실행하고 싶은 경우
        console.log('onSettled');
    }
})- useMutation을 정의할 때만 사용하는 것이 아닌, 트리거인 mutate에도 사용할 수 있다.
const onSavePerson = () => {
✅    savePerson.mutate(person, {
✅        onSuccess: () => { // 요청이 성공한 경우
            console.log('onSuccess');
        },
✅        onError: (error) => { // 요청에 에러가 발생된 경우
            console.log('onError');
        },
✅        onSettled: () => { // 요청이 성공하든, 에러가 발생되든 실행하고 싶은 경우
            console.log('onSettled');
        }
    }); // 데이터 저장
}
React Natvie Layout Desing
View의 크기(범위)를 결정하는 속성
View의 크기를 결정하는 속성은 flex와 width, height 두 가지로 나뉜다.
width, height에 숫자를 넣으면 고정 크기, %를 넣으면 화면 크기에 따른 상대적 크기를 설정할 수 있습니다.
flex는 크기를 비율로 설정하는 것 입니다.
⭐️
flex는부모 View 크기의 특정 비율만큼 차지하게 됩니다.
- 예시코드
export default class App extends Component<Props> {
  render() {
    return (
      <View style={styles.container}>
        <View style={styles.case1} />
        <View style={styles.case2} />
        <View style={styles.case3} />
      </View>
    );
  }
}

const styles = StyleSheet.create({
  container: {
    flex: 1,
    backgroundColor: 'white',
  }, // ✅ 전체 컨테이너. 화면 100% 비율
  case1: {
    flex: 1,
    backgroundColor: 'red',
  }, // ✅ 부모 컨테이너의 1 차지
  case2: {
    flex: 3,
    backgroundColor: 'green',
  }, // ✅ 부모 컨테이너의 3 차지
  case3: {
    flex: 1,
    backgroundColor: 'blue',
  }, // ✅ 부모 컨테이너의 1 차지.

디바이스 전체를 지금, 1 : 3 : 1의 비율로 화면을 차지하고 있음.- 'flex: 1' 인 컨테이너(container) 뷰는 화면 전체를 1의 비율만큼 차지하고 있다.
- case1,2,3은 컨테이너 View 안에서 각각 1:3:1의 비율만큼 공간을 차지하고 있다.
flex는 부모 View 크기의 특정 비율만큼 차지하게 됩니다.
컨테이너 View의 부모는 화면 전체를 뜻하게 됩니다.
Skeleton UI
스켈레톤 UI는 실제 데이터가 렌더링 되기 전에 보이게 될 화면의 윤곽을 먼저 그려주는 로딩 애니메이션이다.
"어떤 것이 보여질 것입니다 ~"라고 미리 알려주는 효과를 주어 사용자의 이탈을 방지하는 효과를 기대할 수 있음.
CSS만으로 댓글 최신순으로 올려주기
예시 ) 모바일 환경에서 만약 댓글같은 것을 달았을 때,
- 제일 상위 컴포넌트에
flex-direction : column-reverse

reverse해주기 전에는 댓글이 맨 밑으로 갔는데,
reverse로 적용해주니 최신순으로 댓글이 맨 위로 달린다.
이로써 간단하게 css 속성만으로 최신순으로 볼 수 있게 되었다.