사전 지식
시간 변환
Duration 클래스
만난 지 며칠 U&I 프로젝트에서 이미 Duration 클래스를 사용했었다. Duration 클래스는 특정 날짜를 가리키는 DateTime 과는 다르게 기간을 표현할 수 있는 클래스였다.
video_player 플러그인을 사용하면서 현재 실행되고 있는 영상의 위치, 총 길이 등을 Duration 클래스로 반환받게 된다.
이때, 개발자가 선호하는 자료 형태와 실제 사용자가 선호하는 자료 형태가 다르기 때문에 보기 좋은
String 값으로Duration 클래스를 전화하는 게 매우 중요하다!
Duration 클래스를 String 으로 전환
Duration 클래스를 화면에 그대로 출력하면 개발자들은 쉽게 이해할 수 있지만 일반 사람은 이해하기 힘들다.
Duration duration = Duration(seconds: 192);
print(duration); // 0:03:12.000000 출력
0:03:12.000000 에서 '.' 앞부분만 출력하고 싶다.
String 에 split() 함수로 원하는 부분만 가져오자
Duration duration = Duration(seconds: 192);
print(duration.toString().split('.')[0]); // 0:03:12출력
split() 함수
split() 함수는 첫번째 매개변수에 들어오는 값을 기준으로 String 값을 나누고 각각 나뉜 값을 List에 넣어서 반환한다.
즉, duration = 0:03:12.000000 을 duration.toString().split('.') 을 하면
List에 [0:03:12, 000000] 이 저장된다.
여기서 [0] 번째 인덱스를 출력하니까 0:03:12가 출력되는 것이다.
print(duration.toString().split('.')[0].split(':').sublist(1,3).join(':')); // 03:12이렇게 하면 '시' 단위를 생략하고 '분:초' 단위로 표현할 수 있다. 근데 복잡하다.
Duration 클래스의 정의로 이동해서 toString() 함수를 보면 '초' 단위 시간을 '시', '분', '초' 로 변환하는 방법이 코드로 작성되어 있다. 이걸 참고해보자
print('${duration.inMinutes.toString().padLeft(2, '0')}:${(duration.inSeconds % 60).toString().padLeft(2, '0')}'); // 03:12 출력padLeft(), padRight()함수들
pad() 함수들은 String의 길이를 맞춰주는 역할을 한다.
첫번째 매개변수에 String의 최소 길이를 입력하고 두번째 매개변수에 길이가 부족할 때 채워줄 String 값을 넣어준다.
Left,Right에 따라서 왼쪽에 채워줄지 오른쪽에 채워줄지를 정한다.print('23'.padLeft(3,'0')); // 023 print('233'.padLeft(3,'0')); // 233
사전 준비
pubspec.yaml 설정하기
image_picker 패키지 다운로드
flutter pub add image_pickervideo_player 패키지 다운로드
flutter pub add video_player네이티브 설정하기
이번 프로젝트는 갤러리 관련 권한이 필요하다. 따라서 갤러리 권한을 추가해줘야 한다.
안드로이드 권한은 AndroidManifest.xml 파일에서 추가할 수 있다.
<uses-permission android:name="android.permission.READ_EXTERNAL_STORAGE" />프로젝트 초기화하기
homescreen 위젯을 만들자
import 'package:flutter/material.dart';

class HomeScreen extends StatelessWidget {
  const HomeScreen({super.key});

  @override
  Widget build(BuildContext context) {
    return Scaffold(
      body: Text('홈스크린'),
    );
  }
}
레이아웃 구상하기
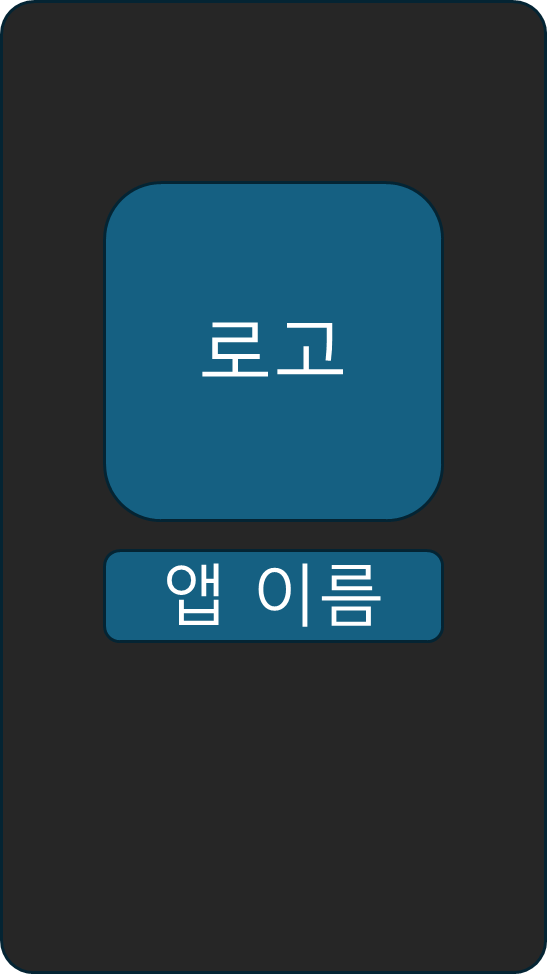
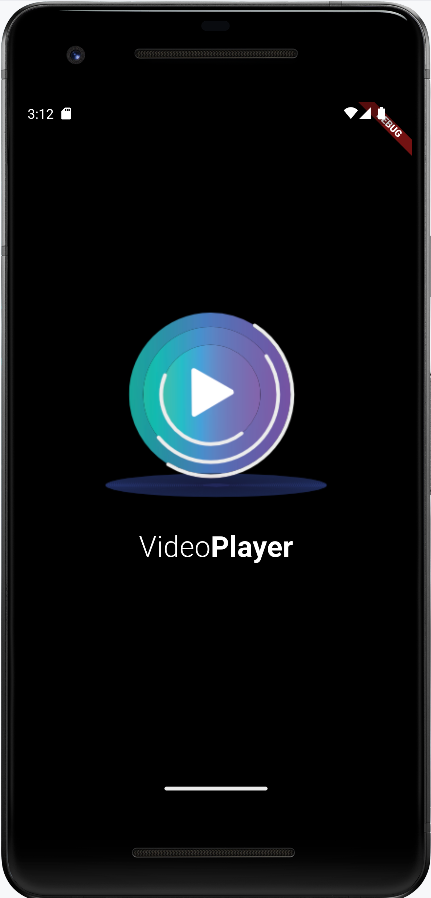
첫 화면 : renderEmpty()함수
앱을 처음 실행했을 때 화면에 보여줄 위젯을 반환하는 함수이다.
앱의 로고와 이름을 보여주고 배경에 gradiant를 적용해보자
플레이 화면 : renderVideo() 함수
구현하기
1. 첫 화면 : renderEmpty() 함수 구현하기
Xfile 클래스
HomeScreen 에서 동영상 파일 선택과 관련해서 상태 관리를 할 계획이니 HomeScreen 클래스를 StatefulWidget 으로 구성해준다.
동영상을 선택할 때 사용할 image_picker 플러그인은 이미지나 동영상을 선택했을 때, Xfile 이라는 클래스 형태로 선택된 값을 반환해준다.
Xfile 형태의 video 변수를 선언하고 이 값을 기반으로 renderEmpty() 를 보여줄지 renderVideo() 를 보여줄지 정한다.
import 'package:flutter/material.dart';
import 'package:image_picker/image_picker.dart';

class HomeScreen extends StatefulWidget {
  const HomeScreen({super.key});

  @override
  State<HomeScreen> createState() => _HomeScreenState();
}

class _HomeScreenState extends State<HomeScreen> {
  XFile? video; // 1. 동영상 저장할 변수

  @override
  Widget build(BuildContext context) {
    return Scaffold(
      backgroundColor: Colors.black,
      // 2. 동영상이 선택됐을 때, 선택 안됐을 때 보여줄 위젯, 조건부 연산자로 구현
      body: video == null ? renderEmpty() : renderVideo(),
    );
  }

  Widget renderEmpty() { // 3. 동영상 선택 전 보여줄 위젯
    return Container();
  }

  Widget renderVideo() { // 4. 동영상 선택 후 보여줄 위젯
    return Container();
  }
}
renderEmpty() 함수 설계하기
class _HomeScreenState extends State<HomeScreen> {
  XFile? video; // 1. 동영상 저장할 변수

  @override
  Widget build(BuildContext context) {
    return Scaffold(
      backgroundColor: Colors.black,
      // 2. 동영상이 선택됐을 때, 선택 안됐을 때 보여줄 위젯, 조건부 연산자로 구현
      body: video == null ? renderEmpty() : renderVideo(),
    );
  }
//===================================================================
  Widget renderEmpty() {
    // 3. 동영상 선택 전 보여줄 위젯
    return Container(
      width: MediaQuery.of(context).size.width, // 너비 최대로 늘리기
      child: Column(
        mainAxisAlignment: MainAxisAlignment.center,
        children: [
          _Logo(), // 로고 이미지 위젯
          SizedBox(
            height: 30.0,
          ),
          _AppName(), // 앱 이름 위젯
        ],
      ),
    );
  }
//===================================================================
  Widget renderVideo() {
    // 4. 동영상 선택 후 보여줄 위젯
    return Container();
  }
}
_Logo 위젯
// 로고를 보여줄 위젯
class _Logo extends StatelessWidget {
  const _Logo({super.key});

  @override
  Widget build(BuildContext context) {
    return Image.asset('asset/img/logo.png');
  }
}
_AppName 위젯
// 앱 제목 출력하는 위젯
class _AppName extends StatelessWidget {
  const _AppName({super.key});

  @override
  Widget build(BuildContext context) {
    final textStyle = TextStyle(
      color: Colors.white,
      fontSize: 30.0,
      fontWeight: FontWeight.w300,
    );
    return Row(
      mainAxisAlignment: MainAxisAlignment.center,
      children: [
        Text('Video', style: textStyle),
        Text(
          'Player',
          style: textStyle.copyWith(
            fontWeight: FontWeight.w700, // textStyle 에서 폰트 두께만 700으로 변경
          ),
        )
      ],
    );
  }
}
결과
2. 배경색 그라데이션 구현하기
BoxDecoration 클래스를 사용하면 Container 위젯의 배경색, 테두리, 모서리 둥근 정도 등 전반적인 디자인을 변경할 수 있다.
또한 BoxDecoration 클래스 에는 Gradiant 라는 매개변수가 있다. 이걸 이용하면 그라데이션을 구현할 수 있다.
Widget renderEmpty() {
    // 3. 동영상 선택 전 보여줄 위젯
    return Container(
      width: MediaQuery.of(context).size.width, // 너비 최대로 늘리기
      decoration: getBoxDecoration(), // 1. getBoxDecoration() 함수로부터 값 가져오기
      child: Column(
        mainAxisAlignment: MainAxisAlignment.center,
        children: [
          _Logo(),
          SizedBox(
            height: 30.0,
          ),
          _AppName(),
        ],
      ),
    );
  }

  BoxDecoration getBoxDecoration() {
    return BoxDecoration(
        // 2. 그라데이션 색상 적용하기
        gradient: LinearGradient(
            begin: Alignment.topCenter,
            end: Alignment.bottomCenter,
            colors: [
          Color(0xFF2A3A7C),
          Color(0xFF000118),
        ]));
}결과

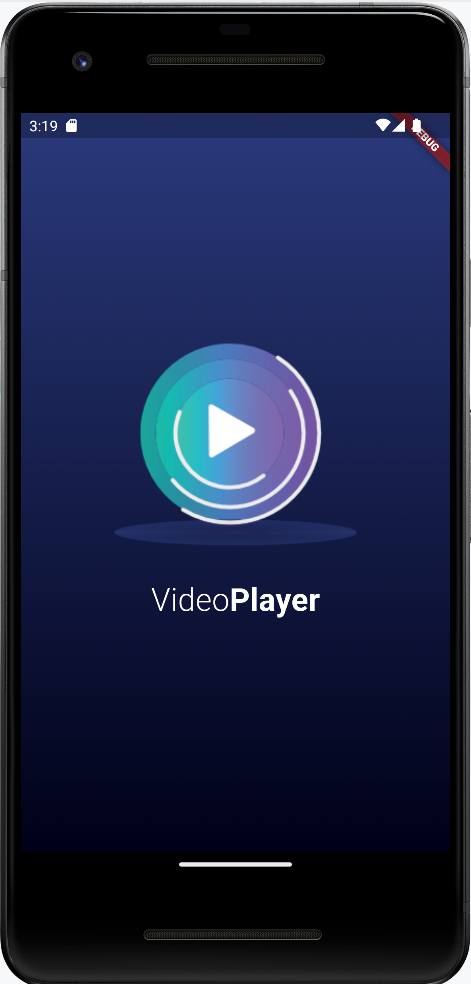
그라데이션이 구현이 됐다!
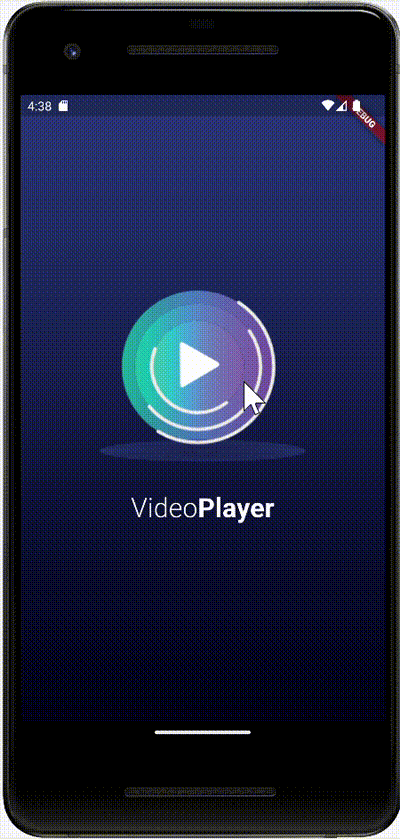
3. 파일 선택 기능 구현하기
로고를 탭하면 비디오와 사진을 선택할 수 있는 기능을 구현해보자
_Logo 위젯에 GestureDetector를 추가해서 onTap() 함수가 실행됬을 때, 동영상을 선택하는 onNewVideoPressed()함수 를 실행하겠다.
이미지 선택하는 기능을 구현한 onNewPressed() 함수
Widget renderEmpty() {

    return Container(
      width: MediaQuery.of(context).size.width,
      decoration: getBoxDecoration(),
      child: Column(
        mainAxisAlignment: MainAxisAlignment.center,
        children: [
          _Logo(onTap: onNewVideoPressed,), // 1. 로고 탭하면 실행하는 함수 onNewVideoPressed 전달
          SizedBox(
            height: 30.0,
          ),
          _AppName(),
        ],
      ),
    );
  }

  // 2. 이미지 선택하는 기능을 구현한 함수
  void onNewVideoPressed() async {
    final video = await ImagePicker().pickVideo(
      source: ImageSource.gallery,
    );
    if (video != null) {
      setState(() {
        this.video = video;
      });
    }
}-
_Logo 위젯을 탭 했을 때 실행되는onTap 매개변수에onNewVideoPressed() 함수를 입력해서 로고를 탭하면 동영상을 선택하는 화면이 실행되게 한다. -
ImagePicker().pickVideo() 함수를 실행하면 동영상을 선택하는 화면을 실행할 수 있다.
ImagePicker().pickVideo() 함수
이 함수의source 매개변수로ImageSource.gallery또는ImageSource.camera를 선택할 수 있다.
ImageSource.gallery는 이미 저장되어 있는 동영상을 갤러리로부터 선택하는 화면을 실행하고
ImageSource.camera는 카메라를 실행한 후 동영상 촬영을 마치면 해당 영상이 선택된다.
선택한 동영상을XFile 형태로비동기로 반환받을 수 있으며 사용자가 선택한 값이 존재하면 video 변수에 저장한다.
_Logo 클래스, onTap 으로 상위 위젯으로부터 탭 콜백 받기
class _Logo extends StatelessWidget {
  final GestureTapCallback onTap; // 탭했을 때 실행할 함수
  const _Logo({super.key, required this.onTap});

  @override
  Widget build(BuildContext context) {
    return GestureDetector(
      onTap: onTap, // 3. 상위 위젯으로부터 탭 콜백 받기
      child: Image.asset('asset/img/logo.png'),
    );
  }
}Image.asset을GestureDetector로 감싸서onTap() 함수를 외부로부터 입력받는다.
여기서는_HomeScreenState의onNewVideoPressed() 함수를 입력받는다.
4. 플레이어 화면 구현하기
CustomVideoPlayer 위젯을 따로 생성하서 영상 재생과 관련된 모든 코딩을 작업할 것이다.
일단 renderVideo() 함수에서는 CustomVideoPlayer 위젯을 배치하는 정도의 작업만 하겠다.
Widget renderVideo() {
    // 4. 동영상 선택 후 보여줄 위젯
    return Center(
      child: CustomVideoPlayer(), // 동영상 재생기 위젯
    );
  }
5. 동영상 재생기 위젯 CustomVideoPlayer 구현하기
lib 아래에 component 폴더를 생성하고 그 안에 custom_video_player.dart 파일을 생성한다.
CustomVideoPlayer 위젯은 HomeScreen 위젯에서 선택된 동영상을 재생하는 모든 상태를 관리한다. 따라서 StatefulWidget으로 생성한다.
import 'package:flutter/material.dart';
import 'package:image_picker/image_picker.dart';

// 1. 동영상 재생기 위젯 생성
class CustomVideoPlayer extends StatefulWidget {
  final XFile video; // 선택한 동영상을 저장할 변수

  const CustomVideoPlayer(
      {super.key, required this.video}); // 상위에서 선택한 동영상 주입해주기

  @override
  State<CustomVideoPlayer> createState() => _CustomVideoPlayerState();
}

class _CustomVideoPlayerState extends State<CustomVideoPlayer> {
  @override
  Widget build(BuildContext context) {
    return Center(
      child: Text(
        '비디오 플레이어', // 2. 샘플 텍스트
        style: TextStyle(color: Colors.white),
      ),
    );
  }
}
홈스크린에 CustomVideoPlayer 위젯 넣기
import 'package:flutter/material.dart';
import 'package:image_picker/image_picker.dart';
import 'package:vid_player/component/custom_video_player.dart';

.
.
.

class _HomeScreenState extends State<HomeScreen> {

  .
  .
  .

  Widget renderVideo() {
    return Center(
      child: CustomVideoPlayer(video: video!), // 2. 선택된 동영상 입력해주기
    );
  }
}
실행 모습
로고를 눌러서 동영상을 선택하면 샘플 텍스트로 입력한 '비디오 플레이어' 문구가 보인다.
6. CustomVideoPlayer 위젯 기능 개선하기
선택한 동영상을 화면에 보여주기
video_player 패키지에서 VideoPlayerController 와 VideoPlayer 위젯을 이용해서 선택한 동영상을 화면에 보여주는 기능을 구현하겠다.
import 'dart:io';

import 'package:flutter/material.dart';
import 'package:image_picker/image_picker.dart';
import 'package:video_player/video_player.dart';

class CustomVideoPlayer extends StatefulWidget {
  final XFile video; // 선택한 동영상을 저장할 변수

  const CustomVideoPlayer(
      {super.key, required this.video}); // 상위에서 선택한 동영상 주입해주기

  @override
  State<CustomVideoPlayer> createState() => _CustomVideoPlayerState();
}

class _CustomVideoPlayerState extends State<CustomVideoPlayer> {
  VideoPlayerController? videoController; // 1. 동영상을 조작하는 컨트롤러
  @override
  void initState() {
    super.initState();

    initializeController(); // 2. 컨트롤러 초기화 함수
  }

  initializeController() async { // 3. 선택한 동영상으로 컨트롤러 초기화 하는 함수
    final videoController = VideoPlayerController.file(
      File(widget.video.path),
    );
    await videoController.initialize();

    setState(() {
      this.videoController = videoController;
    });
  }

  @override
  Widget build(BuildContext context) {
    if (videoController == null) { // 4. 동영상 컨트롤러가 준비중일 때, 로딩처리
      return Center(
        child: CircularProgressIndicator(), // 로딩 표시
      );
    }
    return AspectRatio( // 5. 동영상 비율에 따른 화면 렌더링 조정
      aspectRatio: videoController!.value.aspectRatio,
      child: VideoPlayer(
        videoController!,
      ),
    );
  }
}
-
initializeController는VideoPlayerController를 선언하는 역할을 한다.
VideoPlayerController는State가 생성되는 순간 한번만 생성되어야 하니initState() 함수에서 선언한다. -
VideoPlayerController.file 생성자를 이용해서 파일로부터VideoPlayerController를 생성한다.
-
VideoPlayerController를 생성하고 나면initialize() 함수를 실행해서 동영상을 재생할 수 있는 상태로 준비해줘야 한다. -
에러없이
initialize() 함수가 실행되면VideoPlayerController를 사용할 수 있는 상태라는 뜻이니setState() 함수로this.videoController에 준비한videoController 변수를 저장한다.
-
videoController == null일 때 (즉, 준비가 되지 않았을 때) 로딩처리를 해준다 -
AspectRatio는child 매개변수에 입력되는 위젯의 비율을 정할 수 있는 위젯이다.aspectRatio 매개변수에 원하는 비율을 입력할 수 있다.
VideoPlayerController 를 선언할 수 있는 대표적인 3가지 생성자들

7. Slider 위젯 동영상과 연동하기
Stack 위젯으로 VideoPlayer 위젯과 Slider 위젯 배치하기
Stack 위젯을 활용해보겠다.
 @override
  Widget build(BuildContext context) {
    if (videoController == null) {
      return Center(
        child: CircularProgressIndicator(), // 로딩 표시
      );
    }
    return AspectRatio(
      aspectRatio: videoController!.value.aspectRatio,
      child: Stack( // 1. children 위젯을 위로 쌓을 수 있는 Stack 위젯
        children: [
          VideoPlayer( // VideoPlayer 위젯을 Stack 으로 이동
            videoController!,
          ),
          Positioned( // 2. child 위젯의 위치를 정할 수 있는 위젯
            bottom: 0,
            right: 0,
            left: 0,
            child: Slider( // 3. 동영상 재생 상태를 보여주는 Slider 위젯
              value: 0,
              onChanged: (double val) {},
              min: 0,
              max: videoController!.value.duration.inSeconds.toDouble(), // 동영상의 재생 길이를 초 단위로 반환
            ),
          ),
        ],
      ),
    );
}-
Stack 위젯은 위젯이List에 입력되는 순서대로 쌓아 올려진다. -
Stack 위젯은 기본적으로children 위젯들을 정중앙에 위치시킨다.
만약Stack 위젯내부의 특정 위치에 위젯을 위치시키고 싶다면Positioned 위젯을 사용해서 위치를 정해줘야 한다.Positioned 위젯
child 매개변수 외에 top, bottom, left, right 매개변수를 입력할 수 있다.
각각 위 아래, 왼쪽, 오른쪽에서 몇 픽셀에 child 위젯을 위치할지 정할 수 있다.
Slider 위젯 완성하기
return AspectRatio(
      aspectRatio: videoController!.value.aspectRatio,
      child: Stack(
        children: [
          VideoPlayer(
            videoController!,
          ),
          Positioned(
            bottom: 0,
            right: 0,
            left: 0,
            child: Slider(
              // 동영상 재생 상태를 보여주는 Slider 위젯
              onChanged: (double val) {
                // 1. Slider가 이동할 때 마다 실행할 함수
                videoController!.seekTo(
                  Duration(seconds: val.toInt()),
                );
              },
              // 2. 동영상 재생 위치를 초 단위로 표현
              value: videoController!.value.position.inSeconds.toDouble(),
              min: 0,
              max: videoController!.value.duration.inSeconds.toDouble(),
            ),
          ),
        ],
      ),
);-
seekTo() 함수는 동영상의 재생 위치를 특정 위치로 이동해준다. -
position.inSeconds 게터를 실행하면 현재 동영상이 실행되고 있는 위치를 받을 수 있다.
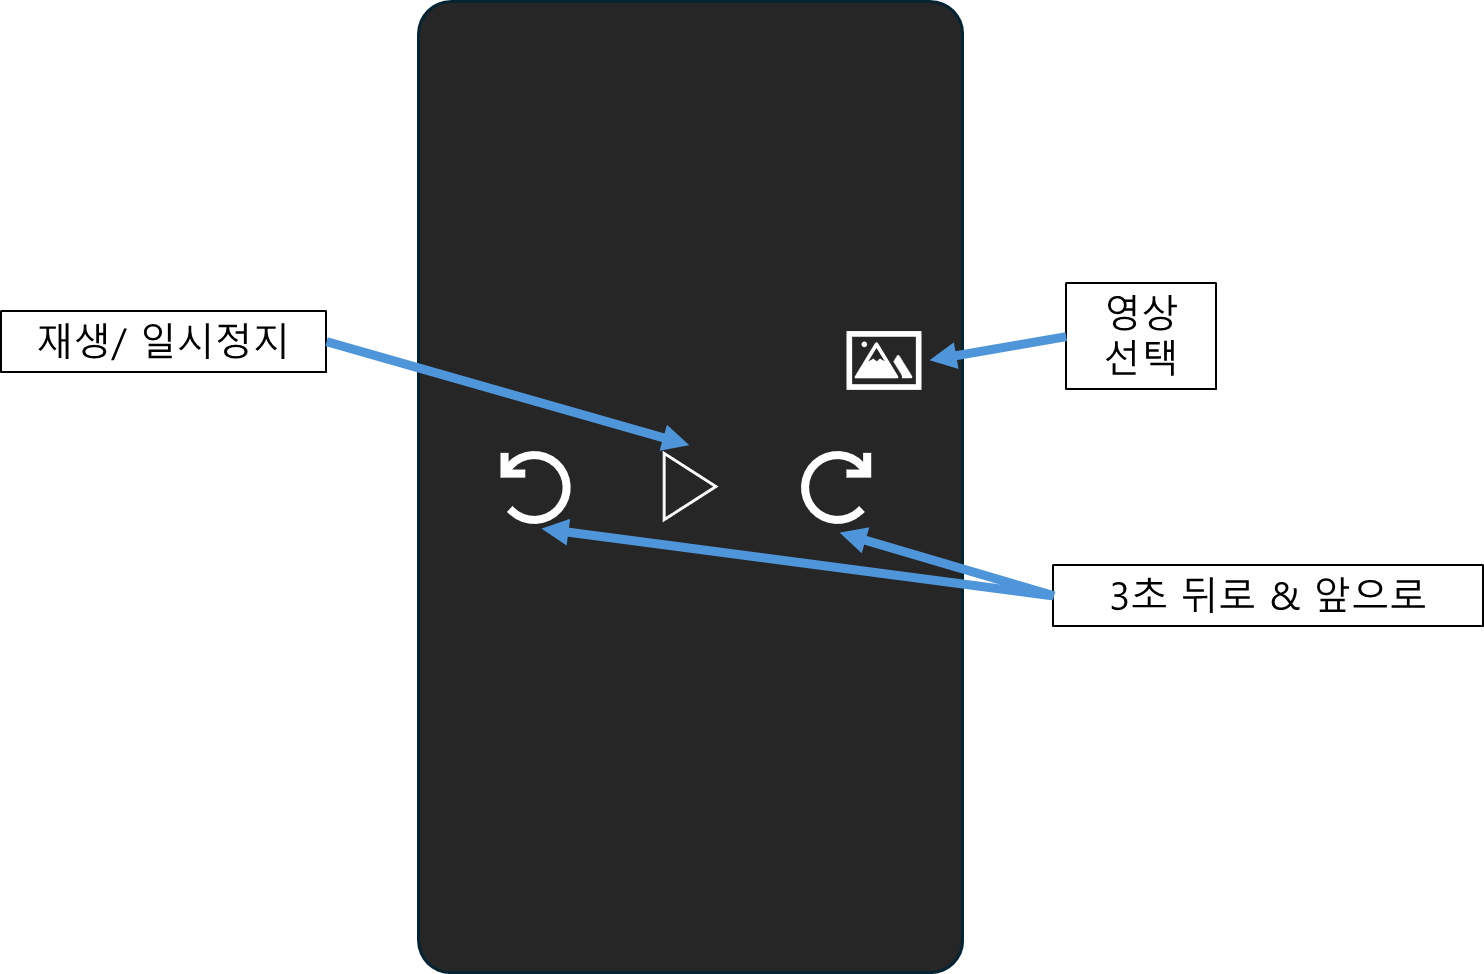
8. 동영상 컨트롤 버튼 구현하기

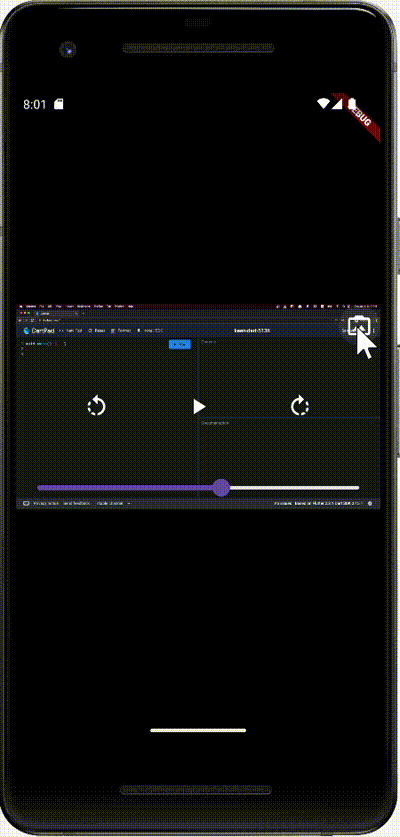
여기 레이아웃에 있는 4개의 버튼을 구현할 것이다.
버튼의 공통된 기능을 구현할 위젯을 하나 만들자.
버튼 공통 위젯 구현
아이콘을 눌렀을 때 실행할 함수를 onPressed 매개변수로 받고 아이콘 모양을 IconData 매개변수로 받도록 한다.
import 'package:flutter/material.dart';

// 아이콘 모양과 눌렀을 때 실행할 함수를 가진 인스턴스 생성
class CustomIconButton extends StatelessWidget {
  final GestureTapCallback onPressed; // 1. 아이콘을 눌렀을 때 실행할 함수
  final IconData iconData; // 2. 아이콘 모양(상위 위젯에서 모양에 따라 인스턴스를 생성할 것)

  // 생성자
  const CustomIconButton(
      {super.key, required this.onPressed, required this.iconData});

  @override
  Widget build(BuildContext context) {
    return IconButton( // 아이콘을 버튼으로 만들어주는 IconButton 위젯
      onPressed: onPressed, // 아이콘을 눌렀을 때 실행할 함수
      iconSize: 30.0, // 아이콘 크기
      color: Colors.white, // 아이콘 색상
      icon: Icon( // 아이콘
        iconData, // 생성자로부터 아이콘 모양 전달받음
      ),
    );
  }
}
아이콘 버튼 구현하기
Stack 위젯 안에서 Align 위젯을 활용하여 정렬할 수도 있다.
import 'package:vid_player/component/custom_icon_button.dart';


class CustomVideoPlayer extends StatefulWidget {
  .
  .
  .
}

class _CustomVideoPlayerState extends State<CustomVideoPlayer> {
  VideoPlayerController? videoController; // 1. 동영상을 조작하는 컨트롤러
  @override
  void initState() {

    .
    .
    .

  }

  @override
  Widget build(BuildContext context) {

    .
    .
    .

    return AspectRatio(
      aspectRatio: videoController!.value.aspectRatio,
      child: Stack(
        children: [
          VideoPlayer(
            videoController!,
          ),
          Positioned(
      				 .
                     .
                     .
          ),
          Align( // 1. 오른쪽 위에 새 동영상 아이콘 위치
            alignment: Alignment.topRight,
            child: CustomIconButton(
              onPressed: () {},
              iconData: Icons.photo_camera_back,
            ),
          ),
          Align( // 2. 동영상 재생 관련 아이콘 중앙에 위치
            alignment: Alignment.center,
            child: Row(
              mainAxisAlignment: MainAxisAlignment.spaceEvenly,
              children: [
                CustomIconButton( // 되감기 버튼
                  onPressed: () {},
                  iconData: Icons.rotate_left,
                ),
                CustomIconButton( // 재생 버튼
                  onPressed: () {},
                  iconData: videoController!.value.isPlaying
                      ? Icons.pause
                      : Icons.play_arrow,
                ),
                CustomIconButton( // 앞으로 감기 버튼
                  onPressed: () {},
                  iconData: Icons.rotate_right,
                ),
              ],
            ),
          ),
        ],
      ),
    );
  }
}

4개의 버튼들이 배치가 잘 되었다.
되감기 버튼 눌렀을 때 실행할 함수 구현
// 되감기 버튼 눌렀을 때 실행할 함수
  void onReversePressed() {
    final currentPosition = videoController!.value.position; // 현재 실행중인 위치

    Duration position = Duration(); // 0초로 실행 위치 초기화

    if (currentPosition.inSeconds > 3) {
      // 현재 실행 위치가 3초보다 길 때만 3초 되감기 하기
      position = currentPosition - Duration(seconds: 3);
    }
    videoController!.seekTo(position);
  }
빨리감기 버튼 눌렀을 때 실행할 함수 구현
// 빨리감기 버튼 눌렀을 때 실행할 함수
  void onForwardPressed() {
    final maxPosition = videoController!.value.duration; // 동영상 총 길이
    final currentPosition = videoController!.value.position; // 현재 실행중인 위치

    Duration position = maxPosition; // 동영상 총 길이로 실행 위치 초기화

    if ((maxPosition - Duration(seconds: 3)).inSeconds >
        currentPosition.inSeconds) {
      // 현재 실행 위치가 3초보다 길 때만 3초 빨리감기 하기
      position = currentPosition + Duration(seconds: 3);
    }
    videoController!.seekTo(position);
  }
재생 버튼 눌렀을 때 실행할 함수
// 재생 버튼 눌렀을 때 실행할 함수
  void onPlayPressed() {
    if (videoController!.value.isPlaying) { // 현재 동영상이 실행중이면
      videoController!.pause(); // 일시정지
    }
    else {
      videoController!.play(); // 동영상이 정지중이면 다시 실행
    }
  }
Slider 위젯에 동영상의 실행 위치 반영하기
동영상이 현재 실행되고 있는 위치가 바뀔 때 마다 build() 함수가 계속 재실행 되어야 한다.
addListener() 함수를 사용해서 videoController 변수의 상태가 변경될 때 마다 setState() 함수로 build() 함수를 재실행해주면 현재 동영상의 위치가 정상적으로 Slider 위젯에 반영될 수 있다.
class _CustomVideoPlayerState extends State<CustomVideoPlayer> {

  .
  .
  .

  initializeController() async {
    final videoController = VideoPlayerController.file(
      File(widget.video.path),
    );
    await videoController.initialize();

    // 1. 컨트롤러의 속싱이 변경될 때 마다 실행할 함수 등록
    videoController.addListener(videoControllerListener);

    setState(() {
      this.videoController = videoController;
    });
  }

  // 동영상의 재생 State가 변경될 때 마다 setState() 를 실행해서 build()를 재실행한다.
  void videoControllerListener() {
    setState(() {});
  }
  // State가 폐기될 때 같이 폐기할 함수들 실행 (메모리관리)
  @override
  void dispose() {
    // 2. listener 삭제
    videoController?.removeListener(videoControllerListener);
    super.dispose();
  }

.
.
.

}
Slider 위젯과 버튼 기능 반영 확인
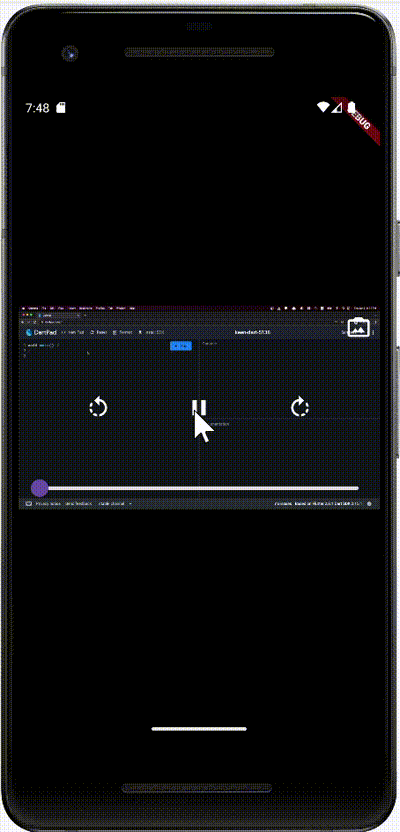
재생버튼, 되감기 빨리감기, Slider 전부 다 잘 작동하는 모습이다.
영상 선택 버튼 기능 구현하기
home_screen.dart 파일에 renderVideo() 함수에 onNewVideoPressed() 함수를 전달한다.
Widget renderVideo() {
    // 4. 동영상 선택 후 보여줄 위젯
    return Center(
      child: CustomVideoPlayer(
        video: video!,
        onNewVideoPressed: onNewVideoPressed,
      ), // 2. 선택된 동영상 입력해주기
    );
  }
그리고 CustomVideoPlayer 위젯에 onNewVideoPressed 함수를 전달해 준다.
class CustomVideoPlayer extends StatefulWidget {
  final XFile video; // 선택한 동영상을 저장할 변수
  final GestureTapCallback onNewVideoPressed; // 새로운 동영상을 선택하면 실행되는 함수

  const CustomVideoPlayer(
      {super.key,
      required this.video,
      required this.onNewVideoPressed}); // 상위에서 선택한 동영상 주입해주기

  @override
  State<CustomVideoPlayer> createState() => _CustomVideoPlayerState();
}

class _CustomVideoPlayerState extends State<CustomVideoPlayer> {

  .
  .
  .

    return AspectRatio(
      aspectRatio: videoController!.value.aspectRatio,
      child: Stack(
        children: [
          VideoPlayer(
            videoController!,
          ),
          Positioned(
            .
            .
            .

          ),
          Align(
            // 1. 오른쪽 위에 새 동영상 아이콘 위치
            alignment: Alignment.topRight,
            child: CustomIconButton(
     		  // 카메라 아이콘을 선택하면 새로운 동영상 선택하는 함수 실행
              onPressed: widget.onNewVideoPressed,
              iconData: Icons.photo_camera_back,
            ),
          ),

            .
            .
            .
}
동영상을 이미 선택한 상황에서 새로운 동영상 선택하게 만들기
동영상 선택 아이콘을 누르면 동영상 선택 화면이 나오지만, 다른 동영상을 눌러도 현재 실행중인 영상만 나온다.
왜냐하면 동영상의 소스를 videoController 변수를 인스턴스화 할 때 선언했는데 현재 코드에서 videoController 변수는 initState() 함수에서만 선언되기 때문이다.
@override
  void initState() {
    super.initState();

    initializeController(); // 2. 컨트롤러 초기화 함수
  }

  initializeController() async {
    // 3. 선택한 동영상으로 컨트롤러 초기화 하는 함수
    final videoController = VideoPlayerController.file(
      File(widget.video.path),
    );
    await videoController.initialize();

    // 1. 컨트롤러의 속싱이 변경될 때 마다 실행할 함수 등록
    videoController.addListener(videoControllerListener);

    setState(() {
      this.videoController = videoController;
    });
  }
따라서 StatefulWidget의 생명주기의 또 하나의 함수인 didUpdateWidget() 함수를 사용해서 새로운 동영상이 선택되었을 때 videoController 를 새로 생성하도록 코드를 짜야 한다.
class _CustomVideoPlayerState extends State<CustomVideoPlayer> {
  VideoPlayerController? videoController; // 1. 동영상을 조작하는 컨트롤러

  @override
  // covariant 키워드는 CustomVideoPlayer 클래스의 상속된 값도 허가해준다.
  void didUpdateWidget(covariant CustomVideoPlayer oldWidget) {
    super.didUpdateWidget(oldWidget);

    // 1. 새로 선택한 동영상의 경로가 이전과 같은지 확인
    if (oldWidget.video.path != widget.video.path) {
      initializeController(); // 다른 동영상일 때만 videoController 변수를 재생성
    }
  }
.
.
.
동영상 변경 확인
이제 다른 동영상을 재생할 수 있다!
9. 컨트롤러 감추기 기능 만들기
동영상 위에 있는 4개의 버튼들을 탭하면 가려지게 만들어 보자
class _CustomVideoPlayerState extends State<CustomVideoPlayer> {
  VideoPlayerController? videoController;
  bool showControls = false; // 1. 동영상 조작하는 아이콘을 보일지 여부

  .
  .
  .

  @override
  Widget build(BuildContext context) {
    if (videoController == null) {
      return Center(
        child: CircularProgressIndicator(), // 로딩 표시
      );
    }
    return GestureDetector( // 2. 화면 전체의 탭을 인식하기 위해 사용
      onTap: () {
        setState(() {
          showControls = !showControls;
        });
      },
      child: AspectRatio(
        aspectRatio: videoController!.value.aspectRatio,
        child: Stack(
          children: [
            VideoPlayer(
              videoController!,
            ),
            if (showControls)
              Container(
                color: Colors.black.withOpacity(0.5), // 3. 아이콘 버튼을 보일 때 화면을 어둡게 변경
              ),
            Positioned(
              .
              .
              .

            ),
              if (showControls)
            	Align( // 동영상 새로 선택하기 버튼
              .
              .
              .

            ),
              if (showControls)
            	Align( // 동영상 컨트롤 버튼들
              .
              .
              .

              ),
            ),
          ],
        ),
      ),
    );
  }

  // 되감기 버튼 눌렀을 때 실행할 함수
  void onReversePressed() {
    final currentPosition = videoController!.value.position; // 현재 실행중인 위치

    Duration position = Duration(); // 0초로 실행 위치 초기화

    if (currentPosition.inSeconds > 3) {
      // 현재 실행 위치가 3초보다 길 때만 3초 되감기 하기
      position = currentPosition - Duration(seconds: 3);
    }
    videoController!.seekTo(position);
  }

  // 빨리감기 버튼 눌렀을 때 실행할 함수
  void onForwardPressed() {
    final maxPosition = videoController!.value.duration; // 동영상 총 길이
    final currentPosition = videoController!.value.position; // 현재 실행중인 위치

    Duration position = maxPosition; // 동영상 총 길이로 실행 위치 초기화

    if ((maxPosition - Duration(seconds: 3)).inSeconds >
        currentPosition.inSeconds) {
      // 현재 실행 위치가 3초보다 길 때만 3초 빨리감기 하기
      position = currentPosition + Duration(seconds: 3);
    }
    videoController!.seekTo(position);
  }

  // 재생 버튼 눌렀을 때 실행할 함수
  void onPlayPressed() {
    if (videoController!.value.isPlaying) {
      videoController!.pause();
    } else {
      videoController!.play();
    }
  }
}
컨트롤러 감추기 결과
이제 화면을 탭하면 버튼들이 잘 숨겨진다!
추가구현 : 타이머를 활용하여 자동으로 버튼 숨기게하기
import 'dart:async'; // 1. Timer 클래스를 사용하기 위해 import

class CustomVideoPlayer extends StatefulWidget {

  .
  .
  .

}

class _CustomVideoPlayerState extends State<CustomVideoPlayer> {
  VideoPlayerController? videoController;
  bool showControls = false;
  Timer? hideControlsTimer; // 2. Timer 객체 추가


  .
  .
  .

  @override
  void dispose() {
    videoController?.removeListener(videoControllerListener);
    hideControlsTimer?.cancel(); // 3. Timer가 존재하면 취소
    super.dispose();
  }

  @override
  Widget build(BuildContext context) {
    if (videoController == null) {
      return Center(
        child: CircularProgressIndicator(),
      );
    }
    return GestureDetector(
      onTap: () {
        setState(() {
          showControls = !showControls;
        });
        resetHideControlsTimer(); // 4. 탭 시마다 Timer를 초기화
      },
      child: AspectRatio(
        aspectRatio: videoController!.value.aspectRatio,
        child: Stack(
          children: [
            VideoPlayer(
              videoController!,
            ),
            if (showControls)
              Container(
                color: Colors.black.withOpacity(0.5),
              ),
            Positioned(

              .
              .
              .

            ),
            if (showControls)
              Align(

                .
                .
                .

              ),
            if (showControls)
              Align(

                .
                .
                .

              ),
          ],
        ),
      ),
    );
  }


  .
  .
  .


  // 5. Timer를 리셋하는 함수
  void resetHideControlsTimer() {
    hideControlsTimer?.cancel(); // 이전 Timer가 있으면 취소
    hideControlsTimer = Timer(Duration(seconds: 3), () { // 3초 후에 자동으로 버튼 숨김
      setState(() {
        showControls = false; // 버튼 숨김
      });
    });
  }
}
화면을 탭했을 때 버튼이 나타나고, 일정 시간이 지나면 자동으로 숨겨지도록 처리한다.
3초뒤에 버튼이 자동으로 사라지는걸 볼 수 있다.
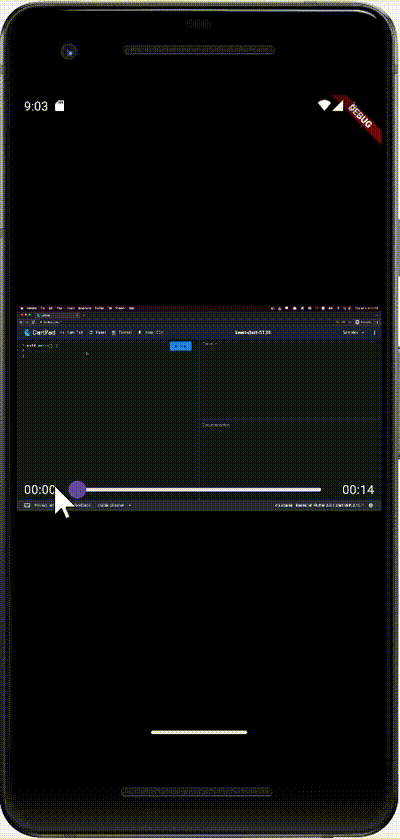
10. 타임스탬프 추가하기
Slider를 통해서 동영상이 어느 정도 실행되고 있는지 짐작할 수 있지만 정확한 시간은 알 수 없다.
현재 실행중인 위치와 동영상 길이를 Slider 위젯의 좌우에 배치해 보겠다.
Slider를 Row 로 감싸고 양쪽에 타임스탬프를 Text위젯으로 배치
@override
  Widget build(BuildContext context) {

    .
    .
    .

    return GestureDetector(
      onTap: () {
        setState(() {
          showControls = !showControls;
        });
        resetHideControlsTimer(); // 탭 시마다 Timer를 초기화
      },
      child: AspectRatio(
        aspectRatio: videoController!.value.aspectRatio,
        child: Stack(
          children: [
            VideoPlayer(
              videoController!,
            ),
            if (showControls)
              Container(
                color: Colors.black.withOpacity(0.5),
              ),
            Positioned(
              bottom: 0,
              right: 0,
              left: 0,
              child: Padding(
                padding: EdgeInsets.symmetric(horizontal: 8.0),
                child: Row( // Slider를 Row로 감쌈
                  children: [
                    renderTimeTextFromDuration(
                      videoController!.value.position, // 동영상 현재 위치 Text 위젯
                    ),
                    Expanded( // Slider가 남는 공간을 모두 차지하도록 Expand 위젯으로 구현
                      child: Slider( // Slider 위젯
                        onChanged: (double val) {
                          videoController!.seekTo(
                            Duration(seconds: val.toInt()),
                          );
                        },
                        value: videoController!.value.position.inSeconds
                            .toDouble(),
                        min: 0,
                        max: videoController!.value.duration.inSeconds
                            .toDouble(),
                      ),
                    ),
                    renderTimeTextFromDuration(
                      videoController!.value.duration, // 동영상 총 길이 Text 위젯
                    )
                  ],
                ),
              ),
            ),
            if (showControls)
              Align(

                .
                .
                .

              ),
            if (showControls)
              Align(

                .
                .
                .

              ),
          ],
        ),
      ),
    );
  }

  // Duration 값을 보기 편한 형태의 Text 위젯으로 반환하는 함수
  Widget renderTimeTextFromDuration(Duration duration) {
    return Text(
      '${duration.inMinutes.toString().padLeft(2, '0')}:${(duration.inSeconds % 60).toString().padLeft(2, '0')}',
      style: TextStyle(
        color: Colors.white,
      ),
    );
  }
타임스탬프 추가 모습