이 글은 실전 프로젝트로 배우는 타입스크립트의 고급타입과 맵드타입을 보고 정리한 글입니다.
유틸리티 타입 소개
타입스크립트 핸드북 참고사이트: https://joshua1988.github.io/ts/usage/utility.html
이미 정의해 놓은 타입을 변환할 때 사용하기 좋은 문법이 유틸리티 타입이다.
이를 코드로 보면 아래와 같다.
interface Address {
  email: string;
  address: string;
}

type MayHaveEmail = Partial<Address>;

const me: MayHaveEmail = {}; // 가능
const you: MayHaveEmail = { email: 'test@abc.com' }; // 가능
const all: MayHaveEmail = { email: 'capt@hero.com', address: 'Pangyo' }; // 가능
다음과 같이
Partial타입으로 작성하게 되면 interface에 정의되어 있는 타입 중 부분만으로 객체를 만들 수 있다.
이렇게 유틸리티 타입을 사용하면 훨씬 더 간결한 문법으로 타입을 새로 정의하지 않고 새로운 타입으로 사용할 수 있다.
유틸리티 타입 사례 - Pick
네이버 쇼핑이라는 사이트에 제품의 정보를 가져오는 fetchProducts 라는 함수가 있고, 상품 상세보기를 눌렀을 때 나오는 displayProductDetail 이라는 함수가 있다고 해보자.
이들의 인수를 위한 인터페이스 Product, ProductDetail 을 정의하게 되면 아래와 같다.
interface Product {
    id: number;
    name: string;
    price: number;
    brand: string;
    stock: number;
}

// 상품 목록을 받아오기 위한 API 함수
function fetchProducts(): Promise<Product[]> {
    // ..
}

interface ProductDetail {
    id: number;
    name: string;
    price: number;
}

type ShoppingItem = Pick<Product, 'id' | 'name' | 'price'>

function displayProductDetail(shoppingItem: ShoppingItem) {

}
이 코드를 보면
Product,ProductDetail부분에서id, number, price의 중복이 발생하고 있음을 확인할 수 있다. 이를 해결하기 위해Pick이라는 유틸리티 타입을 사용하여ShoppingItem과 같은 타입을 만들면 코드의 중복을 줄일 수 있다.
Omit 타입과 기타 유틸리티 타입 목록 소개
오밋(Omit) 타입은 특정 타입에서 지정된 속성을 제거한 나머지 속성 타입을 정의해준다.
interface Product {
  id: number;
  name: string;
  price: number;
  brand: string;
  stock: number;
}

const productWithoutStock: Omit<Product, 'stock'> = {
  id: 123,
  name: '상품1',
  price: 1000,
  brand: 'abc'
}

const productWithoutBrandAndPrice: Omit<Product, 'brand'|'price'> = {
  id: 1234,
  name: '상품2',
  stock: 1111
}
유틸리티 타입 사례 - Partial
이제 특정 상품만 업데이트를 해야하는 상황이 왔다고 가정해보자. 업데이트 해야하는 항목 중 Product 전체를 업데이트 하는 것이 아닌, 부분만 업데이트를 하려면 어떻게 해야할까? 코드로 가보자.
// 중복 발생
interface UpdateProduct {
  id?: number;
  name?: string;
  price?: number;
  brand?: string;
  stock?: number;
}

type UpdateProduct = Partial<Product>
// 3. 특정 상품 정보를 업데이트(갱신) 하는 함수
function updateProductItem(productItem: Partial<Product>) {}
interface키워드를 사용하여 옵셔널로 인수로 받아서 부분만 처리하게 만들 수 있다. 그러나 이렇게 만드는 경우, 중복이 발생하여 비효율적이다. 따라서Partial을 사용하여 전체에서 필요한 부분만 받게UpdateProduct를 정의할 수 있다.
유틸리티 타입 구현 및 정리
Partial 내부 구현
Partial이 어떻게 구현되어 있는지 알아보자.
Partial.ts
type Partial<T> = {
    [P in keyof T]?: T[P];
};
현재 코드를 바로 보았을 때, 어떤 내용인지 알기 어렵다. 순차적으로
Partial이 어떤 방식으로 구현되는 지 알아보자.
#1
type UserProfileUpdate = {
  username?: UserProfile['username'];
  email?: UserProfile['email'];
  profilePhotoUrl?: UserProfile['profilePhotoUrl'];
};
처음은 위와 같이
UserProfileUpdate라는 타입을 선언하여 옵셔널을 다 달아주고,UserProfile의 키로 접근한다.
#2
type UserProfileUpdate = {
  [p in 'username' | 'email' | 'profilePhotoUrl']?: UserProfile[p];
};
type UserProfileKeys = keyof UserProfile;
다음은
in을 사용하여username, email, profilePhotoUrl을 돌면서 코드를 줄여준 모습이다. 여기에서keyof를 사용하면UserProfile안에 키들을 모두 볼 수 있다.
#3
type UserProfileUpdate = {
  [p in keyof UserProfile]?: UserProfile[p];
};
keyof를 적용하면 위와 같이 코드를 줄일 수 있다.
#4
type Subset<T> = {
  [p in keyof T]?: T[p];
};
최종적으로 제네릭을 사용하여 T를 인수로 받아 위와같이 작성할 수 있다. 이를 처음
Partial과 비교하였을 때 동일하다는 것을 확인할 수 있다.
맵드 타입 소개
맵드 타입이란 기존에 정의되어 있는 타입을 새로운 타입으로 변환해 주는 문법을 의미한다.
→ 자바스크립트의 map() API 함수를 타입에 적용한 것과 같은 효과를 가진다.
맵드 타입 예제
우선 자바스크립트의 for...in 문을 살펴보자.
var arr = ['a', 'b', 'c'];
for (var key in arr) {
  console.log(arr[key]);
}
이는 arr 배열을 돌면서 값들을 순회한다.
타입스크립트의 맵드 타입은 아래와 같다.
type Heroes = 'Hulk' | 'Capt' | 'Thor';
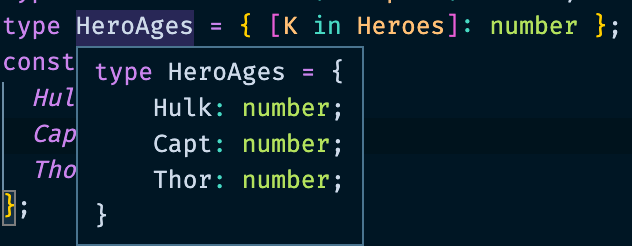
type HeroAges = { [K in Heroes]: number };
const ages: HeroAges = {
  Hulk: 33,
  Capt: 100,
  Thor: 1000,
};
Heroes라는 타입을 이용하여 안의 값들을 돌면서 number 타입을 부여한다. 따라서ages라는 변수의 타입을HeroAges로 부여하여 위와 같이 선언할 수 있다.
이렇게, 맵드 타입이란 기존에 정의되어 있는(Heroes) 타입을 이용하여 새로운 타입으로 변환(HeroAges)해준다.
