Travis CI를 사용하여 배포가 자동으로 되어도 배포하는 동안은 애플리케이션이 종료된다.
오랫동안 종료되는건 아니지만 새로운 JAR가 실행되기 전까진 기존 JAR를 종료시켜 놓기 때문이다.
애플리케이션이 종료되는 동안은 서비스를 이용할 수 없기 때문에 엔진엑스를 이용하여 무중단 배포를 진행하려고 한다.
엔진엑스(Nginx) : 웹서버, 리버스 프록시, 캐싱, 로드 밸런싱, 미디어 스트리밍을 위한 오픈소스 소프트웨어, 엔진엑스가 가진 기능 중 리버스 프록시(외부의 요청을 받아 백엔드 서버로 전달하는 기능을 가짐)을 통해 무중단 배포 환경을 구축할 예정
사진 출처

1. 엔진엑스 설치와 스프링부트 연동하기
1-1. 엔진엑스 설치하기
-
EC2에 접속해서 명령어로 엔진엑스 설치
sudo yum install nginx위 명령어를 사용했지만 다음과 같은 에러를 만났다.
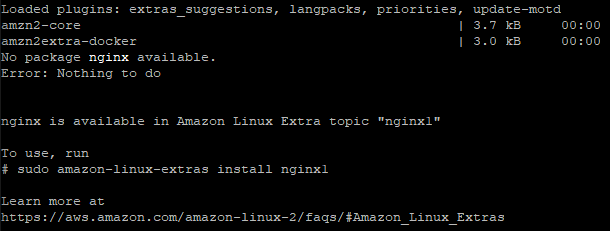
사진의 To use, run # sudo amazon-linux-extras install nginx1 부분을 보고
sudo amazon-linux-extras install nginx1명령어를 쳤더니 아래 사진과 같이 떴다.
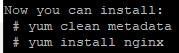
이제 설치를 할 수 있다고 하니sudo yum clean metadata && sudo yum install nginx -y명령어로 설치를 진행했다.

yum list installed nginx명령어로 설치가 완료된 것을 확인했다.

-
엔진엑스 설치가 완료되면 엔진엑스 실행하기
sudo service nginx start
1-2. 보안 그룹 추가
- 엔진엑스의 포트 번호(기본 : 80)를 EC2 인스턴스 보안그룹에 추가해야한다.

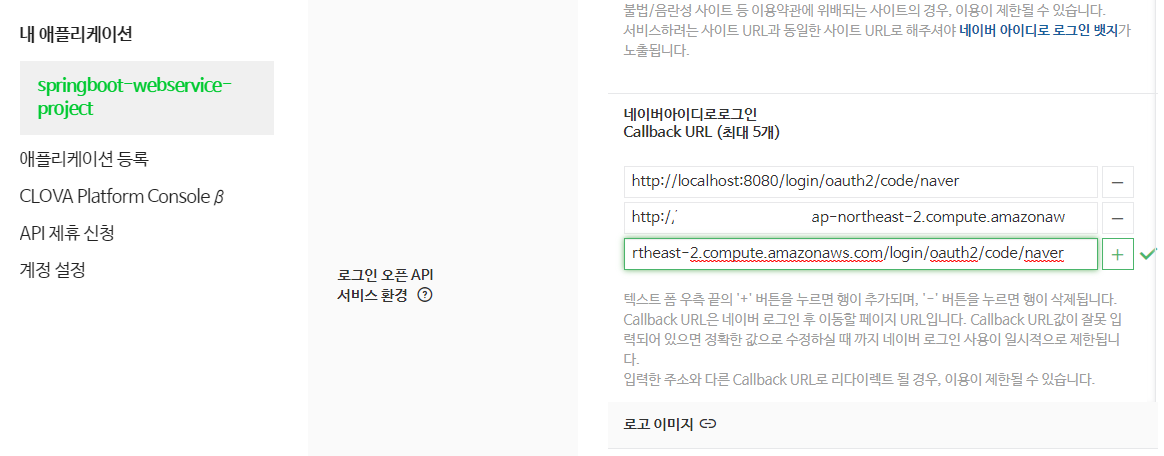
- 리다이렉션 주소 추가
8080이 아닌 80포트로 주소가 변경되니 구글과 네이버 로그인에도 변경된 주소를 등록해야만 함
원래 추가했던 주소에서 8080 포트 번호만 제거 한 뒤 추가
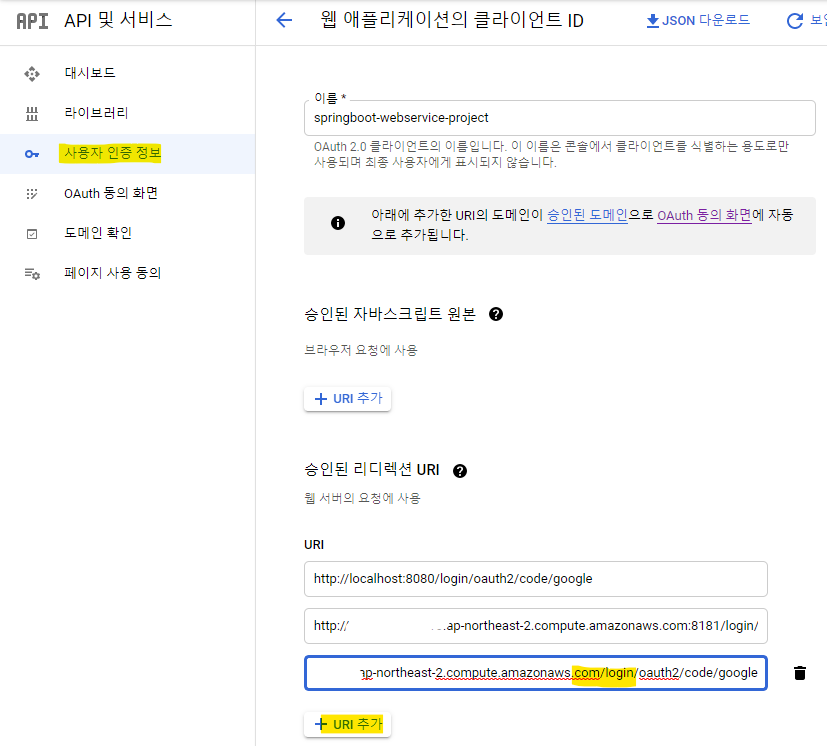
주소를 추가 한 뒤 EC2의 도메인으로 접근하되, 8080 포트를 제거하고 접근해 본다.
(엔진엑스가 정상적으로 켜져있지 않다면 해당 화면이 뜨지 않는다.)

1-3. 엔진엑스와 스프링부트 연동
엔진엑스가 현재 실행중인 스프링부트 프로젝트를 바라볼 수 있도록 프록시 설정을 하려고 함
sudo vim /etc/nginx/nginx.conf설정 파일에서 해당 부분 추가
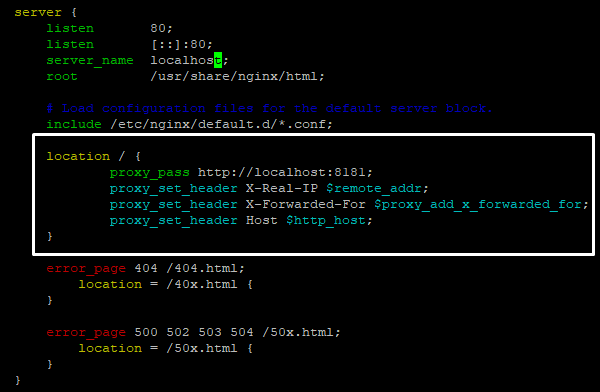
- 추가 후 엔진엑스 재시작
sudo systemctl start nginx

2. 무중단 배포 스크립트 만들기
2-1. profile API 추가하기
이 API는 이후 배포시에 8081을 쓸지, 8082를 쓸지 판단하는 기준이 됨
@RequiredArgsConstructor
@RestController
public class ProfileController {
    private final Environment env;

    @GetMapping("/profile")
    public String profile() {
        List<String> profiles = Arrays.asList(env.getActiveProfiles());
        List<String> realProfiles = Arrays.asList("real", "real1", "real2");
        String defaultProfile = profiles.isEmpty()? "default" : profiles.get(0);

        return profiles.stream()
                .filter(realProfiles::contains)
                .findAny()
                .orElse(defaultProfile);
    }
}
env.getActiveProfiles()
1. 현재 실행중인 Active Profile을 모두 가져온다.
2. real, outh, real-db등이 활성화 되어있다면 3개가 모두 담겨있음
이 코드가 잘 작동하는지 테스트 코드 작성하기
public class ProfileControllerUnitTest {

    @Test
    public void real_profile이_조회된다() {
        //given
        String expectedProfile = "real";
        MockEnvironment env = new MockEnvironment();
        env.addActiveProfile(expectedProfile);
        env.addActiveProfile("oauth");
        env.addActiveProfile("real-db");

        ProfileController controller = new ProfileController(env);

        //when
        String profile = controller.profile();

        //then
        assertThat(profile).isEqualTo(expectedProfile);
    }

    @Test
    public void real_profile이_없으면_첫번째가_조회된다() {
        //given
        String expectedProfile = "oauth";
        MockEnvironment env = new MockEnvironment();

        env.addActiveProfile(expectedProfile);
        env.addActiveProfile("real-db");

        ProfileController controller = new ProfileController(env);

        //when
        String profile = controller.profile();

        //then
        assertThat(profile).isEqualTo(expectedProfile);
    }

    @Test
    public void active_profile이_없으면_default가_조회된다() {
        //given
        String expectedProfile = "default";
        MockEnvironment env = new MockEnvironment();
        ProfileController controller = new ProfileController(env);

        //when
        String profile = controller.profile();

        //then
        assertThat(profile).isEqualTo(expectedProfile);
    }
}
/profile이 인증없이 호출될 수 있게 SecurityConfig 클래스에 제외코드를 추가함
.antMatchers("/", "/css/**", "/images/**", "/js/**", "/h2-console/**", "/profile").permitAll()
SecurityConfig 설정이 잘 되어있는지 테스트 코드로 검증
@RunWith(SpringRunner.class)
@SpringBootTest(webEnvironment = SpringBootTest.WebEnvironment.RANDOM_PORT)
public class ProfileControllerTest {

    @LocalServerPort
    private int port;

    @Autowired
    private TestRestTemplate restTemplate;

    @Test
    public void profile은_인증없이_호출된다() throws Exception {
        String expected = "default";

        ResponseEntity<String> response = restTemplate.getForEntity("/profile", String.class);
        assertThat(response.getStatusCode()).isEqualTo(HttpStatus.OK);
        assertThat(response.getBody()).isEqualTo(expected);
    }
}
모든 테스트가 성공하고 깃허브로 푸시하여 배포 -> /profile로 접속하여 잘 나오는지 확인

2-2. real1, real2 profile 생성
스프링 부트에서는 properties의 이름을 application-xxx.properties로 만들면 xxx라는 이름의 profile이 생성되어 이를 통해 관리할 수 있음
현재 EC2 환경에서 실행되는 profile은 real밖에 없음. real은 Travis CI 배포 자동화를 위한 profile이니 무중단 배포를 위한 profile 2개(real1, real2)를 src/main/resources 아래에 추가해준다.
//application-real1.properties
server.port=8081
spring.profiles.include=oauth,real-db
spring.jpa.properties.hibernate.dialect=org.hibernate.dialect.MySQL5InnoDBDialect
spring.session.store-type=jdbc
//application-real2.properties
server.port=8082
spring.profiles.include=oauth,real-db
spring.jpa.properties.hibernate.dialect=org.hibernate.dialect.MySQL5InnoDBDialect
spring.session.store-type=jdbc두 파일의 차이점은 서버 포트 번호가 다르다는 것, 작성 후 깃허브에 푸시한다.
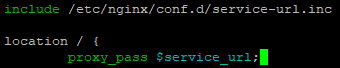
2-3. 엔진엑스 설정 수정
무중단 배포의 핵심은 엔진엑스 설정이다. 배포때마다 엔진엑스의 프록시 설정(스프링부트로 요청을 흘려보내는 설정)이 순식간에 교체된다. 프록시 설정이 교체될 수 있도록 설정을 추가해야한다.
엔진엑스 설정이 모여있는 /etc/nginx/conf.d/에 service-url.inc라는 파일 생성
sudo vim /etc/nginx/conf.d/service-url.inc
생성 후 다음 코드 입력
set $service_url http://127.0.0.1:8080;
생성한 파일을 엔진엑스가 사용할 수 있게 nginx.conf 파일을 열어서 설정
sudo vim /etc/nginx/nginx.conf
수정 후 엔진엑스 재시작
2-4. 배포 스크립트들 작성
-
먼저 step2와 중복되지 않기 위해 EC2에 step3 디렉토리 생성
mkdir ~/app/step3 && mkdir ~/app/step3/zip -
무중단 배포는 step3를 사용할 것이기 때문에
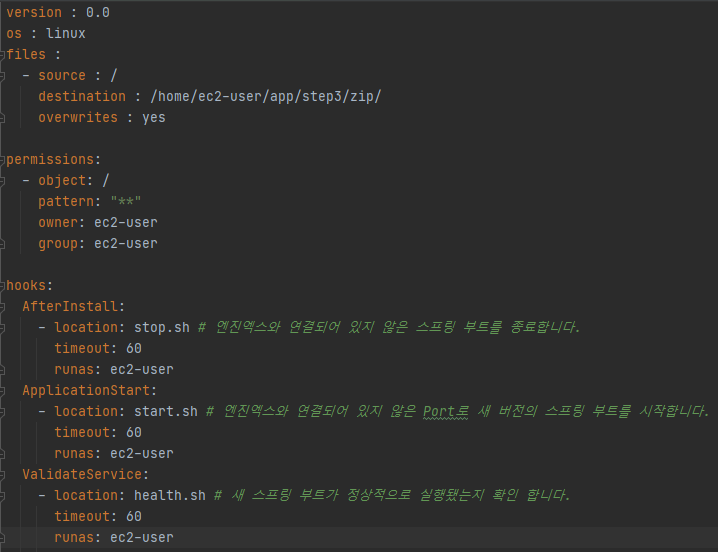
appspec.yml도 step3로 배포되도록 수정
destination : /home/ec2-user/app/step3/zip/ -
무중단 배포를 진행할 스크립트들은 총 5개
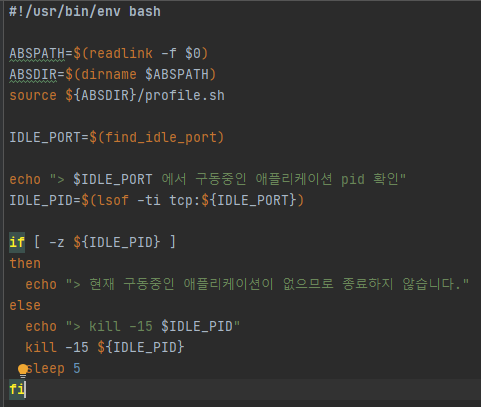
1.stop.sh: 기존 엔진엑스에 연결되어 있지 않지만, 실행중이던 스프링부트 종료
2.start.sh: 배포할 신규 버전 스프링부트 프로젝트를 stop.sh로 종료한 'profile'로 실행
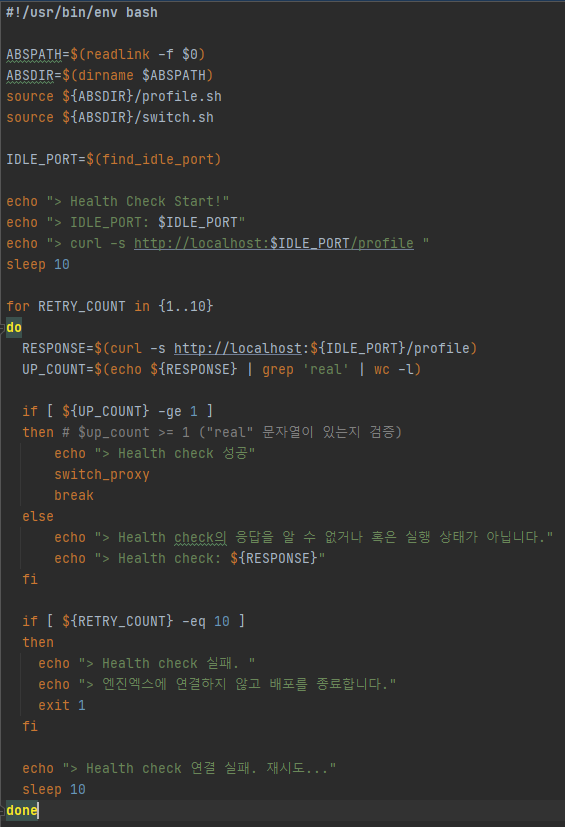
3.health.sh:start.sh로 실행시킨 프로젝트가 정상적으로 실행됐는지 체크
4.switch.sh: 엔진엑스가 바라보는 스프링부트를 최신 버전으로 변경
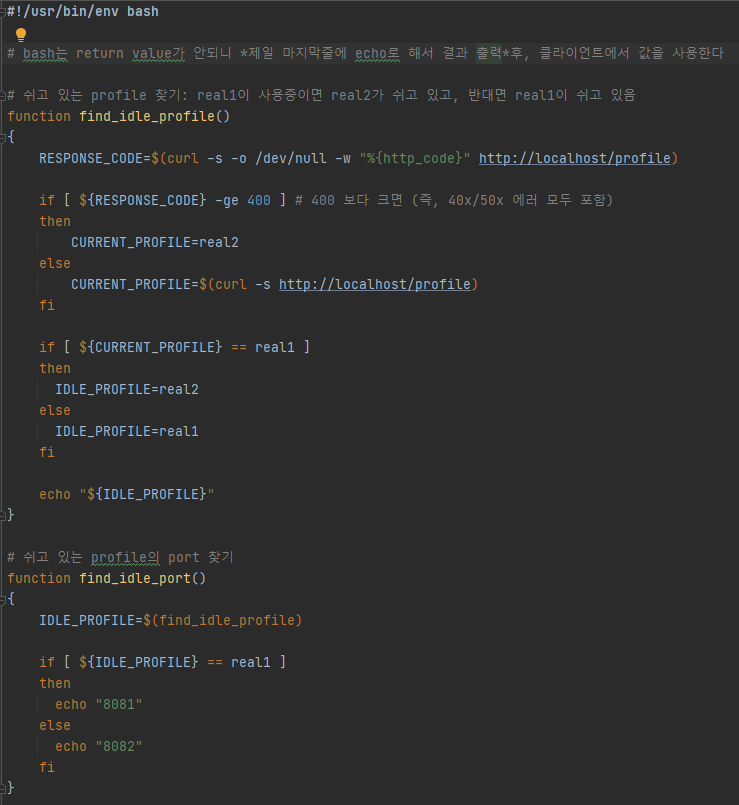
5.profile.sh: 앞선 4개의 스크립트 파일에서 공용으로 사용할 'profile'과 포트체크 로직 -
appspec.yml에서 스크립트를 사용하도록 설정
-
5개의 스크립트 파일 작성하기
profile.sh
start.sh

stop.sh
health.sh
switch.sh

3. 무중단 배포 테스트
3-1. 버전 자동 수정되게 설정하기
잦은 배포로 인해 jar 파일명이 겹칠수도 있다. 매번 버전을 올리는것은 번거로우므로 자동으로 버전값이 변경될 수 있도록 설정해줘야 한다.
build.gradle 수정하기
version '1.0.1-SNAPSHOT'+newDate().format("yyyyMMddHHmmss")
3-2. 테스트하기
여기까지 구성한 뒤 최종 코드를 깃허브로 푸시하고 배포가 자동으로 되는지 codedeploy로그로 확인해보기
tail -f /opt/codedeploy-agent/deployment-root/deployment-logs/codedeploy-agent-deployments.log
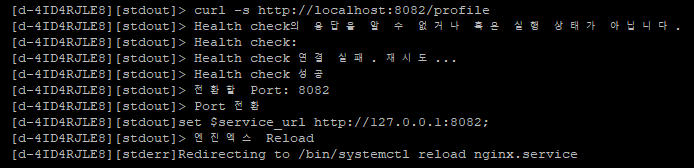
재배포 한뒤 포트 번호 변경 확인