react-beautiful-dnd 영어 버전
react-beautiful-dnd 한국어 버전
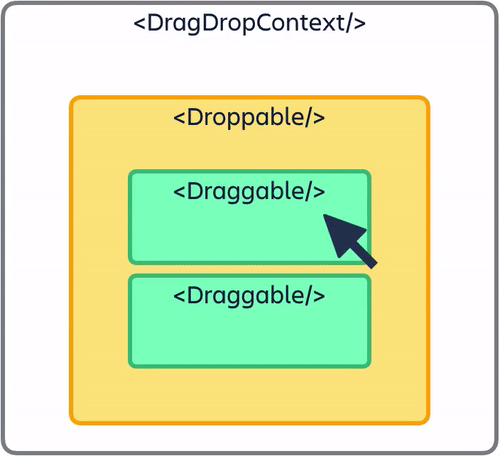 react-beautiful-dnd 원리(출처 : 공식 홈페이지)
사용하게된 배경과 문제점
: 프로젝트에서 사진등록 부분에 DnD가 필요했었다. 유저들이 상품을 등록할때, 사진의 순서도 중요하다고 생각되어서 도입하게 되었다.
항상 새로운것을 도입할때마다 삽질을 안한적이 없었는데, 이번에도 역시나....
상품을 미리 등록을 한경우, 수정 할 때 서버에서 가지고 오는 이미지와 수정모드에서 새로 등록할 때 파일을 분리해서 각각의 다른 리코일 스태이트로 관리했었다. 그러나 이렇게 했을때, 스테이트가 다르기때문에 드롭을 했을때, 오류가 났었다. 결국 하나의 스테이트로 합쳐야 했던 문제점이 있었다. (다음엔 꼭...!!)
1. react-beautiful-dnd 설치하기
npm i react-beautiful-dnd
2. <DragDropContext> 으로 감싸기(click)
전체 어플리케이션을 <DragDropContext>로 감싸는걸 권장하지만, 그렇게 사용하지 않고 필요한 부분에서만도 사용이 가능하다.(nested는 불가능하다). 그리고 <DragDropContext>안에서 와를 사용할 수 있다.
import {DragDropContext, Droppable, Draggable} from 'react-beautiful-dnd';

const Dnd = () => {
  const datas = [
    {
      id: '1',
      text : 'first'
    },
    {
      id: '2',
      text : 'second'
    },
    {
      id: '3',
      text : 'third'
    },
  ]

  return (
    <DragDropContext>
      <div className='top-container'>
            <div className="box-container">
              {datas.map(({ id, text }, index) => (
                <div key={id} className='box'>{text}</div>;
              ))}
            </div>
      </div>
    </DragDropContxt>
  );
}
3. <Droppable> 으로 드랍 가능한 공간 설정하기(click)
<Droppable />는 <Draggable />가 드랍 될 수 있는 공간이다.
<Droppable />는 여러 <Draggable />를 포함 할 수 있다. (당연히 <Draggable />은 <Droppable />에 포함 되어야한다!!)
아래와 같이 props를 추가해주어야한다. 아래와 같은 props없이 드래그가 작동하지 않는다.
<Droppable droppableId="droppable-1" type="test1">
  {(provided, snapshot) => (
    <div
      ref={provided.innerRef}      // 추가된
      {...provided.droppableProps} // props
      style={{ backgroundColor: snapshot.isDraggingOver ? 'blue' : 'grey' }}> // style 추가
      <h2>I am a droppable!</h2>
      {provided.placeholder}
    </div>
  )}
</Droppable>;
import {DragDropContext, Droppable, Draggable} from 'react-beautiful-dnd';

const Dnd = () => {
  const datas = [
    {
      id: '1',
      text : 'first'
    },
    {
      id: '2',
      text : 'second'
    },
    {
      id: '3',
      text : 'third'
    },
  ]

  return (
    <DragDropContext>
      <Droppable droppableId="first-box" direction="horizontal"> // direction의 디폴트값은 vertical
        {(provided, snapshot) => (
          <div
            className='top-container'
            ref={provided.innerRef}
            style={{ backgroundColor: snapshot.isDraggingOver ? 'blue' : 'grey' }}
            {...provided.droppableProps}
           >
              <div className="box-container">
                {datas.map(({ id, text }, index) => (
                  <div key={id} className='box'>{text}</div>;
                ))}
              </div>
          </div>
          {provided.placeholder}  // !!!!!
        )}
      </Droppable>
    </DragDropContxt>
  );
}
주의 할 점
{provided.placeholder} 꼭 추가하기
4. <Draggable> 으로 드래그 기능 추가하기(click)
드래그가 가능하게할 엘리먼트를 <Draggable>로 감싸 주어야한다.
감싸진(home Droppable)<Droppable>에서 재정렬이 가능하고 또 다른 <Droppable>로 옮길 수 도 있다.
아래와 같이 props를 추가해주어야한다. 아래와 같은 props없이 드래그가 작동하지 않는다.
  <div
    ref={provided.innerRef}          // 추가된
    {...provided.draggableProps}     // ....
    {...provided.dragHandleProps}>   // props
    <h4>My draggable</h4>
  </div>
import {DragDropContext, Droppable, Draggable} from 'react-beautiful-dnd';

const Dnd = () => {
  const datas = [
    {
      id: '1',
      text : 'first'
    },
    {
      id: '2',
      text : 'second'
    },
    {
      id: '3',
      text : 'third'
    },
  ]

  return (
    <DragDropContext>
      <Droppable droppableId="first-box" direction="horizontal"> // direction의 디폴트값은 vertical
        {(provided, snapshot) => (
          <div
            className='top-container'
            ref={provided.innerRef}
            style={{ backgroundColor: snapshot.isDraggingOver ? 'blue' : 'grey' }}
            {...provided.droppableProps}
           >
              <div className="box-container">
                {datas.map(({ id, text }, index) => (
                  <div key={id} className='box'>{text}</div>;
                ))}
              </div>
          </div>
          {provided.placeholder}
        )}
      </Droppable>
    </DragDropContxt>
  );
}
5. 순서 저장하기(click)
<DragDropContext>의 props에 onDragEnd라는게 있다. onDragEnd에서 state를 저장해주면 옮긴 순서대로 반영이된다.
import {DragDropContext, Droppable, Draggable} from 'react-beautiful-dnd';

const Dnd = () => {
  const [testState, setTestState] = useState(null)

  const datas = [
    {
      id: '1',
      text : 'first'
    },
    {
      id: '2',
      text : 'second'
    },
    {
      id: '3',
      text : 'third'
    },
  ]

  const dragHandler = (result) => {
    console.log(result); // 드래그 후  결과값을 볼 수 있다.

    if (!result.destination) return;  // destination는 드래그 후 결과값, result.source는 드래그 전 이전값이 담겨있다.
    const originData = [...testState];
    const [reorderedData] = originData.splice(result.source.index, 1);
    originData.splice(result.destination.index, 0, reorderedData);

    setTestState(originData);
  }

  useEffect(()=>{
    setTestState(datas);
  },[])

  return (
    <DragDropContext onDragEnd={dragHandler}>
      <Droppable droppableId="first-box" direction="horizontal"> // direction의 디폴트값은 vertical
        {(provided, snapshot) => (
          <div
            className='top-container'
            ref={provided.innerRef}
            style={{ backgroundColor: snapshot.isDraggingOver ? 'blue' : 'grey' }}
            {...provided.droppableProps}
           >
              <div className="box-container">
                {datas.map(({ id, text }, index) => (
                  <div key={id} className='box'>{text}</div>;
                ))}
              </div>
          </div>
          {provided.placeholder}
        )}
      </Droppable>
    </DragDropContxt>
  );
}