오늘은 MVP에 대해 정리해보려고 한다. 다음은 글의 목차이다.
목차
- Intro
- MVP란?
- MVP 예제
- MVP의 문제점
- Outro
Intro
콘솔 프로그램에서 MVC 패턴을 사용한 프로젝트를 안드로이드 프로젝트로 옮겨가는 과정에서, 나는 “XML이 View이고 Activity는 Controller구나!”라는 생각을 했다. 그래서 MVC 패턴을 적용했다고 착각했다.
하지만 틀렸다..! Activity는 Controller 뿐만 아니라 View의 역할도 하기 때문에 MVC보다는 MA라고 부르는 게 적합할 것이다.
MVC 패턴에서는 Controller가 View의 구현과 강하게 결합되는 것을 방지하기 위해 View를 추상화했다. 하지만 콘솔 프로그램에서 MVC 패턴을 사용한 프로젝트를 안드로이드 프로젝트로 옮겼을 때, Activity는 Controller와 View의 역할을 모두 하고 있었다. 이런 문제점을 해결하기 위해 나온 것이 바로 MVP이다.
오늘은 MVP의 개념과 문제점에 대해 알아보려고 한다.
MVP란?
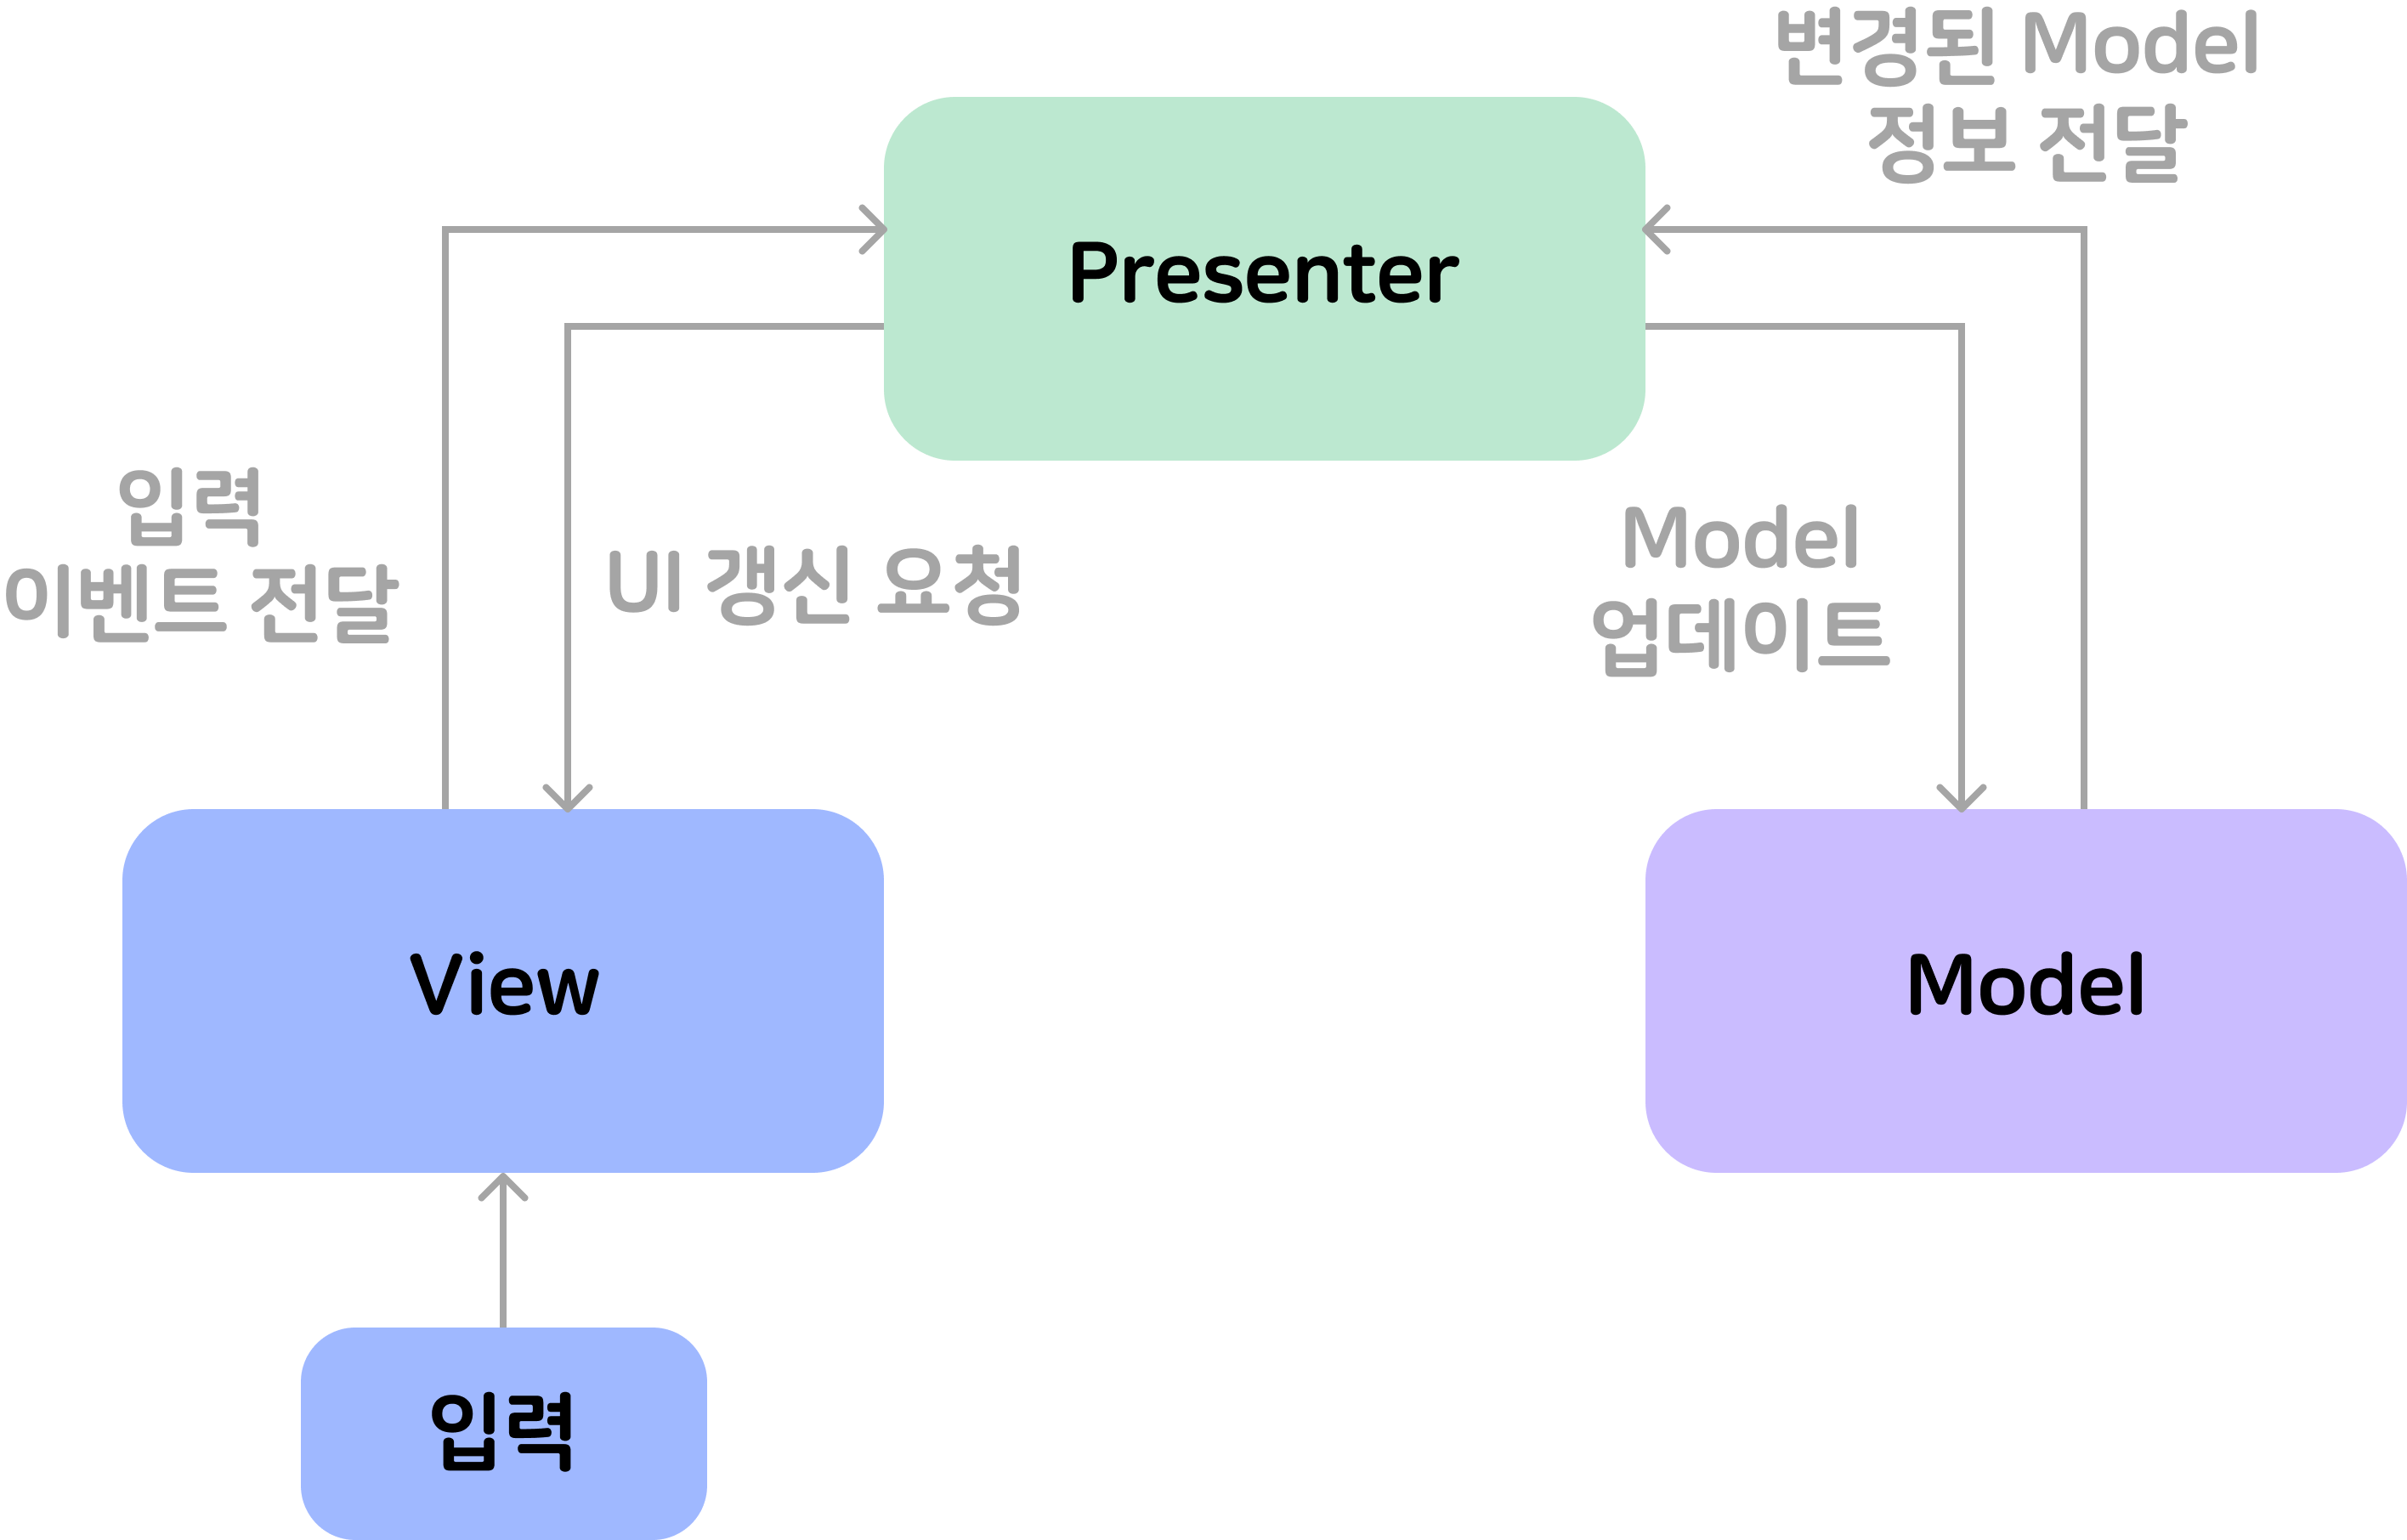
MVP 패턴은 Model, View, Presenter로 이루어져있다.
MVP 패턴에서는 Activity를 View로 인식하고, Controller의 역할을 할 클래스를 만든다. 이 클래스가 바로 Presenter이다. View를 그리는 작업은 안드로이드 의존성이 필요하기 때문에 Activity를 View로 인식한다.
MVP 패턴의 핵심은 View를 추상화하는 데 있다. 그럼 View를 어떻게 추상화할 수 있을까?
이때 계약(Contract)을 활용하면 된다. 일반적으로 MVP 패턴에서는 Contract를 활용해 View를 추상화한다. Contract는 마치 기능 명세서와 같아서, View와 Presenter가 각자의 역할을 정확히 수행할 수 있도록 가이드 역할을 한다.
예제를 통해 MVP에 대해 좀 더 자세히 알아보겠다.
MVP 예제
티켓을 예매하는 프로그램을 만든다고 가정하고 기능 명세서를 작성해보자.
📋 기능 명세서
🎨 View가 할 일
- 사용자가 선택한 티켓 장수 보여주기
- 발권된 티켓(티켓 장수, 발권인 이름) 보여주기
- 반가워요! 해나님, 2장의 티켓이 예매 되었어요.
🕹️ Presenter가 할 일
- 티켓 수 증가
- 현재 티켓 수에서 1 증가
- 티켓 수 감소
- 현재 티켓 수에서 1 감소 (최소 티켓 수는 1)
- 티켓 발행
- 티켓 수와 발권인 이름 적힌 티켓을 발행
기능 명세서를 보면 예약을 진행해주는 시스템과 티켓이 필요하다. Resevation과 Ticket이라는 이름을 가진 도메인 모델을 만들어보자.
class Reservation {
    private var count: Int = 1

    fun increase(): Int = ++count

    fun decrease(): Int = if (count == 1) 1 else --count

    fun makeTicket(): Ticket = Ticket(count)
}
// MVP를 알아보는 예제이므로, name은 입력 받지 않고 기본 인자로 설정했다.
data class Ticket(
val count: Int,
val name: String = "해나",
)도메인 모델을 만들었으니 이를 활용해 기능 명세서를 코드로 작성해보겠다.
interface Contract {
    interface View {
        fun show(count: Int)

        fun show(ticket: Ticket?)
    }

    interface Presenter {
        fun increaseCount()

        fun decreaseCount()

        fun issueTicket()
    }
}
여기서 주의깊게 봐야할 점은 Presenter 내의 메서드들이 반환값을 가지지 않는다는 것이다.
MVP 패턴에서 Presenter는 일반적으로 값을 반환하지 않는다. Presenter가 직접적으로 데이터를 반환하는 것이 아니라, 데이터를 처리하고 그 결과를 View에 반영하도록 지시해야 한다.
기능 명세서를 다 작성했으니 Presenter의 구현체를 만들어보겠다.
Presenter는 View에 의존한다. 이때 Presenter는 View의 구체적인 구현체(Activity 객체)에 직접 의존해서는 안 된다. 따라서 추상화한 Contract.View를 사용해 View에 의존해야 한다.
class Presenter(
    // private val view: MVPActivity 와 같이 구체적인 구현체에 의존해서는 안 됨
    // 추상화한 View 인터페이스 사용해 의존해야 함
    private val view: Contract.View,
): Contract.Presenter {
    private val reservation = Reservation()

    override fun increaseCount() {
        val newCount = reservation.increase()
        view.show(count = newCount)
    }

    override fun decreaseCount() {
        val newCount = reservation.decrease()
        view.show(count = newCount)
    }

    override fun issueTicket() {
        val ticket: Ticket = reservation.makeTicket()
        view.show(ticket)
    }
}
이제 이 Presenter가 필요한 View에서 초기화시켜주면 된다. 즉, Presenter 구현체의 인스턴스는 Activity에서 생성하여 가지고 있는다. 그리고 Activity가 View의 역할을 하기 때문에 Activity에서 Contract의 View를 구현하면 된다.
class MVPActivity : AppCompatActivity(), Contract.View { // 추상화한 View 인터페이스를 상속
    private val presenter: Contract.Presenter = Presenter(this) // View는 Presenter를 알고 있다.

    override fun onCreate(savedInstanceState: Bundle?) {
        super.onCreate(savedInstanceState)
				...
    }

    override fun show(count: Int) {
        ...
    }

    override fun show(ticket: Ticket?) {
		...
    }
}
예제에 사용할 XML은 아래와 같이 만들었다.
| 예매 전 | 예매 후 |
|---|---|
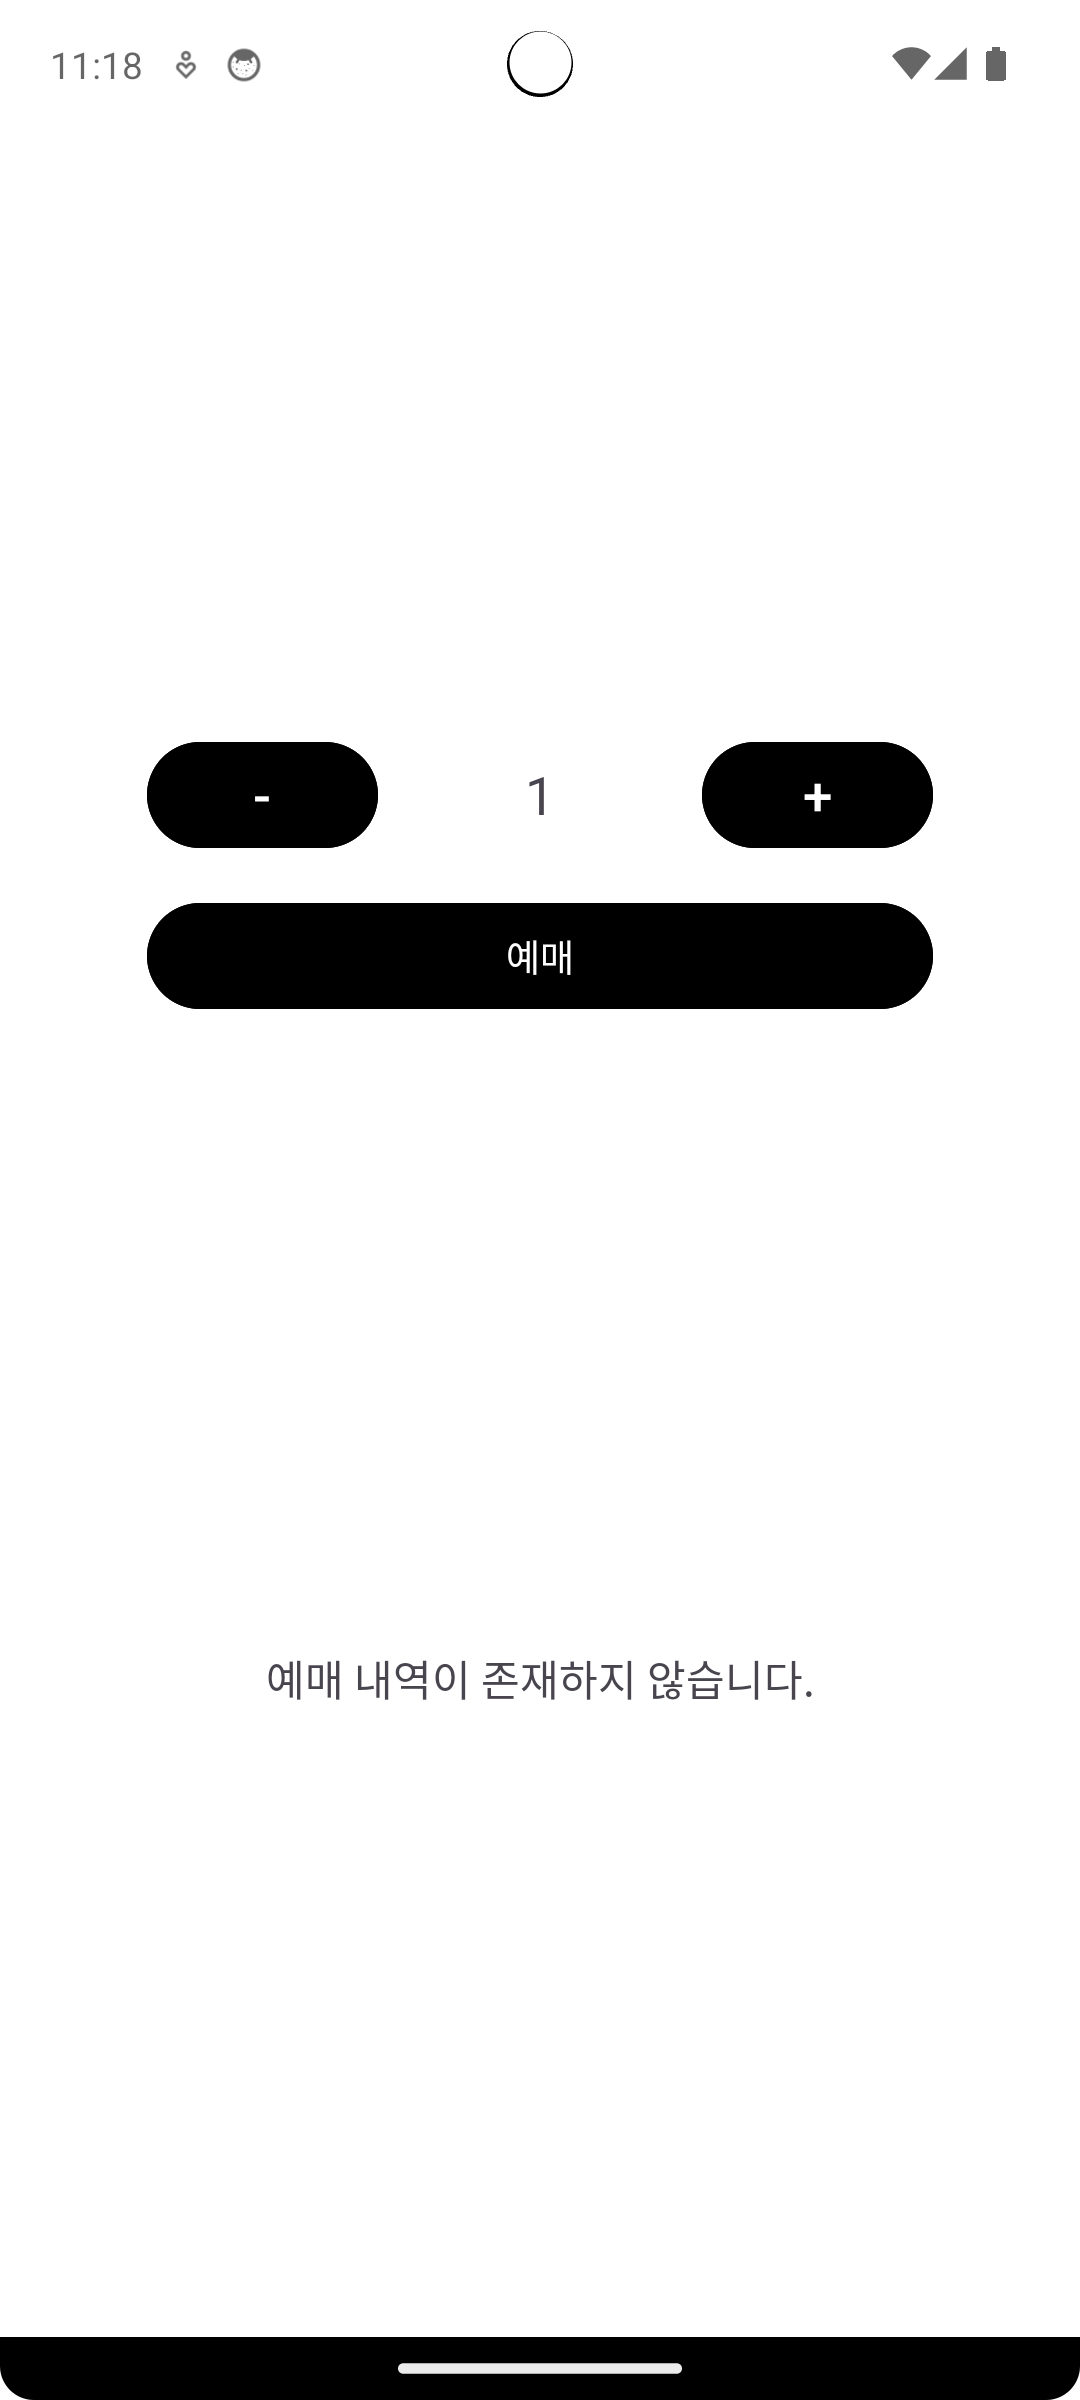 | 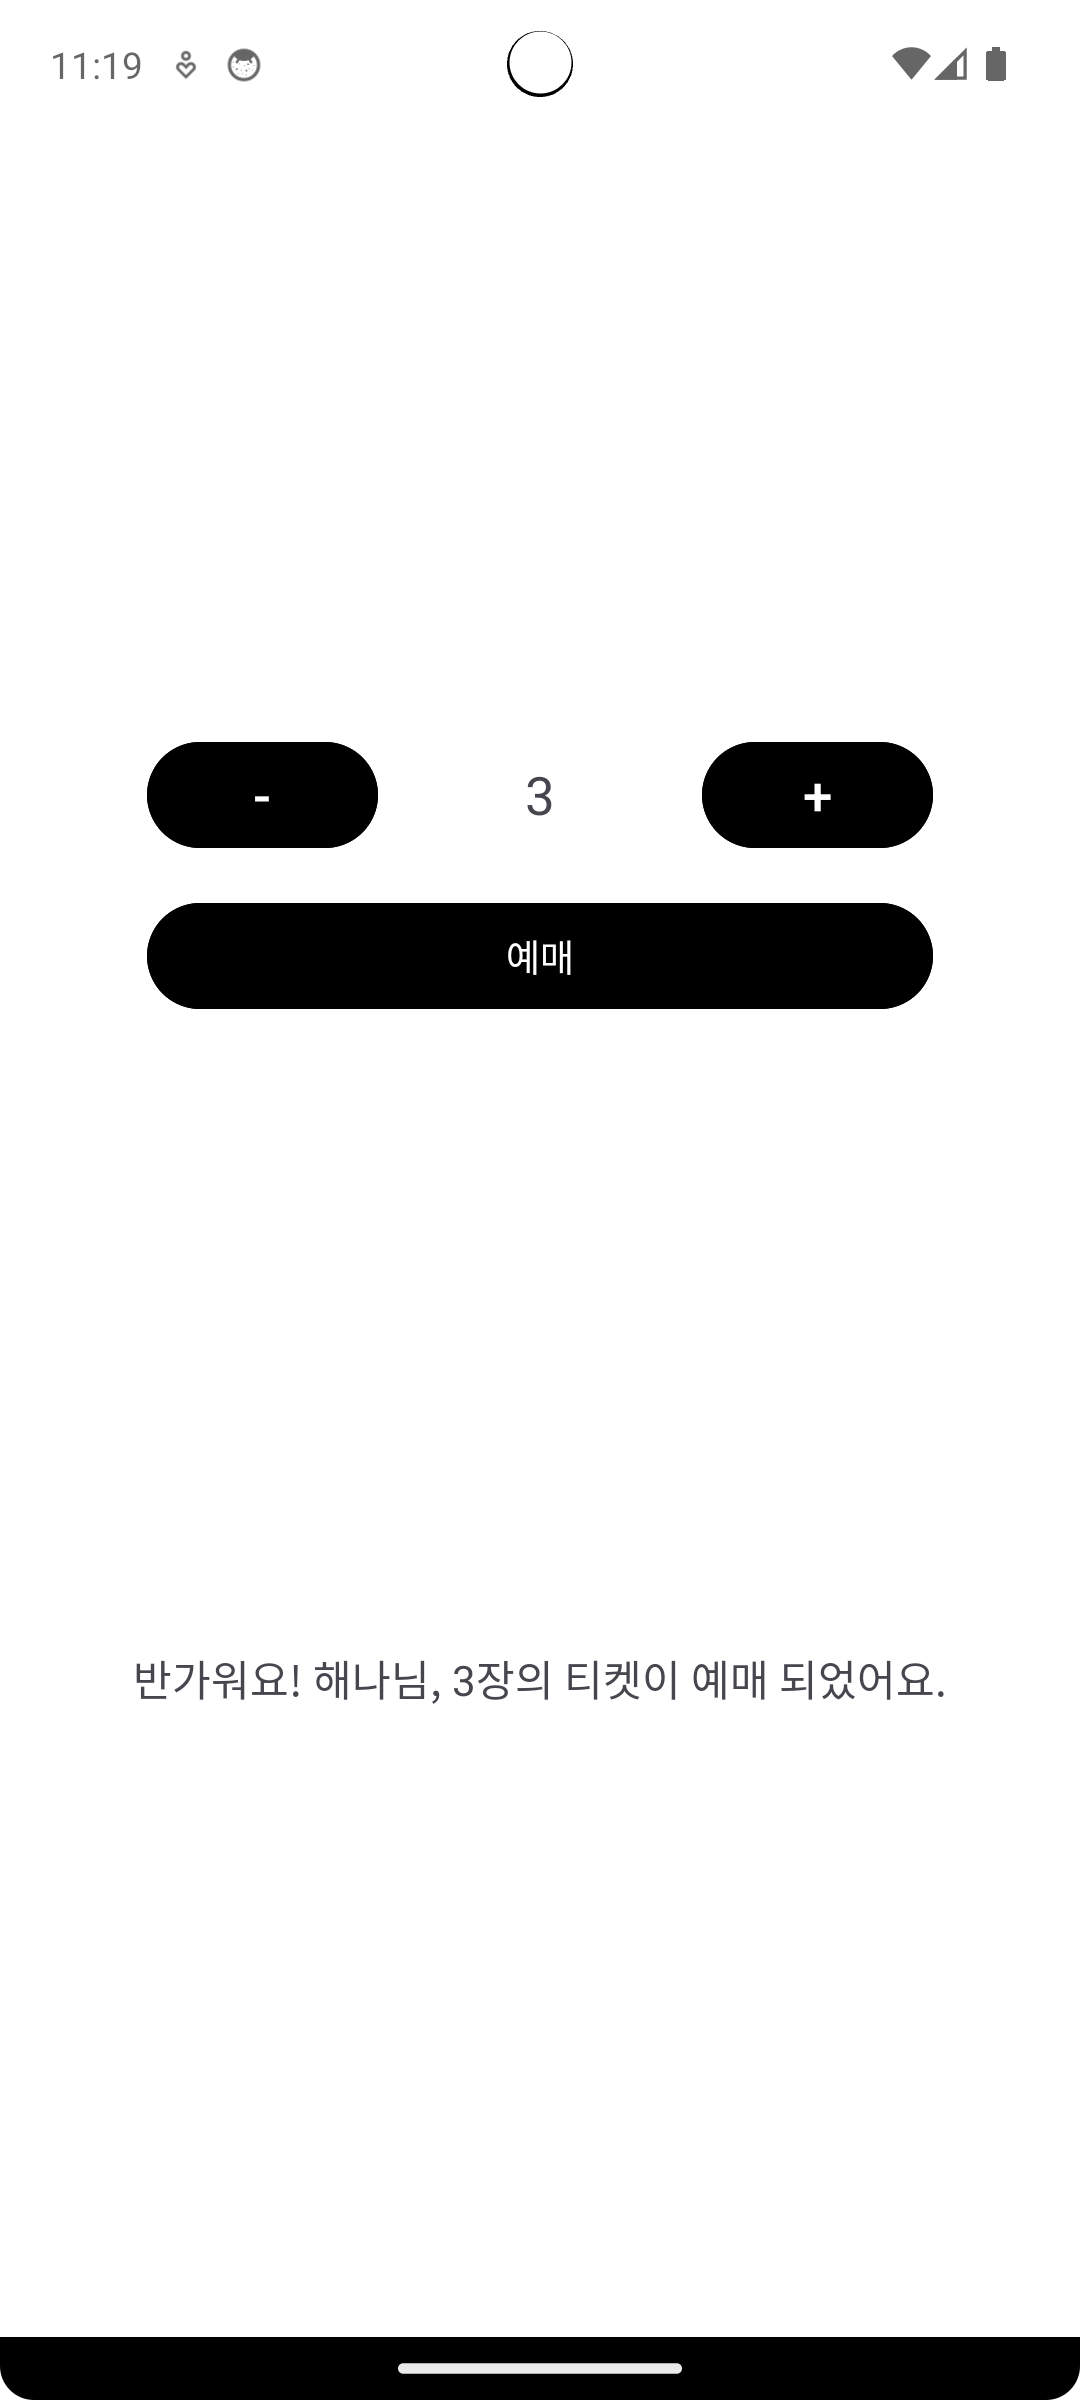 |
XML 코드는 아래와 같이 작성했다. 필자는 DataBinding와 BindingAdapter를 사용하고 있다. ticket의 null 여부에 따라 다른 문구를 출력하기 위해 BindingAdapter를 활용했다.
<?xml version="1.0" encoding="utf-8"?>
<layout xmlns:android="http://schemas.android.com/apk/res/android"
    xmlns:app="http://schemas.android.com/apk/res-auto"
    xmlns:bind="http://schemas.android.com/apk/res-auto"
    xmlns:tools="http://schemas.android.com/tools"
    android:background="@color/white">

    <data>

        <variable
            name="activity"
            type="com.woowacourse.blog_challenge.mvp.MVPActivity" />

        <variable
            name="count"
            type="int" />

        <variable
            name="ticket"
            type="com.woowacourse.blog_challenge.model.Ticket" />
    </data>

    <androidx.constraintlayout.widget.ConstraintLayout
        android:id="@+id/main"
        android:layout_width="match_parent"
        android:layout_height="match_parent"
        tools:context=".mvp.MVPActivity">

        <androidx.constraintlayout.widget.Guideline
            android:id="@+id/guideline"
            android:layout_width="wrap_content"
            android:layout_height="wrap_content"
            android:orientation="horizontal"
            app:layout_constraintEnd_toEndOf="parent"
            app:layout_constraintGuide_percent="0.2"
            app:layout_constraintStart_toStartOf="parent"
            app:layout_constraintTop_toTopOf="parent" />

        <Button
            android:id="@+id/btn_decrease"
            android:layout_width="wrap_content"
            android:layout_height="wrap_content"
            android:backgroundTint="@color/black"
            android:onClick="@{() -> activity.decreaseCount()}"
            android:text="-"
            android:textSize="20dp"
            app:layout_constraintBottom_toBottomOf="@id/tv_count"
            app:layout_constraintEnd_toStartOf="@id/tv_count"
            app:layout_constraintStart_toStartOf="parent"
            app:layout_constraintTop_toTopOf="@id/tv_count" />

        <TextView
            android:id="@+id/tv_count"
            android:layout_width="wrap_content"
            android:layout_height="wrap_content"
            android:text="@{String.valueOf(count)}"
            android:textSize="20dp"
            app:layout_constraintBottom_toBottomOf="@id/btn_reservation"
            app:layout_constraintEnd_toStartOf="@id/btn_increase"
            app:layout_constraintStart_toEndOf="@id/btn_decrease"
            app:layout_constraintTop_toTopOf="@id/guideline"
            tools:text="0" />

        <Button
            android:id="@+id/btn_increase"
            android:layout_width="wrap_content"
            android:layout_height="wrap_content"
            android:backgroundTint="@color/black"
            android:onClick="@{() -> activity.increaseCount()}"
            android:text="+"
            android:textSize="20dp"
            app:layout_constraintBottom_toBottomOf="@id/tv_count"
            app:layout_constraintEnd_toEndOf="parent"
            app:layout_constraintStart_toEndOf="@id/tv_count"
            app:layout_constraintTop_toTopOf="@id/tv_count" />

        <Button
            android:id="@+id/btn_reservation"
            android:layout_width="0dp"
            android:layout_height="wrap_content"
            android:layout_marginTop="24dp"
            android:backgroundTint="@color/black"
            android:onClick="@{() -> activity.issueTicket()}"
            android:text="예매"
            app:layout_constraintEnd_toEndOf="@id/btn_increase"
            app:layout_constraintStart_toStartOf="@id/btn_decrease"
            app:layout_constraintTop_toBottomOf="@id/tv_count" />

        <!--bind:ticket은 BindingAdapter를 활용한 코드-->
        <TextView
            android:id="@+id/tv_ticket"
            android:layout_width="0dp"
            android:layout_height="wrap_content"
            android:layout_marginHorizontal="36dp"
            android:gravity="center"
            android:textSize="16dp"
            app:layout_constraintBottom_toBottomOf="parent"
            app:layout_constraintEnd_toEndOf="parent"
            app:layout_constraintStart_toStartOf="parent"
            app:layout_constraintTop_toBottomOf="@id/btn_reservation"
            bind:ticket="@{ticket}"
            tools:text="반가워요! 해나님, 4장의 티켓이 예매 되었어요." />

    </androidx.constraintlayout.widget.ConstraintLayout>
</layout>@BindingAdapter("ticket") // Layout 파일에서 "ticket"이라는 속성으로 사용할 수 있도록 정의
fun TextView.setReservationDetail(ticket: Ticket?) {
text = if (ticket == null) "예매 내역이 존재하지 않습니다."
else "반가워요! ${ticket.name}님, ${ticket.count}장의 티켓이 예매 되었어요."
}이제 마지막으로 Activity의 코드를 완성해 보자. Presenter를 직접 DataBinding을 통해 XML에 바인딩 하는 것은 권장되지 않는다. Presenter가 View의 구체적인 구현을 알지 못하도록 View를 추상화했지만, DataBinding을 통해 XML에 직접 바인딩 하면 Presenter가 View(XML)에 강하게 의존하게 되기 때문이다.
따라서 Activity가 Presenter에게 명령을 전달하고, Presenter가 필요한 처리를 수행한 후 View를 갱신하는 방식으로 구현해야 한다.
class MVPActivity : AppCompatActivity(), Contract.View {
    private val binding: ActivityMvpBinding by lazy { DataBindingUtil.setContentView(this, R.layout.activity_mvp) }
    private val presenter: Contract.Presenter = Presenter(this)

    override fun onCreate(savedInstanceState: Bundle?) {
        super.onCreate(savedInstanceState)
        binding.activity = this
        show(count = 1)
        show(ticket = null)
    }

    fun increaseCount() { // Activity가 presenter에게 작업 요청
        presenter.increaseCount()
    }

    fun decreaseCount() { // Activity가 presenter에게 작업 요청
        presenter.decreaseCount()
    }

    fun issueTicket() { // Activity가 presenter에게 작업 요청
        presenter.issueTicket()
    }

    override fun show(count: Int) {
        binding.count = count
    }

    override fun show(ticket: Ticket?) {
        binding.ticket = ticket
    }
}
이로써 MVP 패턴 적용이 끝났다. 과정을 다시 정리해보자면 다음과 같다.
- View(Activity)가 사용자 입력을 받음
- View는 입력된 데이터를 처리하거나 UI를 업데이트하기 위해 Presenter에게 작업을 요청
- Presenter는 Model과 상호작용하여 필요한 데이터를 가져오거나 비즈니스 로직을 수행
- Presenter는 처리된 데이터를 추상화된 View 인터페이스를 통해 UI에 업데이트 하도록 지시
MVP의 문제점
지금까지 MVP 패턴에 대해 알아보았다. MVP 패턴은 View와 Model 간 의존성을 제거했고, Presenter를 활용해 Controller가 View의 구현과 강하게 결합하는 문제를 해결했다. 하지만 Presenter와 View 사이의 의존성은 여전히 존재한다. 즉, Presenter는 독립적인 존재가 아니다. 또한 특정 View의 Contract에 의존하기 때문에, 다른 View에서 Presenter를 재사용하기 어렵다. 이 문제점들을 어떻게 해결할 수 있을까?
Outro
MVP의 문제점은 Presenter대신 ViewModel이라는 개념을 도입해 해결할 수 있다. ViewModel은 View를 참조하지 않아서 ViewModel과 View 사이에 의존성이 없기 때문이다. MVVM은 다음 포스팅에서 알아보도록 하겠다.
참고자료