
네이버 검색 API 요청
안드로이드 인터넷 권한 허용 설정
AndroidManifest.xml 에 android.permission.INTERNET 설정을 추가해준다
➡️ 설정하지 않으면 안드로이드 앱에서 인터넷에 접속할 수 없다
<?xml version="1.0" encoding="utf-8"?>
<manifest xmlns:android="http://schemas.android.com/apk/res/android"
    xmlns:tools="http://schemas.android.com/tools">

    <application
        ...
    </application>

	// 인터넷 권한 허용 설정
    <uses-permission android:name="android.permission.INTERNET" />

</manifest>
네이버 검색 API 요청
- 네이버 API를 요청하기 위해선
HTTP 요청 헤더에 Client Id와 Client Secret 키를 추가해야한다
class MainActivity : AppCompatActivity() {

    lateinit var activityMainBinding: ActivityMainBinding

    val clientId = BuildConfig.NAVER_CLIENT_ID
    val clientSecret = BuildConfig.NAVER_CLIENT_SECRET

    lateinit var searchWord: String

    override fun onCreate(savedInstanceState: Bundle?) {
        super.onCreate(savedInstanceState)

        activityMainBinding = ActivityMainBinding.inflate(layoutInflater)
        setContentView(activityMainBinding.root)

        activityMainBinding.run {
            thread {
                try {
                    searchWord = URLEncoder.encode("치킨", "UTF-8")
                    Log.d("검색어 인코딩 성공", searchWord)
                } catch (e: Exception) {
                    Log.d("검색어 인코딩 실패", e.toString())
                }

                // 파라미터
                // query : 검색어(필수), UTF-8로 인코딩
                // display : 한 번에 표시할 검색 결과 개수 (기본값: 10, 최댓값: 100)
                // start : 검색 시작 위치(기본값: 1, 최댓값: 1000)
                // sort : sim(정확도순)[기본값]/date(날짜순) 내림차순 정렬
                val apiURL = "https://openapi.naver.com/v1/search/news.json?query=$searchWord&display=10&start=1&sort=sim"
                // URL 객체 생성
                val url = URL(apiURL)
                // 접속 후 스트림 추출
                val httpURLConnection = url.openConnection() as HttpURLConnection
                httpURLConnection.requestMethod = "GET"
                // httpUrlConnection 객체 메서드로 헤더 설정
                httpURLConnection.setRequestProperty("X-Naver-Client-Id", clientId)
                httpURLConnection.setRequestProperty("X-Naver-Client-Secret", clientSecret)

                val responseCode = httpURLConnection.responseCode

                // Log.d("response", responseCode.toString())
            }
        }
    }
}
JSON 데이터 파싱하기
네이버 검색 API Docs - 블로그 검색 구현 예제
JSON 파일 읽기
방법 1과 방법 2의 동작은 같지만 방법 2가 좀 더 간결하다
- 방법 1
class MainActivity : AppCompatActivity() {
	...

    override fun onCreate(savedInstanceState: Bundle?) {
        ...

        activityMainBinding.run {
            thread {
            	...
                // 네이버 검색 API 요청 코드에 이어서 작성

                // UTF-8 방식으로 읽어오기 위해서
                val inputStreamReader = InputStreamReader(httpURLConnection.inputStream, "UTF-8")
                // 라인 단위로 읽어오기 위해서
                val bufferedReader = BufferedReader(inputStreamReader)

                var str: String? = null
                val stringBuffer = StringBuffer()

                do {
                    str = bufferedReader.readLine()
                    if (str != null) {
                        stringBuffer.append(str)
                    }
                } while (str != null)

                val data = stringBuffer.toString()

                // Log.d("data", data)
            }
        }
    }
}- 방법 2
class MainActivity : AppCompatActivity() {
	...

    override fun onCreate(savedInstanceState: Bundle?) {
        ...

        activityMainBinding.run {
            thread {
            	...
                // 네이버 검색 API 요청 코드에 이어서 작성

                val reader = BufferedReader(InputStreamReader(httpURLConnection.inputStream))
                val stringBuffer = StringBuffer()

                var line: String?
                while (reader.readLine().also { line = it } != null) {
                    stringBuffer.append(line)
                }
                reader.close()

                val data = stringBuffer.toString()

                // Log.d("data", data)
            }
        }
    }
}
JSON 데이터 파싱(분석)
Log로 찍어선 data를 한눈에 보기 불편해서 postman을 이용해 데이터를 분석해봤다
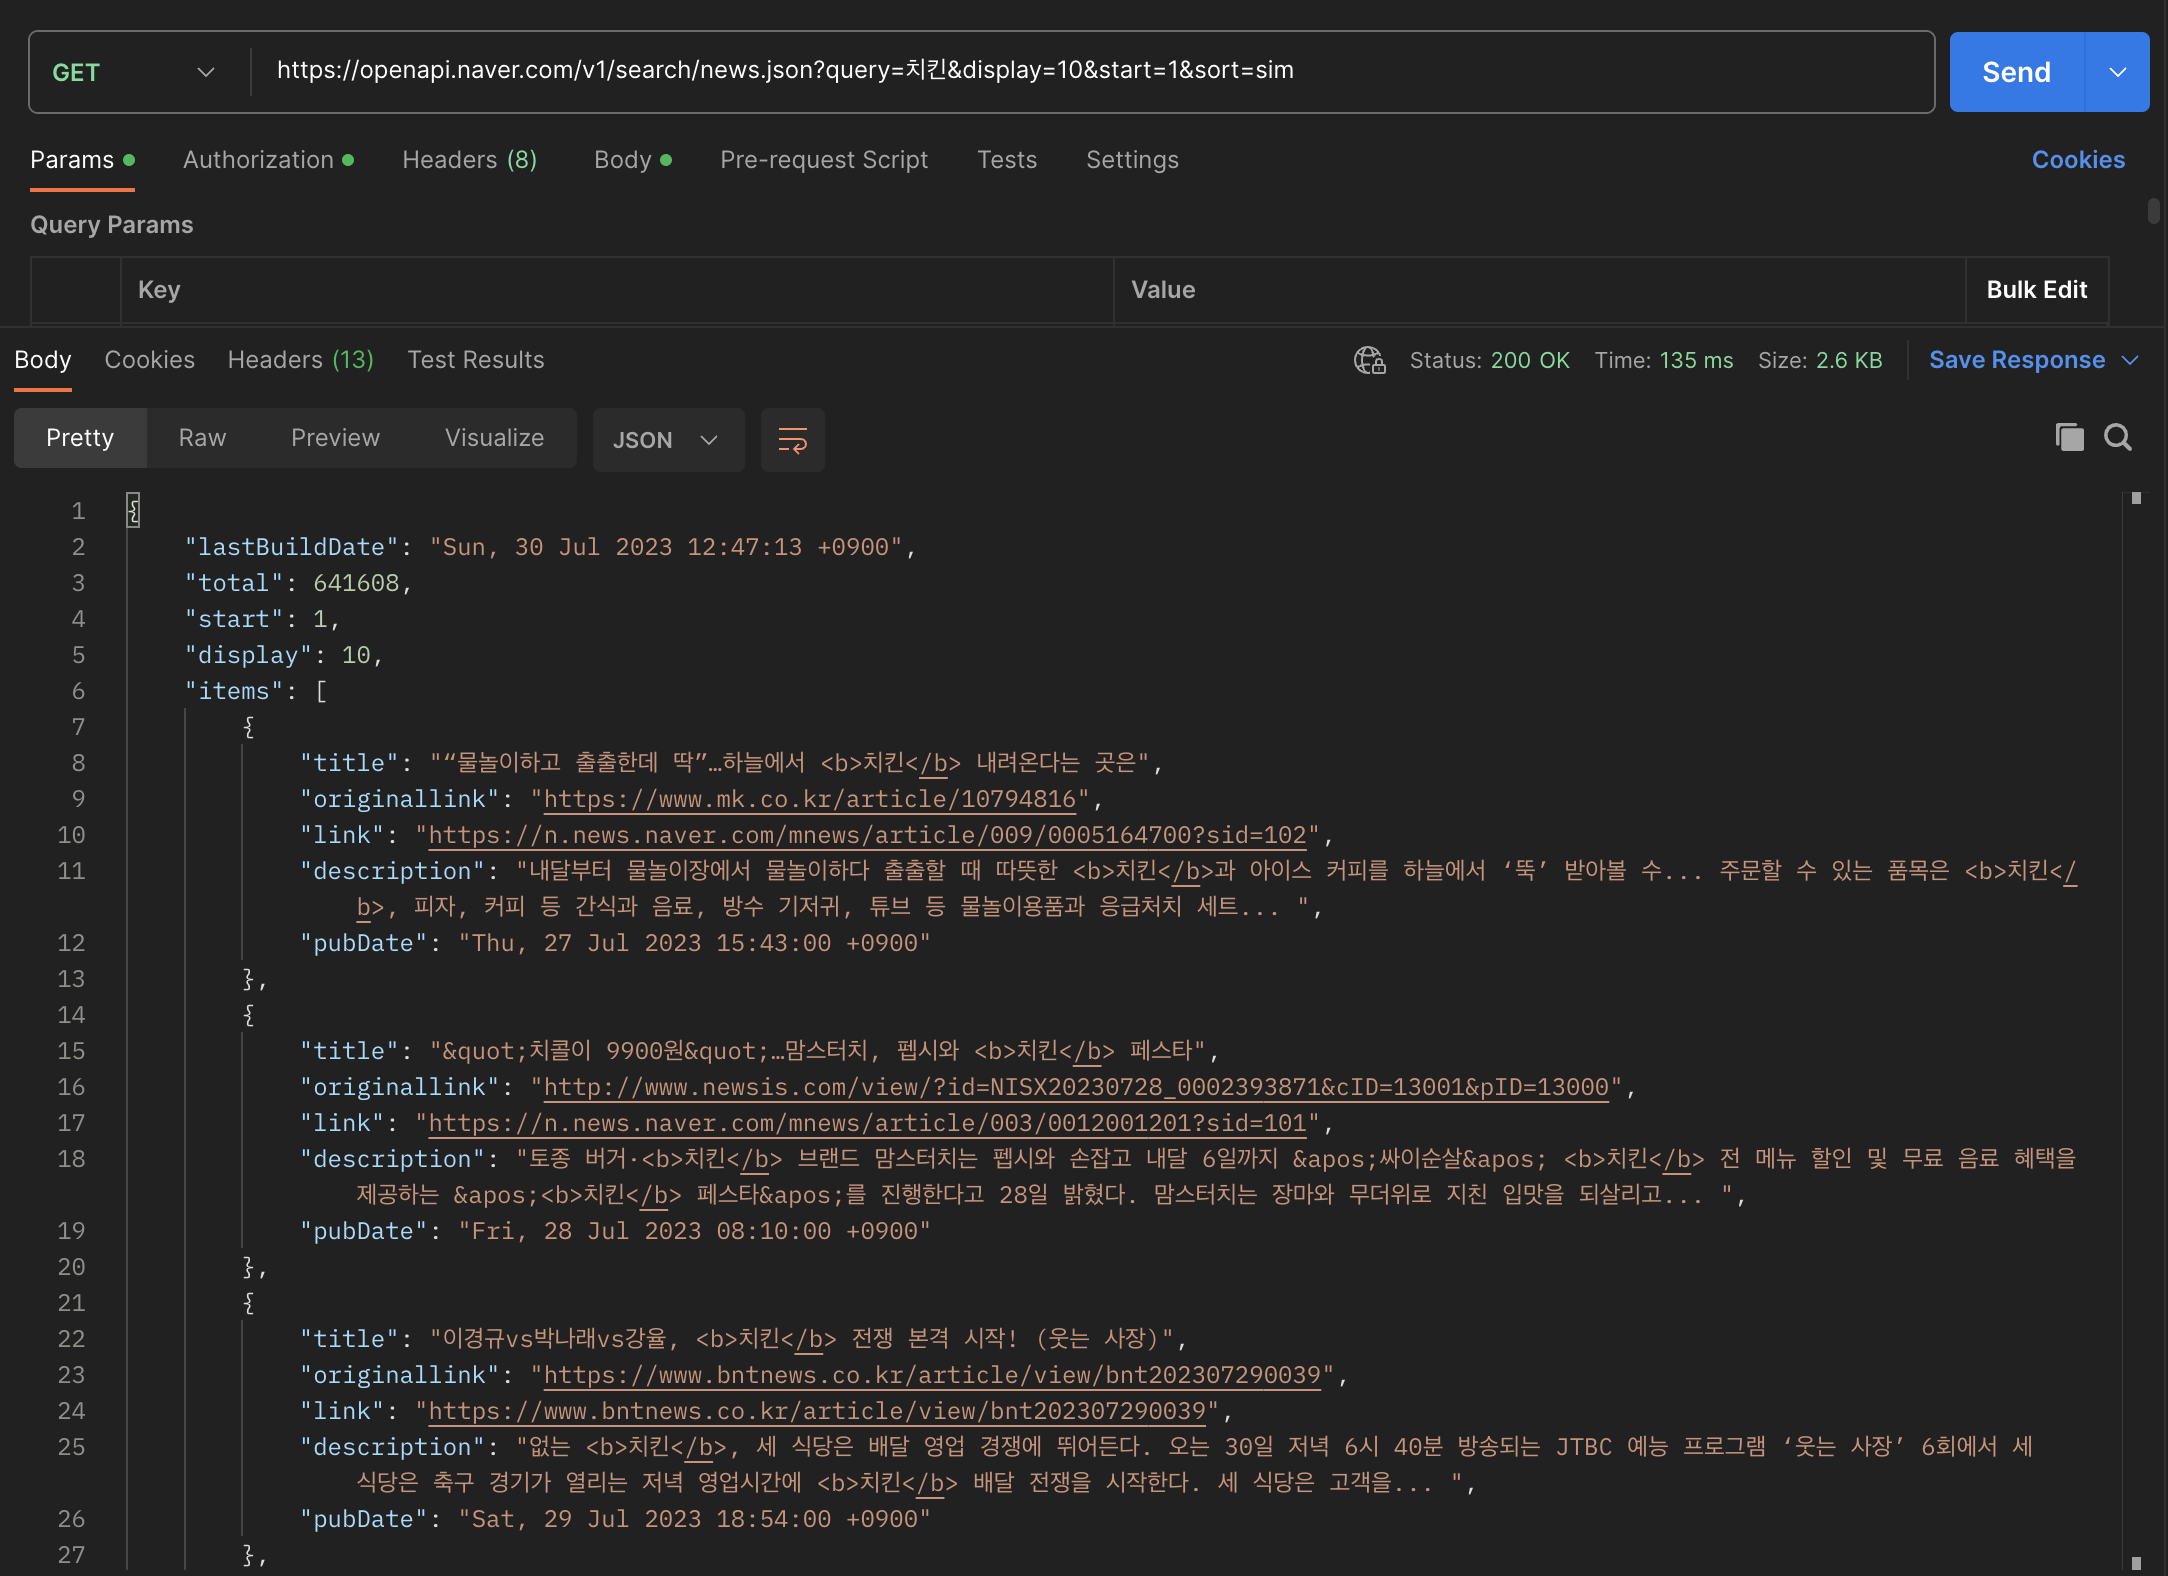
JSON 데이터 분석
{ }: JSONObject, 이름 - 값 형태[ ]: JSONArray, 0부터 1씩 증가하는 순서값을 가지고 관리
{ }은 JSONObject, [ ]는 JSONArray를 이용하면 된다
class MainActivity : AppCompatActivity() {
...
override fun onCreate(savedInstanceState: Bundle?) {
...
activityMainBinding.run {
thread {
...
// JSON 파일 읽기 코드에 이어서 작성
// 먼저 최상위가 `{}` 이므로 JSONObject를 사용한다
val root = JSONObject(data)
// items은 []안에 {}로 구분되어 있다
// 먼저 getJSONArray를 이용해 items를 추출한다
val itemArray = root.getJSONArray("items")
for (idx in 0 until itemArray.length()) {
// items의 기사들은 {}로 감싸져있기에 getJSONObject 이용해 idx 번째 JSONObject를 추출한다
val itemObject = itemArray.getJSONObject(idx)
// 원하는 데이터들을 추출한다
val title = itemObject.getString("title")
val description = itemObject.getString("description")
val link = itemObject.getString("link")
Log.d("data", title)
Log.d("data", description)
Log.d("data", link)
Log.d("data", "-------------------------------------------------------")
}
}
}
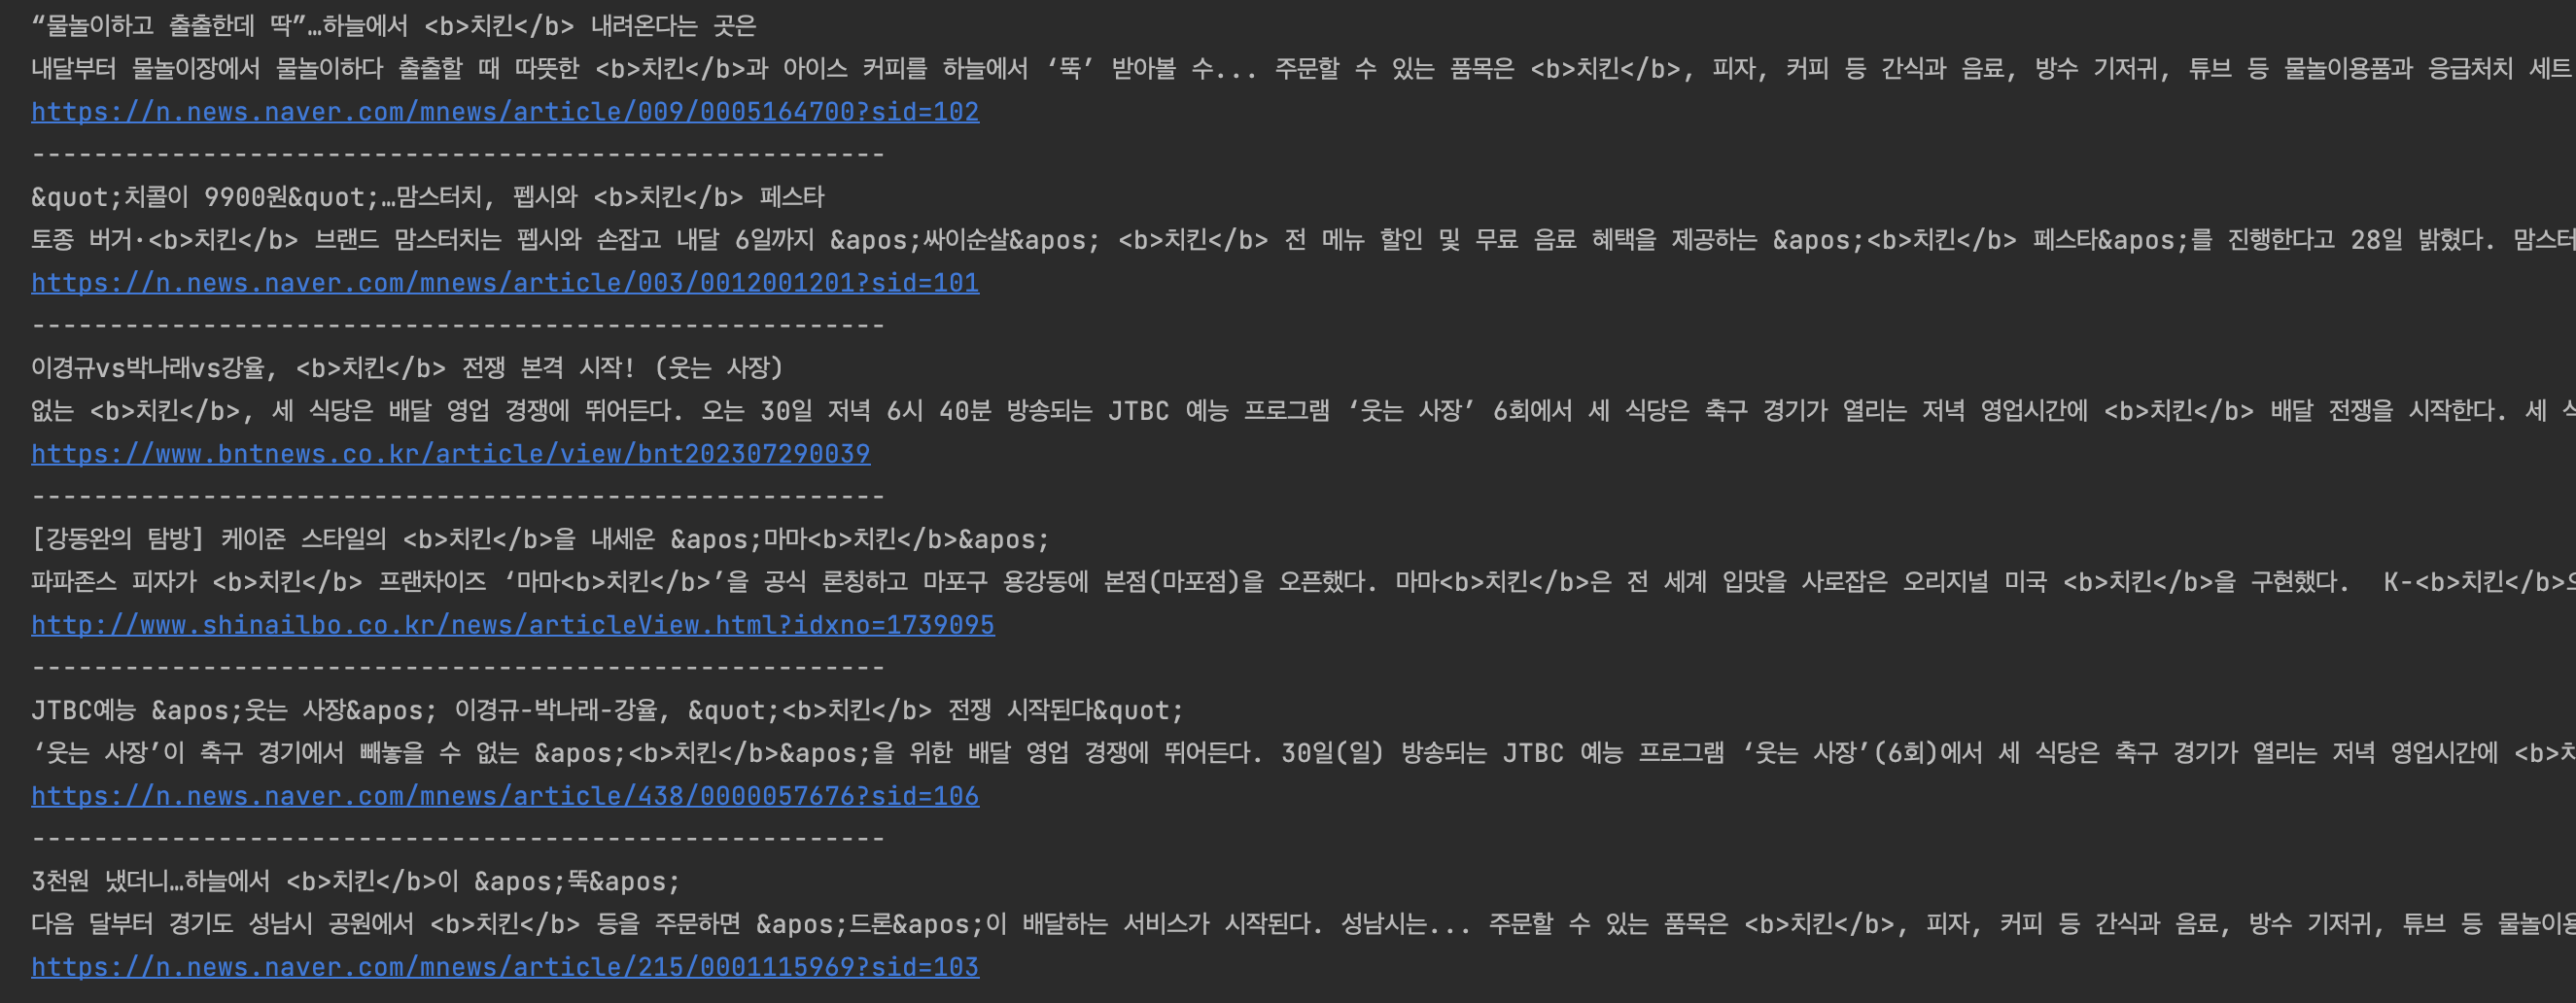
}데이터 파싱 결과
추출한 데이터를 log로 찍어보면 다음과 같이 잘 나오는 걸 확인할 수 있다!

Android Developer