Spring을 새롭게 공부하게 되었는데 이를 복습하면서 기록하기 위해 이 글을 작성하게 되었다.
[수업 목표]
1. 스프링 3계층 Controller, Service, Repository 각 역할을 이해한다.
2. 스프링 MVC를 이해하고 사용법을 익힌다.
3. 스프링 IoC 컨테이너 / DI 의 핵심개념을 이해한다.
01. 필수 프로그램 설치
1) ItelliJ IDEA Ultimate
2) Java 8
3) Advanced REST Client - UI 없이 API 확인
02. 스프링 프로젝트 준비하기
1. 스프링 프로젝트 준비
1) IntelliJ 실행
2) New Project 클릭
3) 왼쪽 메뉴에서 "Spring Initializer" 클릭 후 "Next" 클릭
4) [중요] 확인 사항
- Type: Gradle
- Language: Java
- Java Version: 8
5) 검색창에 다음 5가지 검색 후 엔터
- Lombok
- Spring Web
- Spring Data JPA
- H2 Database
- MySQL Driver
2. IntelliJ 세팅
환경설정 -> "auto import" -> Insert imports on paste: Always / Add unambiguous imports on the fly 체크
3. DB 준비 (H2 웹콘솔 이용)
1) H2 웹콘솔 설정
- src > main > resources > application.properties 파일 안에 아래 코드 작성
spring.h2.console.enabled=true
spring.datasource.url=jdbc:h2:mem:springcoredb
2) SpringcoreApplication.java 파일 실행
3) H2 console URL(http://localhost:8080/h2-console) 접속해서, "JDBC URL"에 위에서 설정한 URL(jdbc:h2:mem:springcoredb) 입력 후 Connect 버튼 클릭
03. Servlet
"스프링 서버 구현 시 왜 꼭 Controller, Service, Repository 사용해야 할까?
일단, Servlet 사용해보자!
Servlet(서블릿)은 자바를 사용하여 웹페이지를 동적으로 생성하는 서버측 프로그램 혹은 그 사양을 말함.
출처: 위키백과
"상품 검색 API" 구현
-
@ServletComponentScan : ItemSearchServlet 클래스의 @WebServlet 어노테이션이 동작하게 함
-> @WebServlet(urlPatterns = "/api/search")까지 보고 ItemSearchServlet에 들어옴 -> GET 요청에 대한 처리가 ItemSearchServlet에서 처리됨 -
모든 서버의 요청들은 요청(HttpServletRequest) 과 응답(HttpServletResponse)로 되어있음
-
ItemSerachServlet 클래스
// 1. API Request 의 파라미터 값에서 검색어 추출 -> query 변수
String query = request.getParameter("query");

// 2. 네이버 쇼핑 API 호출에 필요한 Header, Body 정리
RestTemplate rest = new RestTemplate(); // 서버에서 또 다른 서버 호출 시 사용
HttpHeaders headers = new HttpHeaders();
headers.add("X-Naver-Client-Id", "");
headers.add("X-Naver-Client-Secret", "");
String body = "";
HttpEntity<String> requestEntity = new HttpEntity<>(body, headers);

// 3. 네이버 쇼핑 API 호출 결과 -> naverApiResponseJson (JSON 형태)
ResponseEntity<String> responseEntity = rest.exchange("https://openapi.naver.com/v1/search/shop.json?query=" + query, HttpMethod.GET, requestEntity, String.class);
String naverApiResponseJson = responseEntity.getBody();

// 4. naverApiResponseJson (JSON 형태) -> itemDtoList (자바 객체 형태)
//  - naverApiResponseJson 에서 우리가 사용할 데이터만 추출 -> List<ItemDto> 객체로 변환
ObjectMapper objectMapper = new ObjectMapper() // 응답 JSON을 자바 객체로 만들어 주는 것!
                .configure(DeserializationFeature.FAIL_ON_UNKNOWN_PROPERTIES, false);
JsonNode itemsNode = objectMapper.readTree(naverApiResponseJson).get("items");
List<ItemDto> itemDtoList = objectMapper
                .readerFor(new TypeReference<List<ItemDto>>() {})
                .readValue(itemsNode);

// 5. API Response 보내기
//  5.1) response 의 header 설정
response.setContentType("application/json");
response.setCharacterEncoding("UTF-8");
//  5.2) response 의 body 설정
PrintWriter out = response.getWriter();
//  - itemDtoList (자바 객체 형태) -> itemDtoListJson (JSON 형태)
String itemDtoListJson = objectMapper.writeValueAsString(itemDtoList);
out.print(itemDtoListJson);
out.flush();-
"상품 검색 API" 동작 순서
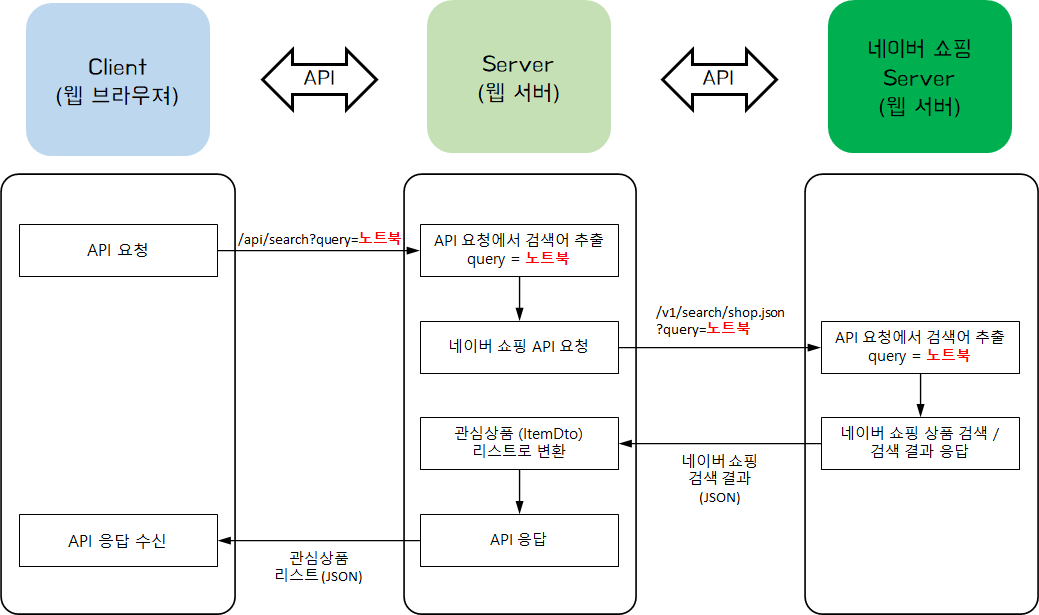
-
ARS에서 API 동작 검증
http://localhost:8080/api/search?query=노트북
04. Controller
Controller의 장점
- HTTP request, reponse 처리를 위해 매번 작성해야 하는 중복 코드 생략 가능
- API 마다 파일을 만들 필요 없음(보통 유사 API를 하나의 Controller로 관리)
- 함수 이름도 마음대로 설정 가능 (단, 클래스 내의 중복함수명 불가)
05. 스프링 MVC 이해 - Response
1) 스프링 MVC란?
- MVC (Model-View-Controller) 디자인 패턴
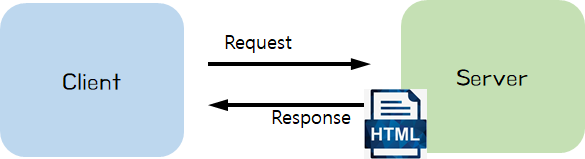
- 서버에서 HTML 을 내려주는 경우
1) 정적 (static) 웹 페이지
- Controller
1. Client의 요청을 Model 로 받아 처리
ex) 회원가입을 위한 개인 정보들(id, pw, name)
2. Client에게 View (정적 웹 페이지, HTML)를 내려줌
2) 동적 (dynamic) 웹 페이지
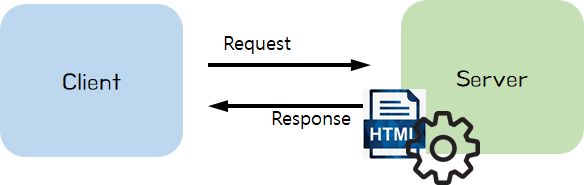
- Controller
1. Client의 요청을 Model 로 받아 처리
-> Model: client에서 서버로 보내주는 정보
2. Template engine에게 View, Model 전달
-> Model: controller가 template engine에 보내주는 것
a. View: 동적 HTML 파일
b. Model: View 에 적용할 정보들
3. Template engine
a. View에 Model을 적용 -> 동적 웹페이지 생성
- ex) 로그인 성공 시, "로그인된 사용자의 id"를 페이지에 추가
- Template engine 종류: 타임리프(Thymeleaf), Groovy, FreeMarker, Jade 등 (스프링에서 JSP 이용은 추천X)
4. Client에게 View (동적 웹페이지, HTML)를 내려줌
2) 타임리프를 이용한 스프링 MVC 실습
1) Intellij - New project 생성
- 'Spring Web', 'Thymeleaf', 'Lombok' 라이브러리 선택
2) HelloResponseController.java
import org.springframework.stereotype.Controller;
import org.springframework.ui.Model;
import org.springframework.web.bind.annotation.*;

@Controller
@RequestMapping("/hello/response")
public class HelloResponseController {
    // [Response header]
    //   Location: http://localhost:8080/hello.html
    @GetMapping("/html/redirect")
    public String htmlFile() {
        return "redirect:/hello.html";
    }

    // [Response header]
    //   Content-Type: text/html
    // [Response body]
    // * resources/templates/hello.html 의 text 내용
    //   <!DOCTYPE html>
    //   <html>
    //     <head><meta charset="UTF-8"><title>By Templates engine</title></head>
    //      <body>Hello, Spring 정적 웹 페이지!!</body>
    //   </html>
    @GetMapping("/html/templates")
    public String htmlTemplates() {
        return "hello";
    }

    // [Response header]
    //   Content-Type: text/html
    // [Response body]
    //   <!DOCTYPE html>
    //   <html>
    //     <head><meta charset="UTF-8"><title>By @ResponseBody</title></head>
    //      <body>Hello, Spring 정적 웹 페이지!!</body>
    //   </html>
    @GetMapping("/body/html")
    @ResponseBody
    public String helloStringHTML() {
        return "<!DOCTYPE html>" +
               "<html>" +
                   "<head><meta charset=\"UTF-8\"><title>By @ResponseBody</title></head>" +
                   "<body> Hello, 정적 웹 페이지!!</body>" +
               "</html>";
    }

    // [Response header]
    //   Content-Type: text/html
    // [Response body]
    // * resources/templates/hello-visit.html 의 text 내용
    @GetMapping("/html/dynamic")
    public String helloHtmlFile(Model model) {
        visitCount++;
        model.addAttribute("visits", visitCount);
        // resources/templates/hello-visit.html
        return "hello-visit";
    }

    private static long visitCount = 0;

    // [Response header]
    //   Content-Type: text/html
    // [Response body]
    //   {"name":"BTS","age":28}
    @GetMapping("/json/string")
    @ResponseBody
    public String helloStringJson() {
        return "{\"name\":\"BTS\",\"age\":28}";
    }

    // [Response header]
    //   Content-Type: application/json
    // [Response body]
    //   {"name":"BTS","age":28}
    @GetMapping("/json/class")
    @ResponseBody
    public Star helloJson() {
        return new Star("BTS", 28);
    }
}
3) HTTP 메시지

- Client 와 Server 간 Request, Response는 HTTP 메시지 규약을 따름
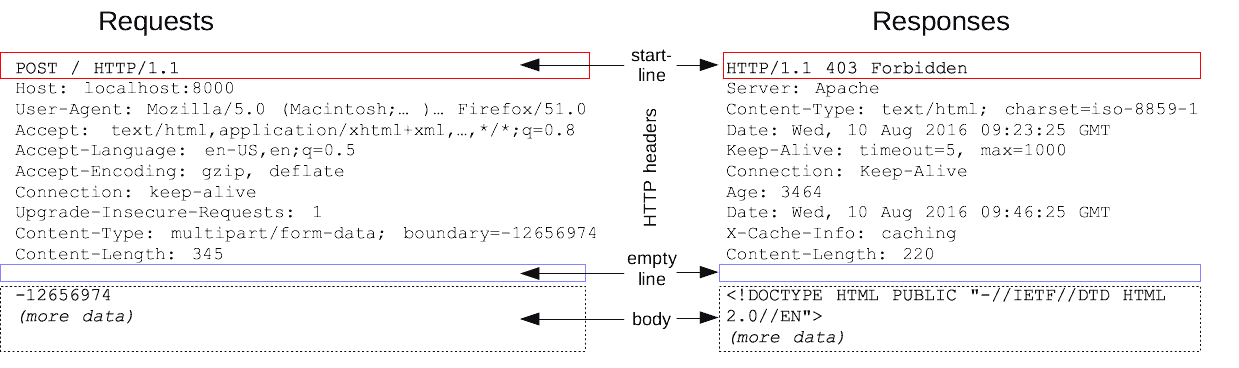
3-1) 메시지 구조
- 시작줄 (start line)
- Response에선 '상태줄 (status line)'
- 헤더 (headers)
- 본문 (body)
3-2) Request 메시지
- 시작줄: API 요청 내용
GET naver.com HTTP/1.1- 헤더
- "Content type"
1. 없음
2. HTML form 태그로 요청 시
application/x-www-form-urlencoded
3. AJAX 요청 시
application/json
- "Content type"
- 본문
- GET 요청: (보통) 없음
- POST 요청: (보통) 사용자가 입력한 폼 데이터
name=홍길동&age=20
3-3) Response 메시지
- 상태줄: API 요청 결과(상태 코드, 상태 텍스트)
- 상태 코드: 서버에서 클라이언트의 요청을 어떻게 처리했는 지 나타냄
- 헤더
- "Content type"
1. 없음
2. Response 본문 내용이 HTML 인 경우
text/html
3. Response 본문 내용이 JSON인 경우
application/json - "Location" : Redirect 할 페이지 URL
- "Content type"
- 본문
- HTML
- JSON
4) Controller 와 HTTP Response 메시지
- 공통된 path @RequestMapping으로 빼줄 수 있음
- th: 타임리프 약자, 동적으로 넘겨주겠다.
4-1) 정적 웹페이지
- static 폴더
- Redirect
- Template engine 에 View 전달
- 타임리프 default 설정
a. prefix: classpath:/templates/
b. suffix: .html
- 타임리프 default 설정
- @ResponseBody
- View를 사용하지 않고, HTTP Body에 들어갈 String을 직접 입력
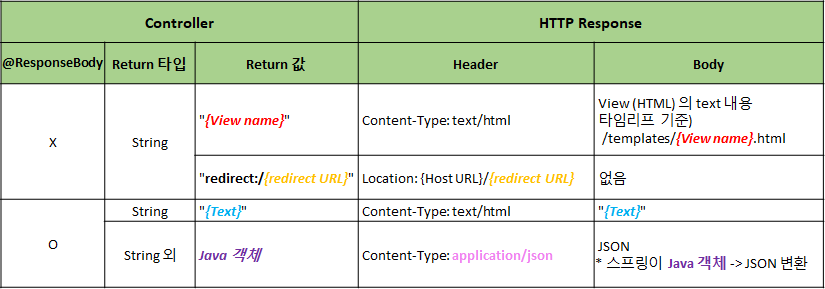
4-2) 동적 웹페이지
- View, Model 정보 -> 타임리프에게 전달
- 타임리프 처리(View 정보, Model 정보)
4-3) JSON 데이터
- 반환값: String
- 반환값: String외 자바 클래스
- "자바 객체에서 JSON 으로 변환"은 스프링이!!!!
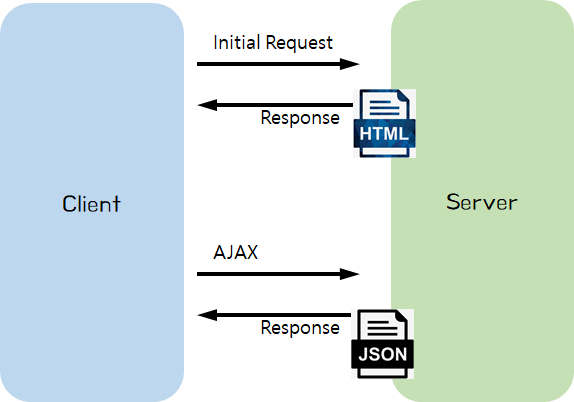
(참고) Response 트렌드의 변화
- JSON 데이터
(참고) @RestController
= @Controller + @ResponseBody
5) 스프링 MVC 동작원리
@Controller는 스프링 서버 개발자 입장에서는 시작점과 끝점으로 보이지만, 사실 많은 부분을 보이지 않게 처리해 주고 있다.
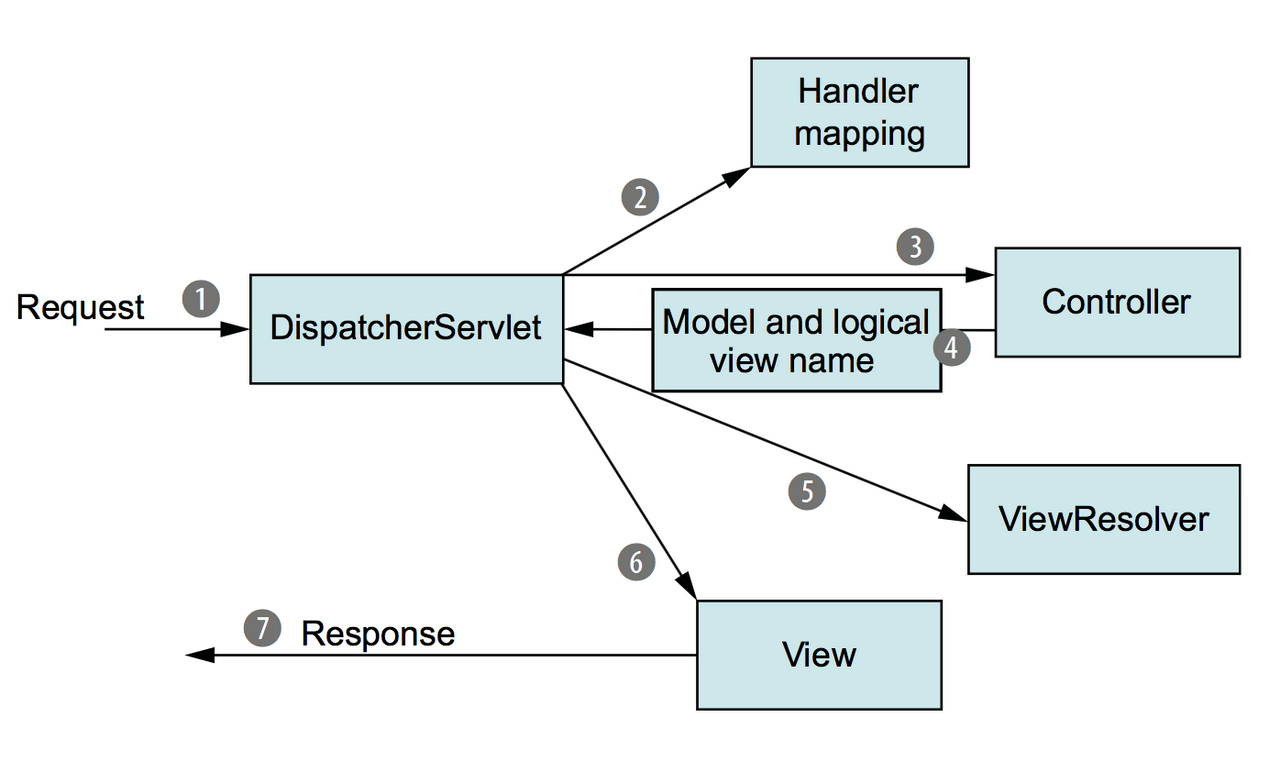
- Client -> DispatcherServlet
a. 가장 앞 단에서 요청을 받아 FrontController로도 불림 - Dispatcher -> Controller
- API를 처리해 줄 Controller를 찾아 요청을 전달
- Handler mapping에는 API path와 Controller 함수가 매칭되어 있음
- 함수 이름을 내 마음대로 설정 가능했던 이유!
- Controller에서 요청하는 Request의 정보('Model') 전달
@Controller
	public class ItemSearchController {
	@GetMapping("/api/search")
	@ResponseBody
	public List<ItemDto> getItems(@RequestParam String query) {
	// ...
	}
}- Controller -> DispatcherServlet
a. Controller 가 Client 으로 받은 API 요청을 처리
b. 'Model' 정보와 'View' 정보를 DispatcherServlet 으로 전달 - DispatcherServlet -> Client
a. ViewResolver 통해 View 에 Model 을 적용
b. View 를 Client 에게 응답으로 전달
06. 스프링 MVC 이해 - Request
1) Controller와 HTTP Request 메시지
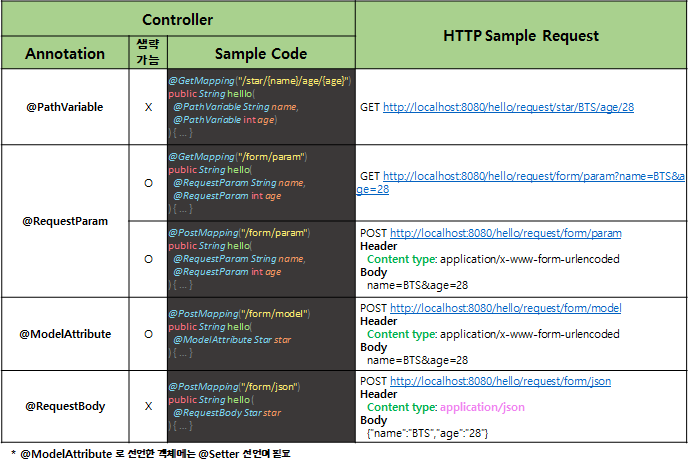
- HelloResponseController.java
import org.springframework.stereotype.Controller;
import org.springframework.web.bind.annotation.*;
@Controller
@RequestMapping("/hello/request")
public class HelloRequestController {
@GetMapping("/form/html")
public String helloForm() {
return "hello-request-form";
}
// [Request sample]
// GET http://localhost:8080/hello/request/star/BTS/age/28
@GetMapping("/star/{name}/age/{age}")
@ResponseBody
public String helloRequestPath(@PathVariable String name, @PathVariable int age)
{
return String.format("Hello, @PathVariable.<br> name = %s, age = %d", name, age);
}
// [Request sample]
// GET http://localhost:8080/hello/request/form/param?name=BTS&age=28
@GetMapping("/form/param")
@ResponseBody
public String helloGetRequestParam(@RequestParam String name, @RequestParam int age) {
return String.format("Hello, @RequestParam.<br> name = %s, age = %d", name, age);
}
// [Request sample]
// POST http://localhost:8080/hello/request/form/param
// Header
// Content type: application/x-www-form-urlencoded
// Body
// name=BTS&age=28
@PostMapping("/form/param")
@ResponseBody
public String helloPostRequestParam(@RequestParam String name, @RequestParam int age) {
return String.format("Hello, @RequestParam.<br> name = %s, age = %d", name, age);
}
// [Request sample]
// POST http://localhost:8080/hello/request/form/model
// Header
// Content type: application/x-www-form-urlencoded
// Body
// name=BTS&age=28
@PostMapping("/form/model")
@ResponseBody
public String helloRequestBodyForm(@ModelAttribute Star star) {
return String.format("Hello, @RequestBody.<br> (name = %s, age = %d) ", star.name, star.age);
}
// [Request sample]
// POST http://localhost:8080/hello/request/form/json
// Header
// Content type: application/json
// Body
// {"name":"BTS","age":"28"}
@PostMapping("/form/json")
@ResponseBody
public String helloPostRequestJson(@RequestBody Star star) {
return String.format("Hello, @RequestBody.<br> (name = %s, age = %d) ", star.name, star.age);
}
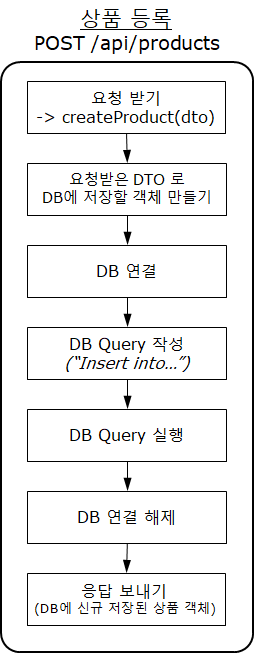
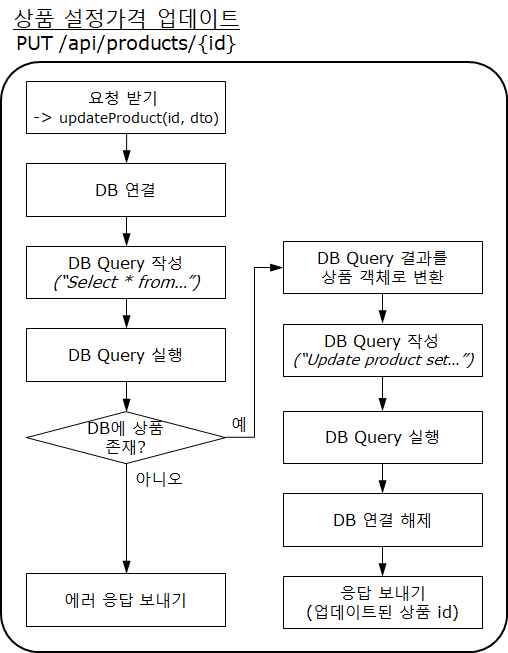
}07. 나만의 셀렉샵 - 관심상품 등록 API 구현
[웹 서비스 구성도]

- 관심상품 등록 API
- 관심상품 최저 희망가 업데이트 API
- 관심상품 조회 API
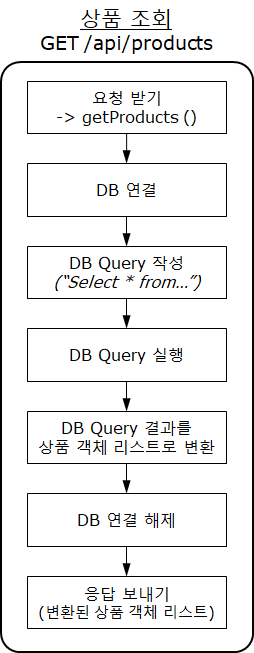
08. Controller, Service, Repository
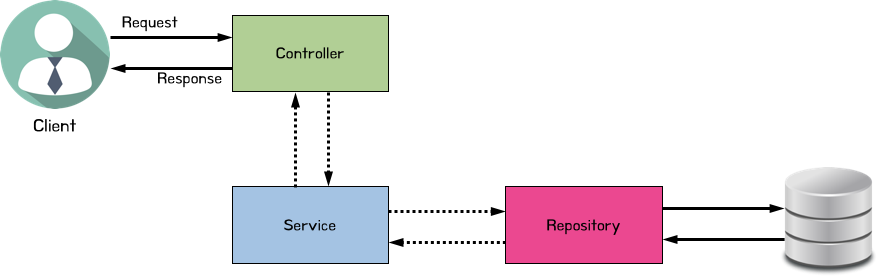
1. Controller
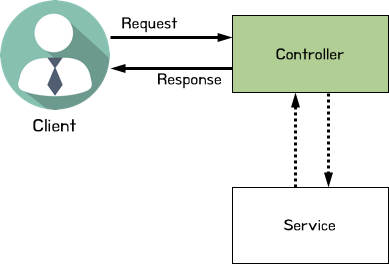
- 클라이언트의 요청을 받음
- 요청에 대한 처리는 서비스에게 전담
- 클라이언트에게 응답
2. Service

- 사용자의 요구사항을 처리('비지니스 로직')
- DB 정보가 필요 시 Repository 에게 요청
3. Repository

- DB 관리 (연결, 해제, 자원 관리)
- DB CRUD 작업 처리
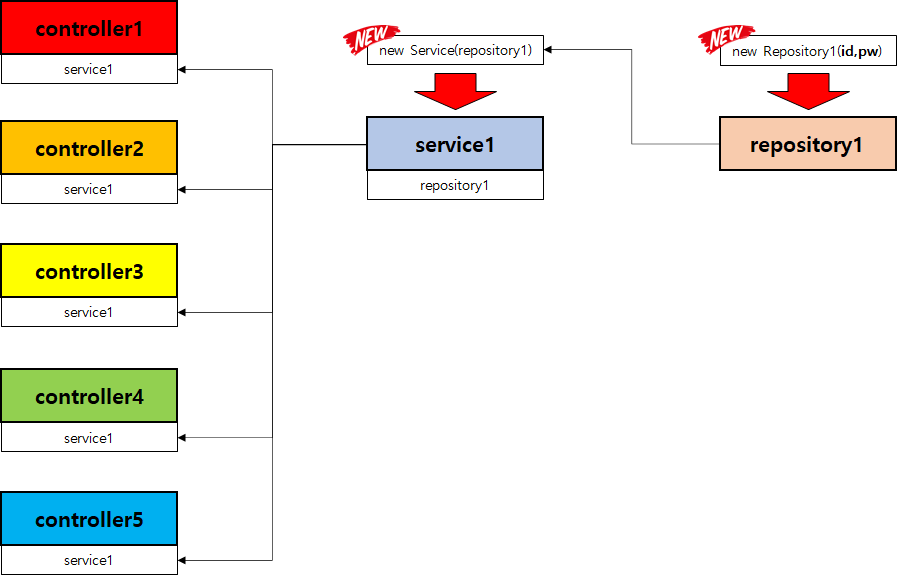
09. 객체 중복 생성 문제 해결
- ProductService.java
// 멤버 변수 선언
private final ProductRepository productRepository;

// 생성자: ProductService() 가 생성될 때 호출됨
public ProductService() {
        // 멤버 변수 생성
	this.productRepository = new ProductRepository();
}
10. DI (의존성 주입)의 이해
1) 강한 결합의 문제점
- 모든 Controller 와 모든 Service의 코드 변경 필요

2) 강한 결합 해결방법
- 각 객체에 대한 생성은 1번만
- 생성된 객체를 모든 곳에서 재사용
-> 강한 결합이 느슨한 결합이 됨
3) DI (의존성 주입)의 이해
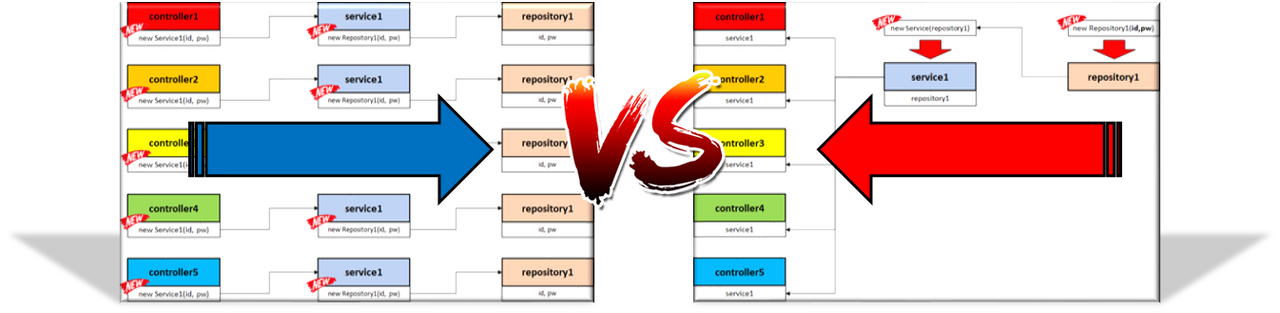
"제어의 역전 (IoC: Inversion of Control)"
프로그램의 제어 흐름이 뒤바뀜
- 용도에 맞게 필요한 객체를 가져다 사용
11. 스프링 IoC 컨테이너 사용하기
1) 스프링 IoC 컨테이너
-
DI 사용을 위해서는 객체 생성이 우선 되어야 하는데 어디서 객체 생성?
-> 스프링 프레임워크가 필요한 객체를 생성하여 관리!!! -
빈 (Bean): 스프링이 관리하는 객체
-
스프링 IoC 컨테이너: '빈'을 모아둔 통
2) 스프링 '빈' 등록 방법
- @Component
- 클래스 선언 위에 설정
- 스프링 서버가 뜰 때 스프링 IoC에 '빈' 저장
- @Component 클래스에 대해서 스프링이 해주는 일
<1> 객체 생성 <2> 스프링 IoC 컨테이너에 빈 저장
- @Component 클래스에 대해서 스프링이 해주는 일
- '빈' 아이콘 확인 -> 스프링 IoC에서 관리할 '빈' 클래스라는 표시
- @Component 적용 조건
- @ComponentScan에 설정해 준 packages 위치와 하위 packages 들
- @SpringBootApplication에 의해 default 설정 되어있음
- @Bean
- 직접 객체를 생성하여 '빈'으로 등록 요청
- BeanConfiguration
import org.springframework.context.annotation.Bean;
import org.springframework.context.annotation.Configuration;

@Configuration
public class BeanConfiguration {

	@Bean
    public ProductRepository productRepository() {
    	String dbUrl = "jdbc:h2:mem:springcoredb";
        String dbId = "sa";
        String dbPassword = "";

        return new ProductRepository(dbUrl, dbId, dbPassword);
    }
}- 스프링 서버가 뜰 때 스프링 IoC에 '빈' 저장
<1> @Bean 설정된 함수 호출
<2> 스프링 IoC 컨테이너에 빈 저장 - '빈' 아이콘 확인 -> 스프링 IoC에 '빈'에 등록될 것이라는 표시
3) 스프링 '빈' 사용 방법
- @Autowired
- 멤버변수 선언위에 @Autowired -> 스프링에 의해 DI(의존성 주입) 됨
- '빈'을 사용할 함수 위에 @Autowired -> 스프링에 의해 DI(의존성 주입) 됨
- @Autowired 적용 조건
- 스프링 IoC 컨테이너에 의해 관리되는 클래스에서만 가능
- @Autowired 생략 조건
- Spring 4.3 버전 부터 생략 가능
- 생성자 선언이 1개일 때만 생략 가능
- Lombok의 @RequiredArgsConstructor를 사용하면 생략 가능
- ApplicationContext
- 스프링 IoC 컨테이너에서 빈을 수동으로 가져오는 방법
12. 스프링 3계층 Annotation 적용하기
- 스프링 3계층 Annotation은 모두 @Component
- @Controller, @RestController
- @Service
- @Repository
- @Respository
- JpaRepository<"@Entity 클래스", "@Id 의 데이터 타입">를 상속받는 interface 로 선언
-> 스프링 Data JPA에 의해 자동으로 @Repository가 추가됨
-> @Repository 역할 대부분을 자동으로 수행해 줌
- JpaRepository<"@Entity 클래스", "@Id 의 데이터 타입">를 상속받는 interface 로 선언
결과
마치며
새로 배우는 내용이라 복습하면서 자세하게 적어보았다. 아즈아😬
출처: 스파르타 코딩 클럽
2주차