[수업 목표]
1. 웹의 인증 및 인가의 개념을 이해한다.
2. 스프링 시큐리티를 이용해 폼 로그인 기능을 구현한다.
3. 스프링 시큐리티 OAuth2를 이용해 소셜 로그인 기능을 구현한다.
4. JWT 로그인 기능을 구현한다.
01. 웹의 인증 및 인가
인증 vs. 인가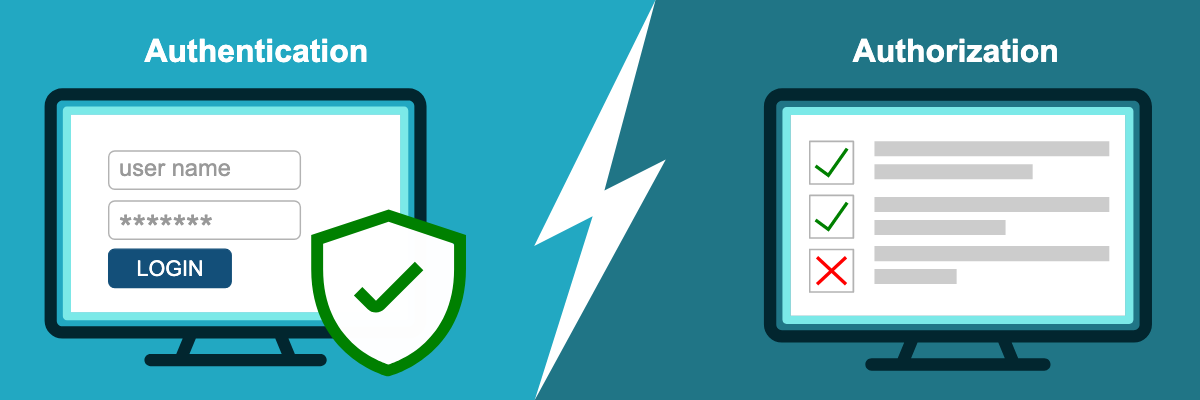
출처: https://aboutssl.org/authentication-vs-authorization/
- 인증 (Authentication): 사용자 신원을 확인하는 행위
- 인가 (Authorization): 사용자 권한을 확인하는 행위
예를 들면,
- 인증: 회사 출입을 위한 출입증 확인 혹은 생체정보(지문, 홍채) 인식
- 인가: 회사 건물 내 접근 권한 관리
웹에서의 인증 및 인가
- 인증: 로그인을 통해 본인임을 확인(주로 Id, PW 이용)
- 인가: 주로 역할에 따른 사용 권한 관리

02. 쿠키와 세션
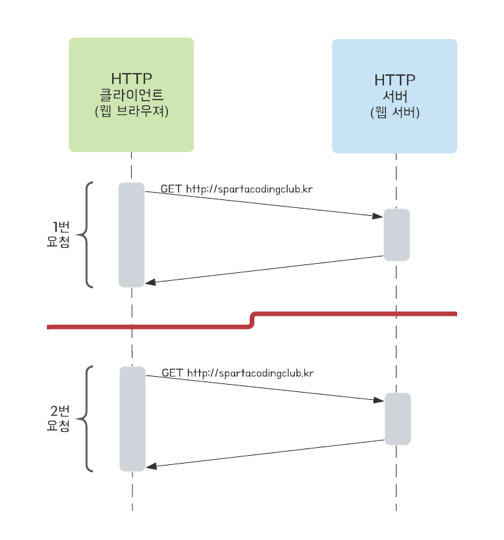
1. 사용자를 구별하지 못 하는 HTTP
- HTTP 는 상태를 저장하지 않음. ('Stateless')
- HTTP 상태는 기억되지 않아서 웹 서버에서는 1번과 2번이 같은 클라이언트의 요청인지 알 수 없음.
2. 쿠키와 세션
쿠키와 세션 모두 HTTP에 상태 정보를 유지(Stateful)하기 위해 사용됨.
즉, 쿠키와 세션을 통해 서버에서는 클라이언트 별로
인증 및 인가를 할 수 있게 됨.- 쿠키
- 클라이언트에 저장될 목적으로 생성한 작은 정보를 담은 파일
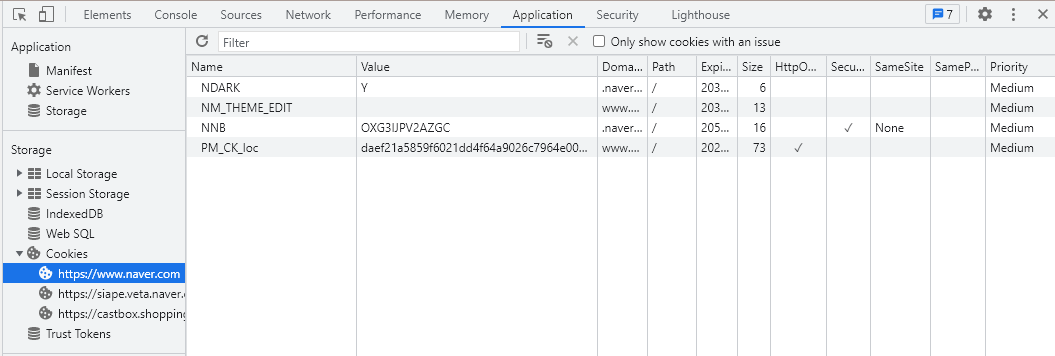
- 클라이언트인 웹 브라우저에 저장된 '쿠키'를 확인해보기
- 크롬 브라우저 기준 '개발자 도구' 열기
- Application - Storage - Cookies 에 도메인 별로 저장되어 있는 것 확인
- 구성요소
- Name (이름): 쿠키를 구별하는 데 사용되는 키 (중복X)
- Value (값): 쿠키의 값
- Domain (도메인): 쿠키가 저장된 도메인
- Path (경로): 쿠키가 사용되는 경로
- Expires (만료기한): 쿠키의 만료기한(만료기한이 지나면 삭제됨)
- 세션
- 서버에서 일정시간 동안 클라이언트 상태를 유지하기 위해 사용
- 서버에서 클라이언트 별로 유일무이한 '세션ID'를 부여한 후 클라이언트 별 필요한 정보를 서버에 저장
- 서버에서 생성한 '세션ID'는 클라이언트의 쿠키 값('세션 쿠키'라고 부름)으로 저장되어 클라이언트 식별에 사용됨
- 세션 동작 방식
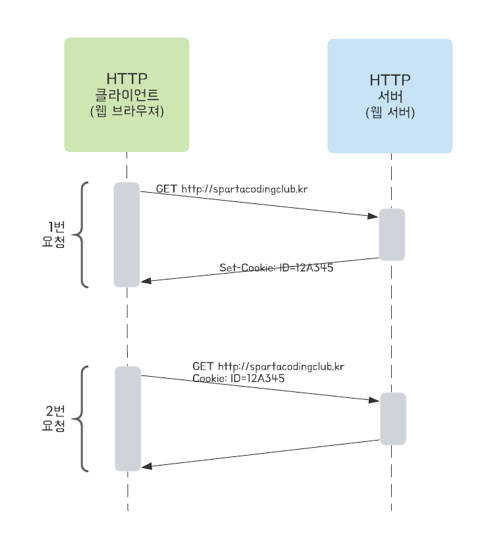 위 그림에서와 같이 서버는 세션ID를 사용해 세션을 유지함.
1. 클라이언트가 서버에 1번 요청
2. 서버가 세션 ID를 생성하고, 응답 헤더에 전달
   - 세션 ID 형태: "SESSIONID = 12A345"
3. 클라이언트가 쿠키를 저장('세션쿠키')
4. 클라이언트가 서버에 2번 요청
   - 쿠키값 (세션 ID) 포함하여 요청
5. 서버가 세션 ID를 확인하고, 1번 요청과 같은 클라이언트임을 인지
쿠키와 세션 비교
| 쿠키 | 세션 | |
|---|---|---|
| 설명 | 클라이언트에 저장될 목적으로 생성한 작은 정보를 담은 파일 | 서버에서 일정시간동안 클라이언트 상태를 유지하기 위해 사용 |
| 저장 위치 | 클라이언트 (웹 브라우저) | 웹 서버 |
| Ex | 사이트 팝업의 "오늘 다시보지 않기" 정보 저장 | 로그인 정보 저장 |
| 만료 시점 | 쿠키 저장 시 만료일시 설정 O (브라우저 종료 시도 유지 가능) | 다음 중 하나가 만족될 경우 만료됨 1. 브라우저 종료 시까지 2. 클라이언트 로그아웃 시까지 3. 서버에 설정한 유지기간까지 해당 클라이언트의 재요청이 없는 경우 |
| 용량 제한 | 브라우저 별로 다름(크롬 기준) - 하나의 도메인 당 180개 - 하나의 쿠키 당 4KB | 개수 제한 없음 (단, 세션 저장소 크기 이상 저장 X) |
| 보안 | 취약 (클라이언트에서 쿠키정보 쉽게 변경, 삭제, 가로채기 당할 수 O) | 비교적 안전 (서버에 저장되어 상대적 안전) |
03. '스프링 시큐리티' 프레임워크
'스프링 시큐리티' 프레임워크는 스프링 서버에 필요한 인증 및 인가를 위해 많은 기능을 제공해 줌으로써 개발의 수고를 덜어줌.
'스프링 프레임워크'가 웹서버 구현에 편의를 제공해 주는 것과 비슷!
이제부터 '나만의 셀렉샵' 서비스에 회원 관리 기능을 추가해보자!
1) '스프링 시큐리티' 프레임워크 추가
- build.gradle에 아래 코드 추가 후, Load Gradle Change 클릭
// 스프링 시큐리티
implementation 'org.springframework.boot:spring-boot-starter-security'
2) '스프링 시큐리티' 활성화 (기능 동작)
- security > WebSecurityConfig
import org.springframework.context.annotation.Configuration;
import org.springframework.security.config.annotation.web.builders.HttpSecurity;
import org.springframework.security.config.annotation.web.configuration.EnableWebSecurity;
import org.springframework.security.config.annotation.web.configuration.WebSecurityConfigurerAdapter;

@Configuration
@EnableWebSecurity // 스프링 Security 지원을 가능하게 함
public class WebSecurityConfig extends WebSecurityConfigurerAdapter {
    @Override
    protected void configure(HttpSecurity http) throws Exception {

        http.authorizeRequests()
                // 어떤 요청이든 '인증'
                .anyRequest().authenticated()
                .and() // 조건 추가!
                    // 로그인 기능 허용
                    .formLogin() // 스프링 Security에서 미리 만들어 놓은 기능
                    .defaultSuccessUrl("/") // 로그인 성공 시 어디로 이동시킬 지
                    .permitAll() // 로그인 관련 기능에 대하여 허용
                .and()
                    // 로그아웃 기능 허용
                    .logout()
                    .permitAll();
    }
}
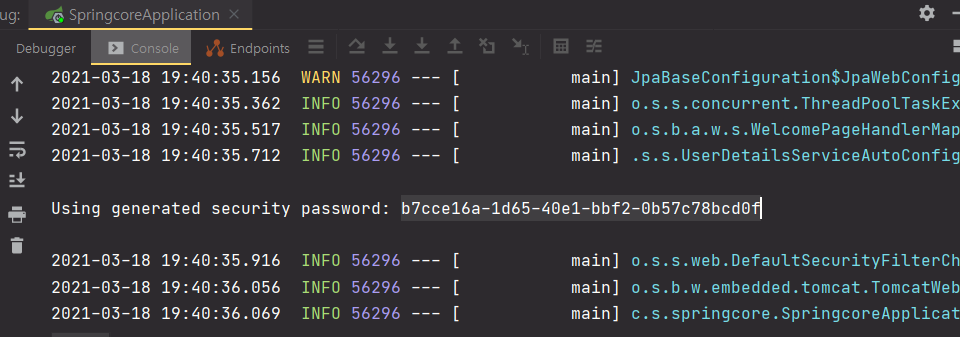
- configure 함수로 스프링 Security 인증 및 인가 관련 설정 가능참고) 스프링 시큐리티의 default 로그인 기능
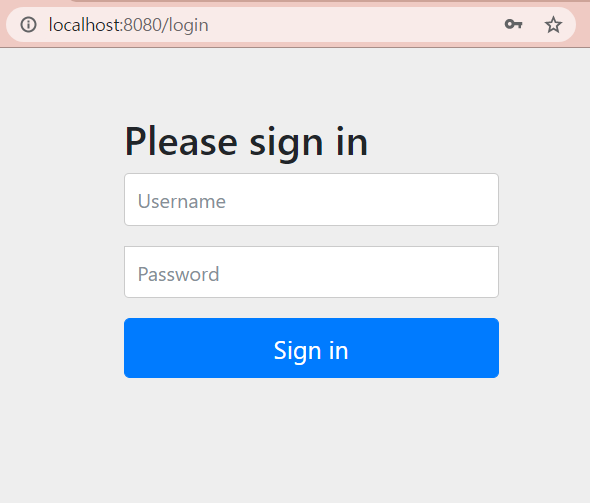
- Username: user
- Password: spring 로그 확인(서버 시작마다 변경됨)
04. 회원 가입 UI 반영
1) 회원 가입 UI 반영
- UI
- 타임리프 모듈 추가 (build.gradle)
- 회원 가입, 회원 로그인 Form 페이지 추가
(resources > templates) - 공통 css 파일(static > css)
- 회원 가입 페이지 요청 처리
- UserController 작성(login, signup)
- WebSecurityConfig 에 formLogin() 처리 부분 변경
   	.and()
   	// 로그인 기능 허용
   	.formLogin()
   	.loginPage("/user/login") // 로그인 뷰가 나타남
   	.defaultSuccessUrl("/")
   	.failureUrl("/user/login?error") // 로그인 실패했을 때 url
   	.permitAll()
- WebSecurityConfig에서 알아서 어떤 요청이든 인증하도록 되어있음
- 따라서 알아서 Redirect 해줌2) UI 이슈 해결
- "기대하는 UI" vs "실제 UI"
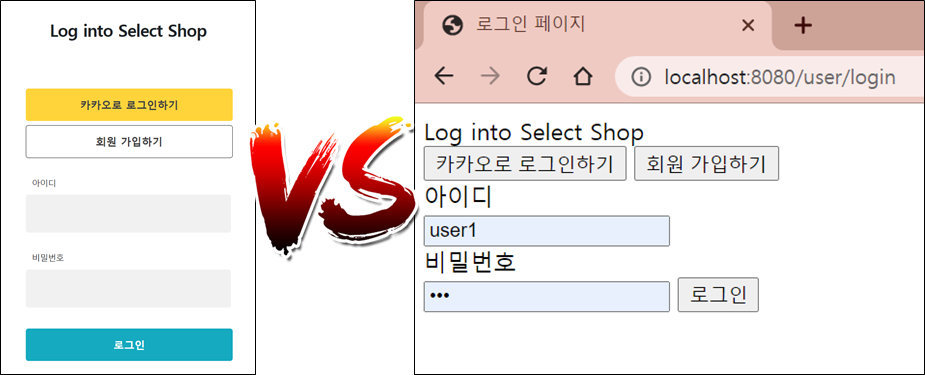
- 로그인 페이지에 CSS 가 적용되지 않음
- 개발자 도구에서 에러 확인
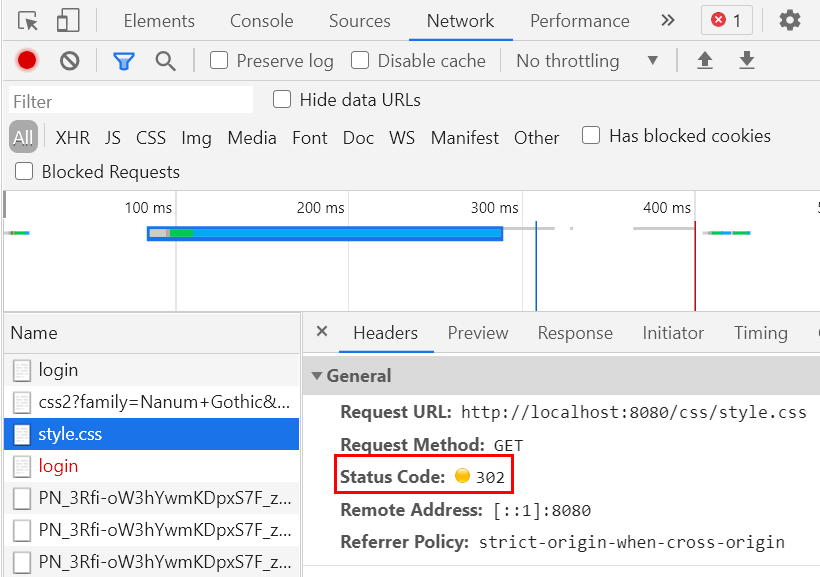
- 스프링 Security가 어떤 요청이든지 막도록 되어 있음
- 개발자 도구에서 에러 확인
- 스프링 시큐리티의 URL 허용 정책 변경 필요 확인
- 인증 전에 로그인 화면에 필요한 것들은 허용해야 함.
  	// image 폴더를 login 없이 허용
  	.antMatchers("/images/**").permitAll()
  	// css 폴더를 login 없이 허용
  	.antMatchers("/css/**").permitAll()
05. 회원 가입 기능 구현
1) 회원 테이블 설계
- 회원 DB 설계
- id: PK, 유일무이해야 함!
- 회원 DB에 매핑되는 @Entity 클래스 구현
- @Getter : get 함수를 일괄적으로 만들어줌.
- @NoArgsConstructor : 기본 생성자를 만들어줌.
- @Entity : DB 테이블 역할.
- @GeneratedValue(strategy = GenerationType.AUTO) : 자동으로 값이 1씩 증가.
- @Id : PK로 설정한다.
- @Enumerated(value = EnumType.STRING) : DB 저장 시 ENUM 값이 아닌 STRING으로 바뀌어서 저장됨.
- nullable : null 허용 여부.
- unique : 중복 허용 여부. (false 일때 중복 허용, default)
2) 관리자 회원 가입 인가 방법
- '관리자 가입 토큰' 입력 필요 : 랜덤하게 생성된 토큰 사용
-> 실제로는 이렇지 않다는 점..
보통 현업에서는
1) '관리자' 권한을 부여할 수 있는 관리자 페이지 구현
2) 승인자에 의한 결재 과정 구현 → 관리자 권한 부여
3) 회원가입 API 구현
1. 회원가입 요청 DTO 구현
2. 회원관리 Controller 구현(+ 회원가입 요청 처리 POST)
3. 회원가입 API Service 구현
- 회원 가입 요청 처리
<1> 회원 중복 Id 확인
<2> 관리자 가입 요청에 대해 '관리자 가입 토큰' 인가
4. 회원가입 API Repository 구현
5. UI 연동 테스트
- 확인 결과, 회원가입 버튼 클릭시 회원 가입 페이지로 넘어가지 않고, h2-console 도 안됨
6. 스프링 Security 허용 정책 변경 필요
- 회원 관리 API 허용 (CSRF 무시)
- h2-console 사용에 대한 허용 (CSRF, FrameOptions 무시)
- security > WebSecurityConfig
import org.springframework.context.annotation.Configuration;
import org.springframework.security.config.annotation.web.builders.HttpSecurity;
import org.springframework.security.config.annotation.web.builders.WebSecurity;
import org.springframework.security.config.annotation.web.configuration.EnableWebSecurity;
import org.springframework.security.config.annotation.web.configuration.WebSecurityConfigurerAdapter;

@Configuration
@EnableWebSecurity // 스프링 Security 지원을 가능하게 함
public class WebSecurityConfig extends WebSecurityConfigurerAdapter {

    @Override
    public void configure(WebSecurity web) {
        // h2-console 사용에 대한 허용 (CSRF, FrameOptions 무시)
        web
                .ignoring()
                .antMatchers("/h2-console/**");
    }

    @Override
    protected void configure(HttpSecurity http) throws Exception {
        // 회원 관리 처리 API (POST /user/**) 에 대해 CSRF 무시
        http.csrf()
                .ignoringAntMatchers("/user/**");

        http.authorizeRequests()
                // image 폴더를 login 없이 허용
                .antMatchers("/images/**").permitAll()
                // css 폴더를 login 없이 허용
                .antMatchers("/css/**").permitAll()
                // 회원 관리 처리 API 전부를 login 없이 허용
                .antMatchers("/user/**").permitAll()
                // 그 외 어떤 요청이든 '인증'
                .anyRequest().authenticated()
                .and()
                    // 로그인 기능
                    .formLogin()
                    .loginPage("/user/login")
                    .defaultSuccessUrl("/")
                    .failureUrl("/user/login?error")
                    .permitAll()
                .and()
                    // 로그아웃 기능
                    .logout()
                    .permitAll();
    }
}
- POST 요청 시에는 CSRF 무시해야 함06. 패스워드 암호화 구현
1) 패스워드 암호화

- 문제점: PASSWORD가 DB에 평문으로 저장되어 있음
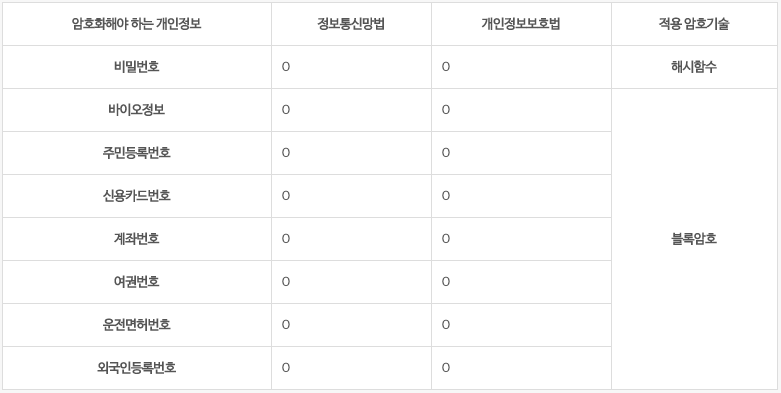
-> 회원 등록 시 '비밀번호'는 사용자가 입력한 문자 그대로 DB에 저장하면 안됨.'정보통신망법, 개인정보보호법'에 의해 비밀번호는 암호화(Encryption)가 의무!
-
따라서 아래와 같이 암호화 후 패스워드 저장이 필요
- 평문 → (암호화 알고리즘) → 암호문
- "nobodynobody" → "2a$10.."
- 평문 → (암호화 알고리즘) → 암호문
-
또한 복호화가 불가능한 '일방향' 암호 알고리즘 필요
'일방향' 암호 알고리즘- 암호화: 평문 → (암호화 알고리즘) → 암호문
- 복호화: 불가 (
암호문 → (암호화 알고리즘) → 평문)
-
그럼 사용자가 로그인할 때는 암호화된 패스워드를 기억해야 함? -> NO!!
- 사용자가 로그인을 위해 "아이디, 패스워드(평문)" 입력
- 서버에 로그인 요청
- 서버에서 패스워드(평문)을 암호화
- DB에 저장된 "아이디, 패스워드 (암호문)"과 일치 여부 확인
2) 패스워드 암호화 적용
스프링 Security에서 '권고'하고 있는 'BCrypt 해시함수'를 사용해 패스워드를 암호화하여 DB에 저장하자!
- 암호화 알고리즘을 "빈(Bean)" 으로 등록 (알고리즘 사용 준비 완료)
- security > WebSecurityConfig
@Bean
public BCryptPasswordEncoder encodePassword() {
    return new BCryptPasswordEncoder();
}
[암호화 알고리즘 사용 용도]
(1) 회원 가입 시 패스워드를 암호화하여 저장
- 직접 구현!
(2) 로그인 인증 시 사용
- 스프링 Security 자동으로 가져다가 사용
- 로그인 처리 시
- 사용자가 입력한 패스워드 평문을 암호화
- 암호화된 DB의 패스워드와 비교
- 회원 가입 시 패스워드 암호화 구현
- service > UserService
@Autowired
public UserService(UserRepository userRepository, PasswordEncoder passwordEncoder) {
        this.userRepository = userRepository;
        this.passwordEncoder = passwordEncoder;
}
...

public void registerUser(SignupRequestDto requestDto) {
	...
	// 패스워드 암호화
    	String password = passwordEncoder.encode(requestDto.getPassword());
        ...
- BCryptPasswordEncoder를 DI.- 동작 검증
- 회원 가입 후 DB에 패스워드가 암호화되어 저장되는 지 확인
07. 로그인, 로그아웃 기능 구현
1) 로그인, 로그아웃 처리 과정
-
스프링 Security 사용 전

-
스프링 Security 사용 후

-
Client의 요청은 모두 스프링 Security 를 거침
-
스프링 Security 역할
-
인증/인가
a. 성공 시: Controller 로 Client 요청 전달- Client 요청 + 사용자 정보
b. 실패 시: Controller로 Client 요청 전달되지 않음
- Client에게 Error Response 보냄
-
-
로그인 처리 과정
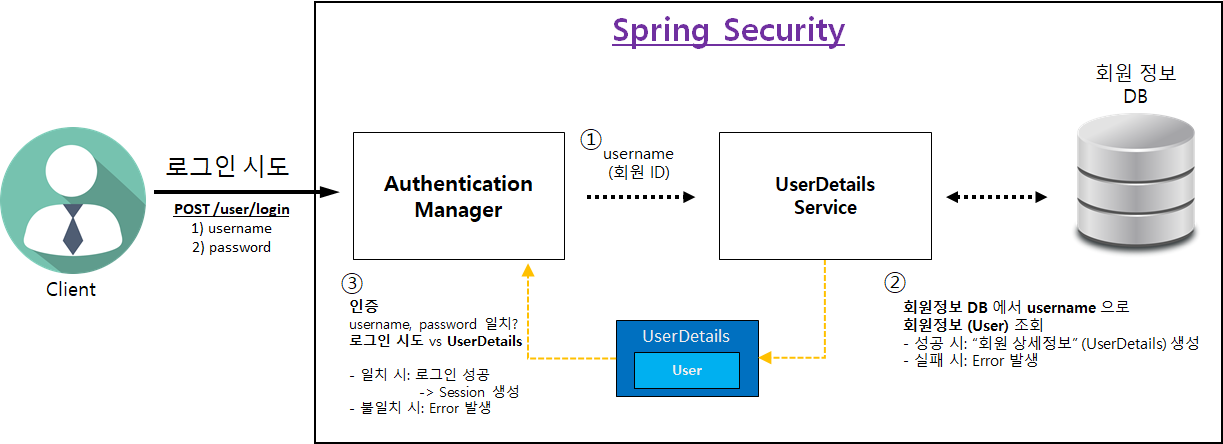
[위 그림 설명]
- Authentication Manager가 직접하지 않고
  UserDetails Service에게 일을 시킴
- UserDetails가 User을 담고 있음
- 3번에서 pw(평문) 암호화된걸로 비교하는 것도 포함
- 일치하면 세션 생성(일정기간 동안 조회할 필요 X)
- 스프링 Security에서는 Authenticaiton Manager구현되어 있음
- UserDetails는 우리가 조회해야함.
- 스프링 Security에서 구현된 인터페이스로 Service와
UserDetails 구현하면 자동으로 동작하도록 해줌.- Client
a. 로그인 시도
b. 로그인 시도할 username, password 정보를 HTTP body로 전달 (POST 요청)
c. 로그인 시도 URL은 WebSecuityConfig 클래스에서 변경 가능
@Override
protected void configure(HttpSecurity http) throws Exception {
    http.authorizeRequests()
            .anyRequest().authenticated()
            .and()
                // [로그인 기능]
                .formLogin()
                // 로그인 View 제공 (GET /user/login)
                .loginPage("/user/login")
                // 로그인 처리 (POST /user/login)
                .loginProcessingUrl("/user/login")
                .permitAll();
}
- 위와 같이 설정 시(loginProcessingUrl) "POST /user/login"
로 설정됨-
인증 관리자 (Authentication Manager)
a. UserDetailsService 에게 username 을 전달하고 회원 상세 정보를 요청 -
UserDetailsService
a. 회원 DB 에서 회원 조회
b. 조회된 회원 정보(user)를 UserDetails 로 변환
c. UserDetails 를 "인증 관리자"에게 전달
// a.
User user = userRepository.findByUsername(username)
        .orElseThrow(() -> new UsernameNotFoundException("Can't find " + username));

// b.
UserDetails userDetails = new UserDetailsImpl(user)-
"인증 관리자"가 인증 처리
a. 아래 2개의 username, password 일치 여부 확인- Client가 로그인 시도한 username, password
- UserDetailsService가 전달해준 UserDetails의 username, password
b. password 비교 시
- Client가 보낸 password는 평문이고, UserDetails의 password는 암호문
- Client가 보낸 password를 암호화해서 비교
c. 인증 성공 시 -> 세션에 로그인 정보 저장
d. 인증 실패 시 -> Error
로그아웃 처리
- "GET /user/logout" 요청 시 로그아웃
- 서버 세션에 저장되어 있는 로그인 사용자 정보 삭제
2) 로그인, 로그아웃 구현
- 로그인, 로그아웃 처리 URL 설정
(security > WebSecurityConfig)
// 로그인 처리 (POST /user/login)
.loginProcessingUrl("/user/login")

// 로그아웃 처리 URL
.logoutUrl("/user/logout")-
DB의 회원 정보 조회 -> 스프링 Security의 "인증 관리자"에게 전달
a. UserDetailsService 구현
(security > UserDetailsServiceImpl)- UserDetailsService 인터페이스 구현(loadUserByUsername을 꼭 정의) -> UserDetailsServiceImpl 클래스
b. UserDetails 구현
(security > UserDetailsImpl)- UserDetails 인터페이스 구현 -> UserDetailsImpl 클래스
// a.
public UserDetails loadUserByUsername(String username) throws UsernameNotFoundException {
	User user = userRepository.findByUsername(username)
		.orElseThrow(() -> new UsernameNotFoundException("Can't find " + username));

        return new UserDetailsImpl(user);
}
3) 회원 로그인 / 로그아웃 UI 처리
- 로그인 성공 시 페이지
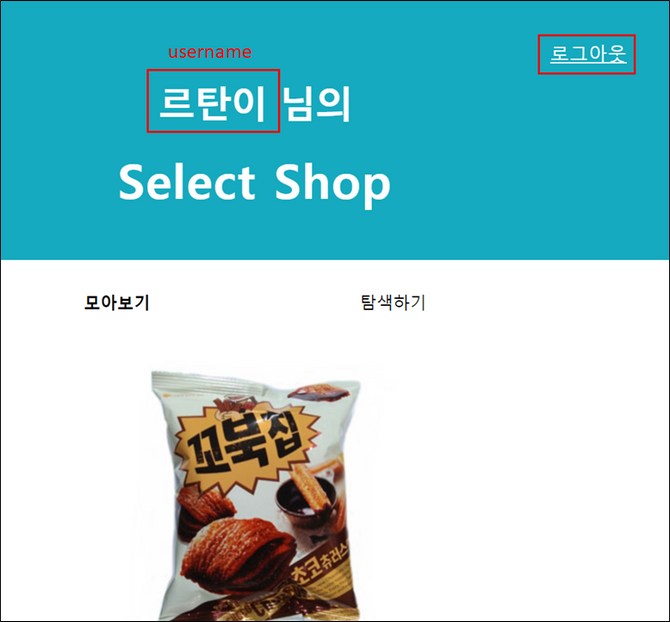
- "로그아웃" 버튼 클릭 시
- "GET /user/logout" 로 API 설계 했는데, GET으로 처리되지 않음 "POST /user/logout"으로 처리 필요
(클라이언트가 POST로 요청 필요)- 이유: CSRF protection이 기본적으로 enable 되어 있기 때문
- CSRF protection을 disable 하면 GET /user/logout 으로도 사용 가능 -> 이렇게 할 수도 있음!
- 로그인 성공한 회원의 username 표시
- UI 에서 username 대신 nickname(별칭), name(회원 본명)을 표시해 주기도 함
- Controller에서 "로그인된 회원 정보" 사용 가능
- 스프링 Security가 "로그인된 회원 정보"를 Controller에게 전달해 줌
- Controller에서 "로그인된 회원 정보(UserDetailsImpl)" 사용하는 방법
@Controller
public class TestController {
    @GetMapping("/")
    public String test(@AuthenticationPrincipal UserDetailsImpl userDetails) {
    }
}- 로그인한 사용자의 username 적용 구현
1. Controller에서 model에 'username'전달
2. 타임리프 적용 필요
08. 회원별 상품 등록 및 조회
1) 상품 등록 및 조회 (모든 회원)
- 일단, 상품 등록 API가 처리되지 않고 있음
- POST "/api/products" 요청 -> HTTP 403 Forbidden
(서버에서 너한테 허용해 주지 않는 거야!!) - POST 요청마다 처리해 주는 대신 CSRF protection을 disable
a. POST 요청마다 처리
(앞서 했던 것 처럼 POST 요청 있을 때마다 하는 것은 비효율적)
b. CSRF를 disable
- POST "/api/products" 요청 -> HTTP 403 Forbidden
// a.
http.csrf()
        .ignoringAntMatchers("/user/**")
		.ignoringAntMatchers("/api/products/**");

// b.
// CSRF protection 을 비활성화
http.csrf().disable();
2) 상품 등록 및 조회 (회원별)
회원 별로 등록된 상품을 조회하도록 해보자!
- 상품 등록 시 누구의 상품인지 등록 필요
- 관심 상품 등록 시, 등록을 요청한 "회원 정보" 추가 필요
- 회원 (User) 테이블을 보고, 어떤 정보를 저장해야 좋을지 결정 필요
(기존 컬럼: id, username, password, email, role)
- 각 회원마다 부여되어 있는 "회원 테이블 ID(id)"를 저장하는 것으로 결정
- 보통 테이블의 PK를 사용함 -> DB 입장에서 효율적
- "DB 연관관계"!! (4주차)
- 회원 (User) 테이블을 보고, 어떤 정보를 저장해야 좋을지 결정 필요
- Product 테이블에 "회원 테이블 ID" 추가
- 관심 상품 (Product) 테이블에 "회원 테이블 ID" 저장을 위한 컬럼 "userId" 추가 (Product에도 ID가 있으니까!)
(model > Product)
- 상품 등록 및 조회 구현
a. Controller에서 로그인 회원 정보(UserDetailsImpl)를 받아 Service로 전달(userId 전달)
(controller > ProductController)
b. Service에서 회원별 상품 등록 및 조회 구현(createProduct, getProducts 둘 다 변경 있음)
(service > ProductService)
c. Repository에 회원별 상품 조회하는 함수 추가 (id 가지고 조회해서)
(repository > ProductRepository)
> updateProduct는 로그인한 사용자의 상품만 있어 userId 필요X
but, 현업에서는 실제 userId 추가하여 이 로그인한 사용자의
product인지 확인(내가 다른 사용자의 상품을 변경할 수도 있음)
09. 관리자 상품 조회
1) 상품 조회 (관리자용) 설계
-
요구사항
- 인가: 관리자는 모든 사용자가 등록한 상품 조회 가능.
-
Client에서 "일반 회원"과 "관리자" 구분하여 API 호출 필요
- 일반 회원 : GET /api/products
- 관리자 : GET /api/admin/products
-
프론트 개발자와 작업 방법 논의
- 서버에서 역할을 프론트에 내려줄 수 있는 방법
1. 로그인 성공 시 Response에 회원 Role 추가
2. 쿠키 사용
(세션 유지를 위해 쿠키 설정했던 것과 같은 방식)
3. index.html에 admin 데이터 추가(아래)
- 서버에서 역할을 프론트에 내려줄 수 있는 방법
a. 관리자인 경우만 -> "admin" id를 가진 <div> 추가
   (동적 웹페이지 사용)
b. 프론트 개발자 작업
   - "admin" id가 내려오면 관리자로 판단
   - 상품 조회 시 역할별로 분리하여 API 호출
2) 상품 조회 (관리자용) 구현
- "관리자" 회원에 대한 처리
a. "관리자"인 경우에만 model 값 ("admin_role":true) 추가
(controller > HomeController)
b. 타임리프 문법에 맞춰, model에 "admin_role" 값이 있으면 -> "admin" id 값을 가진<div>추가
(resources > templates > index.html)
// a.
if (userDetails.getUser().getRole() == UserRoleEnum.ADMIN) {
            model.addAttribute("admin_role", true);
}
// b.
<div th:if="${admin_role}" id="admin"></div>- "관리자" 용 상품 목록 조회 API 구현
a. GET /api/admin/products 에 대한 처리
- controller > ProductController
// (관리자용) 등록된 모든 상품 목록 조회
@GetMapping("/api/admin/products")
public List<Product> getAllProducts() {
	return productService.getAllProducts();
} - controller > ProductService
// 모든 상품 조회 (관리자용)
public List<Product> getAllProducts() {
	return productRepository.findAll();
}- FE 작업 내용 적용
- resources > static > basic.js
but, "관리자"용 조회 목록이 다른 사용자 로그인된 상태에서 브라우저에 치기만해도 나옴.
일반인도 접근권한이 있음
10. 접근 불가 페이지 만들기
1) API 접근 권한 제어 이해
'일반 사용자'는 관리자 페이지에 접속이 인가되지 않아야 함.
- 스프링 Security에 "권한 (Authority)" 설정 방법
- 회원 상세정보 (UserServiceImpl) 를 통해 "권한(Authority)" 설정 가능
- 권한을 1개 이상 설정 가능
- "권한 이름" 규칙
- "ROLE"_로 시작해야 함
ex) "ADMIN" 권한 부여 -> "ROLE_ADMIN"
- "ROLE"_로 시작해야 함
public class UserDetailsImpl implements UserDetails {

// ...
@Override
public Collection<? extends GrantedAuthority> getAuthorities() {
        SimpleGrantedAuthority adminAuthority = new SimpleGrantedAuthority("ROLE_ADMIN");
        Collection<GrantedAuthority> authorities = new ArrayList<>();
        authorities.add(adminAuthority);

        return authorities;
    }
}- 스프링 Security를 이용한 API 별 권한 제어 방법
- Controller에 "@Secured" 어노테이션으로 권한 설정 가능
- @Secured("권한 이름") 선언
-> 권한 1개 이상 설정 가능
- @Secured("권한 이름") 선언
// (관리자용) 등록된 모든 상품 목록 조회
@Secured("ROLE_ADMIN")
@GetMapping("/api/admin/products")
public List<Product> getAllProducts() {
	return productService.getAllProducts();
}- "@Secured" 어노테이션 활성화 방법
@Configuration
@EnableWebSecurity // 스프링 Security 지원을 가능하게 함
@EnableGlobalMethodSecurity(securedEnabled = true) // @Secured 어노테이션 활성화
public class WebSecurityConfig extends WebSecurityConfigurerAdapter {
2) 접근 불가 페이지 적용
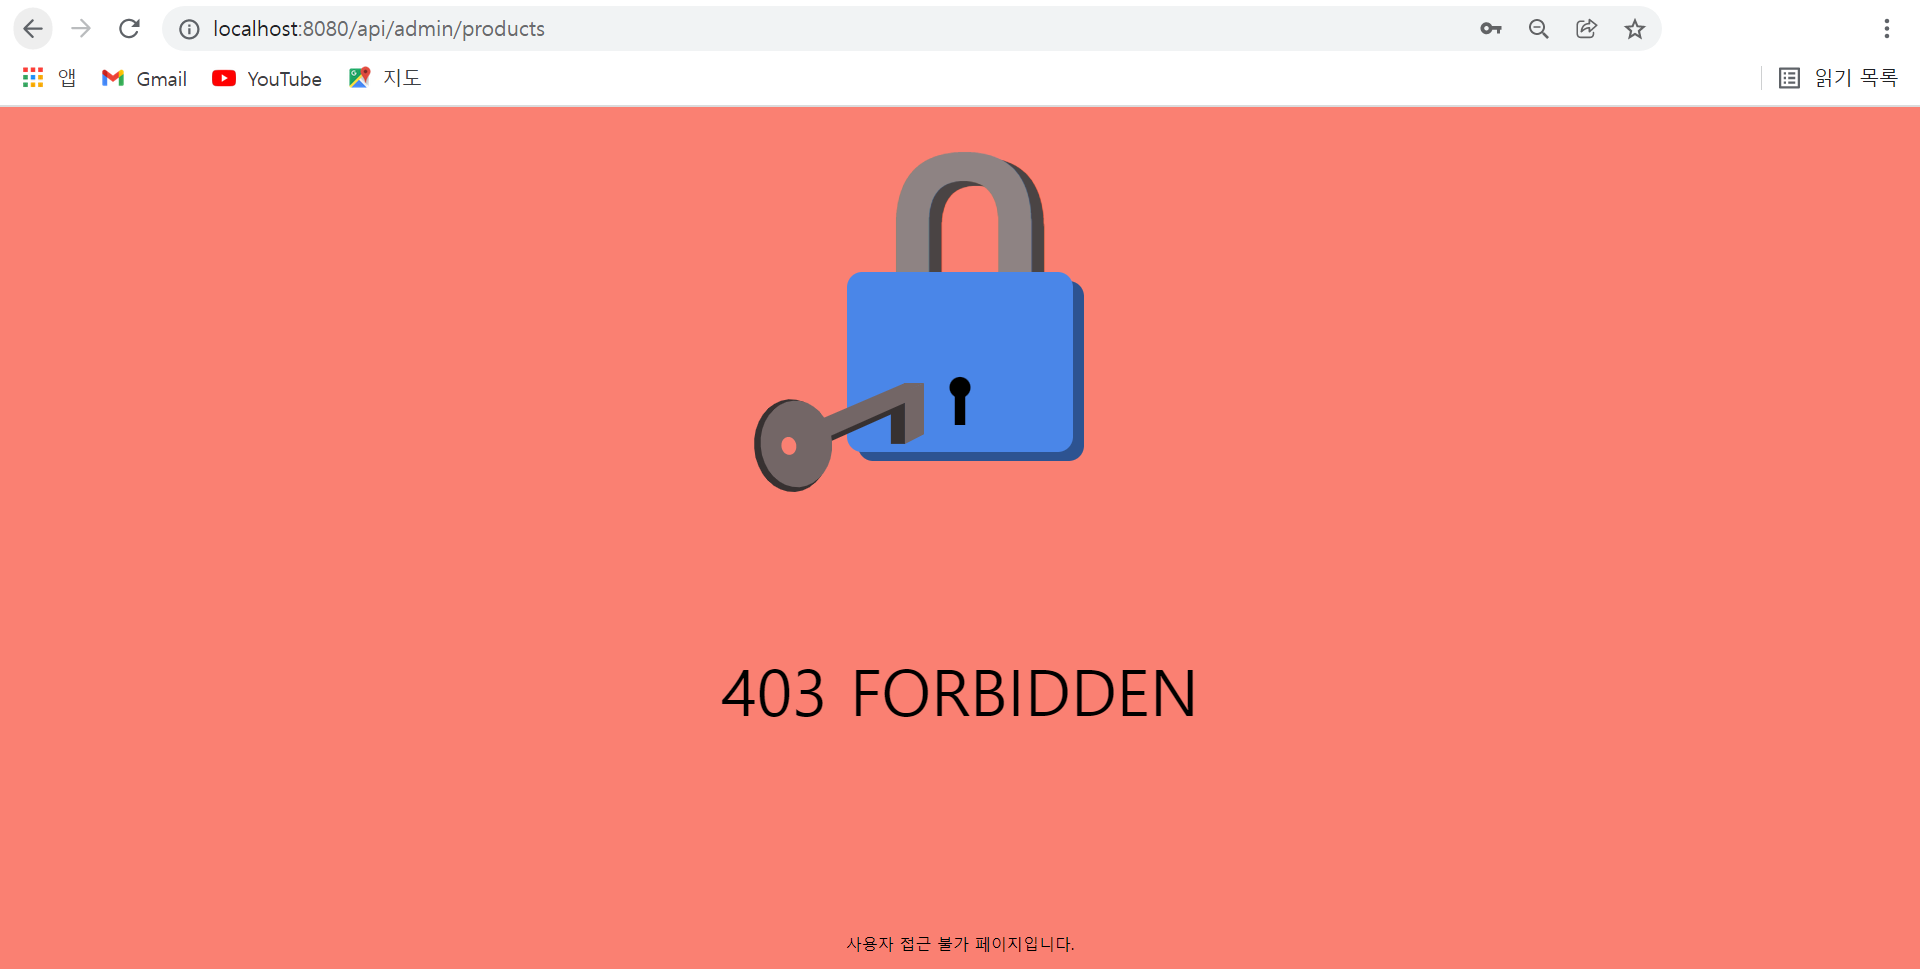
스프링 Security 설정을 이용해 일반 사용자가 '관리자용 상품조회 API' 에 접속 시도 시 접속 불가 페이지가 뜨도록 구현해보자
- FE 작업 -> Forbidden 페이지 적용
- resources > static > forbidden.html
- WebSecurityConfig 파일 수정
a. "@Secured" 어노테이션 활성화 코드 추가
b. "접근 불가" 페이지 URL 설정 -> "/forbidden.html" (accessDeniedPage)
- security > WebSecurityConfig
- 관리자용 상품조회 API에 @Secured 어노테이션으로 권한 설정
a. @Secured(value = UserRoleEnum.Authority.ADMIN) 코드 추가
- controller > ProductController
b. UserRoleEnum에 "권한 이름" 규칙 적용 - model > UserRoleEnum
public enum UserRoleEnum {
    USER(Authority.USER),  // 사용자 권한
    ADMIN(Authority.ADMIN);  // 관리자 권한

    private final String authority;

    UserRoleEnum(String authority) {
        this.authority = authority;
    }

    public String getAuthority() {
        return this.authority;
    }

    public static class Authority {
        public static final String USER = "ROLE_USER";
        public static final String ADMIN = "ROLE_ADMIN";
    }
}- 스프링 Security가 로그인한 회원의 권한을 인식하도록 수정
a. GrantedAuthority는 인터페이스, SimpleGrantedAuthority 사용
- security > UserDetailsImpl
@Override
public Collection<? extends GrantedAuthority> getAuthorities() {
	UserRoleEnum userRole = user.getRole();
	String authority = userRole.getAuthority();

	SimpleGrantedAuthority simpleAuthority = new SimpleGrantedAuthority(authority);
    Collection<GrantedAuthority> authorities = new ArrayList<>();
    authorities.add(simpleAuthority);

    return authorities;
}
참고) HTTP Status Code 403
클라이언트 오류 상태. 서버에 요청이 전달되었지만, 권한 때문에 거절됨
MDN Docs
11. 소셜 로그인
1) 소셜 로그인 탄생 배경
👉 모든 웹 사이트에서 회원가입 과정을 거치는 것은 사용자에게 부담이 됩니다.
매번 번거로운 회원가입 과정을 수행해야 할 뿐 아니라, 웹 사이트마다 다른 아이디와 비밀번호를 기억해야 합니다.
또한 웹 사이트를 운영하는 측에서도 회원들의 개인정보를 지켜야하는 역할이 부담이 됩니다. 바이러스와 백신의 관계 처럼, 발전하는 해킹 기술을 막기 위해 보안을 강화하는 노력이 지속적으로 필요하기 때문이죠.
이런 문제를 해결하기 위해 OAuth 를 사용한 소셜 로그인이 등장합니다.
2) OAuth 란?
👉 OAuth는 인터넷 사용자들이 비밀번호를 제공하지 않고 다른 웹사이트 상의 자신들의 정보에 대해 웹사이트나 애플리케이션의 접근 권한을 부여할 수 있는 공통적인 수단으로서 사용되는, 접근 위임을 위한 개방형 표준입니다. 사용자가 애플리케이션에게 모든 권한을 넘기지 않고 사용자 대신 서비스를 이용할 수 있게 해주는 HTTP 기반의 보안 프로토콜 입니다.
OAuth를 사용하는 서비스 제공자는 대표적으로 구글, 페이스북 등이 있습니다. 국내에는 대표적으로 네이버와 카카오가 있죠.
12. 카카오 로그인 사용 승인받기
1) 카카오 로그인 사용 승인 받기
기본 흐름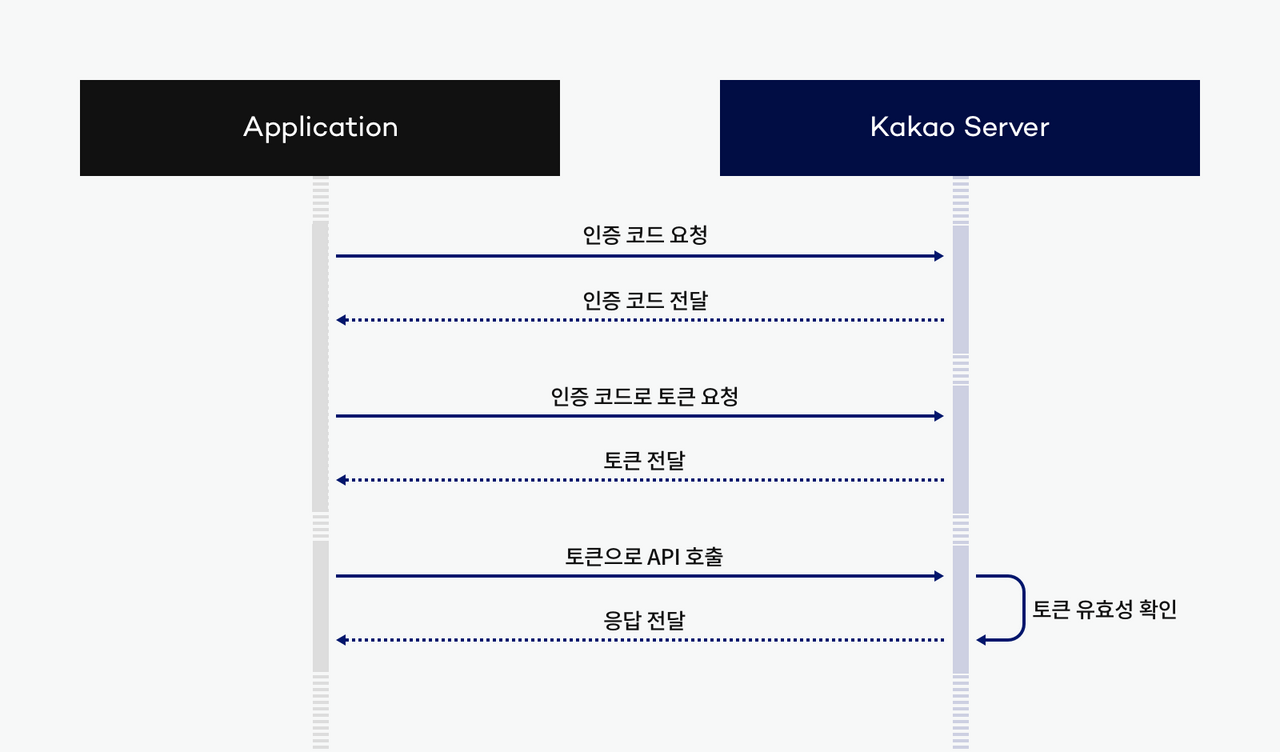
애플리케이션 등록
- 위 사이트 접속 후,
회원가입 > 내 애플리케이션 메뉴 선택 > 애플리케이션 추가하기 > 앱 아이콘, 앱 이릅, 사업자명 저장

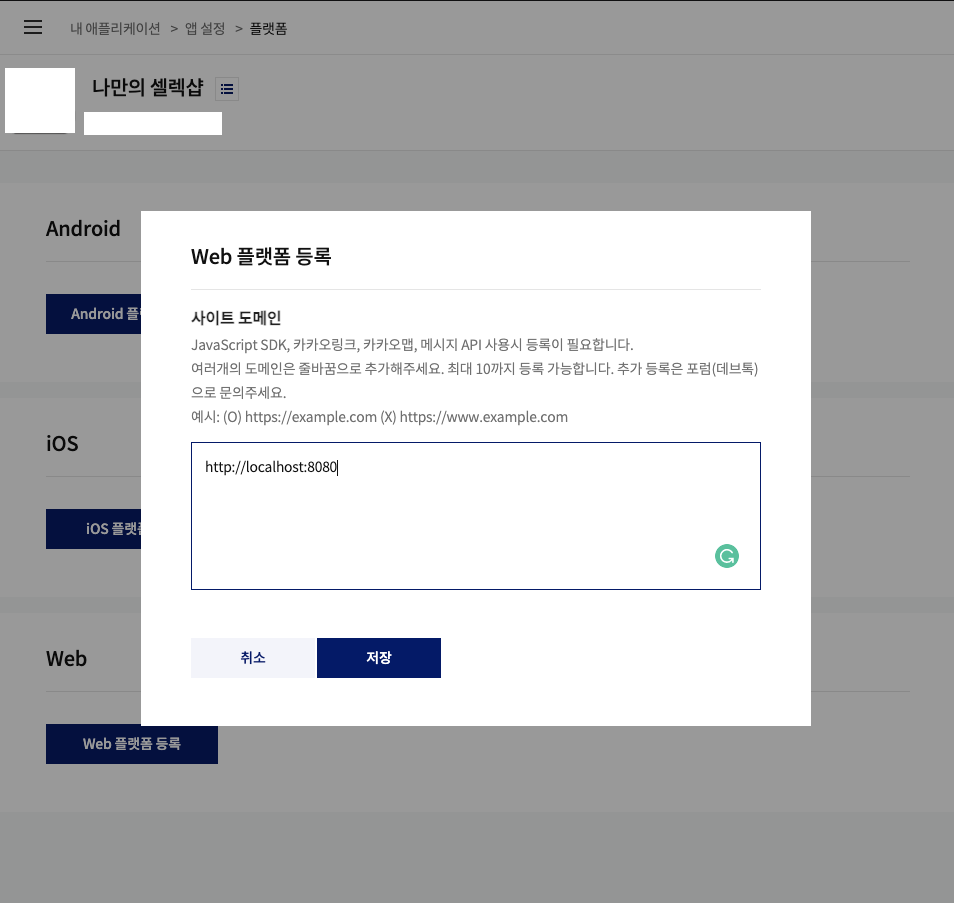
- 사이트 도메인 등록하기
- 애플리케이션 선택
- 플랫폼 메뉴 선택
- Web 플랫폼 등록
- 사이트 도메인 입력
👉 사이트 도메인은 개발 중인 로컬환경의 서버 주소 입력
ex) http://localhost:8080
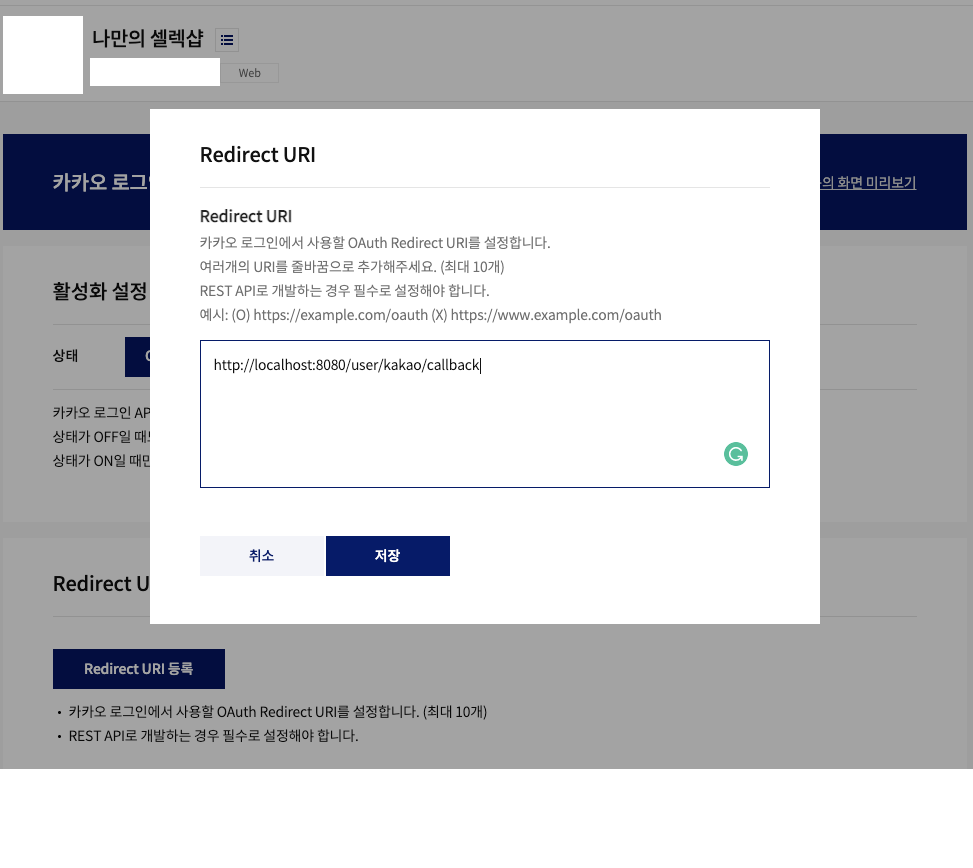
- 카카오로 로그인 했을 때 인가토큰을 받게 될 Redirect URI (callback)를 설정하기
ex) http://localhost:8080/user/kakao/callback
- 동의항목 설정하기
- 카카오 서버로부터 사용자의 어떤 정보를 받을 지 정할 수 있음
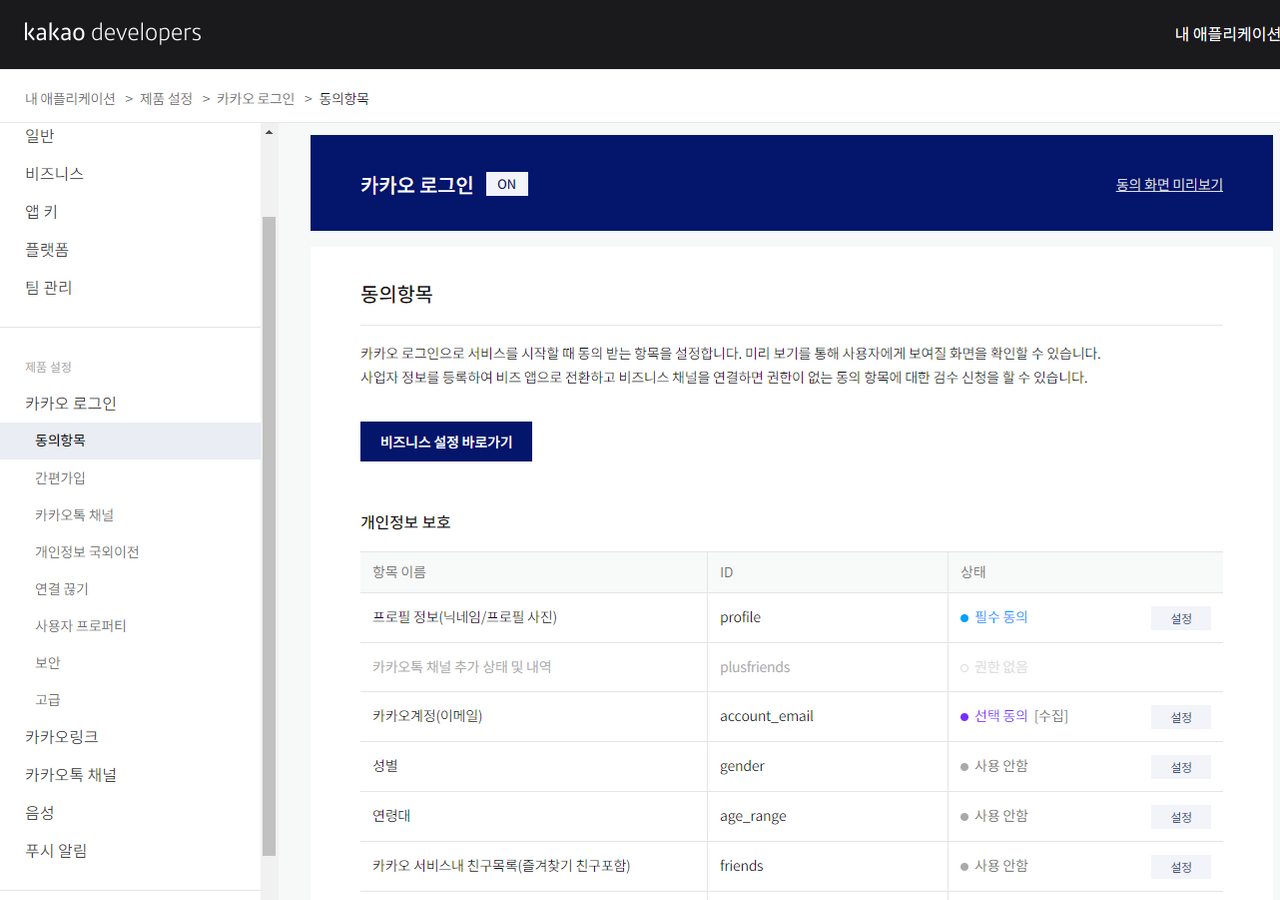
ex) 프로필 정보('필수 동의'), 카카오계정(이메일)정보('선택 동의') / 동의 목적: 회원가입
- 카카오 서버로부터 사용자의 어떤 정보를 받을 지 정할 수 있음
준비 끝!!!!!!
13. 카카오 사용자 정보 가져오기
1) 카카오 서버에서 인가코드 받기
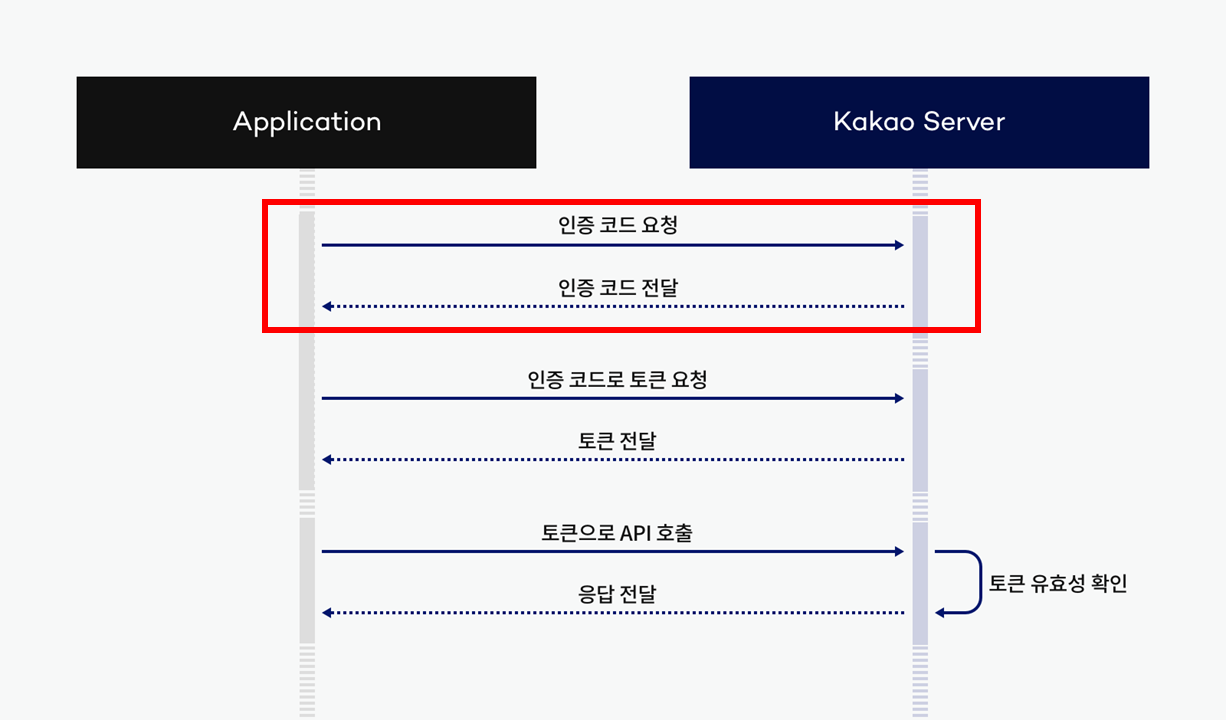 참고: "인가코드 받기" 메뉴얼
- 카카오 인가코드 받기
- 인가코드 요청 방법(REST_API_KEY, REDIRECT_URI 넣기)
- "/templates/login.html" 파일 수정
https://kauth.kakao.com/oauth/authorize?client_id={REST_API_KEY}&redirect_uri={REDIRECT_URI}&response_type=code-
kakao developers에서 REST API 키 확인
-
카카오 로그인 시도
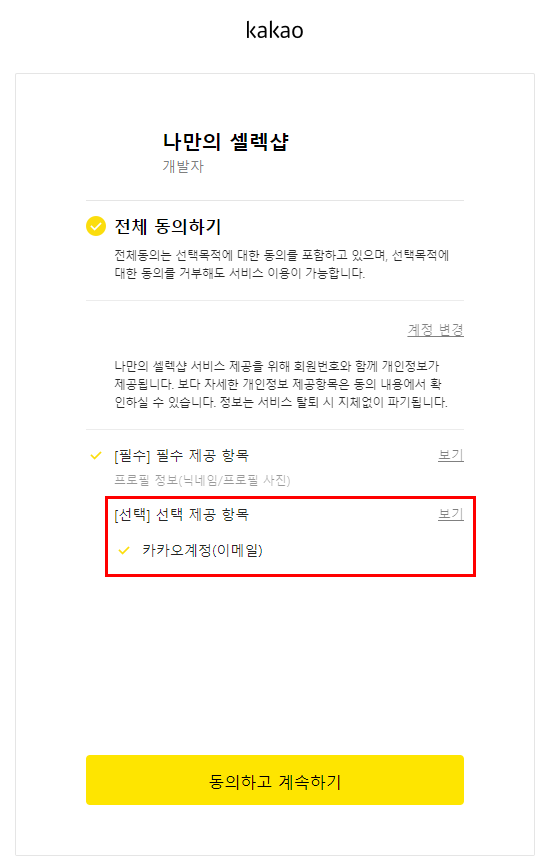
사용자가 카카오 로그인 페이지를 통해 '동의하고 계속하기'를 클릭하면, Redirect URI (callback)로 '인가코드'가 전달 됨!
-
카카오에서 보내주는 '인가코드' 처리
- controller > UserController
@GetMapping("/user/kakao/callback")
public String kakaoLogin(@RequestParam String code) {
	// authorizedCode: 카카오 서버로부터 받은 인가 코드
        userService.kakaoLogin(code);

        return "redirect:/";
}
<1> 카카오에서 보내주는 '인가코드'를 받음 ⇒ Controller
Ex) http://localhost:8080/user/kakao/callback?code=zAGh...
<2> '인가코드'를 가지고 카카오 로그인 처리 ⇒ Service
<3> 로그인 성공 시 "/" 으로 redirect ⇒ Controller2) 카카오 사용자 정보 가져오기
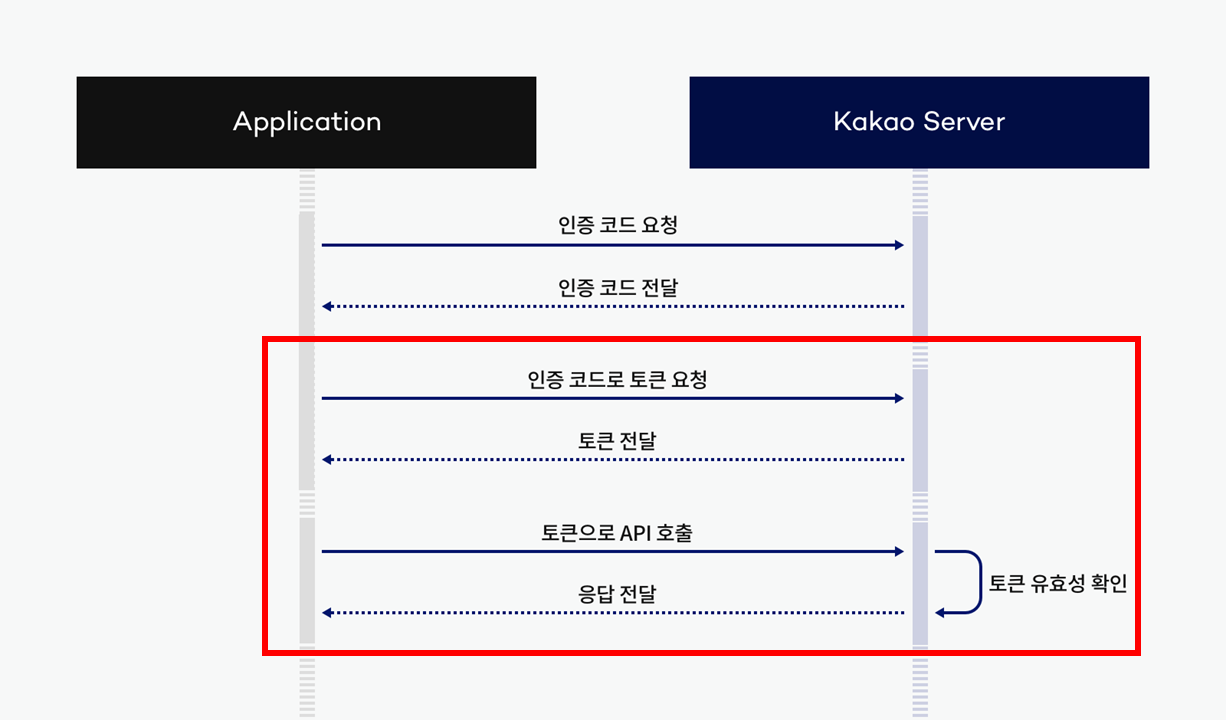
- "인가 코드"로 "액세스 토큰" 요청
// 1. "인가 코드"로 "액세스 토큰" 요청
// HTTP Header 생성
HttpHeaders headers = new HttpHeaders();
headers.add("Content-type", "application/x-www-form-urlencoded;charset=utf-8");

// HTTP Body 생성
MultiValueMap<String, String> body = new LinkedMultiValueMap<>();
body.add("grant_type", "authorization_code");
body.add("client_id", "본인의 REST API키");
body.add("redirect_uri", "http://localhost:8080/user/kakao/callback");
body.add("code", code);

// HTTP 요청 보내기
HttpEntity<MultiValueMap<String, String>> kakaoTokenRequest =
	new HttpEntity<>(body, headers);
RestTemplate rt = new RestTemplate();
ResponseEntity<String> response = rt.exchange(
	"https://kauth.kakao.com/oauth/token",
	HttpMethod.POST,
    	kakaoTokenRequest,
        String.class
);

// HTTP 응답 (JSON) -> 액세스 토큰 파싱
String responseBody = response.getBody();
ObjectMapper objectMapper = new ObjectMapper();
JsonNode jsonNode = objectMapper.readTree(responseBody);
String accessToken = jsonNode.get("access_token").asText();- "액세스 토큰"로 "카카오 사용자 정보" 가져오기
- 카카오 사용자 정보 JSON 의 예
{
  "id": 1632335751,
  "properties": {
    "nickname": "르탄이",
    "profile_image": "http://k.kakaocdn.net/...jpg",
    "thumbnail_image": "http://k.kakaocdn.net/...jpg"
  },
  "kakao_account": {
    "profile_needs_agreement": false,
    "profile": {
      "nickname": "르탄이",
      "thumbnail_image_url": "http://k.kakaocdn.net/...jpg",
      "profile_image_url": "http://k.kakaocdn.net/...jpg"
    },
    "has_email": true,
    "email_needs_agreement": false,
    "is_email_valid": true,
    "is_email_verified": true,
    "email": "letan@sparta.com"
  }
}
14. 카카오 사용자 정보로 회원가입 설계
1) 카카오 사용자 회원가입 설계
관심 상품 등록을 했을 때 회원 구분이 필요하기 때문에, 카카오 서버에서 받은 사용자 정보를 이용해 회원 가입
-
현재 회원 (User) 테이블
- id, username, password, email, role -
카카오로부터 받은 사용자 정보
- kakaoId, nickname, email -
테이블 설계 옵션
- 카카오 User를 위한 테이블을 하나 더 만듦
a. 장점: 결합도가 낮아짐- 성격이 다른 유저 별로 분리
-> 차후 각 테이블의 변화에 서로 영향 X - 예) 카카오 사용자들만 profile_image 컬럼 추가 O
- 예) 관심상품 등록 시, 회원별로 다른 테이블을 참조해야 함
<1> 일반 회원: User - Product
<2> 카카오 회원: KakaoUser - Product
- 성격이 다른 유저 별로 분리
- 기존 회원 (User) 테이블에 카카오 User 추가
a. 장점: 구현이 단순해짐
b. 단점: 결합도가 높아짐- 폼 로그인을 통해 카카오 로그인 사용자의 username, password 를 입력해서 로그인한다면??
- 폼 로그인을 통해 카카오 로그인 사용자의 username, password 를 입력해서 로그인한다면??
- 카카오 User를 위한 테이블을 하나 더 만듦
-
회원 (User) 테이블에 적용하자!
컬럼명 컬럼타입 중복허용 설명 카카오 사용자 id Long X 테이블 ID 테이블 ID username String X 회원 아이디 nickname password String O 패스워드 UUID
(랜덤 문자열)email String X 이메일 주소 email role String O 역할 "USER"로 고정 kakaoId String
(Nullable)X 카카오 로그인 ID kakaoId 패스워드를 UUID : 폼 로그인을 통해서 로그인되지 않도록
15. 카카오 사용자 정보로 회원가입 구현
1) 카카오 사용자 정보로 회원가입
- User 테이블에 'kakaoId' 추가
- 회원가입
: kakaoId를 가진 회원이 없는 경우에만 회원 가입
// DB 에 중복된 Kakao Id 가 있는지 확인
Long kakaoId = kakaoUserInfo.getId();
User kakaoUser = userRepository.findByKakaoId(kakaoId)
	.orElse(null);
if (kakaoUser == null) {
    // 회원가입
    // username: kakao nickname
    String nickname = kakaoUserInfo.getNickname();

    // password: random UUID
    String password = UUID.randomUUID().toString();
    String encodedPassword = passwordEncoder.encode(password);

    // email: kakao email
    String email = kakaoUserInfo.getEmail();
    // role: 일반 사용자
    UserRoleEnum role = UserRoleEnum.USER;

    kakaoUser = new User(nickname, encodedPassword, email, role, kakaoId);
    userRepository.save(kakaoUser);
}
2) 강제 로그인 처리
-
로그인 성공 시,
- "로그인 성공 사용자 정보"(UserDetails)는 SecurityContext에 저장됨
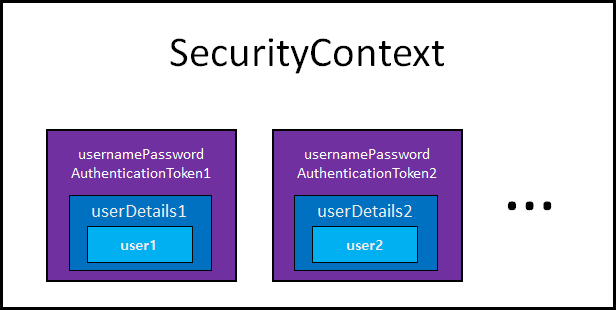
- User < UserDetails < UsernamePasswordAuthenticationToken < SecurityContext
- "로그인 성공 사용자 정보"(UserDetails)는 SecurityContext에 저장됨
-
강제 로그인 처리 방법
- SecurityContextHolder를 통해 SecurityContext에 "로그인 성공 사용자 정보" 직접 추가
// 4. 강제 로그인 처리
UserDetails userDetails = new UserDetailsImpl(kakaoUser);
Authentication authentication = new UsernamePasswordAuthenticationToken(userDetails, null, userDetails.getAuthorities());
SecurityContextHolder.getContext().setAuthentication(authentication);
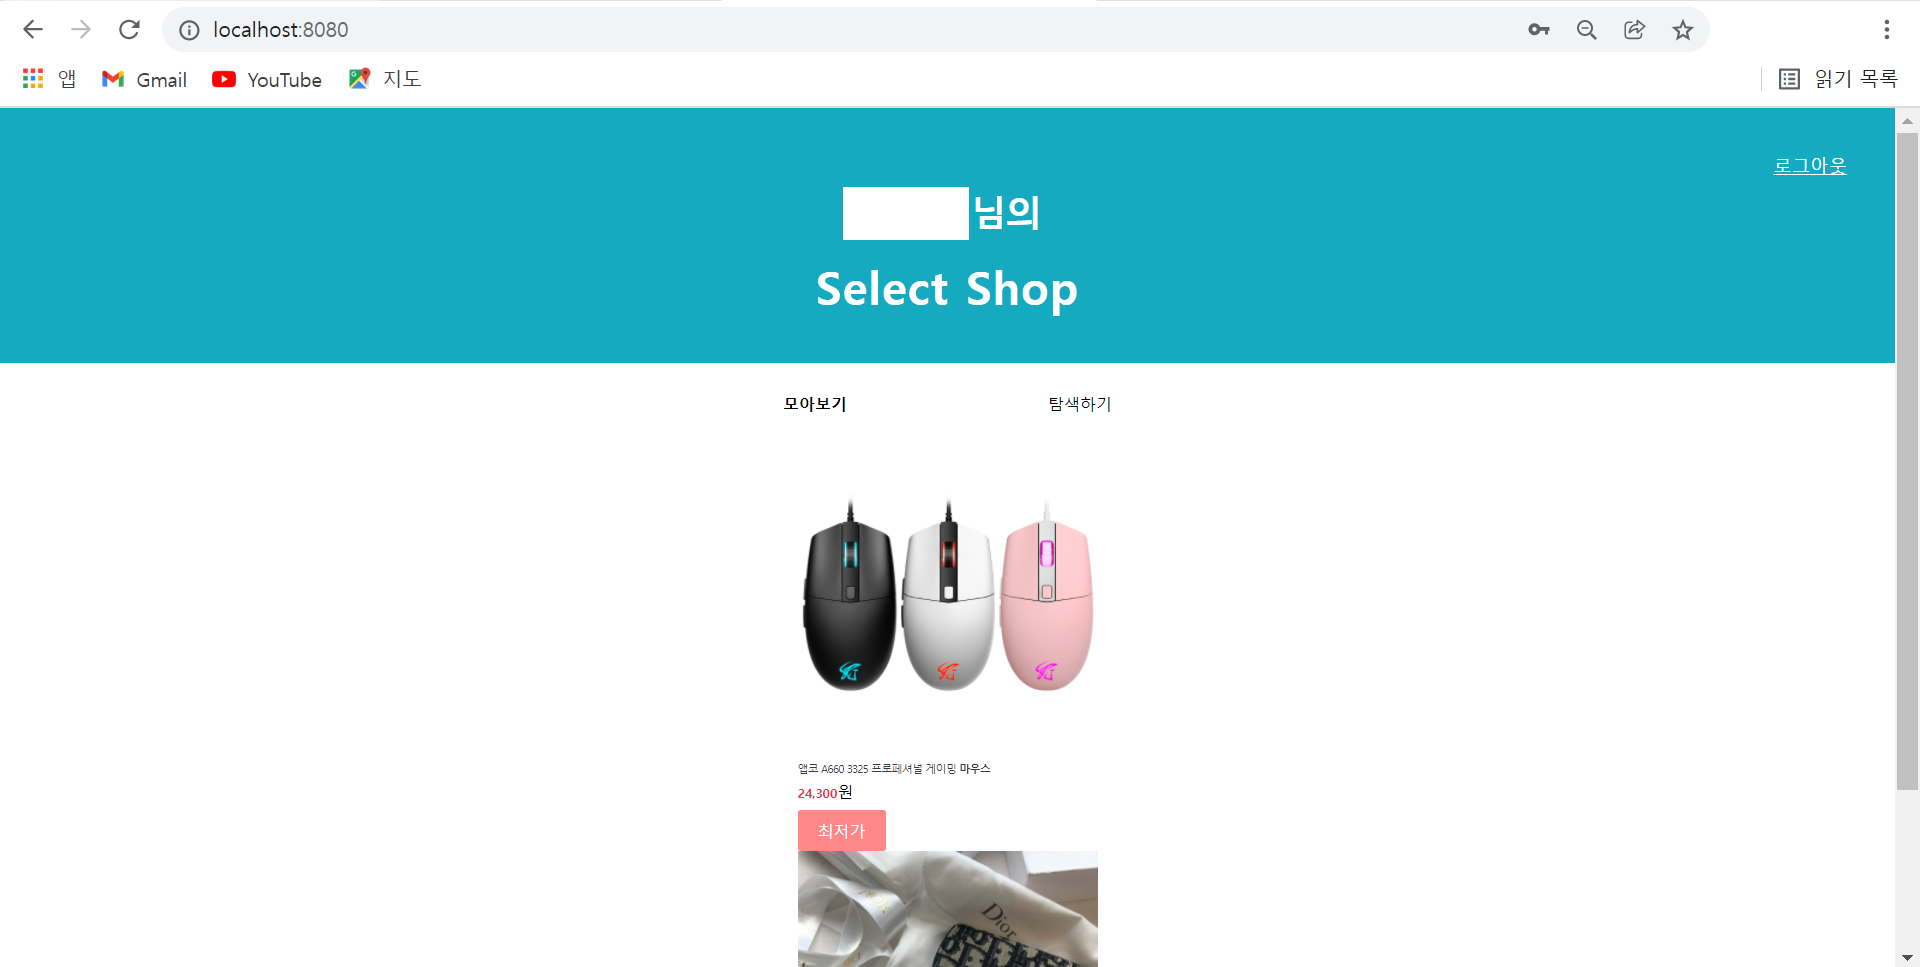
결과
로그인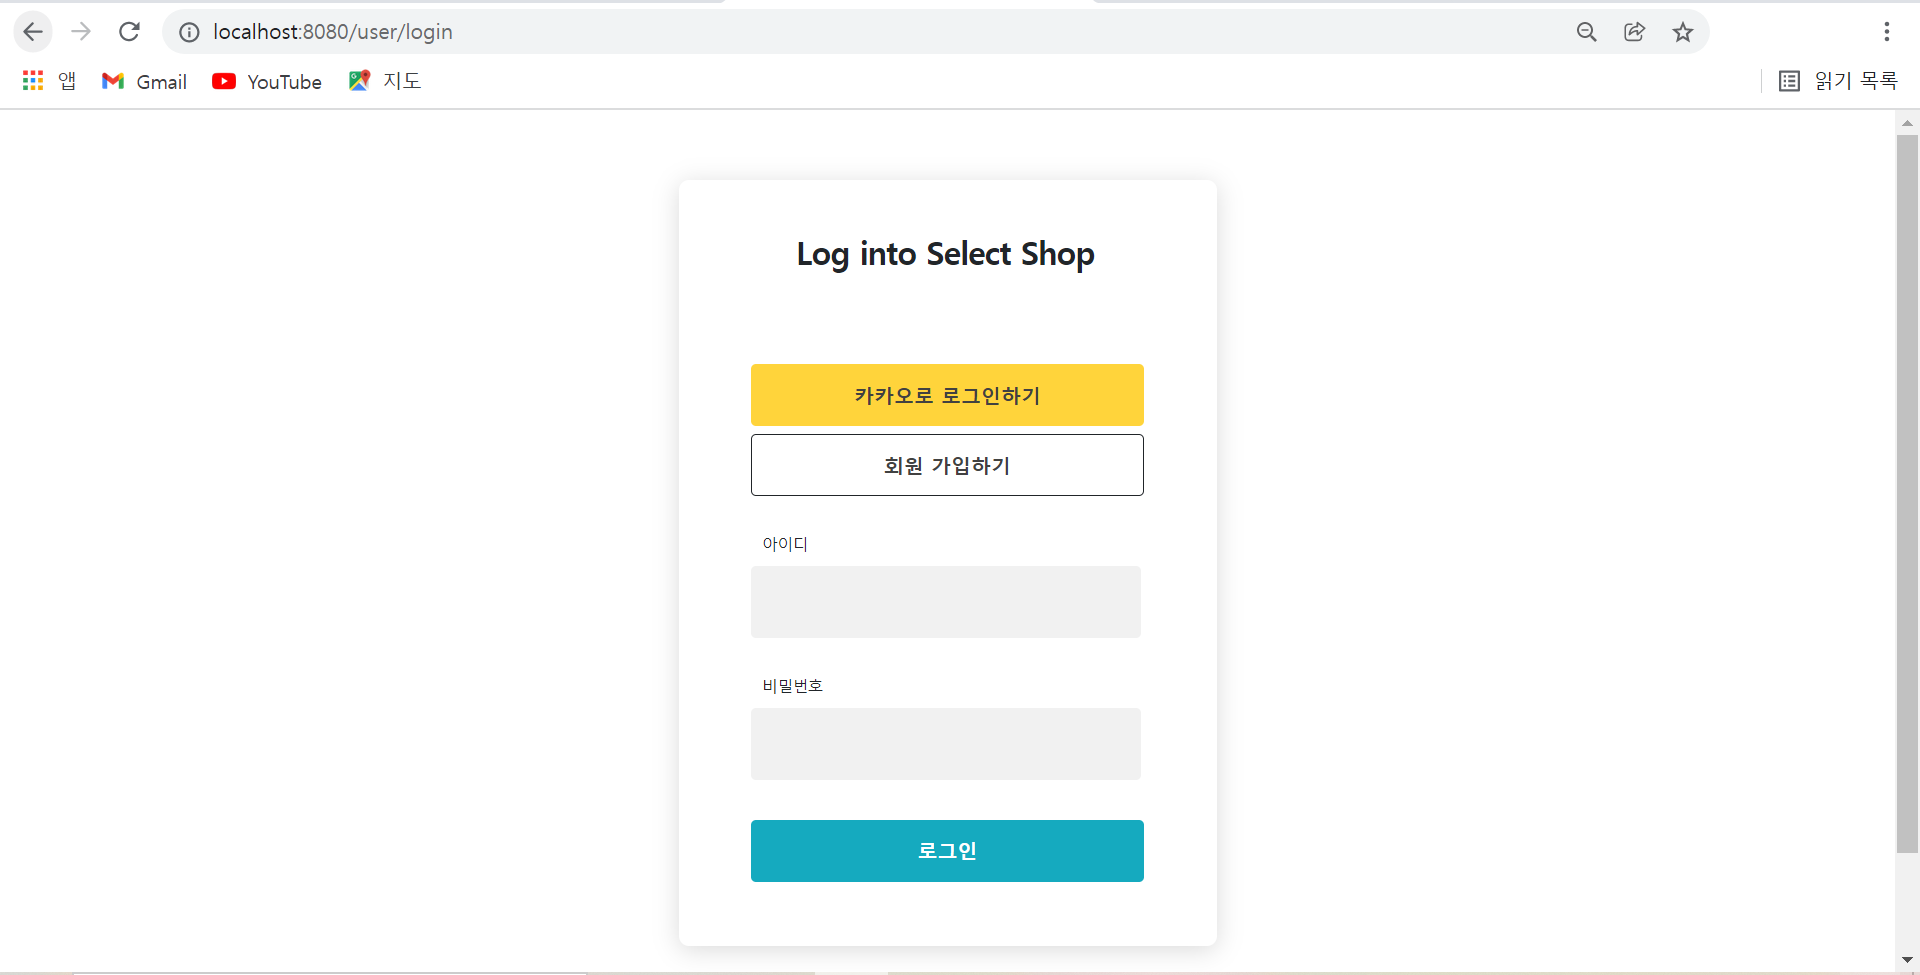
회원가입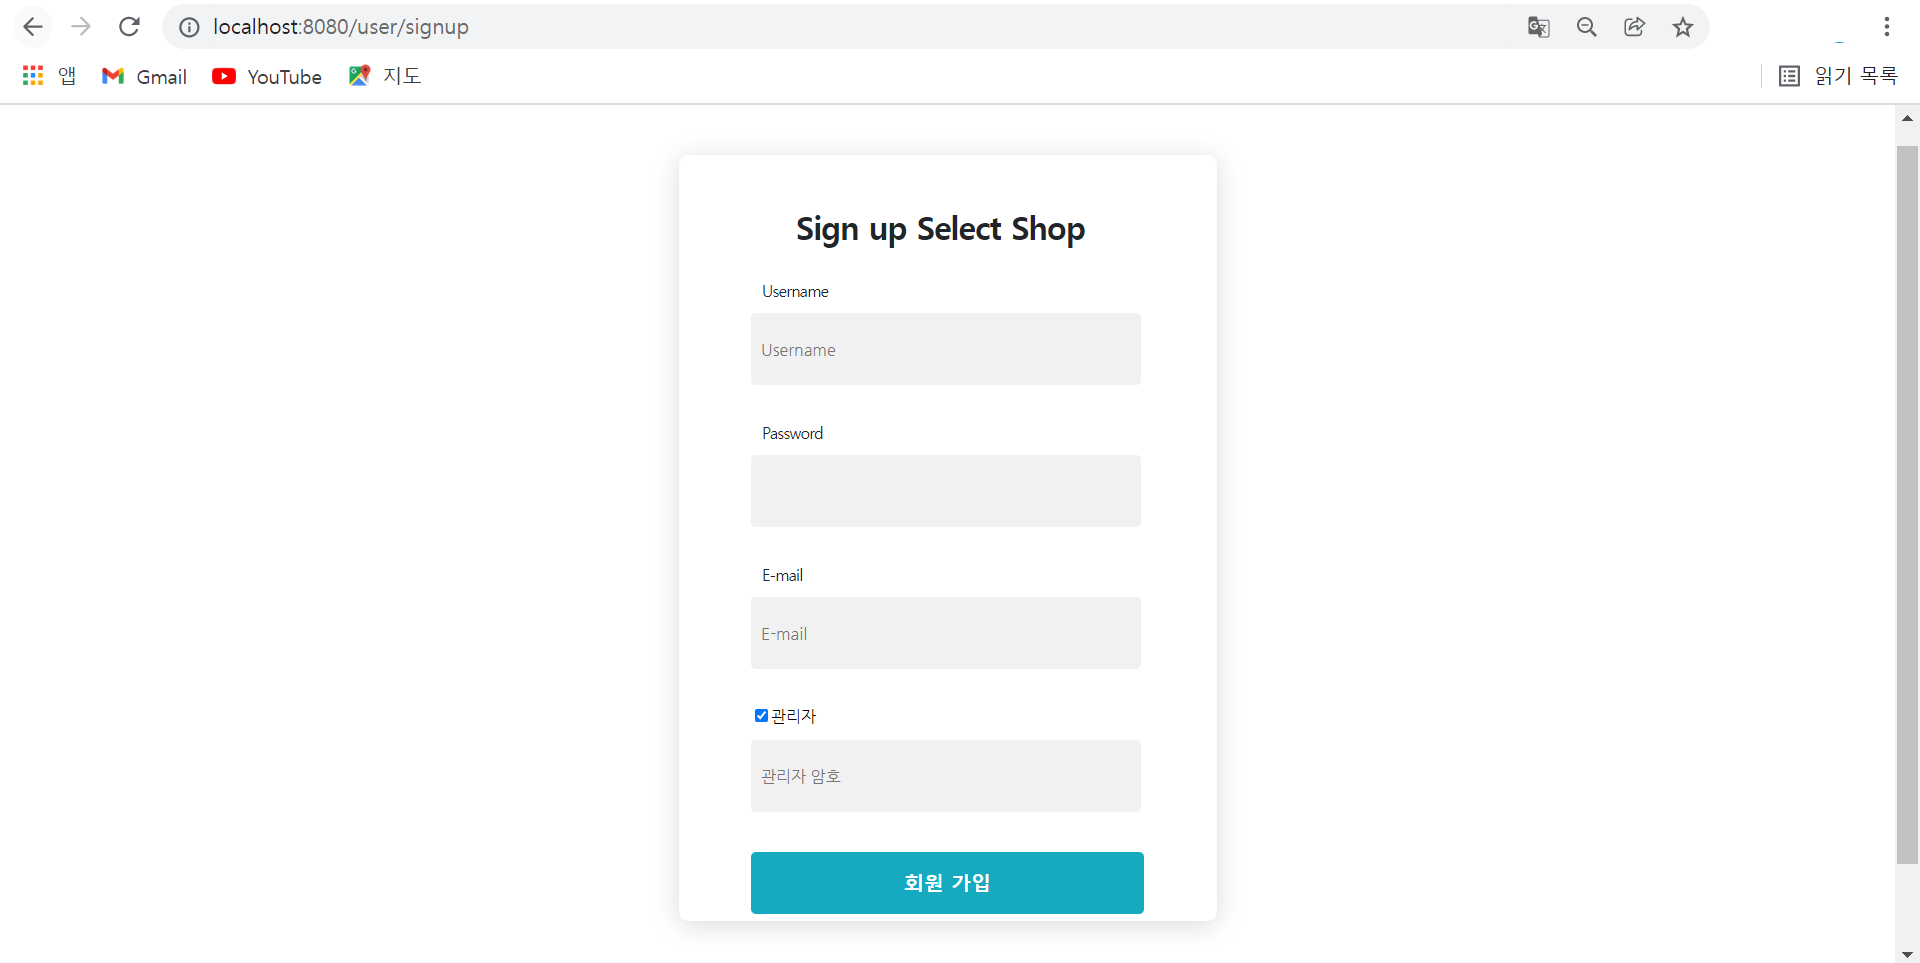
홈 화면
마치며
2주차 공부하면서 학교에서 배운 네트워크나 DB 관련 내용이 많아 흥미롭게 들었던 것 같다. 추가적으로 JWT 관련 강의도 있었는데 이 부분은 어렵기도 하고 따로 정리해보고 싶어서 다음 게시물에서 정리할 것이다. 아즈아😬
출처: 스파르타코딩클럽
JWT 로그인 구현하기
[스파르타코딩클럽] Spring 심화반 - JWT 로그인 구현하기
 출처:
출처: 