[React] 리덕스 사용해보기
redux를 쓰는 이유
- 모든 컴포넌트가 props를 사용하지 않고 state를 직접 꺼내쓸 수 있다. ( prop drilling을 막아줌 )
- 상태관리가 용이하다.
- 직접 데이터를 수정하는 것이 아님 → 리듀서를 통해 조작 → 외부에서 데이터를 조작하지 못하게 하면서 의도하지 않게 state가 변경되는 것을 방지store : 전역으로 관리하는 state를 담는 공간
action: store에 있는 state를 변경하기 위해 보내는 신호
reducer: state와 이 state를 어떻게 처리할지를 알려주는 action을 파라미터로 받아 처리
사용방법
설치
yarn add redux react-redux @types/react-redux
``
테스트 코드
index.js에서 Provider를 감싼다.
- rootReducer 정의
- 여러개의 리듀서를 하나로 합쳐줌
// reducers/index.ts

import { combineReducers } from 'redux';
import user from './user';

// 여러 reducer를 사용하는 경우 reducer를 하나로 묶어주는 메소드입니다.
// store에 저장되는 리듀서는 오직 1개
const rootReducer = combineReducers({
  user,
});

export default rootReducer;

export type RootState = ReturnType<typeof rootReducer>;
리듀서를 사용할 때는 , 연관이 있는 이름으로 폴더를 만들어서 기능별로 파일을 생성하여 사용한다.
combineReducers 사용하여 한꺼번에 합쳐준다.
- 세부 reducer 정의
    //액션 , 이름 겹치지 않도록 파일이름 / --
    const CHANGENAME = 'user/CHANGE/NAME' as const; // 이름에 + 추가
    const DELETENAME = 'user/DELETE/NAME' as const; // 이름 끝 한글자 제거

    //액션 생성함수
    export const changeName = (name: string) => ({ type: CHANGENAME, name });
    export const deleteName = () => ({ type: DELETENAME });

    type UserAction = ReturnType<typeof changeName> | ReturnType<typeof deleteName>;

    export interface TUserType {
      name: string;
    }

    //초기값 셋팅
    const initialState: TUserType = {
      name: '혜진',
    };

    const user = (currentState = initialState, action: UserAction) => {
      switch (action.type) {
        case CHANGENAME:
          return {
            ...currentState,
            name: currentState.name + action.name,
          };
        case DELETENAME:
          return {
            ...currentState,
            name:
              currentState.name &&
              currentState.name.slice(0, currentState.name.length - 1),
          };
        default:
          return currentState;
      }
    };

export default user;- app컴포넌트 하위에서 모두 store을 사용할 수 있도록 상위에서 감싸줌
createStore객체를 사용 → 리액트 앱에서 사용할 리덕스 스토어를 생성
//index.js

import {createStore} from 'redux';
import rootReducer from './reducers';
const store = createStore(rootReducer);

const root = ReactDOM.createRoot(
  document.getElementById('root') as HTMLElement,
);
root.render(
  <React.StrictMode>
       <Provider store={store}>
         <App />
       </Provider>
  </React.StrictMode>,
);- state 값 사용, 변경
//state 값 사용
const name = useSelector((state: RootState) => state.user.name);
//state 변경
const dispatch = useDispatch();
dispatch(changeName('+')) // 보통 onClick과같은 이벤트 함수에 콜백함수로 넣어줌.
중첩된 컴포넌트에서 간단한 테스트
-
전체 > Component1 > Conponent2 > Component3 중첩된 구조
-
Component3에 있는 버튼을 누를 경우 전체를 감싸고 있는 곳에 포함된 UserNam이 변경되어야 한다.
import { useDispatch, useSelector } from 'react-redux';
import { Button } from '../components/common/button';
import { RootState } from '../reducers';
import { changeName, deleteName } from '../reducers/user';

const ReduxTest = () => {
  const name = useSelector((state: RootState) => state.user.name);
  return (
    <div
      style={{
        backgroundColor: 'white',
        height: '100vh',
        display: 'flex',
        flexDirection: 'column',
        justifyContent: 'center',
        alignItems: 'center',
      }}
    >
      <h2>{`UserName : ${name}`}</h2>
      <Component1 />
    </div>
  );
};

export default ReduxTest;

const Component1 = () => {
  return (
    <div
      style={{
        backgroundColor: 'red',
        width: '500px',
        height: '500px',
        padding: '20px',
      }}
    >
      <h3>component 1</h3>
      <Component2></Component2>
    </div>
  );
};
const Component2 = () => {
  return (
    <div
      style={{
        backgroundColor: 'yellow',
        width: '90%',
        height: '80%',
        padding: '20px',
      }}
    >
      <h3>component 2</h3>
      <Component3></Component3>
    </div>
  );
};

const Component3 = () => {
  const dispatch = useDispatch();
  return (
    <div
      style={{
        backgroundColor: 'green',
        width: '90%',
        height: '80%',
        padding: '20px',
      }}
    >
      <h3>component 3</h3>
      <Button
        width="80px"
        height="30px"
        type="submit"
        css={{ alignSelf: 'center' }}
        onClick={() => dispatch(changeName('+'))}
      >
        추가
      </Button>
      <Button
        width="80px"
        height="30px"
        type="submit"
        css={{ alignSelf: 'center' }}
        onClick={() => dispatch(deleteName())}
      >
        삭제
      </Button>
    </div>
  );
};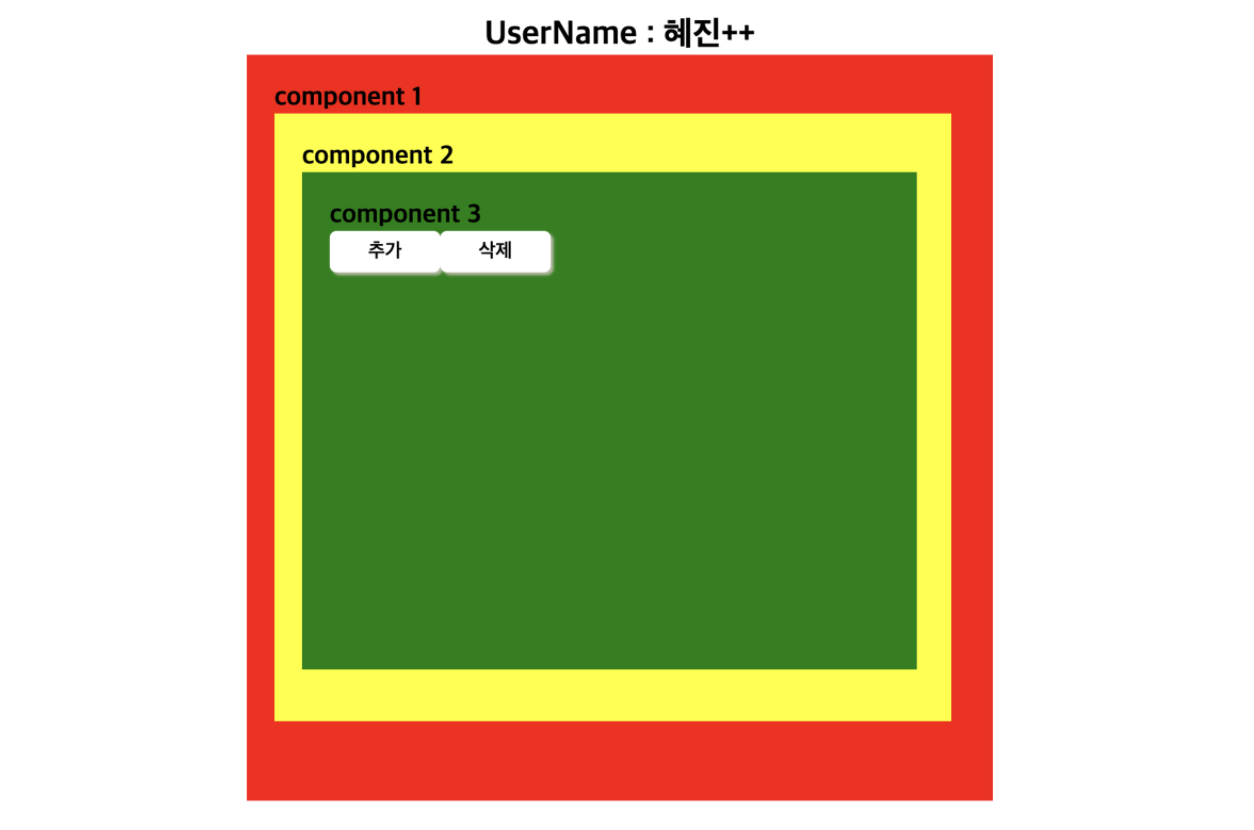
- 기본 default 값은 혜진으로 설정
- 추가 누를 때마다 상위 컴포넌트의 name 영역에 +가 한개씩 추가
- 삭제를 누를 때마다 상위 컴포넌트의 name 영역에 +가 한개씩 삭제
상태관리 라이브러리들이 중 recoil을 사용해봤다.
redux를 사용하는 경우가 많아서 과제라던지, 추후에 프로젝트를 진행할 때 도움이 될 것 같아서 테스트용으로 사용해봤다.
스테이트를 변경하거나 추가할 때,
actions, reducer, type 등 보일러 플레이트 코드를 많이 작성해야 하는 단점을 리코일을 사용하고 나서 리덕스를 사용해보니 더욱 와닿았던 것 같다.
확실히 recoil보다 러닝커브가 높은편인 것 같다.
flux패턴을 이해해야했고,
지금은 정말정말 작은 상태 하나인데도 작성해야하는 코드들이 많았다.
개념을 보았을 때 이해하기 어려웠던 부분이 있었는데, 직접 코드를 작성해보니 이해하기가 좀 더 수월했던것 같다!
