📍 Flutter 개발시작
요즘 뜨고있는 개발 툴인 flutter로 어플 개발을 시작해 보려한다. 안드로이드와 IOS 어플을 한번에 개발이 가능하기 때문에, 시간도 절약되고 내가 이전에 자주 쓰던 firebase와도 연동이 잘 된다 해서 선택하게 되었다. 앞으로 flutter를 쓰기 위해 한 공부로 기록을 시작해 볼 것이다.
오늘은 그 첫번째로 기초 레이아웃들을 강의를 들으며 정리해보았다.
📍 Flutter 설치하기
flutter 설치과정은 유투브의 '더코딩파파' 강의를 들으며 따라했다. MacOS를 사용중이라 아래의 강의를 참고했고, 설치하다가 버전 업그레이드로 인해 에러가 나는 부분은 구글링으로 찾아서 했다.
- 참고로, 강의를 따라하면서 내가 직면한 오류는 안드로이드 애뮬레이터가 작동되지 않아서 거의 한시간 동안 찾아헤맸다.
https://ondemand.tistory.com/318 이 글을 참고하여 sdk를 삽입해 주면 해결된다고 많이들 하지만, 내 맥북은 m1이어서 그런지 쉽게 해결되지 않았다..
결국 찾은 해결방법은 따로 애뮬레이터를 설치해주는 것!
설치 루트는 https://github.com/741g/android-emulator-m1-preview 링크를 타고 들어가 release를 눌러 Asset안에 android-emulator-m1-preview.dmg 파일을 다운하면 된다!
휴.. 역시 설치가 반이다! 이제 본격적으로 공부를 시작해보자
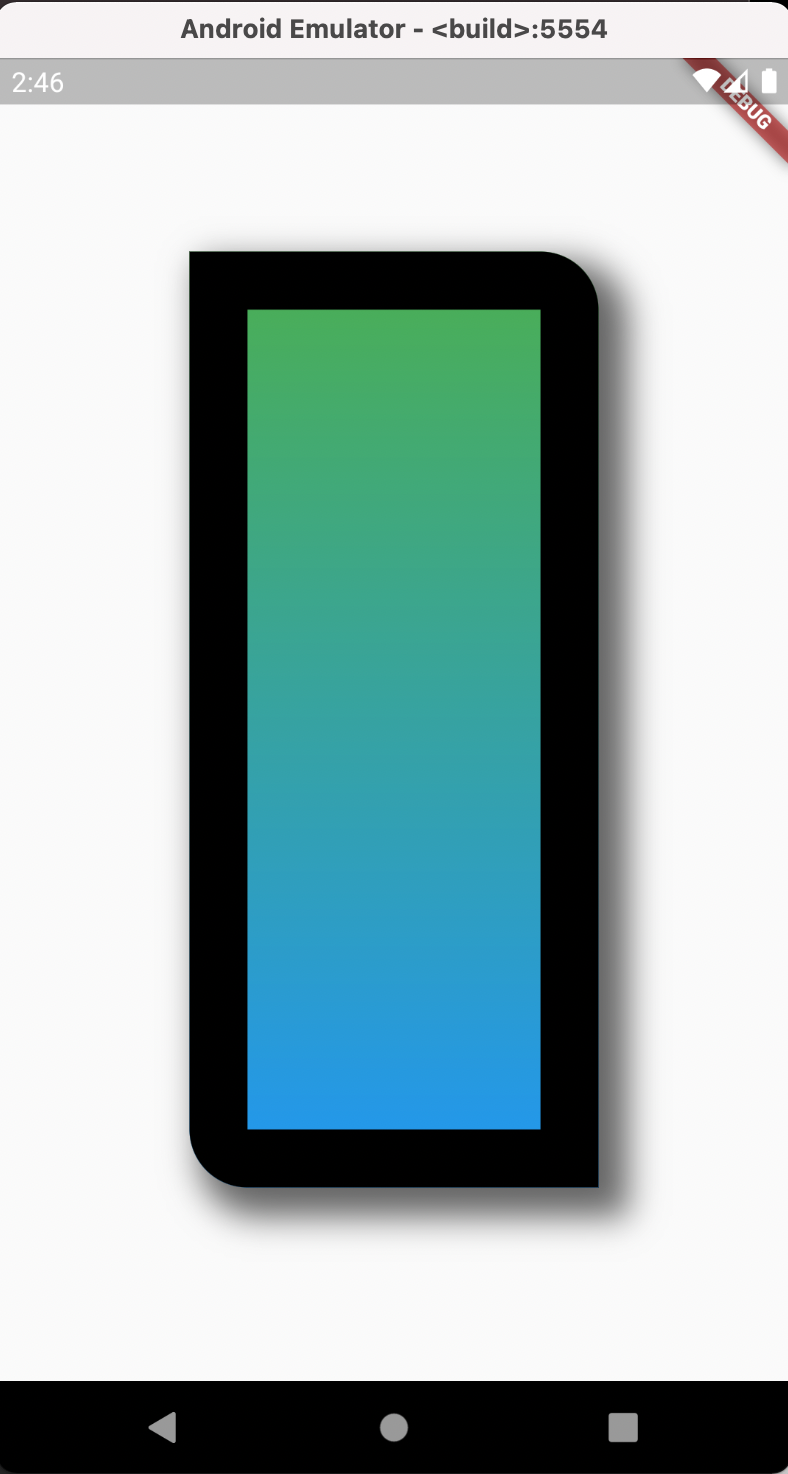
Container
container() 는 가장 간단한 가로, 세로 길이나 배경 색, 가장자리 margin 등등 간단한 기능들을 내포한다. 아래와 같은 코드 상에 Container안에 다양한 기능을 넣을 수 있다.
Widget build(BuildContext context) {
    return Scaffold(
        body: Center(
      child: Container(
        margin: EdgeInsets.all(100), //자기 자신에서부터 30 떨어지게
        decoration: BoxDecoration(
          // color: Colors.yellow,
          border: Border.all(width: 30, color: Colors.black), //가장자리
          borderRadius: BorderRadius.only(
              bottomLeft: Radius.circular(30),
              topRight: Radius.circular(30)),
          boxShadow: [
            BoxShadow(
                color: Colors.black.withOpacity(.6),
                spreadRadius: 5,
                blurRadius: 14,
                offset: Offset(10, 10))
          ],
          gradient:LinearGradient(  //그라데이션 기능을 넣어줄수 있음
            begin: Alignment.topRight,
            end: Alignment.bottomRight,
            colors: [Colors.green, Colors.blue],
          //  stops: [.4,.6] //시작 끝 지정(0-0.4는 녹색, 0.4-0.6은 그래디언트(녹-파),0.6-1은 파)
          )
        ),
      ),
    ));
  }
실행화면
Column
가진 높이 내에서 쌓아주는 역할을 한다. 내부에 있는 컴포넌트 들이 각각 어느 형태로 쌓일지는 mainAxisAlignment로 설정하고, children에 배열 형태로 Container()를 넣어 보여준다. Expanded를 사용하면 영역이 전체로 넓어지고 flex로 비율을 조정할 수 있다.
- MainAxisAlignment.spaceBetween은 높이 내에서 가장 멀리 떨어뜨려 놓는 것, 떨어진 공간을 균등하게 놓는 것이 spaceEvely,
crossAxisAlignment는 좌-우로 쌓이는 방식이다.
Widget build(BuildContext context) {
return Scaffold(
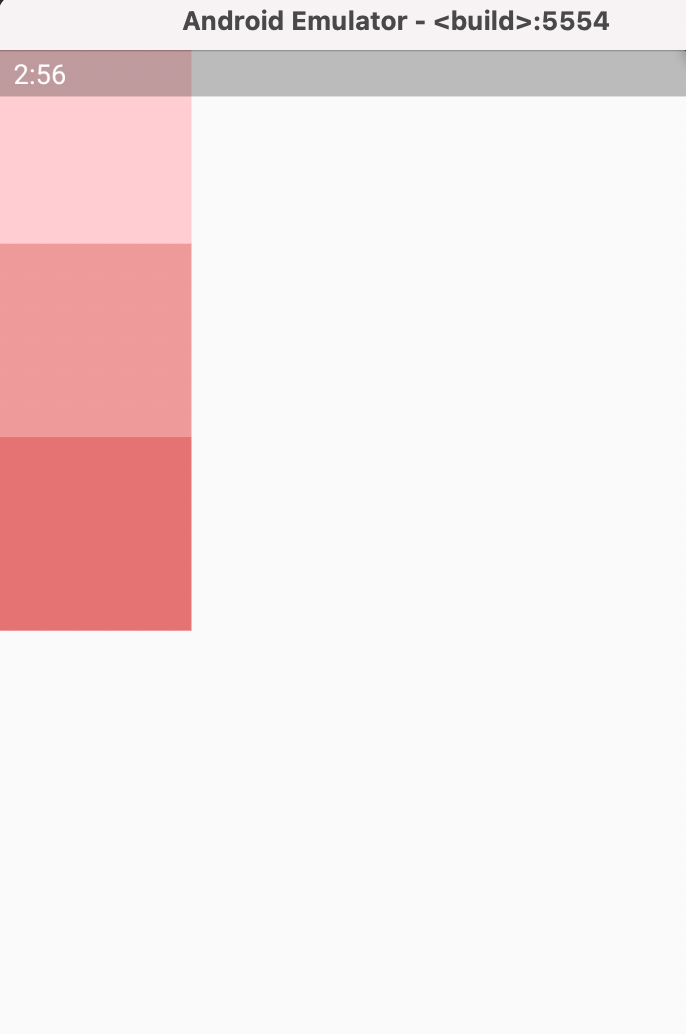
body: Column( //가진 높이 내에서 쌓이는 형태
mainAxisAlignment: MainAxisAlignment.start,
//쌓이는 기준이 어디인지!(위,아래부터)
children: [
Container(
width: 100,
height: 100,
color: Colors.red[100],
),
Container(
width: 100,
height: 100,
color: Colors.red[200],
),
Container(
width: 100,
height: 100,
color: Colors.red[300],
),
],
));
}
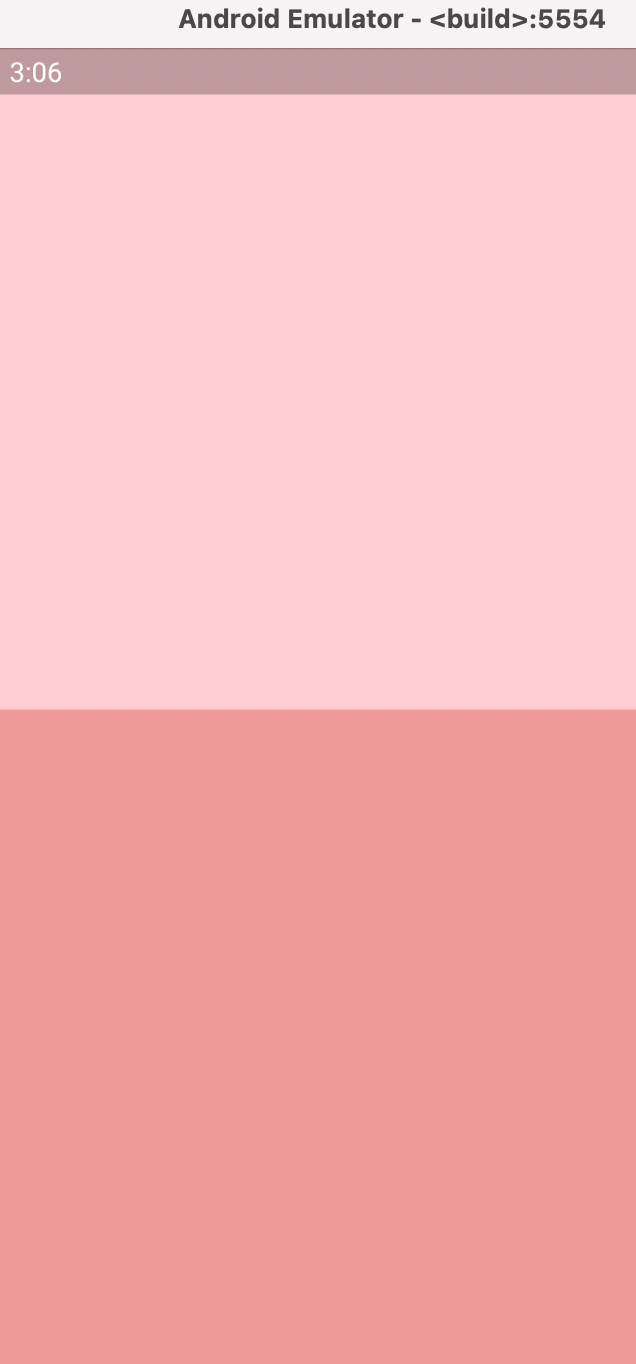
//Expanded로 영역 넓히기
Widget build(BuildContext context) {
return Scaffold(
body: Column(
children: [
Expanded(
flex:2, //비율 조정
child: Container(
color: Colors.red[100],
),
),
Expanded(
flex:1,
child: Container(
color: Colors.red[200],
),
),
],
));
}실행화면
Align(alignment: Alignment(1,-1),
child:Container(width: 100, height: 100, color: Colors.red[100],),)
Stack
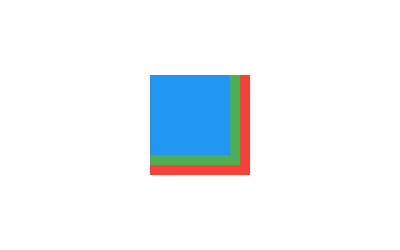
위젯을 서로 겹치게 해서 쌓이게 만든 것이다. 위치를 변경하려면 positioned를 사용한다.
Stack(
  children: <Widget>[
    Container(
      width: 100,
      height: 100,
      color: Colors.red,
    ),
    Container(
      width: 90,
      height: 90,
      color: Colors.green,
    ),
    Container(
      width: 80,
      height: 80,
      color: Colors.blue,
    ),
  ],
)
Text
텍스트를 넣은 예시이다. TextStyle로 색깔과 두께, 크기를 지정할 수 있고 maxline으로 최대 줄 수와 넘칠 경우 overflow 속성으로 표시 할 수 있다.
 Widget build(BuildContext context) {
    return Scaffold(
        body: Container(
      child: Center(
        child: Text(
          '안녕하세요 저는 오늘 피자를 먹었습니다 오후 6시에 요가를 갈 예정입니다',
          maxLines: 1,
          overflow: TextOverflow.ellipsis,  //...으로 넘침 표시
          style: TextStyle(
              color: Colors.green, fontSize: 20, fontWeight: FontWeight.bold),
        ),
      ),
    ));
}- TextOverflow.ellipsis를 적용하면 ...으로 넘친 글자를 표시한다.

TextField
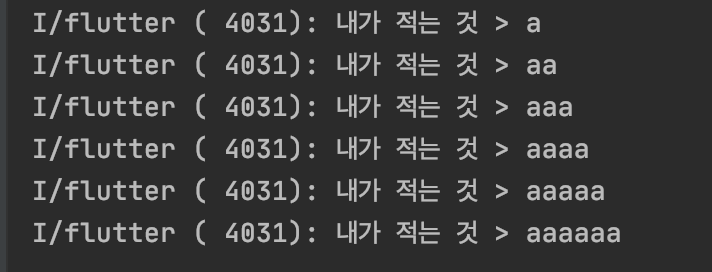
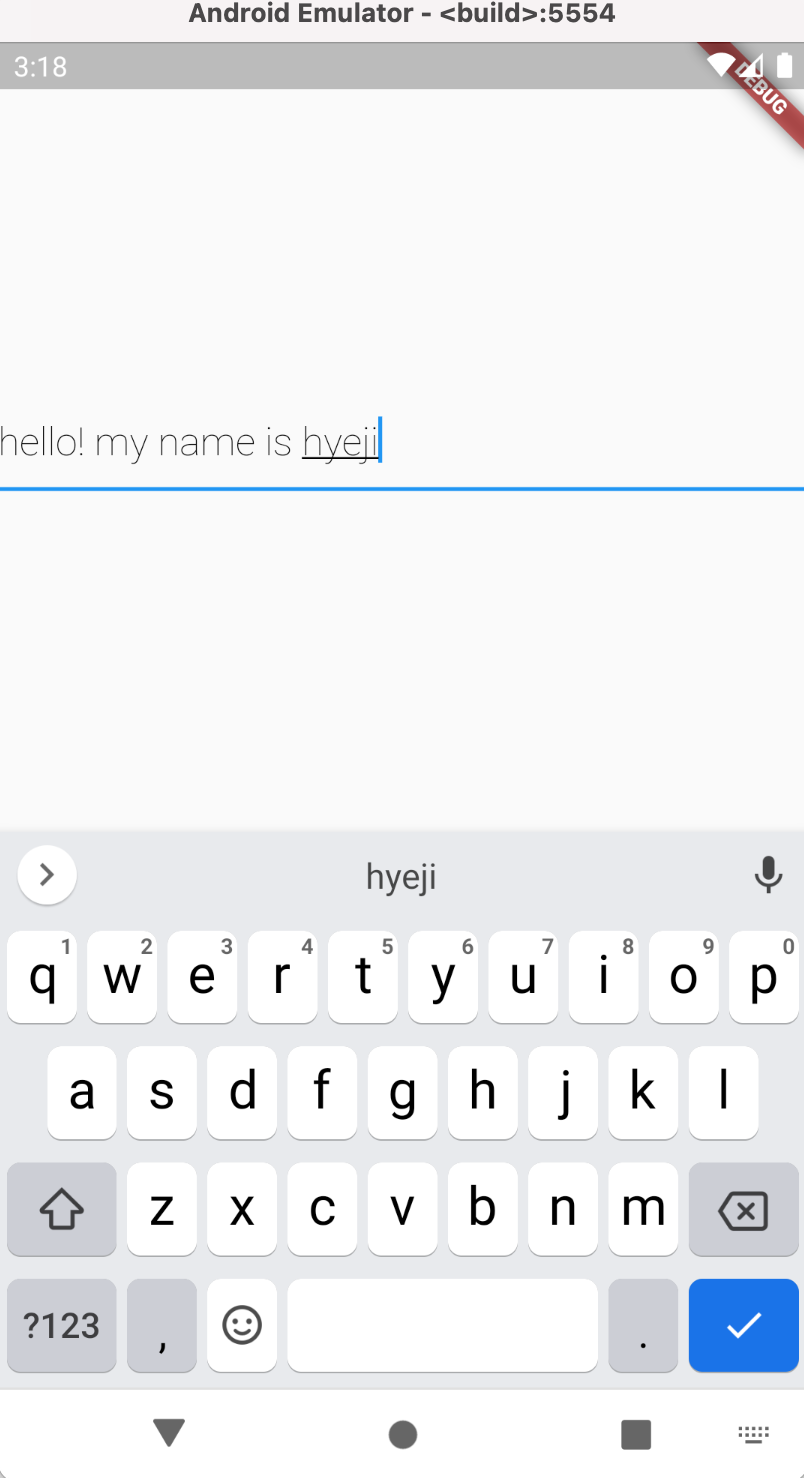
텍스트 필드는 텍스트를 적는 란을 뜻하며 그 안에 스타일을 지정할 수 있고, TextEditingController를 이용해 실시간으로 적는 텍스트를 받는다.길이 제한 을 두기 위해서는 inputFormatters를 사용한다.
import 'package:flutter/services.dart';
class _MyHomePageState extends State<MyHomePage> {
TextEditingController textEditingController = TextEditingController();
void initState(){
super.initState();
textEditingController.addListener(() {
var updateString = textEditingController.text; //실시간으로 적는 것을 받아들임
print('내가 적는 것 > $updateString');
});
}
Widget build(BuildContext context) {
return Scaffold(
body: Container(
child: Center(
child: TextField(
controller: textEditingController,
style: TextStyle(color: Colors.blue, fontSize: 20, fontWeight: FontWeight.w100),
inputFormatters: [LengthLimitingTextInputFormatter(20)],
// keyboardType: TextInputType.number,
decoration: InputDecoration(
// border: InputBorder.none,
hintStyle: TextStyle(color: Colors.grey[300],fontSize: 20),
hintText: '입력해주세요'
),
),
),
));
}
}
- 로그로 찍어보면 어떤 문자들이 들어오는지 알 수 있음
ListView
Stack과 달리 아이템 추가가 제한적이지 않고 넘칠 경우 스크롤이 가능하도록 해준다
Widget build(BuildContext context) {
return Scaffold(
body: ListView( //stack과 달리 제한이 없고 스크롤이 가능하다
padding: EdgeInsets.all(0),
scrollDirection: Axis.vertical,
children: [
Container(
height: 100,
color: Colors.red[300],
),
Container(
height: 100,
color: Colors.red[400],
),
Container(
height: 100,
color: Colors.red[500],
),
],
));
}GridView
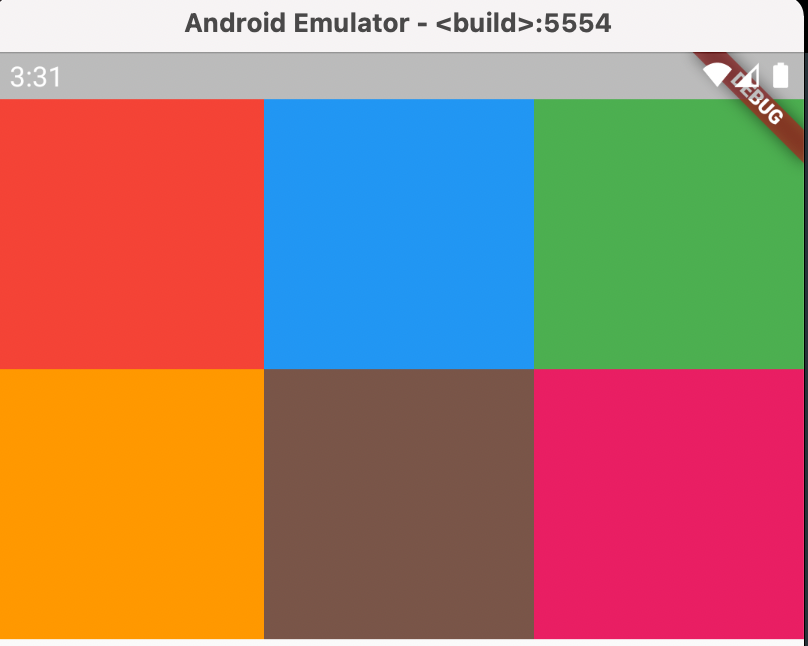
비율을 지정해 아이템을 배치하는 것, crossAxisCount로 한줄에 들어갈 개수를 구한다.
 @override
  Widget build(BuildContext context) {
    return Scaffold(
        body: GridView.count(
      crossAxisCount: 3,
      childAspectRatio: 2/3,
      children: [
        Container(
          color: Colors.red,
        ),
        Container(
          color: Colors.blue,
        ),
        Container(
          color: Colors.green,
        ),
        Container(
          color: Colors.orange,
        ),
        Container(
          color: Colors.brown,
        ), Container(
          color: Colors.pink,
        )
      ],
    ));
  }
}