📌 MongoDB란?
MongoDB는 고성능, 고가용성, 쉬운 확장성을 제공하는 NoSQL 데이터베이스로 문서 지향적인 특성을 가지고 있어, 복잡한 계층적 데이터를 효율적으로 저장하며 관리할 수 있고 자바스크립트 문법을 사용하는 특징이 있다.
스키마가 고정되어 있지 않아, 다양한 형태의 데이터를 유연하게 저장할 수 있는데 이는 개발 과정에서 데이터 구조가 변경될 경우, 데이터베이스 스키마를 수정하지 않고도 대응할 수 있는 장점을 제공한다. 이러한 MongoDB는 간단하고 유연하게 사용할 수 있지만 데이터 일관성을 보장하기 어렵고 유지보수도 어렵다.
- 데이터베이스: 데이터를 따로 저장하고 관리하는 것
- mongoDB: NoSQL
- 도큐먼트: DB에 저장하는 것
- 컬렉션: 도큐먼트 모아놓은 것
=> MongoAtlas로 클라우드에 MongoDB 데이터베이스 생성, mongoose라는 자바스크립트 라이브러리로 서버에서 데이터베이스 다루기
📌 Mongoose
MongoDB에서 공식적으로 제공하는 ODM(Object Document Mapping) 라이브러리로 객체와 데이터베이스 간의 매핑을 자동으로 처리해주는 라이브러리이다. Mongoose를 사용하면 mongoDB를 스키마 기반으로 데이터 모델을 정의할 수 있고, 데이터 유효성 검사, 타입 캐스팅, 쿼리 구성 등의 기능을 손쉽게 사용할 수 있는 기능들을 제공한다.
📖 설치
현재 프로젝트 폴더에서 터미널을 열고, 아래 명령어를 입력해서 패키지 설치
npm install mongoose📌 Next.js에서 환경 변수 추가
- Node.js 환경에서는 환경 변수들을 process.env라는 객체를 통해서 참조
- Next.js에서는 기본적으로 dotenv라는 라이브러리를 지원
dotenv 라이브러리는 .env 같은 이름의 파일에서 환경 변수들을 저장해 두면, Node.js 프로젝트를 실행할 때 환경 변수로 지정해 주는 라이브러리이다. 이때 주의할 점은 .env 파일 같은 건 소스 코드에 포함시키면 안 된다. (gitignore에 작성)
.env.local
MONGODB_URI=mongodb+srv://admin:blahblah@.clusterName.blahblah.mongodb.net/databaseName?retryWrites=true&w=majoritypages/api/short-links/index.js
export default function handler(req, res) {
  const DB_URI = process.env.MONGODB_URI;
  // 데이터베이스 접속 ...
}
이렇게 추가한 값을 process.env.MONGODB_URI 로 참조하여 데이터베이스 접근 가능
📖 Next.js에서 사용하는 특별한 환경 변수
유저의 아이디와 비밀번호 같이 민감한 정보를 담은 데이터베이스의 환경 변수가 웹 사이트에 노출되면 안 된다.
- 특별한 접두사(prefix) 사용 : NEXT_PUBLIC_
- 클라이언트 사이드에서도 사용
예를 들어서 클라이언트 사이드에서 현재 사이트의 호스트 주소를 저장해 두고 참조하고 싶다면 아래와 같이 NEXT_PUBLIC_HOST 라는 이름으로 사용하면 된다.
MONGODB_URI=mongodb+srv://admin:blahblah@cluster0.blahblah.mongodb.net/databaseName?retryWrites=true&w=majority
NEXT_PUBLIC_HOST=http://localhost:3000
export default Home() {
// 페이지 컴포넌트에서는 아래와 같이 사용
return (
<>호스트 주소: {process.env.NEXT_PUBLIC_HOST}</>
);
}📌 데이터베이스 연동하기
- db/ 폴더 생성 (최상위 폴더)
- dbConnect.js 파일 생성
- dbConnect 함수 구현 : 데이터베이스에 접속
dbConnect 함수 구현
mongoose.connect() 함수를 사용해서 커넥션을 만들고 사용
import mongoose from 'mongoose';

const MONGODB_URI = process.env.MONGODB_URI;

if (!MONGODB_URI) {
  throw new Error(
    'Please define the MONGODB_URI environment variable inside .env.local'
  );
}

/**
 * Global is used here to maintain a cached connection across hot reloads
 * in development. This prevents connections growing exponentially
 * during API Route usage.
 */
let cached = global.mongoose;

if (!cached) {
  cached = global.mongoose = { conn: null, promise: null };
}

async function dbConnect() {
  if (cached.conn) {
    return cached.conn;
  }

  if (!cached.promise) {
    const opts = {
      bufferCommands: false,
    };

    cached.promise = mongoose.connect(MONGODB_URI, opts).then((mongoose) => {
      return mongoose;
    });
  }

  try {
    cached.conn = await cached.promise;
  } catch (e) {
    cached.promise = null;
    throw e;
  }

  return cached.conn;
}

export default dbConnect;
공식 리포지터리에 있는 코드(next.js/examples/with-mongodb-mongoose)를 참고해서 구현
- env.local에 Atlas의 URL 환경변수로 저장
MONGODB_URI=mongodb+srv://<username>:<password>@cluster0.631eq.mongodb.net/shortit?retryWrites=true&w=majority&appName=Cluster0
NEXT_PUBLIC_BASE_URL=http://43.200.171.141:30713- 요청에 따른 DB 접속 구현 (커넥션 만들고 콘솔 출력)
dbConnect 함수 호출 (async, await 사용하기)
연동이 잘 되었는지 확인하려면 아래와 같이mongoose.connection.readyState라는 값을 확인할 수 있다. 문서에 따르면 접속한 상태에서는1이라는 값이 출력
import dbConnect from '@/db/dbConnect';
import mongoose from 'mongoose';

export default async function handler(req, res) {
  await dbConnect();
  console.log(mongoose.connection.readyState);
  ...
}
📌 Mongoose 모델 만들기
- db/models 폴더 생성
- ShortLink.js 파일 생성
폴더 이름은 상관없지만, 파일 이름은 모델 이름이랑 되도록 일치하게 하는 게 좋다. - 스키마 만들고 모델 생성
mongoose.Schema()를 사용해서 스키마를 생성- 스키마는 모델이 어떤 속성을 가질지 정하는 용도
mongoose.model()을 사용해서 모델을 생성
이때 모델의 이름을 첫 번째 아규먼트로 넘겨주는데, 이 이름은mongoose.models[ ... ]로 참조할 수 있기 때문에 잘 지정했는지 반드시 확인
예를 들어서 ShortLink라는 모델은 아래와 같이 만들 수 있는데, 모듈 파일을 import할 때마다 모델을 생성하는 일이 일어나지 않도록 mongoose.models['ShortLink'] || mongoose.model('ShortLink',shortLinkSchema)처럼 작성해 둔 부분을 주의해서 봐야한다.
// db/models/ShortLink.js
import mongoose from 'mongoose';

const shortLinkSchema = new mongoose.Schema(
  {
    title: { type: String, default: '' },
    url: { type: String, default: '' },
    shortUrl: { type: String, default: '' },
  },
  {
    timestamps: true,
  }
);

const ShortLink =
  mongoose.models['ShortLink'] || mongoose.model('ShortLink', shortLinkSchema);

export default ShortLink;- 모델 잘 생성되었는 지 확인
// pages/api/short-links/index.js
import dbConnect from "@/db/dbConnect";
import ShortLink from "@/db/models/ShortLink";
import mongoose from "mongoose";

export default async function handler(req, res) {
  await dbConnect();
  console.log(mongoose.connection.readyState);
  console.log(ShortLink);
}
📌 도큐먼트 생성, 조회, 수정, 삭제하기
📖 생성: Model.create()
만들어놓은 모델 사용하여 실제 엔드포인트(/api/short-links)에서 아규먼트로 전달한 값을 도큐먼트로 생성 => 해당 모델에 데이터 저장
- 데이터 저장하는 건 비동기 작업이므로 await 사용
const newShortLink = await ShortLink.create({
  title: '코드잇 커뮤니티',
  url: 'https://www.codeit.kr/community/general',
});
📖 여러 개 조회: Model.find()
조건에 맞는 모든 도큐먼트를 조회
=> 이때 조건으로 쓰이는 객체는 MongoDB의 문법을 따른다.
간단하게는 속성과 값을 키와 밸류로 하는 객체를 넣어줄 수 있다.
const shortLinks = await ShortLink.find(); // 모든 도큐먼트 조회

const filteredShortLinks = await ShortLink.find({ shortUrl: 'c0d317' }) // shortUrl 값이 'c0d317'인 모든 도큐먼트 조회
📖 아이디로 하나만 조회: Model.findById()
아규먼트로 넘겨준 아이디에 해당하는 도큐먼트를 조회
const shortLink = await ShortLink.findById('n3x7j5');📖 아이디로 업데이트하기: Model.findByIdAndUpdate()
- 첫 번째 아규먼트로 넘겨준 아이디에 해당하는 도큐먼트를 업데이트
id - 두 번째 아규먼트로 업데이트할 데이터를 객체로 전달
req.body - 세 번째 아규먼트로 옵션 추가
{new: true}
findByIdAndUpdate 함수의 리턴 값은 수정하기 이전의 도큐먼트 값이다.
그렇기 때문에 세 번째 아규먼트에 {new: true}로 업데이트 된 도큐먼트가 리턴된다.
const updatedShortLink = await ShortLink.findByIdAndUpdate('n3x7j5', req.body, { new: true });📖 아이디로 삭제하기: Model.findByIdAndDelete()
아규먼트로 넘겨준 아이디에 해당하는 도큐먼트를 삭제
await ShortLink.findByIdAndDelete('n3x7j5');📖 switch문을 이용한 도큐먼트 전체 코드
switch문을 이용하여 body를 리퀘스트, 리스폰스하는 도큐먼트 생성, 조회
// pages/api/short-links/index.js
import dbConnect from "@/db/dbConnect";
import ShortLink from "@/db/models/ShortLink";
import mongoose from "mongoose";

// /api/short-links라는 경로로 리퀘스트가 들어왔을 때 실행할 함수
export default async function handler(req, res) {
  await dbConnect();
  console.log(mongoose.connection.readyState);
  console.log(ShortLink);

  switch (req.method) {
    case "POST":
      // 도큐먼트 생성 create
      const newShortLink = await ShortLink.create(req.body);
      // 생성한 도큐먼트를 리스폰스로 보내준다
      res.status(201).send(newShortLink);
      break;

    case "GET":
      // 도큐먼트 조회
      // ShortLink.find() 함수로 도큐먼트를 가져온다
      // 비동기이기 때문에 await를 붙여준다
      const shortLinks = await ShortLink.find();
      // 리스폰스로 shortLink를 보내준다
      res.send(shortLinks);
      break;

    default:
      // 메소드 체이닝
      res.status(404).send();
      break;
  }
}
switch문을 이용하여 body를 리퀘스트, 리스폰스하는 도큐먼트 수정, 조회, 삭제
// pages/api/short-links/[id].js
import dbConnect from "@/db/dbConnect";
import ShortLink from "@/db/models/ShortLink";

export default async function handler(req, res) {
  await dbConnect();
  const { id } = req.query;

  switch (req.method) {
    case "PATCH":
      // 첫 번째 아규먼트(도큐먼트 id)
      // 두 번째 아규먼트(업데이트할 데이터를 객체로 전달 req.body)
      // findByIdAndUpdate 함수의 리턴 값은 수정하기 이전의 도큐먼트 값이다
      // 그렇기 때문에 세 번째 아규먼트에 {new: true}로 업데이트 된 도큐먼트가 리턴된다
      const updatedShortLink = await ShortLink.findByIdAndUpdate(id, req.body, {
        new: true,
      });
      res.send(updatedShortLink);
      break;

    case "GET":
      // ShortLink.findById(id) 함수로 도큐먼트를 가져온다
      // findById 함수에 아규먼트로 전달하는 값은 id
      // 비동기이기 때문에 await를 붙여준다
      const shortLink = await ShortLink.findById(id);
      // 리스폰스로 shortLink를 보내준다
      res.send(shortLink);
      break;

    case "DELETE":
      await ShortLink.findByIdAndDelete(id);
      // 상태 코드 204 No Content
      res.status(204).send();

    default:
      res.status(404).send();
      break;
  }
}
📌 데이터 요청 확인과 결과 받아오기
- request.http 파일 생성 (최상위 폴더)
- Send.Request로 Request 보내고 해당 데이터를 불러옴
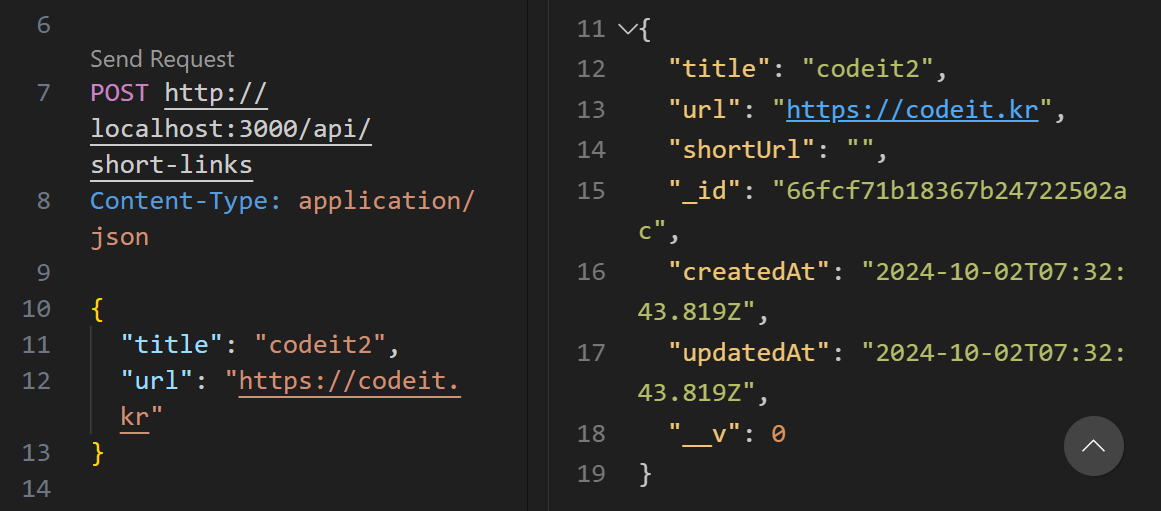
- '_id' : 데이터 서로 구분해주기 위한 것 (mongoose에서 만들어줌)
- '__v' : mongoose가 내부적으로 활용하는 값
// 1. POST로 Send Request 생성하고
// 2. POST에서 생성한 아이디 값을 GET URL에 붙여준다
// 3. GET Send Request 조회하면 POST로 생성한 데이터 조회

###

POST http://localhost:3000/api/short-links
Content-Type: application/json

{
  "title": "codeit2",
  "url": "https://codeit.kr"
}

###

// [id].js
// shortLink 리스폰스가 id 값을 받아 전달된다
GET http://localhost:3000/api/short-links/66fb94df230746a45af65d20

###

// index.js
GET http://localhost:3000/api/short-links

###

PATCH http://localhost:3000/api/short-links/66fb94df230746a45af65d20
Content-Type: application/json

{
  "title": "codeit-edit",
  "url": "https://codeit.kr"
}

###

DELETE http://localhost:3000/api/short-links/66fbad7c230746a45af65d3a

###

// res.send(req.query);
GET http://localhost:3000/api/short-links/123?q=codeit

###

// res.send(req.body);
POST http://localhost:3000/api/short-links/123
Content-Type: application/json

{
  "title": "codeit"
}

###

PATCH http://localhost:3000/api/short-links/123

###

// res.send(req.cookies);
PATCH http://localhost:3000/api/short-links/123
Cookie: session-id=codeit1234