0. 들어가기 전
해당 포스팅은 인프런에 "Spring Cloud로 개발하는 마이크로서비스 애플리케이션(MSA)" 강의를 기반으로 작성됐습니다.
포스팅의 모든 사진 자료는 해당 강의 출처임을 밝힙니다.
오늘부터 드디어 샘플 애플리케이션에 대한 실습과 기능 구현이 시작됩니다.
지금까지는 정말 MS 외부에서 동작하는 부분들(Api Gateway, Eureka Server 등..)에 대해 학습하고 실습했다면, 이제부터는 진짜 MS(Microservice)에 대해서 학습할 순서입니다.
📖 학습 목표
- Users Microservice part1 구현 완성
- DB 연동
- 회원가입
- Spring Security 연동
1. Users Microservice 개요
아키텍처 구조 관점 에서 생각하면 Users Microservice의 위치는 다음과 같습니다.
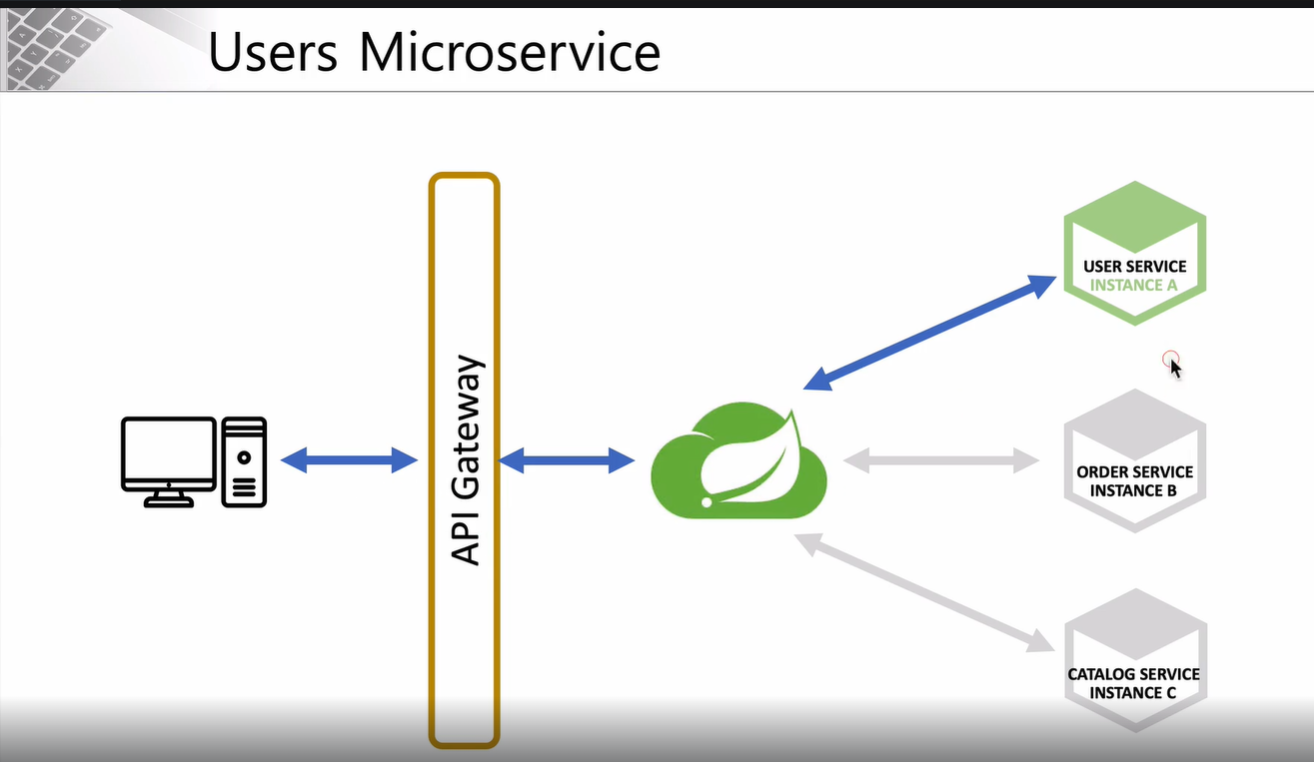
가운데 나뭇잎 아이콘은 Eureka 서버를 의미합니다.
Client와 Eureka 서버 사이에서 Api Gateway가 요청을 처리해줍니다.
User-Service는 Eureka 서버에 위치 정보가 등록된 서비스 중 하나를 뜻합니다.
Users Microservice 내부를 세분화하면 다음과 같습니다.
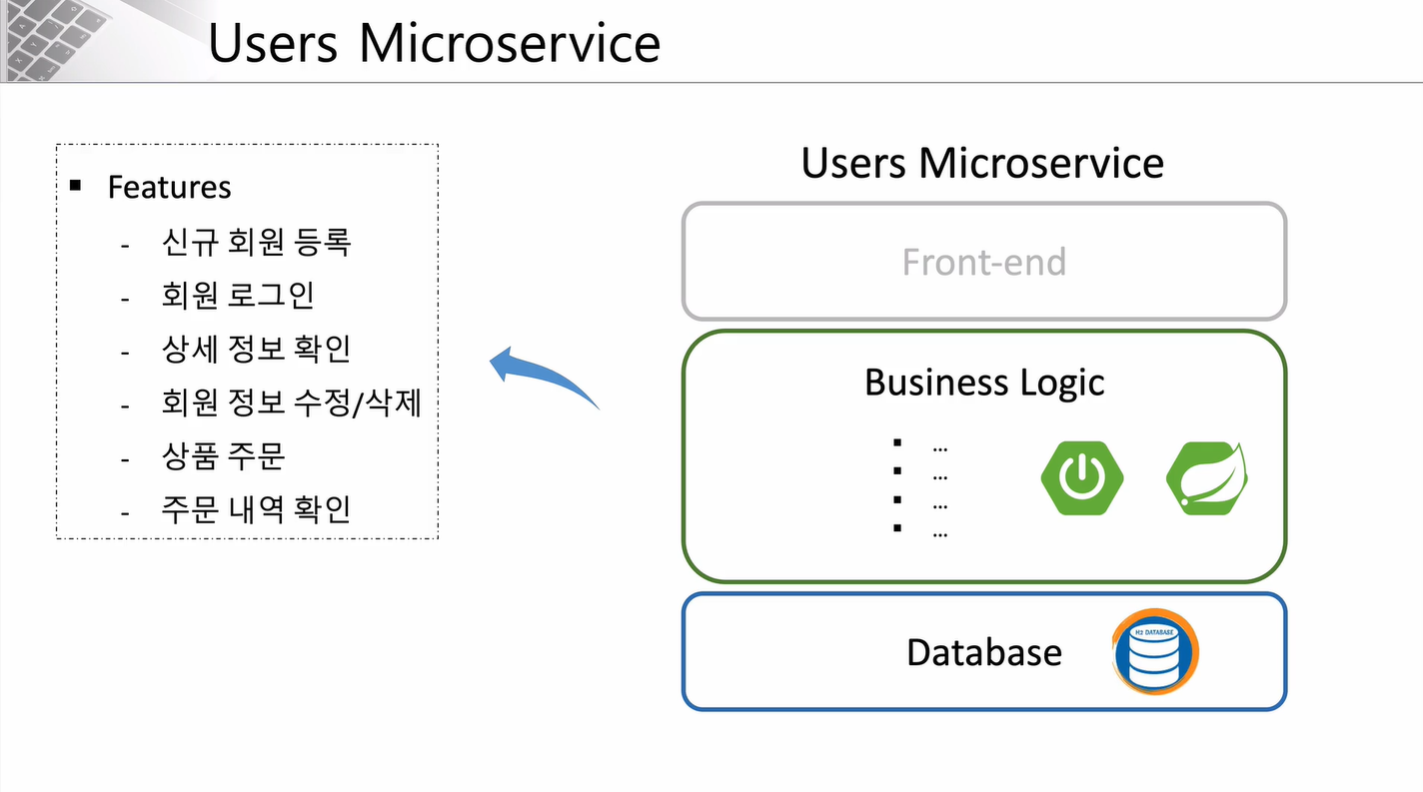
UI 부분은 구현을 하지 않고 REST API로 구현하여 Postman을 활용한 API 테스트만 진행해볼 예정입니다.
내부 Business Logic은 Spring Boot와 Spring Security를 활용하여 구현할 예정입니다.
데이터베이스는 가볍고 사용이 간편한 H2 Database를 활용하여 진행할 예정입니다.
다음으로 Users Microservice의 API 명세서를 살펴보겠습니다.
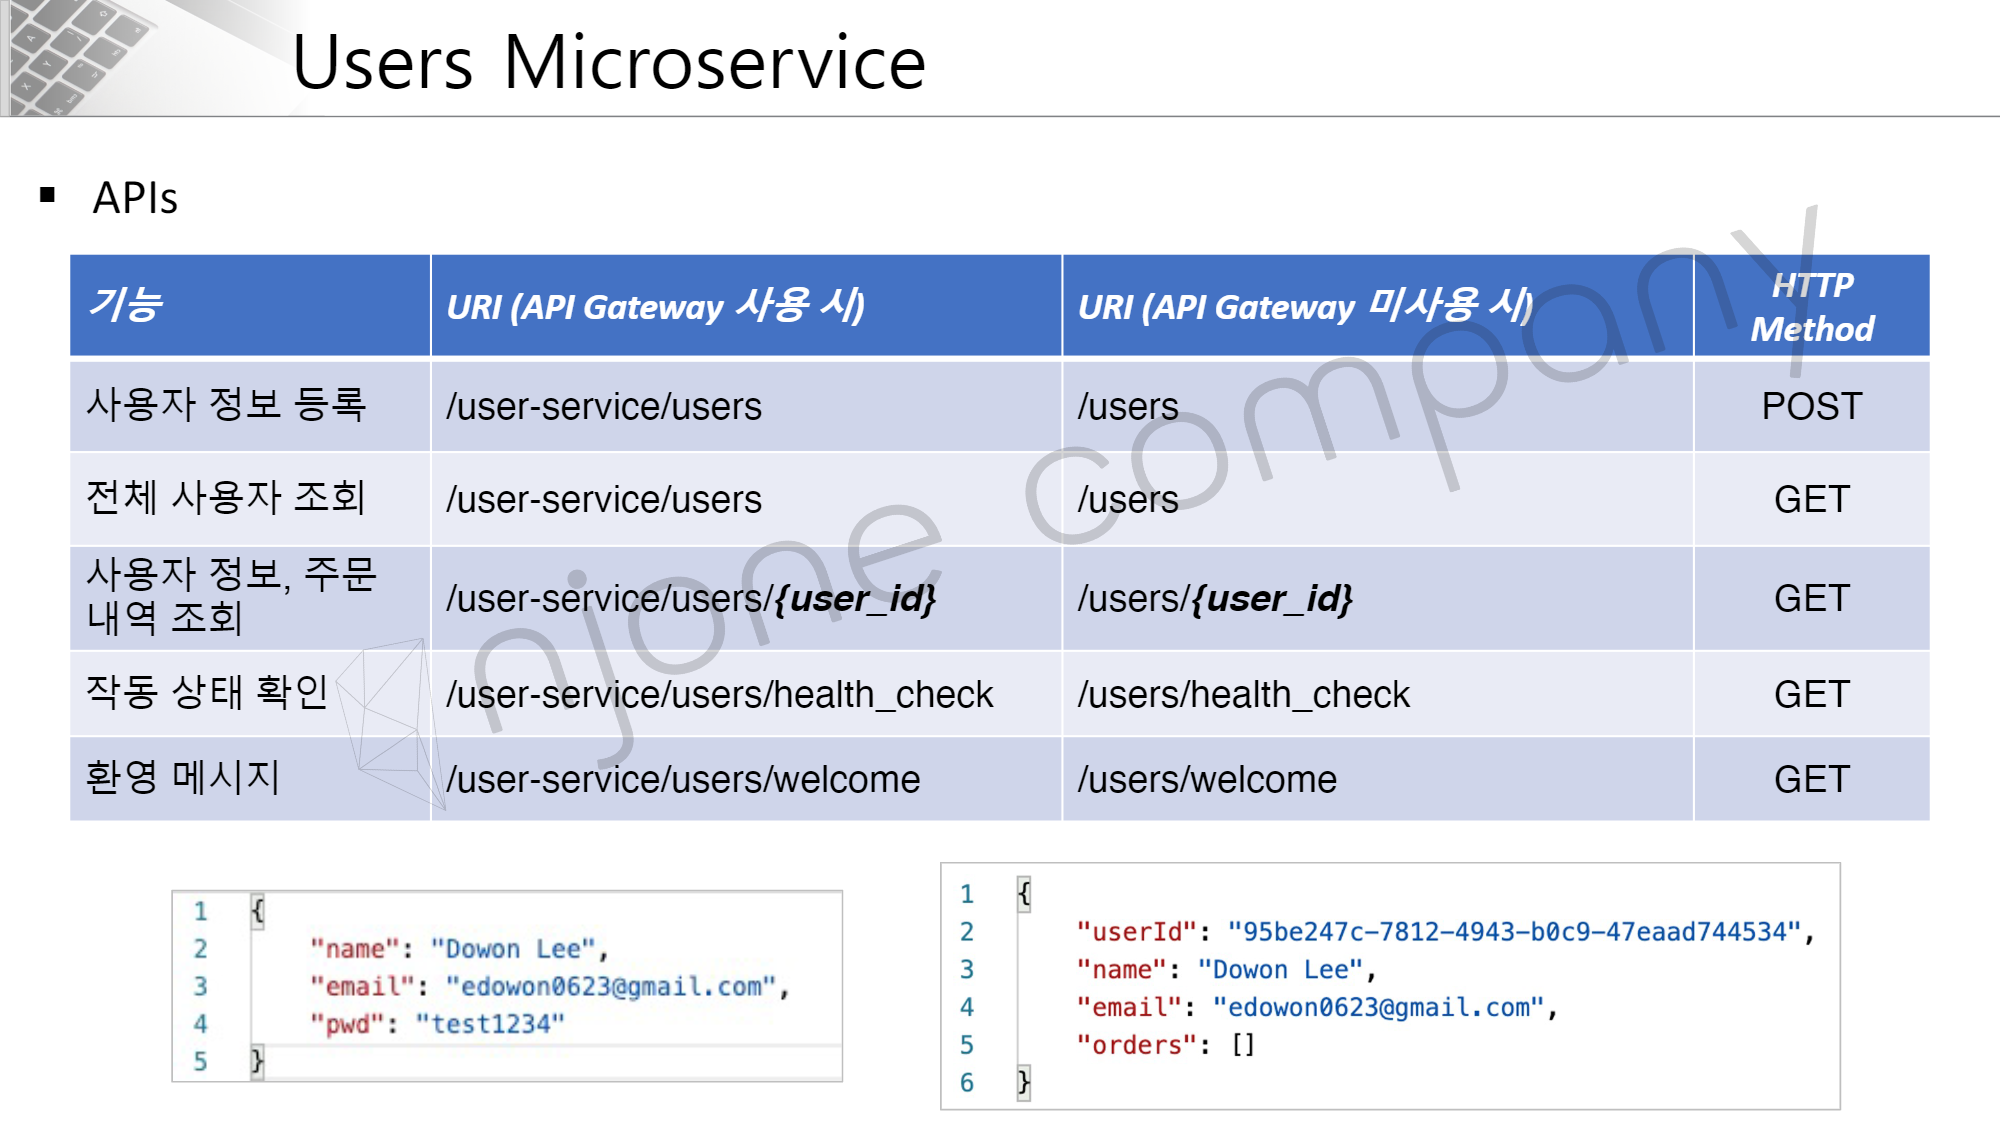
위 명세서에서 URI의 경우, Gateway 사용 시 앞에 user-service 라는 접두어를 붙여줘야 한다는 것이 핵심입니다.
HTTP Method 구성은 POST와 GET 요청으로만 구성되어 있습니다.
아래 사진에 대해 설명하면 좌측은 요청 시 Request Bodty에 담길 내용을 말하고, 오른쪽은 응답 시 Response Body 에 담길 내용을 의미합니다.
2. Users Microservice 프로젝트 생성
Depedencies
-
Spring Boot DevTools : 서버를 리부팅 하지 않아도 자동으로 리로드 해주는 기능 포함
-
Lombok
-
Spring Web
-
Eureka Discovery Client
-
ModelMapper
-
Spting Boot Starter Data JPA
-
H2 Database
Application class
@SpringBootApplication
@EnableDiscoveryClient
public class UserServiceApplication {

    public static void main(String[] args) {
        SpringApplication.run(UserServiceApplication.class, args);
    }

}
@EnableDiscoveryClient 어노테이션을 설정해줍니다.
application.yml
server:
  port: 0

spring:
  application:
    name: user-service

eureka:
  instance:
    instance-id: ${spring.application.name}:${spring.application.instance_id:${random.value}}
  client:
    register-with-eureka: true
    fetch-registry: true
    service-url:
      defaultZone: http://127.0.0.1:8761/eureka

...
포트 번호를 0으로 지정하여 랜덤 포트로 지정하였고, instance-id 값을 지정해줍니다.
이는 동일한 서비스의 여러 인스턴스들을 구분해주기 위해서 설정합니다.
Test
실행해주면 다음과 같이 user-service가 Eureka 서버에 등록되는 것을 알 수 있습니다.

이것으로 Users Microservice 생성 및 기본 설정이 끝났습니다.
3. Users Microservice 서버 테스트
다음으로 Users Microservice 내 RestController를 정의하여 브라우저와 API 테스트를 진행하겠습니다.
UserController
@RestController
@RequestMapping("/")
public class UserController {

    @GetMapping("/health-check")
    public String status() {
        return "It's Working in User-Service";
    }

    ...
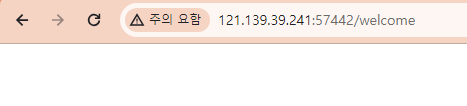
실행 후, Eureka Server 대시보드에 명시된 url에 마우스를 갖다 대면 port를 확인할 수 있습니다.
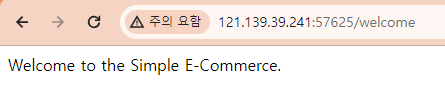
브라우저 상에 해당 port로 "health-check"를 보내면, 다음과 같이 결과가 출력됩니다.

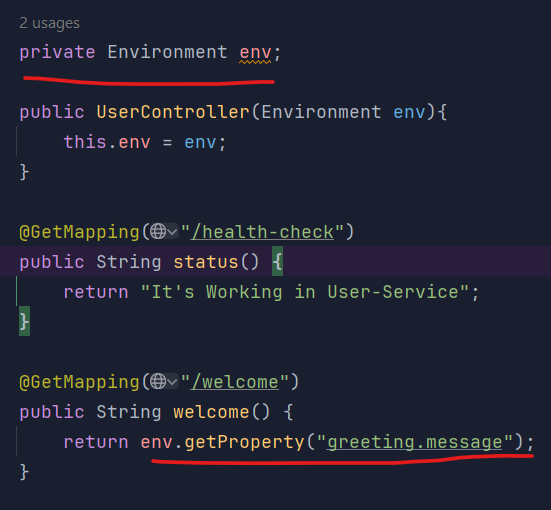
welcome 메시지
application.yml 파일에서 classpath로 정보를 갖여ㅗ는 방법은 2가지가 있습니다.
Environment 객체 사용
- application.yml 메시지 추가
...

greeting: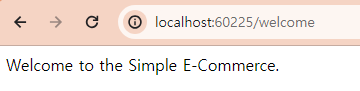
message: Welcome to the Simple E-Commerce.- Environment 객체 의존 주입
- 테스트 결과
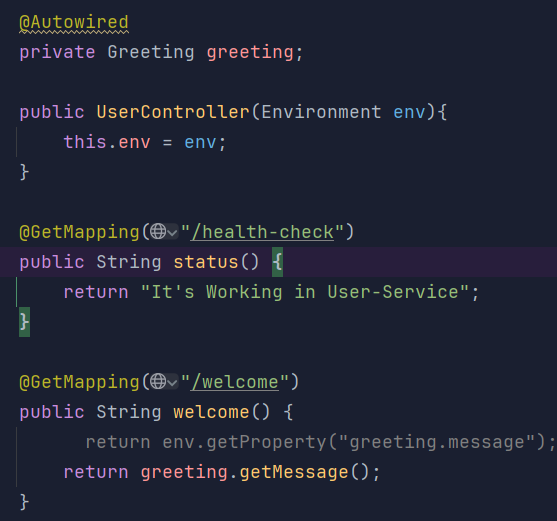
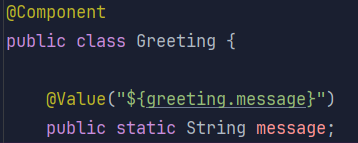
@Value 어노테이션 사용
- Greeting 클래스 정의

위 @Value 어노테이션으로 값을 가져오기 위해서는 "${ ... }" 양식을 반드시 지켜줘야 합니다.
-
Greeting 객체 의존 추가
-
테스트 결과
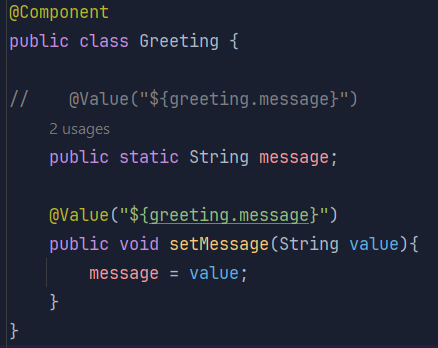
💡 스터디를 하면서 알게된 사실
@Value 관련 내용을 학습하면서 팀원분께서 한가지 의문을 던졌습니다.
"그렇다면 static으로 선언할 경우에는 초기화가 될까요?"
고민해봤지만, 정적 요소가 초기화 되는 시점과 메타 데이터를 읽어오는 시점에 차이를 몰랐다... 따라서, 이번 시간에는 테스트만 진행해본 뒤 다음 포스팅때 해당 내용의 개념을 공부해오려고 합니다.
-
static 선언
-
UserController 수정

-
테스트 결과
결과적으로는 값이 출력되지 않습니다. 이를 통해서 짐작할 수 있는 것은 static 요소를 초기화 하는 시점보다 application.yml 내 메타 데이터를 읽어오는 시점이 빠르다는 것입니다.
그렇다면 static 요소는 메타데이터 값을 주입하는 것이 불가능한가?
결론부터 말하면 아닙니다.
실제 message에 값을 주입하는 메서드를 정의한 뒤 해당 메서드 위에 @Value를 추가해주면 대입되는 것을 확인할 수 있습니다.
-
Greeting 수정
-
테스트 결과
정적요소의 이점은 인스턴스 생성 없이 바로 필드를 사용할 수 있다는 점에서 작성할 코드량이 줄어들게 된다는 점이있습니다.
또한, 여러 곳에서 사용하게 될 경우, 인스턴스를 생성하지 않아 메모리도 적게 사용할 수 있다는 장점이 있습니다.
4. Users Microservice DB 연동
H2 데이터베이스
-
H2 Database는 자바로 작성된 RDBMS
-
Embeded, Server-client 가능
-
JPA 연동 가능
-
웹브라우저 에서 사용 가능
⚠️ 주의
h2 1.4.198 버전 이후부터는 보안 문제로 인해서 자동으로 데이터베이스를 생성하지 않도록 설정되었습니다.
따라서 상위 버전부터는 H2 Database Engine을 통해 Database를 수동으로 생성해주시면 됩니다.
application.yml
H2 Database 및 jpa 관련 설정을 추가해줍니다.
spring:
  application:
    name: user-service
  h2:
    console:
      enabled: true
      settings:
        web-allow-others: true
      path: /h2-console
  jpa:
    hibernate:
      ddl-auto: create
    properties:
      hibernate:
        format_sql: true
        show_sql: true
  datasource:
    driver-class-name: org.h2.Driver
    url: jdbc:h2:mem:testdb
    username: sa
    password:
h2.console.enabled : true
H2 Database 내장되어 있는 GUI 콘솔을 사용하기 위한 설정합니다.
h2.console.settings.web-allow-others : true
외부에서도 H2 콘솔로 접근이 가능합니다.
h2.console.path : 경로
H2 데이터베이스 콘솔창에 접근하기 위한 경로를 설정합니다.
UserEntity
@Entity
@Data
@Table(name="users")
public class UserEntity {

    @Id
    @GeneratedValue(strategy = GenerationType.IDENTITY)
    private Long id;

    @Column(nullable=false, length=50)
    private String email;

    @Column(nullable=false, length=50)
    private String name;

    @Column(nullable=false, unique = true)
    private String userId;

    @Column(nullable=false, unique = true)
    private String encryptedPw ;
}
UserEntity 정의 후 실행하면 H2 Database 경로(localhost:port/설정 path)로 들어가면 테이블이 생성된 것을 확인하실 수 있습니다.
5. Users Microservice 회원가입 구현
💡 DTO와 VO
- DTO(Data Transfer Object) : 데이터 전달 객체, 내부 게터와 세터만 정의.
- VO(Value Object) : 데이터를 의미하는 객체, 클라이언트로 부터 전달받는 데이터 또는 응답할 데이터 자체를 의미.
데이터 흐름
<요청>
RequestUser(요청 데이터) → UserDto(DTO) → UserEntity → DB

<응답>
ResponseUser(응답 데이터) ← UserDto(DTO) ← DB
UserController 수정
@RestController
@RequestMapping("/")
public class UserController {

    private Environment env;
    private UserService userService;

    @Autowired
    private Greeting greeting;

    public UserController(Environment env, UserService userService){
        this.env = env;
        this.userService = userService;
    }

    ...

    @PostMapping("/users")
    public ResponseEntity<ResponseUser> createUser(@RequestBody RequestUser user){
        ModelMapper mapper = new ModelMapper();

        mapper.getConfiguration().setMatchingStrategy(MatchingStrategies.STRICT);

        UserDto userDto = mapper.map(user,UserDto.class);

        userDto = userService.createUser(userDto);

        ResponseUser responseUser = mapper.map(userDto, ResponseUser.class);

        return ResponseEntity.status(HttpStatus.CREATED).body(responseUser);
    }
}
createUser 메서드에 Post 매핑하여 해당 경로로 회원가입 요청이 들어오도록 구현했습니다.
RequestUser
@Data
public class RequestUser {
    @NotNull(message = "Email cannot be null")
    @Size(min=2, message="Email not be less than two characters")
    @Email
    private String email;

    @NotNull(message = "Name cannot be null")
    @Size(min=2, message="Name not be less than two characters")
    private String name;

    @NotNull(message = "Password cannot be null")
    @Size(min=8, message="Password must be equal or greater than eight characters")
    private String pw;
}
클라이언트로 부터 입력받은 데이터를 매핑하여 담는 객체를 의미합니다.
Validation을 통해서 데이터 유효성 검증을 수행합니다.
UserDto
@Data
public class UserDto {

    private String email;

    private String name;

    private String pw;

    private String userId;

    private Date createdAt;

    private String encryptedPw;
}
계층간에 데이터를 전달해주기 위한 객체입니다.
UserService & UserServiceImpl
UserService
public interface UserService {

    UserDto createUser(UserDto userDto);
}
객체지향 특징 중 OCP(개방폐쇄원칙)을 가장 잘 표현한 구현방식입니다.
관습적인 내용이지만, 기능 확장이나 유지 보수 시에 용이한 설계 방식입니다.
UserServiceImpl
@Service
public class UserServiceImpl implements UserService{

    UserRepository userRepository;

    public UserServiceImpl(UserRepository userRepository){
        this.userRepository = userRepository;
    }

    @Override
    public UserDto createUser(UserDto userDto) {
        userDto.setUserId(UUID.randomUUID().toString());

        userDto.setCreatedAt(new Date());

        ModelMapper mapper = new ModelMapper();

        mapper.getConfiguration().setMatchingStrategy(MatchingStrategies.STRICT); // 엄격한 매핑

        UserEntity userEntity = mapper.map(userDto, UserEntity.class);

        userEntity.setEncryptedPw("encrypted_password");

        userRepository.save(userEntity);

        UserDto returnUserDto = mapper.map(userEntity,UserDto.class);

        return returnUserDto;
    }
}
인터페이스를 구현한 클래스, 회원 관련 기능을 구현했습니다.
UserRepository
public interface UserRepository extends CrudRepository<UserEntity,Long> {
}
자주 사용하는 JpaRepository 인터페이스보다 좁은 범위의 기능을 제공합니다.
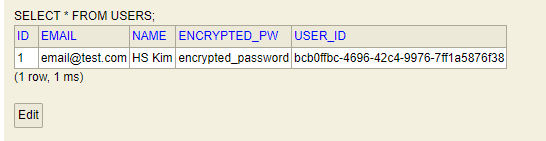
Test
Postman을 활용하여 테스트한 결과는 다음과 같습니다.
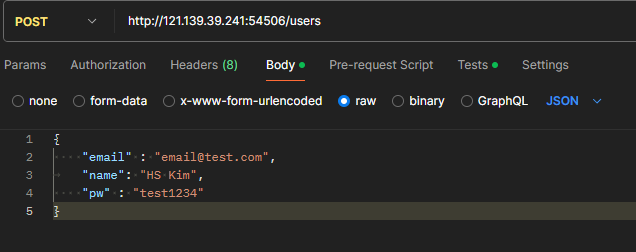

테스트 결과 CREATED 정상 응답한 것을 확인할 수 있습니다.
6. Spring Security 연동
Spring Security
스프링 진영에서 인증과 인가 작업을 수행하는 프레임워크입니다.
Dependency 추가
- Spring Boot Starter Security
WebSecurity 설정
import org.springframework.context.annotation.Bean;
import org.springframework.context.annotation.Configuration;
import org.springframework.security.config.annotation.web.builders.HttpSecurity;
import org.springframework.security.config.annotation.web.configuration.EnableWebSecurity;
import org.springframework.security.config.annotation.web.configurers.AbstractHttpConfigurer;
import org.springframework.security.config.annotation.web.configurers.HeadersConfigurer;
import org.springframework.security.crypto.bcrypt.BCryptPasswordEncoder;
import org.springframework.security.web.SecurityFilterChain;
import org.springframework.security.web.util.matcher.AntPathRequestMatcher;

@Configuration
@EnableWebSecurity
public class WebSecurity  {

    @Bean
    protected SecurityFilterChain configure(HttpSecurity http) throws Exception {

        http.csrf(AbstractHttpConfigurer::disable); // 메서드 참조
        http.authorizeHttpRequests(auth -> auth
                .requestMatchers(new AntPathRequestMatcher("/users/**")).permitAll() // 경로 permitAll
                .requestMatchers(new AntPathRequestMatcher("/h2-console/**")).permitAll()
        );

        // H2와 같이 프레임으로 구분된 html 을 갖는 프로그램에 화면 오류가 나지 않도록 설정을 추가해줘야 함.
        http.headers(h->h.frameOptions(HeadersConfigurer.FrameOptionsConfig::disable));

        return http.build();
    }

    @Bean
    public BCryptPasswordEncoder passwordEncoder(){
        return new BCryptPasswordEncoder();
    }
}
BcryptPasswordEncoder
password를 해싱하기 위해 Bcrypt 알고리즘을 사용했습니다.
랜덤 salt를 부여하여 여러 번의 Hash를 적용한 암호화 방식을 말합니다.
UserServiceImpl
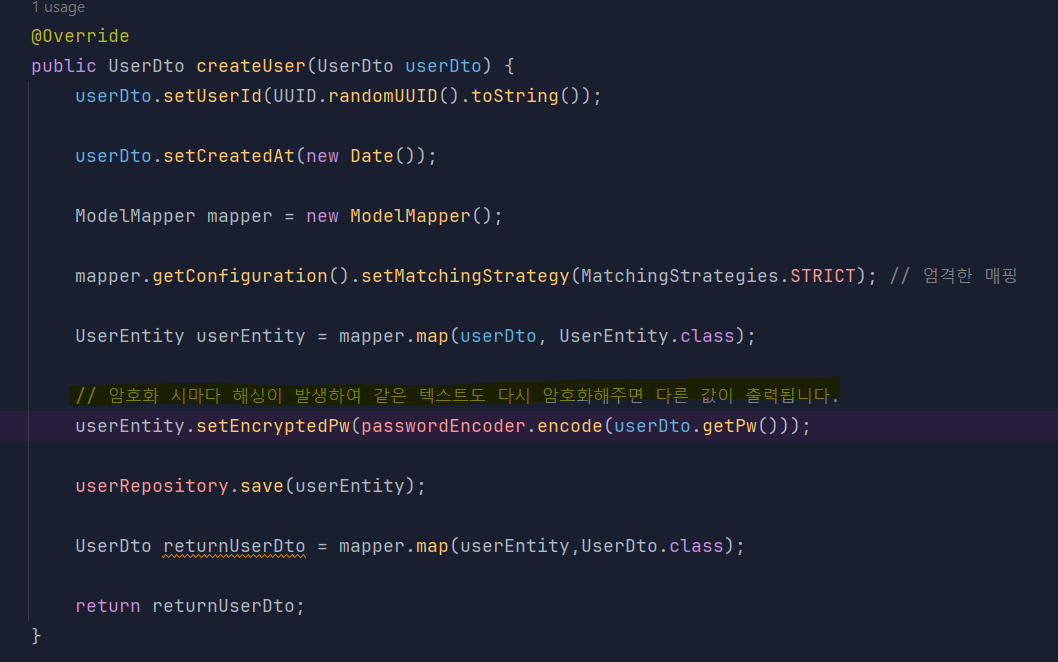
암호화 적용 후 테스트 결과 DB에 해싱화된 데이터가 정상 저장됐습니다.

💡 설정 클래스에 @Bean 등록