화면 상단에 배터리, 네트워크, 시간 등이 표시된 부분을 상태바라고 한다. 이 상태바는 시스템이 제어하는 부분이기 때문에 앱이 제어할 수 없다. 그래서 상태바에 알림을 출력하려면 시스템에 의뢰를 해야하는데, 이때 알림을 제공하는 API 를 사용한다. 알림은 NotificationManager의 notify() 함수로 발생한다.
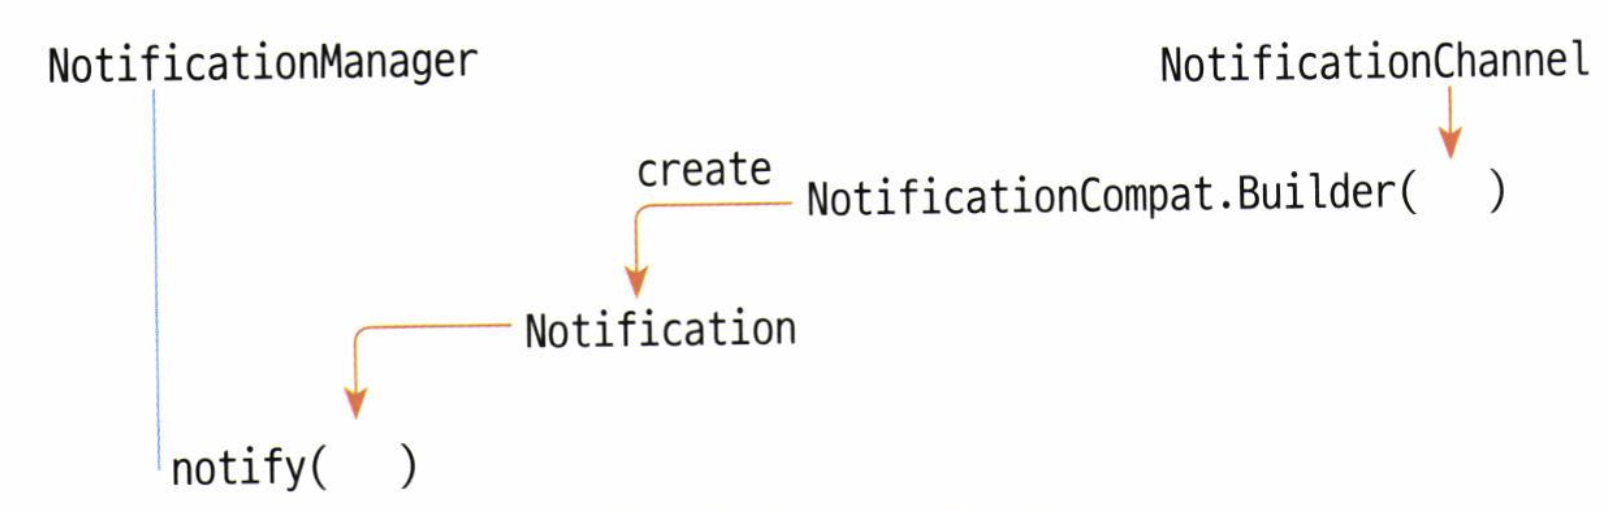
알림 만드는 방법
- NotificationChannel로 알림 채널을 만든다.
- 채널 정보를 이용해 NotificationCompat.Builder()로 Notification 객체를 만든다.
- Notification 객체를 NotificationManager의 notify() 함수에 넣는다.
빌더 만들기
Notification을 만드려면 NotificationCompat.Builder가 필요하다.
빌더 생성자
- API 26버전 이전
NotificationChannel 정보가 필요없었다.
Builder(context: Context!)- API 26버전 이후
NotificationChannel을 만들고 이 채널의 식별값을 매개변수로 전달해줘야 한다.
Builder(context: Context!, channelld: String!)채널 만들기
API 레벨 26에서 채널이라는 개념이 추가되었다. 앱의 알림을 채널로 구분할 수 있으며, 사용자가 환경설정에서 어떤 앱의 알림을 받을지 말지 설정할 수 있다.
API 레벨 26 이전에서는 사용자가 알림을 안받겠다고 하면 해당 앱의 알림을 모두 안받지만, API 레벨 26 이후에서는 앱의 특정 채널의 알림만 받지 않겠다고 설정할 수 있다.
알림채널 생성자
NotificationChannel(id: String!, name: CharSequence!, importance: Int)- id: 채널의 식별값
- name: 설정 화면에 표시할 채널의 이름
- importance : 알림의 중요도
- NotificationManager.IMPORTANCE_HIGH : 알림음이 울리고, 헤드업으로 표시된다.
- NotificationManager.IMPORTANCE_DEFAULT : 알림음이 울린다.
- NotificationManager.IMPORTANCE_LOW : 알림음이 울리지 않는다.
- NotificationManager.IMPORTANCE_MIN : 알림음이 울리지 않고, 상태바에도 표시되지 않는다.
알림 빌더 작성 예시
val manager = getSystemService(NOTIFICATION_SERVICE) as NotificationManager
val builder: NotificationCompat.Builder

if (Build.VERSION.SDK_INT => Build.VERSION_CODES.O) {
	val channelId = "one-channel"
	val channelName = "My Channel One"
    val channel = NotificationChannel(
		channelid,
		channelName,
		NotificationManager.IMPORTANCE_HIGH
	)

    // 채널에 다양한 정보설정
	channel.description = "My Channel One Description"
	channel.setShowBadge(true)
	val uri: Uri = RingtoneManager .getDefaultUri(RingtoneManager.TYPE_NOTIFICATION)
    val audioAttributes = AudioAttributes.Builder()
		•setContentType(AudioAttributes.CONTENT_TYPE_SONIFICATION)
		•setUsage(AudioAttributes.USAGE_ALARM)
        .build()
	channel.setSound(uri, audioAttributes)
	channel.enableLights(true)
	channel.lightColor = Color.RED
    channel.enableVibration(true)
	channel.vibrationPattern = longArrayOf(100, 200, 100, 200)

	// 채널을 NotificationManager에 등록
	manager.createNotificationChannel(channel)

	// 채널을 이용해 빌더 생성
	builder = NotificationCompat.Builder(this, channelId)
}else {
	builder = NotificationCompat.Builder (this)
}
알림(Notification) 객체
빌더를 만들었으면 이 빌더를 이용해 Notification 객체를 만들어야 한다. Notification 객체에는 스몰 아이콘과 발생 시각, 제목, 내용 등의 정보가 담겨있다.
알림 객체 설정하기
빌더의 setter 함수를 이용해 설정한다.
builder.setSmallIcon(android.R.drawable.ic_notification_overlay)
builder.setwhen (System.currentTimeMillis())
builder.setContentTitle("Content Title")
builder.setContentText("Content Massage")
알림 띄우기
NotificationManager 클래스의 notify() 함수로 알림을 띄운다
manger.notify(11, builder.build())builder.build() 함수가 Notification 객체를 만들어 알림이 발생한다. 첫번째 매개변수는 알림의 식별값으로 개발자가 마음대로 지정해서 적으면 된다.
알림 취소
매개변수로 알림의 식별값을 넘겨준다.
manager.cancel(11)알림 취소 막기
사용자가 알림을 터치나 스와이프해도 알림이 사라지지 않게 하려면 builder 의 setter 함수로 지정해야 한다.
// 알림을 터치하면 이벤트는 발생하지만 알림이 사라지지 않는다.
builder.setAutoCancel(false)
// 알림을 스와이프해도 알림이 사라지지 않는다.
builder.setOngoing(true)
알림 구성하기
터치 이벤트
사용자가 알림을 터치했을 때 앱의 액티비티 화면을 실행하도록 하려면 터치 이벤트를 구현해야 한다.상태바는 시스템이 제어하는 영역이므로, onTouchEvent() 함수로는 처리할 수 없다.
따라서 사용자가 알림을 터치했을 때 실행해야 하는 정보를 Notification 객체에 넣어두고, 실제 이벤트가 발생하면 Notification 객체에 등록된 이벤트 처리 내용을 시스템이 실행하는 구조이다.
알림 객체에 액티비티 실행정보 등록하기
사용자가 알림을 터치하면 인텐트(Intent)를 이용해 앱의 액티비티 또는 브로드캐스트 리시버를 실행한다.
Intent를 준비한 후 Notification 객체에 담아서 이벤트가 발생할 때 Intent를 실행해달라고 시스템에게 의뢰해야 한다. 이때 PendingIntent 클래스를 이용하는데, PendingIntent 클래스는 컴포넌트별로 실행을 의뢰하는 함수를 제공한다.
static fun getActivity(context: Context!, requestCode: Int, intent: Intent!, flags: Int): PendingIntent!
static fun getBroadcast (context: Context!, requestCode: Int, intent: Intent!, flags: Int): PendingIntent!
static fun getService(context: Context!, requestCode: Int, intent: Intent, flags: Int): PendingIntent!- flags:
flag값으로 똑같은 알림이 발생했을 때 어떻게 처리해야 하는지 나타낸다.
API 레벨 31을 대상으로 한다면 FLAG_MUTABLE과 FLAG_IMMUTABLE 중 하나를 지정해주어야 한다.- FLAG_MUTABLE
- FLAG_IMMUTABLE
- FLAG_UPDATE_CURRENT
- FLAG_CANCEL_CURRENT
- FLAG_NO_CREATE
- FLAG_ONE_SHOW
예시
val intent = Intent(this, DetailActivity::class.java)
val pendingIntent =
	PendingIntent.getActivity(this, 10, intent, PendingIntent.FLAG_IMMUTABLE)
builder.setContentIntent(pendingIntent) //터치 이벤트 등록
액션(Action)
알림은 최대 3개의 액션(알람 취소, 전화 앱의 수신이나 거부, ...)을 처리할 수 있다.
터치 이벤트와 마찬가지로 사용자가 액션을 터치할 때 실행할 인텐트 정보를 PendingIntent로 구성해서 등록해야 한다.
액션 등록 함수
매개변수로 액션의 정보를 담고있는 Action 객체를 전달한다.
open fun addAction(action: Notification.Action!): Notification.Builder액션 빌더 생성자
Action 객체는 Action.Builder로 만든다.
Builder(icon: Int, title: CharSequence!, intent: PendingIntent!)액션 등록하기
val actionIntent = Intent (this, OneReceiver::class.java)
val actionPendingIntent = PendingIntent.getBroadcast(this, 20, actionIntent,
	PendingIntent.FLAG IMMUTABLE)

builder.addAction(
	NotificationCompat.Action.Builder(
    	android.R.drawable.stat_notify_more,
		"Action",
        actionPendingIntent
	).build( )
)
원격 입력 (Remote Input)
원격 입력이란 액션의 한 종류로, 알림에서 사용자의 입력을 직접 받는 것이다.
RemoteInput 객체 생성
val KEY_TEXT_REPLY = "key_text_reply"
var replyLabel: String = "답장"
var remoteInput: RemoteInput = RemoteInput.Builder(KEY_TEXT_REPLY).run{
	setLabel (replyLabel)
    build()
}
RemoteInput 은 API 레벨 20에서 추가했다. 따라서 minSDK 가 더 낮으면 호환성을 고려해야 하는데 android.app.RemoteInput이 아닌 androidx.core.app.RemoteInput 이용하면 따로 호환성 처리를 해주지 않아도 된다.
인텐트 준비
val replyIntent = Intent(this, ReplyReceiver::class.java)
val replyPendingIntent = PendingIntent.getBroadcast(this, 30, replyIntent,
	PendingIntent.FLAG_MUTABLE)
RemoteInput은 알림에서 사용자의 입력을 받는 것이므로 앱의 화면이 출력되게 하지 않고 브로드캐스트 리시버를 실행해 백그라운드에서 사용자 입력을 처리하는 게 일반적이다.
원격 입력 액션 등록하기
builder.addAction(
	NotificationCompat.Action.Builder(
		R.drawable.send,
        "답장",
		replyPendingIntent
	).addRemoteInput(remoteInput).build()
)
브로드캐스트에서 사용자가 입력한 글을 받기
아래 코드에서 getCharSequence 의 매개변수로 전달하는 문자열이 RemoteInput을 만들 때 지정한 식별값과 같아야 한다는 것에 주의해야 한다.
val replyTxt = RemoteInput.getResultsFromIntent(intent)
	?.getCharSequence("key_text_reply")
알림 갱신
브로드캐스트 리시버에서 사용자의 입력 글을 받은 후 알림을 갱신해줘야 한다. 이때 알림 객체의 식별값을 사용해 갱신해주면 된다.
아래 코드는 알림에 글을 잘 받았다는 신호를 보내는 것으로, 이렇게 보내면 알림에서 글을 입력하는 부분이 사라지게 된다.
manager.notify(11, builder.build())프로그래스(progress)
앱에서 서버로 파일을 올리는 등의 어떤 작업이 진행되는데 시간이 걸릴 때 진행상황을 알려줄 수 있다.
setProgress()
빌더에 setProgress() 함수만 추가해주면 된다.
open fun setProgress(max: Int, progress: Int, indeterminate: Boolean): Notification.Builder- max : progress 바의 최댓값
- progress : progress 바의 진행값
- indeterminate : true이면 왼쪽에서 오른쪽으로 계속 흘러가듯이 표현됨
예시
아래는 10초동안 progress 바의 진행값을 증가시키는 예시이다.
builder.setProgress(100, 0, false)
manager.notify(11, builder.build())

thread {
	for (i in 1..100) {
		builder.setProgress (100, i, false)
        manager.notify(11, builder.build())
        SystemClock.sleep(100)
	}
}
참고 자료
- Do it 안드로이드 도서
