
시작하기 앞서
4장의 내용은 3장과 이어지는데
- profile페이지를 만들고 페이지 내에서 수정을 하게되면 back에 전송되어 수정된 profile이 새로고침 후에도 남아있도록 하는것,
- 그리고 회원탈퇴 버튼 클릭시 메일이 발송되게 하여 유저정보를 삭제요청 해보도록 하겠다 !
- 유저가 쓰는 글을 초 간단하게 django에서 먼저 세팅해보자. 그 뒤 front에서 요청을 Insomnia라는 툴을 이용해서 backend로 정보 전송 테스트를 한번해보자 REST API의 초 강점이 난 여기라고 생각한다.
frontend/src/components/Profile.js
import React, { useState, useEffect } from 'react';
import '../css/Profile.css'
function Profile(){
let [infoModal, setInfomodal] = useState(false)
let [nicknmaModal, setNickname] = useState(false)
let [socialModal, setSocialModal] = useState(false)
//profile
let [userId, setUserId] = useState()
let [userPhoto, setUserPhoto] = useState()
let [userEmail, setUserEmail] = useState("")
let [userMygit, setUserMygit] = useState("")
let [userNickname, setUserNickname] = useState("")
let [usermyInfo, setUserMyInfo] = useState("")
useEffect(()=>{
fetch('http://localhost:8000/user/current/', {
headers: {
Authorization: `JWT ${localStorage.getItem('token')}`
}
})
.then(res => res.json())
.then(json => {
// 현재 유저 정보 받아왔다면, 로그인 상태로 state 업데이트 하고
if (json.id) {
setUserId(json.id)
//유저정보를 받아왔으면 해당 user의 프로필을 받아온다.
}fetch('http://localhost:8000/user/auth/profile/' + json.id + '/update/',{
method : 'PATCH',
headers: {
Authorization: `JWT ${localStorage.getItem('token')}`
},
})
.then((res)=>res.json())
.then((userData)=> {
setUserPhoto(userData.photo)
setUserEmail(userData.email)
setUserMygit(userData.mygit)
setUserNickname(userData.nickname)
setUserMyInfo(userData.myInfo)
})
.catch(error => {
console.log(error);
});;
}).catch(error => {
console.log(error)
});
},[userId])
let sendData;
const handleEffect = (handleSubmit) => {
sendData = {
email : userEmail,
mygit : userMygit,
nickname : userNickname,
myInfo : usermyInfo
}
handleSubmit()
}
const handleSubmit = () => {
let form_data = new FormData();
form_data.append('email', sendData.email);
form_data.append('mygit', sendData.mygit);
form_data.append('nickname', sendData.nickname);
form_data.append('myInfo', sendData.myInfo);
fetch('http://localhost:8000/user/auth/profile/' + userId + '/update/', {
method : 'PATCH',
headers: {
Authorization : `JWT ${localStorage.getItem('token')}`,
},
body : form_data
})
.then(res => res.json())
.catch(error => console.error('Error:', error))
.then(response => console.log('Success:', JSON.stringify(response)));
};
const handleImageSubmit = () => {
let form_data = new FormData();
let fileField = document.querySelector('input[type="file"]');
form_data.append('photo', fileField.files[0])
fetch('http://localhost:8000/user/auth/profile/' + userId + '/update/', {
method : 'PATCH',
headers: {
Authorization : `JWT ${localStorage.getItem('token')}`,
},
body : form_data
})
.then(res => res.json())
.catch(error => console.error('Error:', error))
.then(response => console.log('Success:', JSON.stringify(response)));
};
return(
<>
<main className="profile-main">
<section className="section1">
<div className="thumbnail__">
<img src={userPhoto} alt=""></img>
<label htmlFor="file" className="img-up">
<input type="file" id="file" accept=".jpg, .png, .jpeg, .gif" onChange={(e)=>{
e.preventDefault();
let reader = new FileReader();
let file = e.target.files[0];
reader.onloadend = () => {
setUserPhoto(reader.result)
}
reader.readAsDataURL(file);
}}></input>
이미지 업로드</label>
<button className="img-de" onClick={()=>{
handleImageSubmit()
setInfomodal(false)
setNickname(false)
setSocialModal(false)
}}>저장</button>
</div>
<div className="profile-info">
{
infoModal === true
?(
<form>
<input placeholder={usermyInfo} onChange={(e)=>{
setUserMyInfo(e.target.value)
}}></input>
</form>
)
:(
<>
<h2>{usermyInfo}</h2>
<button className="fix-button" onClick={()=>{
setInfomodal(true)
}}>자기소개 수정</button>
</>
)
}
</div>
</section>
<section className="section2">
<div className="myProfile">
<div className="wrapper">
<div className="title-wrapper">
<h3>닉네임</h3>
</div>
<div className="block-for-mobile">
{
nicknmaModal === true
?null
:<div className="contents">{userNickname}</div>
}
{
nicknmaModal === true
?(
<form className="nickname-form">
<input className="nickname-input" placeholder={userNickname} onChange={(e)=>{
setUserNickname(e.target.value)
}}></input>
</form>
)
:(
<div className="edit-wrapper">
<button className="fix-button" onClick={()=>{setNickname(true)}}>수정</button>
</div>
)
}
</div>
</div>
</div>
<div className="myProfile">
<div className="wrapper">
<div className="title-wrapper">
<h3>소셜 정보</h3>
</div>
<div className="block-for-mobile">
<div className="contents">
{
socialModal === true
?(
<form>
<ul className="social-contents">
<li>
<svg width="32" height="32" fill="none" viewBox="0 0 32 32"><path fill="currentColor" d="M16 16.871L1.019 5H30.98L16 16.871zm0 3.146L1 8.131V27h30V8.131L16 20.017z"></path></svg>
<input className="social-input" placeholder={userEmail} onChange={(e)=>{
setUserEmail(e.target.value)
}}></input>
</li>
<li>
<svg width="20" height="20" fill="currentColor" viewBox="0 0 20 20"><mask id="github" width="20" height="20" x="0" y="0" maskUnits="userSpaceOnUse"><path fill="#ffffff" fillRule="evenodd" d="M6.69 15.944c0 .08-.093.145-.21.145-.133.012-.226-.053-.226-.145 0-.081.093-.146.21-.146.12-.012.226.053.226.146zm-1.255-.182c-.028.08.053.173.174.198.105.04.226 0 .25-.081.024-.08-.053-.173-.174-.21-.104-.028-.221.012-.25.093zm1.783-.068c-.117.028-.198.104-.186.197.012.08.117.133.238.105.117-.028.198-.105.186-.186-.012-.076-.121-.129-.238-.116zM9.87.242C4.278.242 0 4.488 0 10.08c0 4.471 2.815 8.298 6.835 9.645.516.093.697-.226.697-.488 0-.25-.012-1.63-.012-2.476 0 0-2.822.605-3.415-1.202 0 0-.46-1.173-1.121-1.475 0 0-.924-.633.064-.621 0 0 1.004.08 1.557 1.04.883 1.557 2.363 1.109 2.94.843.092-.645.354-1.093.645-1.36-2.255-.25-4.529-.576-4.529-4.455 0-1.109.307-1.665.952-2.375-.105-.262-.448-1.342.105-2.738C5.56 4.157 7.5 5.51 7.5 5.51a9.474 9.474 0 0 1 2.532-.344c.86 0 1.726.117 2.533.343 0 0 1.939-1.355 2.782-1.089.552 1.4.21 2.476.105 2.738.645.714 1.04 1.27 1.04 2.375 0 3.891-2.375 4.202-4.63 4.456.372.319.686.923.686 1.87 0 1.36-.012 3.041-.012 3.372 0 .262.186.58.698.488C17.266 18.379 20 14.552 20 10.08 20 4.488 15.464.24 9.871.24zM3.919 14.149c-.052.04-.04.133.029.21.064.064.157.093.21.04.052-.04.04-.133-.029-.21-.064-.064-.157-.092-.21-.04zm-.435-.326c-.028.052.012.117.093.157.064.04.145.028.173-.028.028-.053-.012-.117-.093-.158-.08-.024-.145-.012-.173.029zm1.306 1.435c-.064.053-.04.174.053.25.092.093.21.105.262.04.052-.052.028-.173-.053-.25-.088-.092-.21-.104-.262-.04zm-.46-.593c-.064.04-.064.146 0 .238.065.093.174.133.226.093.065-.053.065-.157 0-.25-.056-.093-.16-.133-.225-.08z" clipRule="evenodd"></path></mask><g mask="url(#github)"><path fill="currentColor" d="M0 0h20v20H0z"></path></g></svg>
<input className="social-input" placeholder={userMygit} onChange={(e)=>{
setUserMygit(e.target.value)
}}></input>
</li>
</ul>
</form>
)
:(
<ul className="social-contents">
<li>
<svg width="32" height="32" fill="none" viewBox="0 0 32 32"><path fill="currentColor" d="M16 16.871L1.019 5H30.98L16 16.871zm0 3.146L1 8.131V27h30V8.131L16 20.017z"></path></svg>
<span>{userEmail}</span>
</li>
<li>
<svg width="20" height="20" fill="currentColor" viewBox="0 0 20 20"><mask id="github" width="20" height="20" x="0" y="0" maskUnits="userSpaceOnUse"><path fill="#ffffff" fillRule="evenodd" d="M6.69 15.944c0 .08-.093.145-.21.145-.133.012-.226-.053-.226-.145 0-.081.093-.146.21-.146.12-.012.226.053.226.146zm-1.255-.182c-.028.08.053.173.174.198.105.04.226 0 .25-.081.024-.08-.053-.173-.174-.21-.104-.028-.221.012-.25.093zm1.783-.068c-.117.028-.198.104-.186.197.012.08.117.133.238.105.117-.028.198-.105.186-.186-.012-.076-.121-.129-.238-.116zM9.87.242C4.278.242 0 4.488 0 10.08c0 4.471 2.815 8.298 6.835 9.645.516.093.697-.226.697-.488 0-.25-.012-1.63-.012-2.476 0 0-2.822.605-3.415-1.202 0 0-.46-1.173-1.121-1.475 0 0-.924-.633.064-.621 0 0 1.004.08 1.557 1.04.883 1.557 2.363 1.109 2.94.843.092-.645.354-1.093.645-1.36-2.255-.25-4.529-.576-4.529-4.455 0-1.109.307-1.665.952-2.375-.105-.262-.448-1.342.105-2.738C5.56 4.157 7.5 5.51 7.5 5.51a9.474 9.474 0 0 1 2.532-.344c.86 0 1.726.117 2.533.343 0 0 1.939-1.355 2.782-1.089.552 1.4.21 2.476.105 2.738.645.714 1.04 1.27 1.04 2.375 0 3.891-2.375 4.202-4.63 4.456.372.319.686.923.686 1.87 0 1.36-.012 3.041-.012 3.372 0 .262.186.58.698.488C17.266 18.379 20 14.552 20 10.08 20 4.488 15.464.24 9.871.24zM3.919 14.149c-.052.04-.04.133.029.21.064.064.157.093.21.04.052-.04.04-.133-.029-.21-.064-.064-.157-.092-.21-.04zm-.435-.326c-.028.052.012.117.093.157.064.04.145.028.173-.028.028-.053-.012-.117-.093-.158-.08-.024-.145-.012-.173.029zm1.306 1.435c-.064.053-.04.174.053.25.092.093.21.105.262.04.052-.052.028-.173-.053-.25-.088-.092-.21-.104-.262-.04zm-.46-.593c-.064.04-.064.146 0 .238.065.093.174.133.226.093.065-.053.065-.157 0-.25-.056-.093-.16-.133-.225-.08z" clipRule="evenodd"></path></mask><g mask="url(#github)"><path fill="currentColor" d="M0 0h20v20H0z"></path></g></svg>
<span>{userMygit}</span>
</li>
</ul>
)
}
</div>
{
socialModal === true
? null
:(
<div className="edit-wrapper">
<button className="fix-button" onClick={()=>{setSocialModal(true)}}>수정</button>
</div>
)
}
</div>
</div>
</div>
<div className="myProfile">
<div className="wrapper">
<div className="title-wrapper">
</div>
<div className="block-for-mobile">
<div className="contents">
<button className="out-button" onClick={()=>{
fetch('http://localhost:8000/user/current/', {
headers: {
Authorization: `JWT ${localStorage.getItem('token')}`
}
})
.then(res => res.json())
.then(json => {
fetch('http://localhost:8000/user/send/',{
method : 'POST',
headers: {
Authorization: `JWT ${localStorage.getItem('token')}`,
'Content-Type': 'application/json'
},
body : JSON.stringify({email : userEmail})
})
.then((res)=>res.json())
.catch(error => {
console.log(error);
});;
}).catch(error => {
console.log(error)
});
}}>회원탈퇴</button>
<button className="save-button" onClick={()=>{
handleEffect(handleSubmit)
setInfomodal(false)
setNickname(false)
setSocialModal(false)
}}>저장</button>
</div>
</div>
</div>
</div>
</section>
</main>
</>
)
}
export default Profile;return()되는 결과값인 thumbnail에 해당하는 div부터 살펴보자
<div className="thumbnail__">
   <img src={userPhoto} alt=""></img>
   <label htmlFor="file" className="img-up">
      <input type="file" id="file" accept=".jpg, .png, .jpeg, .gif" onChange={(e)=>{
            e.preventDefault();
            let reader = new FileReader();
            let file = e.target.files[0];
            reader.onloadend = () => {
            setUserPhoto(reader.result)
            }
            reader.readAsDataURL(file);
            }}>
      </input>이미지 업로드
   </label>
   <button className="img-de" onClick={()=>{
           handleImageSubmit()
           setInfomodal(false)
           setNickname(false)
           setSocialModal(false)
   }}>저장</button>
</div>
file을 업로드하는 input태그 onChage이벤트속에 왜이렇게 함수가 많을까 ?
이미지 미리보기를 하기 위해서이다. 이미지 미리보기는 소스는 이곳을 참조했다 !
그리고 그 밑으로는 대부분 삼항연산자와 각각의 설정해준 state값을 이용해서 수정버튼 클릭시
state값이 변경되며 수정할 수 있는 input태그가 등장해 Profile의 변경 할 수 있게 한다.
예시 이미지 3장을 보자.
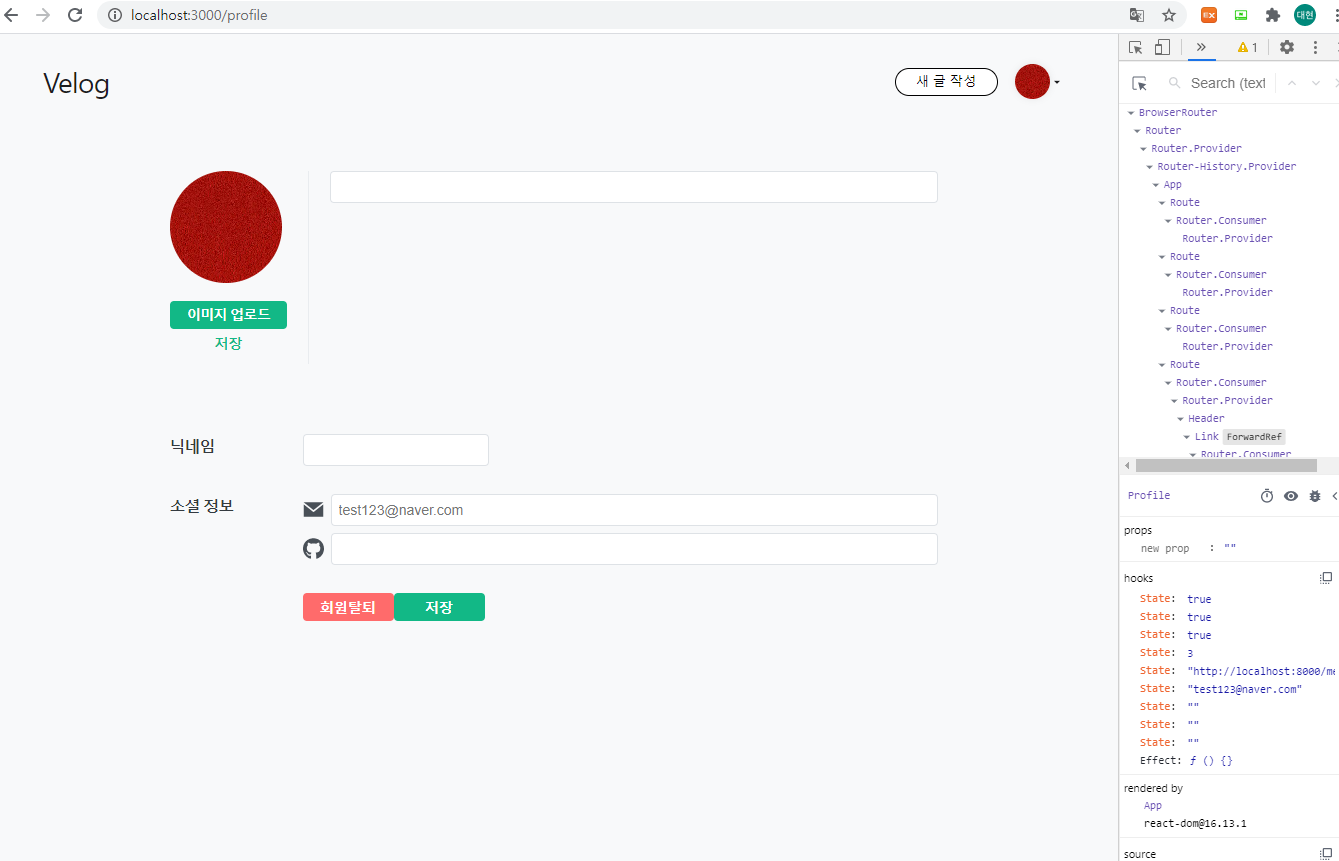
각각의 수정버튼을 눌러줬을 때 input으로 변환되는 모습.
자기소개, 닉네임 , 소셜정보를 따로 수정도 가능하고 한번에 저장버튼을 눌러서 일괄 수정도 가능하다.
하지만 image는 따로 저장버튼을 만들어서 독립적으로 저장할 수 있게 했다.
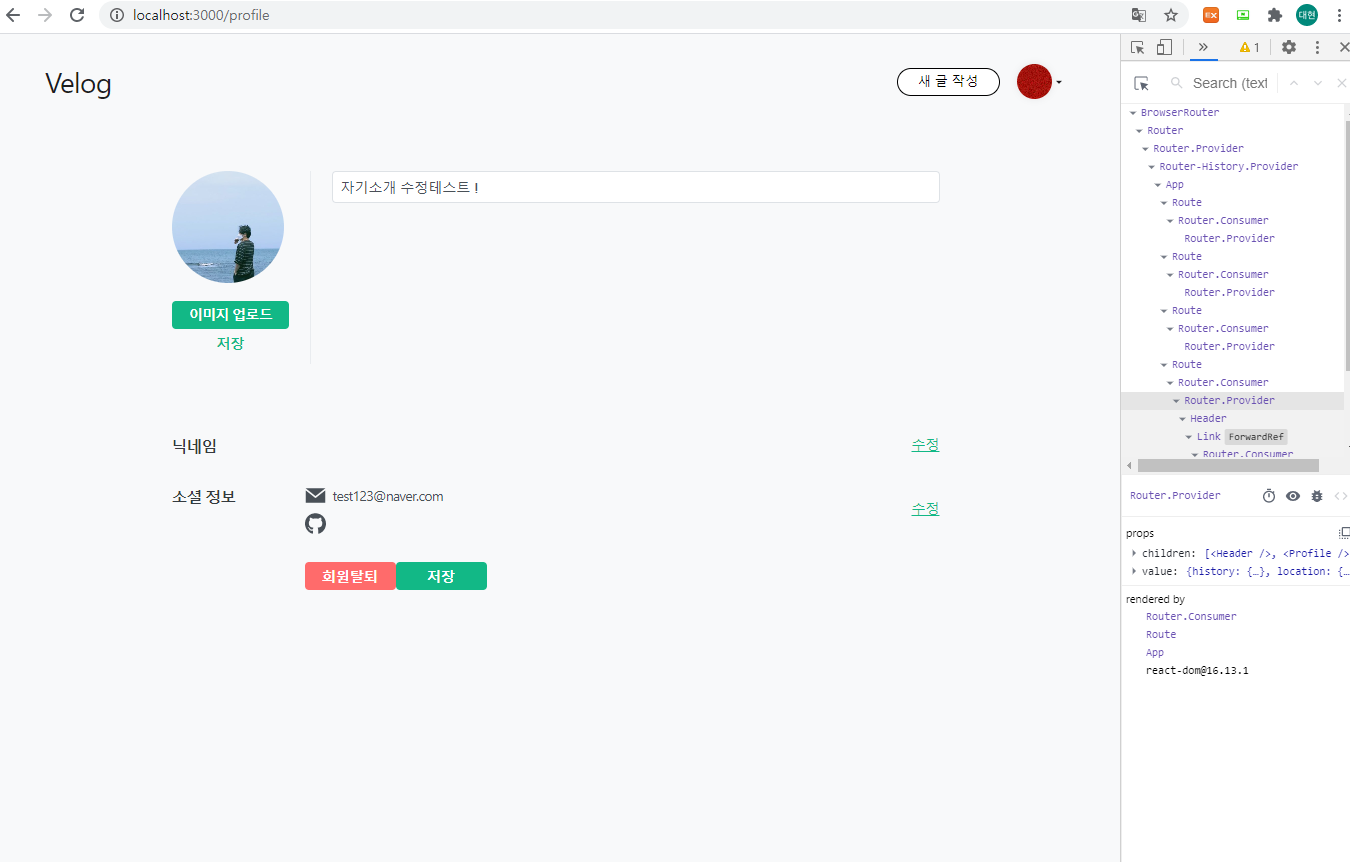
이미지 업로드버튼을 눌러 파일을 선택해서 미리보기 기능이 정상적으로 실행되는것을 알 수 있고, 자기소개 또한 별개로 수정해서 각각의 저장버튼을 눌러본 결과값은 아래와 같다.
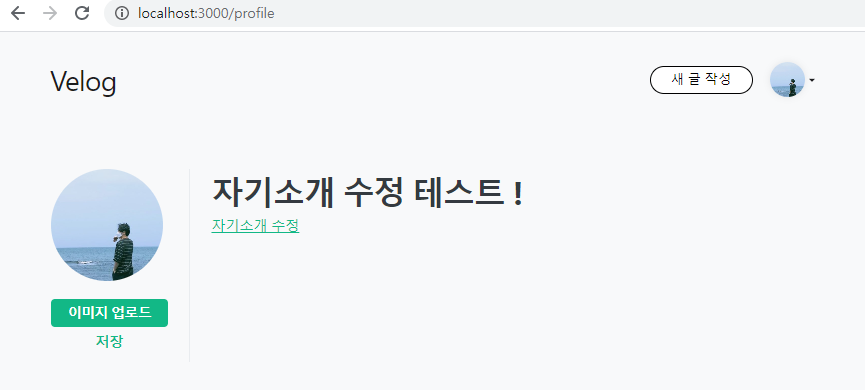
Profile의 이미지뿐만 아니라 header의 이미지또한 바뀐것을 알 수 있고, 자기소개 또한 성공적으로 바뀐모습이다. 그럼 back에도 잘 들어갔는지 확인만 잠깐 해보자 !
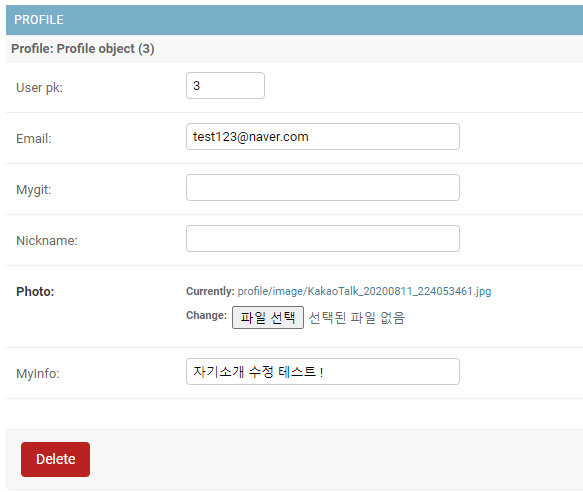
이렇게 admin에 들어가서 확인하는 방법도 있고

이런식으로 useEffect hook안에서 fetch함수로 userProfile을 response값으로 받아오는 과정에서 userData를 console창에 출력해본 모습이다.
그리고 admin에 delete, 나는 회원탈퇴를 저 버튼을 직접 눌러서 진행하도록 하겠다 !
그럴려면 이메일을 보내는 front와 back 설정을 살펴보겠다.
<button className="out-button" onClick={()=>{
        fetch('http://localhost:8000/user/current/', {
            headers: {
              Authorization: `JWT ${localStorage.getItem('token')}`
            }
          })
          .then(res => res.json())
          .then(json => {
            fetch('http://localhost:8000/user/send/',{
                  method : 'POST',
                  headers: {
                      Authorization: `JWT ${localStorage.getItem('token')}`,
                      'Content-Type': 'application/json'
                  },
                  body : JSON.stringify({email : userEmail})
              })
              .then((res)=>res.json())
              .catch(error => {
                  console.log(error);
                });;
          }).catch(error => {
              console.log(error)
            });
}}>회원탈퇴</button>
위는 회원탈퇴 버튼인데 보는것과같이 설명할 게 별로없다 !
backend/api/settings.py
...
#추가
EMAIL_BACKEND = 'django.core.mail.backends.smtp.EmailBackend'
EMAIL_USE_TLS = True
EMAIL_HOST = 'smtp.gmail.com'
EMAIL_PORT = 587
EMAIL_HOST_USER = '' # ex) bum752@gmail.com
EMAIL_HOST_PASSWORD = '' # ex) P@ssw0rd
SERVER_EMAIL = '' # ex) bum752@gmail.com
DEFAULT_FROM_MAIL = '' # ex) bum752
backend/user/views.py
...
#추가된 내용
from django.core.mail import EmailMessage
class MailView(APIView):
def post(self, request, format=None):
email = request.data['email']
if email is not None:
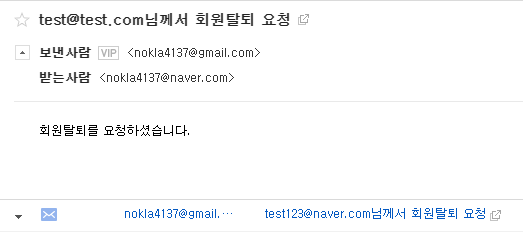
subject = email + '님께서 회원탈퇴 요청'
message = '회원탈퇴를 요청하셨습니다.'
mail = EmailMessage(subject, message, to=['nokla4137@naver.com'])
mail.send()
return Response(status=status.HTTP_200_OK)
else:
return Response(status=status.HTTP_400_BAD_REQUEST)backend/user/urls.py
from django.urls import path
from .views import current_user, UserList, ProfileUpdateAPI, MailView

urlpatterns = [
    path('', UserList.as_view()),
    path('current/', current_user),
    path("auth/profile/<int:user_pk>/update/", ProfileUpdateAPI.as_view()),
    path('send/', MailView.as_view()),
]
이메일을 보내는 django의 세팅은 이곳을 참조했다. 실제 Profile.js의 회원탈퇴버튼을 누를 시 메일이 발송되는지 확인해보자.

뒤늦게 회원탈퇴의 기능을 집어넣어서 상당히 엉성하지만 최초 회원가입시 username이 아닌 email회원가입을 한다면 기본키가 이메일이 되서 자연스럽겠고
회원탈퇴 버튼을 클릭할 시 지금은 아무 경고창도 없이 바로 날라가겠지만
"정말 탈퇴하시겠습니까 ? 확인을 누르시면 24시간 후에 회원탈퇴가 완료됩니다." 라는경고창이라던지 이메일이 발송되고나면 회원탈퇴의 버튼이아니라 24시간동안 탈퇴취소를 할 수 있는(다시 이메일을 보낼 수 있는)버튼 등 간단한 기능들을 추가해주면 자연스러운 코드가 될 듯하다.
(리팩토링 과정 중 수정하겠음.)
이제 Profile.js의 렌더링영역을 보자.
주목할 점은 3가지다.
let sendData;
const handleEffect = (handleSubmit) => {
    sendData = {
        email : userEmail,
        mygit : userMygit,
        nickname : userNickname,
        myInfo : usermyInfo
    }
    handleSubmit()
}
const handleSubmit
const handleImageSubmit
이중 handleEffect라는 함수는 내가 공부가 필요하다고 생각들게 된 가장 큰 원인이었다.
제일 마지막에 살펴보자 !!
    const handleSubmit = () => {
        let form_data = new FormData();
        form_data.append('email', sendData.email);
        form_data.append('mygit', sendData.mygit);
        form_data.append('nickname', sendData.nickname);
        form_data.append('myInfo', sendData.myInfo);
        fetch('http://localhost:8000/user/auth/profile/' + userId + '/update/', {
            method : 'PATCH',
            headers: {
                Authorization : `JWT ${localStorage.getItem('token')}`,
            },
            body : form_data
        })
        .then(res => res.json())
        .catch(error => console.error('Error:', error))
        .then(response => console.log('Success:', JSON.stringify(response)));
    };


    const handleImageSubmit = () => {
        let form_data = new FormData();
        let fileField = document.querySelector('input[type="file"]');
        form_data.append('photo', fileField.files[0])

        fetch('http://localhost:8000/user/auth/profile/' + userId + '/update/', {
            method : 'PATCH',
            headers: {
                Authorization : `JWT ${localStorage.getItem('token')}`,
            },
            body : form_data
        })
        .then(res => res.json())
        .catch(error => console.error('Error:', error))
        .then(response => console.log('Success:', JSON.stringify(response)));
    };
다른 두개의 함수는 거의 흡사한 모습을 가지고있다.
하나는 image submit이고 하나는 그 외의 charfield에 해당하는 submit으로 분리를 시켰다.
합쳐서 충분히 사용도 가능하겠지만, 처음에 두개를 합쳐서 쓰니까 profile수정 중 이미지를 선택을 안해주면 filefield.files[0]에 null값이 들어가니까 자꾸 오류가나서 홧김에 분리를 시켰다.
지금 생각해보니 조건문을 하나 달아주어 filefield.files[0] !== undefine(또는 null)값이라면 append를 시키는 조건으로 진행하면 될 것같은데 리팩토링 할 때 이미지 제거도 추가하면서 같이 수정해보겠다.
이미지 업로드의 참조는 이곳에서 많은 도움을 얻었다 !
Profile.js의 마지막으로 내가 아직 공부가 더 필요하구나를 체감하게 만든 코드는 이녀석이다.
    let sendData;
    const handleEffect = (handleSubmit) => {
        sendData = {
            email : userEmail,
            mygit : userMygit,
            nickname : userNickname,
            myInfo : usermyInfo
        }
        handleSubmit()
    }
sendData라는 녀석은 profile의 정보를 back에 보내기 위해 만든 객체인데 이와같이 작성을 하지않고 함수 밖, 즉 렌더링 영역에
import ...

	...
        let sendData = {
            email : userEmail,
            mygit : userMygit,
            nickname : userNickname,
            myInfo : usermyInfo
        }
        return(
        ...
        )
이와같이 작성시 sendData객체에는 userProfile에서 넘겨받은 각각의 정보를 받아올 수 없어 기본 초기state값 또는 null값을 가지게된다.
왜일까 ?
우리가 useEffect라는 비동기적 hook을 사용하는데 이는 렌더링이 끝난 직후 실행된다. 내가 Profile.js에서 useEffect에 담은 내용은 딱 하나다.
    useEffect(()=>{
        fetch('http://localhost:8000/user/current/', {
          headers: {
            Authorization: `JWT ${localStorage.getItem('token')}`
          }
        })
        .then(res => res.json())
        .then(json => {
          // 현재 유저 정보 받아왔다면, 로그인 상태로 state 업데이트 하고
          if (json.id) {
            setUserId(json.id)
            //유저정보를 받아왔으면 해당 user의 프로필을 받아온다.
        }fetch('http://localhost:8000/user/auth/profile/' + json.id + '/update/',{
                method : 'PATCH',
                headers: {
                    Authorization: `JWT ${localStorage.getItem('token')}`
                },
            })
            .then((res)=>res.json())
            .then((userData)=> {
                setUserPhoto(userData.photo)
                setUserEmail(userData.email)
                setUserMygit(userData.mygit)
                setUserNickname(userData.nickname)
                setUserMyInfo(userData.myInfo)
                console.log(userData)
            })
            .catch(error => {
                console.log(error);
              });;
        }).catch(error => {
            console.log(error)
          });
    },[userId])
바로 Profile의 정보를 back에 요청하여 응답받은 값을 res.json()을 통해 userData로 정의, 그리고 userData라는 객체에 담긴 각각의 정보를 setState하여 변경해주는 역할이 바로 Profile.js에서 useEffect의 역할이었다.
그 다음은 ? Profile중에서 변경하고 싶은 항목이 있다고 치자. nickname을 예로 들겠다.
우선 사용자입장에서 Profile.js가 로딩이 되어 UI가 표시된다면 렌더링과 useEffec가 완료됬을 것이고 각각의 state값에는 해당 user의 profile이 모두 담겼다.
그렇게 담은 state값을 수정버튼을 클릭하고 input을 통해 onChange로 setState해준다.
그렇다면 userNickname에는 수정된 값이 담겼을것이다.
여기서부터 정말 중요한데 !
자 그럼 sendData라는 객체에 수정된 값과 수정되지 않은값들을 모두 담아서 back에 POST를 요청해야할텐데 sendData에도 수정된 state값이 담겼을까 ?
위와같이 렌더링영역에 sendData를 선언하고 그 값을 담았을땐 이미 그 당시의 state값들이 모두 담기게되고, onClick시 실행되는 handlesubmit같은 함수에서 다시 state값을 담아주지 않는이상 sendData에는 수정된 state값을 담을 수 없게 되는것이다.
이에 나는 비동기처리의 제어를 위해서 setTimeout, Promise객체, then, callback, async, await 등등, 그 중 최신문법의 async와 await를 이용해서 처리를 해보려고했지만 생각만큼 이해와 활용에 대해서 만족스럽지 못했고, 원래 난잡한 나의 상태관리 코드를 보며 redux store의 이해도를 높여 이용, 상태관리하는 연습이 필요하다고 생각이 들었는데, 거기다가 비동기적 제어
또한 내 맘대로 핸들링이 되지않아 개념공부 필요성을 절실히 느끼고 velog에 지금껏 공부한것들을 정리하고 수련에 들어가려고한다 !
Insomnia 초간단 테스트
어쨌든 포스팅은 이어나가보도록하자. 음 얼추 Profile.js는 마무리가 된거같으니 마지막으로 초간단하게 post라는 app을 하나 만들어서 테스트용으로 해보려고한다. 설치하고 테스트가 끝나면 지울 예정이니 그냥 backend에 만들지만 간단한 테스트라 그냥하는걸 보기만 해도 된다.
python manage.py startapp post
기존가상환경에 post라는 app을 하나 만들었다. 그리고 setting에 추가해준뒤 모델을 만들겠다.
backend/api/settings.py
INSTALLED_APPS = [
     ...
    'post', # 추가
]
backend/post/models.py
from django.db import models

# Create your models here.

class Post(models.Model):
    title = models.CharField(max_length=100)
    content = models.TextField()

    def __str__(self):
        return self.title
python manage.py makemigrations
python manage.py migrate
backend/post/admin.py
from django.contrib import admin
from .models import Post

# Register your models here.

admin.site.register(Post)
backend/post/serializers.py
from rest_framework import serializers
from .models import Post

class PostSerializer(serializers.ModelSerializer):
    class Meta:
        model = Post
        fields = '__all__'
backend/post/views.py
from django.shortcuts import render
from rest_framework import generics

from .models import Post
from .serializers import PostSerializer

class PostView(generics.ListCreateAPIView):
    queryset = Post.objects.all()
    serializer_class = PostSerializer

    authentication_classes = []   #이거 두줄은 권한이 없는 상태에서 데이테 요청을 가능하게
    permission_classes = []       #만듬 settings.py에서도 아마 가능할 것 같음.
backend/post/urls.py
from django.urls import path
from . import views

urlpatterns = [
    path('', views.PostView.as_view(), name= 'posts_list'),
]
backend/api/urls.py
urlpatterns = [
	...
	path('post/', include('post.urls')),
]
여기까지 마치고 runserver를 한 뒤 Insomnia를 설치하고 켜보자.
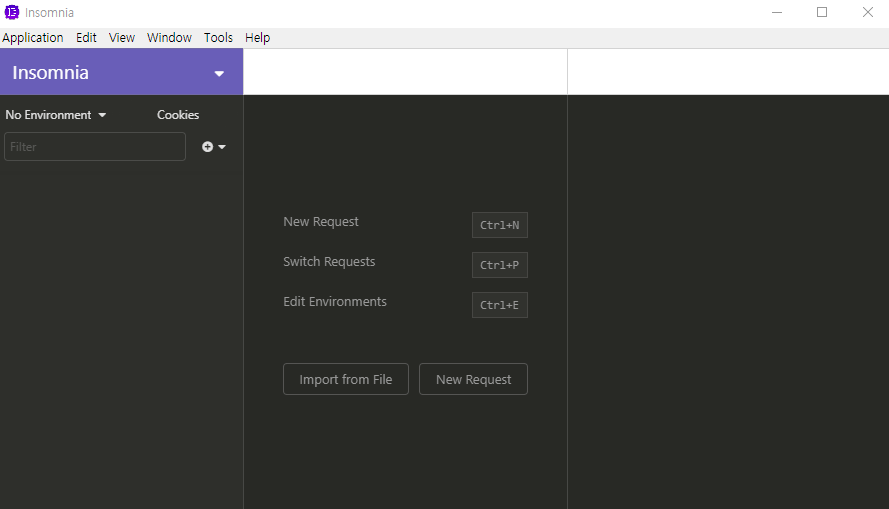
기본화면인데 폴더를 먼저 만들고 Request를 생성해도 좋고 그냥 Request를 생성해도 좋다.
나는 그냥 테스트이기때문에 get_post라는 형식의 method는 get을 선택했다.
만들어진 결과물은 아래와 같다.
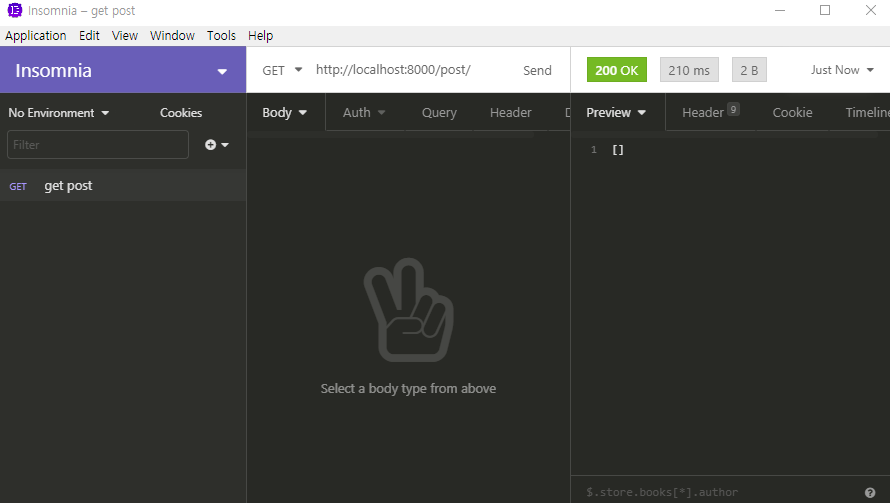
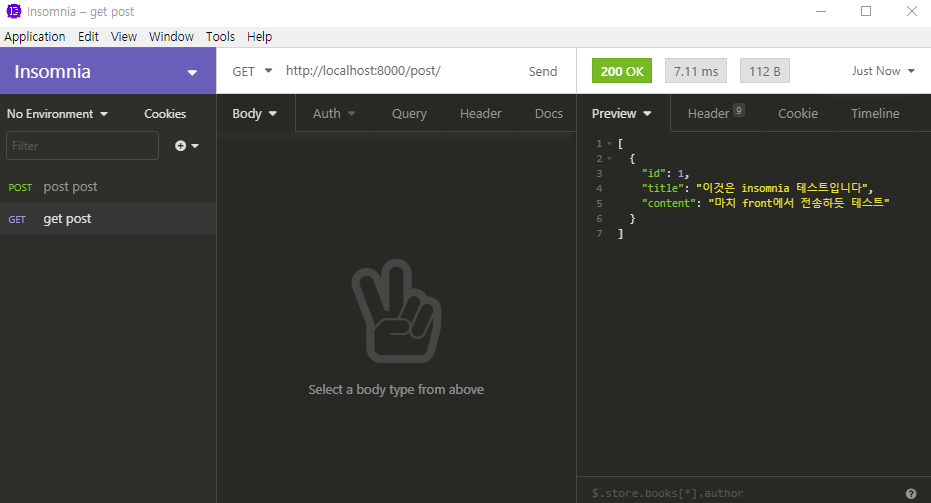
우린 이제 우리가 urls.py에서 지정한 url을 해당 GET옆에 적어주고 send버튼을 눌러보면 위의 이미지 같은 결과를 얻을 수 있다.
200메세지는 가져오는데 성공했다는 메세지인데 빈배열이 담겨있는 Preview를 볼 수 있다!
당연히 우리가 post를 세팅하고 만든뒤에 넣어준 값이 없기때문에 빈배열이 있는것을 확인 할 수 있다. 그럼 POST방식으로 Request를 하나 더 만들어보자
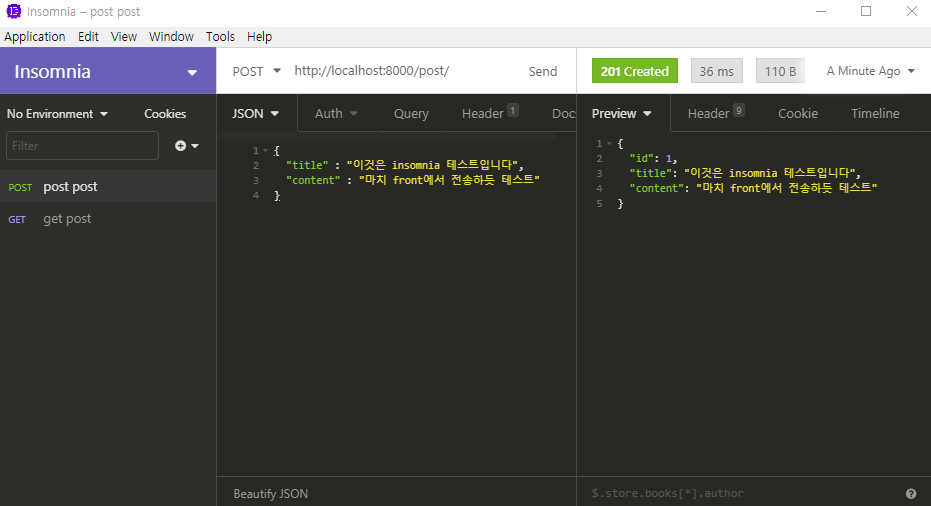
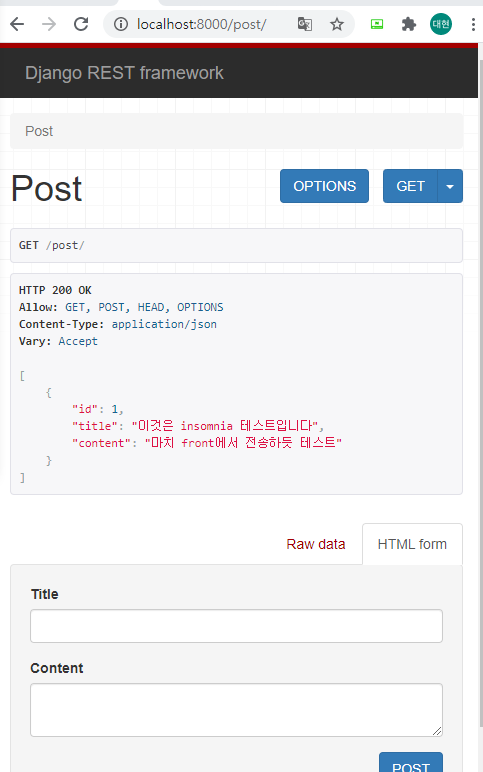
post post라는 이름의 그리고 전송할 언어는 JSON형태로 선택해주자. 이제 우린 POST Request를 만들었고 url은 아까와 같은 주소 설정해준뒤 위와같은 객체를 보내주게되면 위의 이미지같은 결과값을 얻어낸다는 Preview를 확인할 수 있다. 진짜 성공했는지 다시 get post를 send해보자
get post로 돌아와서 send를 클릭했을 때 우리가 POST한 결과물을 get할 수 있는것을 확인할 수 있다. 마지막으로 실제 DB에도 들어갔는지 주소로 들어가서 확인해보자.
이렇게 Insomnia의 간단한 사용법을 알아봤고, 지금부터 REST API의 상당한 장점을 살펴보겠다 !
사람마다 다르게느껴질 수 있겠지만 여기서 느낄 수 있는 장점은 "title"이라는 "content"라는 약속된 이름으로 객체를 주고받는다고 약속했다면 그 외는 front와 back의 완벽한 분리된 협업이 가능해진다는 상당한 장점을 얻을 수 있다!
협업에는 최소한 2명의 front와 back을 담당하는 사람이 있을텐데 완벽하지는 않아도 서로 만들고자하는 프로토타입, 또는 시안따위가 분명 존재할 것이다.
그럼 프로젝트를 진행하기 전에 시안에 맞춰 주고받을 객체들을 서로 약속하는것이다. 예를들면
user는 email과 password를 통해 로그인하고 회원가입시에는 이름, 성별, 연령대를 추가로 입력해야한다고 치자.
로그인한 user는 게시판을 통해 게시글을 작성할 수 있고 게시판에는 th로는 게시글번호, 제목, 작성자, 작성일이 나타난다.
게시글을 클릭해서 들어갔을 때는 제목과 컨텐츠, 작성자, 작성일, 이미지, 조회수, 좋아요수, 코멘트가 필요하다고 약속이 됬다면 서로는 서로의 작업에만 충실하고 마무리시 주고받는 객체의 이름만 서로 고치면서 맞춰준다면 완벽한 분업이 가능하다는 상당한 장점을 가지고있다.
나는 바로 이점에 주목했고 이번프로젝트를 통해서 상당히 많은 공부를 할 수 있었다 !
4장 마치며
5장에서는 글쓰기 버튼을 통해 글작성, 작성됨과 동시에 home화면에 작성된 글이
실제 velog의 모습처럼 미리보기 article에 담겨서 사용자 정보와 작성일 좋아요 등 을 구현해보도록 하겠다.

drf+react 로그인 기능 구현 따라하고 있습니다!
정말 좋은 포스트 감사합니다.
혹시 components의 구성에서 다음과 같이 상속해야 하는 .css들을 좀 알 수 있을까요?
import '../css/Profile.css' <-
그리고 구글이메일적용할때 보안 문제는 어떻게 해결하셨는지 궁금합니다.