리액트 컴포넌트의 순수성
- 리액트에서는 컴포넌트가 순수해야한다고 말하고 있습니다.
- 컴포넌트는 함수니까 순수 함수를 말하는거겠죠?
- 자신의 일에만 신경써야하고, 동일 입력에 대해 동일 출력을 해야합니다.
function Cup(){
	guest = guest + 1; // 요녀석!
  	return <h2>Tea cup for guest #{guest}</h2>
}- 해당 컴포넌트는 호출할 때마다 다른 결과값을 출력하므로 순수하지 않습니다.
Side Effect
- Computer science에서 함수가 결과값 이외에 다른 상태를 변경시킬 때 Side Effect가 있다고 말합니다.
- 하지만 데이터를 패칭, 애니메이션 등 사이드 이팩트를 아예 없앨 수는 없습니다.
React Effect와 사용 방법
- 리액트에서는 이벤트 핸들러에서 대부분의 사이드 이펙트를 처리합니다.
- 하지만 이벤트 핸들러로 해결할 수 없는 것들은 리액트에서 Effect로 처리합니다.
- Effect란 렌더링 자체로 발생하는 Side Effect를 말합니다.
- useEffect가 useSideEffect인 이유는 렌더링으로 인해 발생한 Side Effect만을 다루기 때문입니다!
- useEffect 선언과 의존성 주입
function MyComponent({ a }){
	useEffect(() => {
    	// 여기의 코드는 첫 렌더링 후에만 실행됩니다.
    },[])

  	useEffect(() => {
    	// 여기의 코드는 첫 렌더링과 a의 값이 변화할 때 실행됩니다.
    },[a])

  	return <div />;
}- Clean up 함수
function MyComponent({ a }){
	useEffect(() => {
    	const connection = createConnection();
      	connection.connect();

      	return () => {
        	connection.disconnect();
        }
    },[])

  	return <div />;
}- Clean up 함수의 사용
- 서버와의 지속 연결을 끊을 때
- Fetch를 하고 이를 삭제하거나 무시할 때
- setTimeout과 같은 timer 관련 기능을 쓸 때
- 쓰로틀링이나 디바운싱을 할 때
- 애니메이션을 적용할 때
Data fetch와 Effect
- 페이지 로드 하자마자 데이터를 보여줘야 해! useEffect를 써서 페이지 렌더링이 끝나자 마자 데이터를 불러오자!
- 하지만 React에서는 다음과 같은 이유로 Effect 사용을 자제하라고 합니다.
- Effect는 서버에서 실행되지 않습니다.
- Effect에서 직접 fetch하면 "네트워크 워터폴"이 만들어지기 쉽습니다.
- Effect에서 직접 fetch하는 것은 일반적으로 데이터를 미리 로드하거나 캐시하지 않는다는 것입니다.
- 그럼 어떻게 하니?
- 클라이언트측 캐시를 사용하거나 직접 구현하기
- 프레임워크를 사용한다면 빌트인 fetch 메커니즘을 사용하기
- React Query, useSWR, React Router 6.4+ 등의 오픈 소스 활용하기
Effect 올바르게 사용하기
- 특정 이벤트 or 렌더링 이후
- 렌더링을 위해 데이터를 변환하는가?
- 렌더링 중에 해결할 수 있는가?
function Form(){
	const [firstName, setFirstName] = useState('Taylor');
  	const [lastName, setLastName] = useState("Swift");
  	const [fullName, setFullName] = useState("");

  	useEffect(() => {
    	setFullName(firstName + ' ' + lastName)
    },[firstName, lastName])
}- 이런식의 필요가 없는 useEffect를 피하자
Prop에 의한 Effect
- Prop이 변경될 때 모든 state가 초기값으로 재설정 되어야 한다.
export default function ProfilePage({ userId }){
	const [comment, setComment] = useState("");

  	useEffect(() => {
    	setComment('')
    },[userId])
}- 이런 경우에는 아래처럼 Profile 컴포넌트를 따로 만들어서 key값 부여
export default function ProfilePage({ userId }){
	return (
    	<Profile
          userId={userId}
          key={userId} // 이렇게 key값을 줍니다.
          />
    )
}

function Profile({ userId }){
  	// key가 변하면 이 컴포넌트 및 모든 자식 컴포넌트의 state가 자동적으로 재설정됨
	const [comment, setComment] = useState("");
  ...
}- 이 부분은 정말 꿀팁이네요.
- Props 변경이 되었는 데 일부 state만 바뀌고 싶은 경우에는요?
function List({ items }){
	const [isReverse, setIsReverse] = useState(false);
  	const [selection, setSelection] = useState(null);

  	useEffect(() => {
    	setSelection(null);
    }, [items])
}- 전 상태를 만들어서 useEffect를 제거할 수 있어요.
function List({ items }){
	const [isReverse, setIsReverse] = useState(false);
  	const [selection, setSelection] = useState(null);
  	const [prevItems, setPrevItems] = useState(items);

  	if(items !== prevItems){
      	setPrevItems(items);
    	setSelection(null);
    }
}- 하지만 이 코드를 봤을 때 어떤 느낌이 드나요? 저는 코드의 의미가 한 번에 보이지는 않는 거 같아요.
function List({ items }){
	const [isReverse, setIsReverse] = useState(false);
  	const [selection, setSelection] = useState(null);

  	const selection = items.find((item) => item.id === selectedId) ?? null
}- 대부분의 List 형 데이터에서는 id값이 있기 때문에 이런식으로 코드를 작성해도 될 거 같아요.
반응형과 비반응형
const serverUrl = "https://localhost:1234"; // 비반응형 값

function ChatRoom({ roomId }){
  	// props는 바뀔 수 있으니 반응형 값
	const [message, setMessage] = useState(""); // 반응형 값
}- 반응형 값은 렌더링 시 데이터 흐름에 참여합니다.
- 반응형 값을 다룰 때 이벤트 핸들러와 Effect를 사용할 수 있습니다.
- 그렇다면 이벤트 핸들러와 Effect를 사용할 때는 어떻게 구분하죠?
- sendMesaage(message); 해당 함수에서 message 값이 변경되면 sendMesaage 함수가 반드시 호출되어야 할까요?
- 아닙니다! message는 사용자가 원할 때 전송이 되어야 해요!
- 이런 코드를 비반응형 로직이라 부르며 대체적으로 이벤트 핸들러를 통해 처리해요.
function Example({ message1 = ''}){
	const [message2, setMessage2] = useState('');
  	const click = () => sendUserMessage('message1 or message2')

    return (
    	<>
        	<button onClick={click}>메세지 보내기</button>
        </>
    )
}- 아래와 같은 코드는 roomId가 변경되면 자동으로 연결을 해주면 좋겠죠? 이런 경우를 반응형 로직이라고 합니다.
const connection = createConnection(serverUrl, roomId);
connection.connect();- 반응형 로직을 주로 useEffect()안에서 처리해줍니다!
function MyComponent({ roomId }){
	useEffect(() => {
    	const connection = createConnection(roomId);
      	connection.connect();

      	return () => {
        	connection.disconnect();
        }
    },[roomId])

  	return <div />;
}
Effect 의존성 다루기
반응형 값을 비반응형 값으로!
function MyComponent({ serverUrl, roomId }){
	useEffect(() => {
    	const connection = createConnection(serverUrl, roomId);
      	connection.connect();

      	return () => {
        	connection.disconnect();
        }
    },[serverUrl, roomId])

  	return <div />;
}- serverUrl은 주로 env파일로 명시하기 때문에 비반응형 값입니다!
const serverUrl = 'https://api.example.com'
function MyComponent({ roomId }){
	useEffect(() => {
    	const connection = createConnection(serverUrl, roomId);
      	connection.connect();

      	return () => {
        	connection.disconnect();
        }
    },[roomId]) // 이제 serverUrl은 비반응형 값이기 때문에 의존성에 추가하지 않아도 됩니다.

  	return <div />;
}
반응형 값을 비반응형 값으로 변경하지 못할 때
function ChatRoom({ roomId, theme }){
	useEffect(() => {
    	const connection = createConnection(serverUrl, roomId);
      	connection.on('connected', () => {
        	showNotification('Connected', theme);
        })
      	connection.connect();

      	return () => {
        	connection.disconnect();
        }
    },[roomId, theme]) // 이 경우 theme가 의존성에 추가됩니다.

  	return <div />;
}- theme가 의존성 있기 때문에 theme가 바뀔 때 마다 알람이 띄게됩니다.
- 이러한 동작은 저희가 원치 않는 동작인데요 어떻게 해결할 수 있을까요?
- Effect Event? (사용은 가능하나 아직 정식 릴리즈 되지는 않았습니다.)
function ChatRoom({ roomId, theme }){
  	const onConnected = useEffectEvent(() => {
    	// 이렇게 반응형 로직을 비반응형 로직으로 동작할 수 있습니다.
      	showNotification('Connected', theme);
    })
	useEffect(() => {
    	const connection = createConnection(serverUrl, roomId);
      	connection.on('connected', () => {
        	onConnected();
        })
      	connection.connect();

      	return () => {
        	connection.disconnect();
        }
    },[roomId]) // 따라서 이제 의존성에 theme는 들어가지 않습니다.

  	return <div />;
}- Effect Event를 사용할 때 주의해야할 점
- Effect 내부에서만 호출할 수 있다.
- 다른 컴포넌트나 hook에 전달하면 안된다.
조건에 따라 달리하기
function Example(){
	const [isHovered, setIsHovered] = useState(false);
  	const { isMobile } = useMediaQuery();

  	useEffect(() => {
        	// 최초 렌더링 시와 isHover가 변화할 때 들어갈 로직을 넣습니다.
    }, isMobile ? [] : [isHovered]) // 삼항 연산자를 활용해 의존성을 미디어 환경에 따라 변경합니다.
}
화면에 그리기 전에 Effect 실행시키기
-
useEffect는 컴포넌트에서 state가 바뀌면 컴포넌트를 렌더링하고 화면을 그리고 useEffect가 실행됩니다.

-
useLayoutEffect
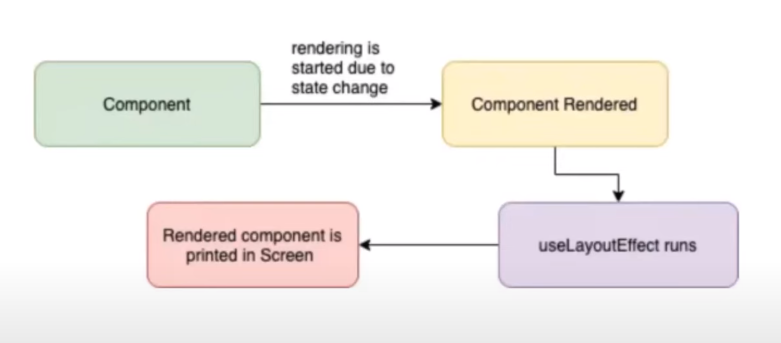
-
렌더링 -> 화면그리기 -> useEffect로 인해 렌더링 -> 화면 그리기
function Tooltip() {
	const ref = useRef(null);
  	const [tooltipHeight, setTooltipHeight] = useState(0); // 아직 height 값이 0이기 때문에 height가 0인 상태로 화면에 그립니다.

  	useEffect(() => {
    	const { height } = ref.current.getBoundingClientRect();
      	setTooltipHeight(height); // 실제 높이를 구한 후 리렌더링하고 화면에 다시 그립니다.
    }, [])

  	// ...아래에 작성될 렌더링 로직에 tooltipHight를 사용합니다.
}- 이러한 경우 깜빡거리는 현상이 발생하게 되는거죠? 왜냐? useEffect는 이미 화면이 그려진 후에 발동되기 때문이에요!
- 렌더링 -> useLayoutEffect로 인해 렌더링 -> 화면 그리기
function Tooltip() {
	const ref = useRef(null);
  	const [tooltipHeight, setTooltipHeight] = useState(0); // 아직 height 값이 0입니다. 하지만 사용자는 height가 0인 화면을 볼 수 없습니다.

  	useLayoutEffect(() => {
      	// useLayoutEffect를 사용했기 때문에 렌더링이 일어난 이후 화면을 그리지 않고 아래 작업을 수행합니다.
    	const { height } = ref.current.getBoundingClientRect();
      	setTooltipHeight(height); // 실제 높이를 구한 후 리 렌더링하고 화면을 그립니다.
    }, [])

  	// ...아래에 작성될 렌더링 로직에 tooltipHight를 사용합니다.
}- 이런 방식이 꼭 좋은 로직인가요? 아니요!
- Effect 로직이 길어지면 화면이 그려지는 시간이 늦어진다.
- State 변화에 따라 브라우저가 화면을 그리는 것을 차단 (사용자가 이를 알아차리지 못한다)
DOM을 바꾸기 전에 style을 주입하기
- 사용하는 경우가 거의 없지만 CSS-in-js같은 라이브러리를 개발할 때 사용합니다.
- Dom이 생기기전에 Effect를 통해 css를 주입해줍니다.
let isInserted = new Set();

function useCSS(rule){
	useInsertionEffect(() => {
    	if (!isInserted.has(rule)){
        	isInserted.add(rule);
          	document.head.appendChild(getStyleForRule(rule));
        }
    })

  	return rule;
}

function Button(){
	const className = useCSS('...');
  	return <div className={calssName} />
}
마무리
이번 글에서는 리액트에서의 사이드 이펙트에 대해 다뤘는데요. key값을 부여함으로써 useEffect를 없애고 useLayoutEffect를 사용해서 Tooltip을 구현하는 부분이 상당히 인상적이었습니다. useEffect를 최대한 자제하고 의존성을 줄여야 한다는 것은 머리로는 알고 있지만 코드를 짜다보면 적용하기 쉽지 않은 거 같습니다. React 공식 문서를 통해 학습을 했을 때 대부분 배운 내용이지만 이렇게 잘 정리된 글로 복습하니 다시 리마인드되고 좋네요.
Reference

흑우 모르는 흑우 없제~