📓 Redux
⚙️ 기본 개념
-
리덕스는 상태 관리 라이브러리다.
-
중앙 집중식 상태 컨테이너인 스토어(store)를 제공해 애플리케이션의 모든 상태를 단일 객체로 관리한다.
-
상태 변화를 위한 순수 함수인 리듀서(reducer)를 사용해 이전 상태와 액션(action)을 받아 새로운 상태를 반환한다.
-
단방향 데이터 흐름을 따르며 액션이 디스패치(dispatch)되면, 리듀서가 이를 처리하고 상태가 업데이트된다.
-
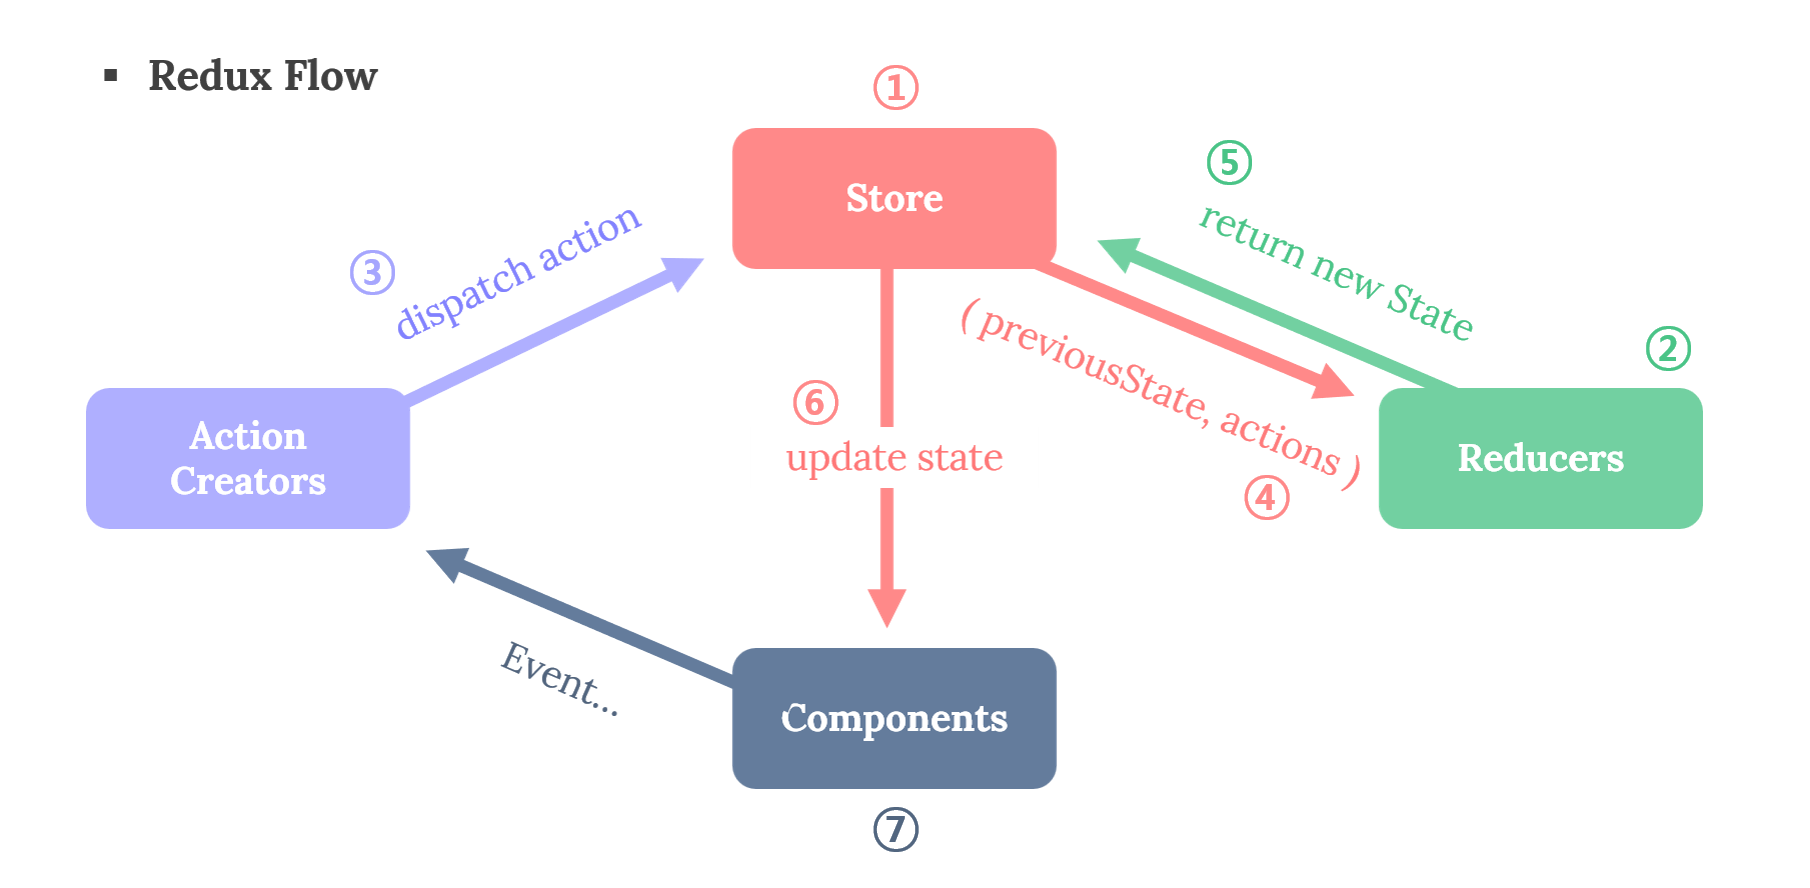
아래 그림을 통해 리덕스의 전체적인 흐름을 살펴보자! ( 반복해야 이해하지! )
1) 하나의 중앙 데이터 store를 갖는다 (데이터는 state 상태)
2) 상태값을 변경해야할 때 데이터들의 state 값을 수정해줄 reducer 함수를 만든다.
3) dispatch를 사용해 reducer에게 state 값을 수정하라고 action 값과 함께 요청한다.
4) reducer가 state 값을 수정하면, subscribe를 사용해 수정된 부분을 UI에 업로드한다.
🪧 리덕스를 왜 사용할까?
-
state 변경을 관리할 때? 하위 컴포넌트에 전달하는 props 문법이 귀찮을 때?
-
프로젝트를 하면서 한 컴포넌트 안에 수많은 상태를 작성하면?
그 컴포넌트 안에 여러 개의 컴포넌트가 중첩돼 있다면?1) 로직이 복잡해지고, 유지보수가 어려워진다.
2) 더 많은 메모리를 사용하고, 리렌더링이 발생할 수 있기에 결국 성능 저하로 이어진다.
3) 상태가 많아지면 다른 컴포넌트로의 재사용이 어려울 수 있다.
4) 상태 전파의 어려움이 발생하거나 중복된 상태를 생성해야 할 수 있다. -
결국, 컴포넌트에 여러 개의 상태를 만든다는 것은 생각보다 단점이 많아진다. 그래서 우리는 리덕스를 설치해 모든 컴포넌트에서 상태를 자유롭게 꺼내 사용할 수 있다.
-
그럼에도 불구하고, 변수의 수가 컨트롤 가능한 정도의 작은 프로젝트라면,
React에 내장되어 있는 Context를 사용하는 것이 좋을 수 있다. -
그러나, 프로젝트가 점점 커지고 있다면, Context에서는 가지고 있는 state가 하나만 변경되어도 Context의 값을 가지고 있는 모든 컴포넌트가 렌더링이 되어버리니까 불필요한 렌더링이 발생하게 될 수도 있으니 주의하자!
⚙️ 리덕스 사용법
🪧 리덕스 설정
- 제일 먼저 리덕스를 설치해야 한다.
  npm install redux
  yarn add redux

  • 리액트에서 리덕스 사용할 수 있게 연결시켜주는 패키지
  npm install react-redux
  yarn add react-redux
🪧 폴더 구조 생성
- 리덕스 폴더 구조는 개발자나 팀 선호도에 따라 다르며 일반적으로는 리덕스 관련된 파일을 한 폴더에 집중시킨다.
  💻 Project
  ├─ 📦 public
  ├─ 📦 src
  │  ├─ 📂 redux // 리덕스 관련된 코드를 모아 놓은 폴더
  │  │  ├─ 📂 actions // 액션 생성자와 관련된 파일들을 보관하는 폴더
  │  │  │  ├─ 📜 actions.js
  │  │  │  └─ 📜 actionTypes.js
  │  │  ├─ 📂 reducers // 리듀서 관련 파일들을 보관하는 폴더
  │  │  │  └─ 📜 todoReducer.js
  │  │  └─ 📜 store.js // 스토어 생성하고 내보내는 파일
  │  ├─ 📜 App.js
  │  └─ 📜 index.js // 애플리케이션 진입점이며, 여기서 Redux Provider를 설정
🪧 액션 정의하기
-
액션은 애플리케이션에서 스토어로 보내는 데이터 묶음이다.
-
액션 정의는 액션 타입을 상수로 정의하고, 액션 생성자는 해당 액션을 생성하는 함수다.
-
액션 타입이 여러개가 아닌 이상, 일반적으로 액션 정의와 액션 생성자는 같은 파일에서 작성된다.
-
액션 타입이 많아지면 파일을 분리해서 관리하는 것이 코드를 구조화하고 유지하기 쉬워진다.
-
각 액션 타입은 대부분 대문자로 작성한다.
  // actionTypes.js

  export const ActionTypes = {
    ADD_TODO: 'ADD_TODO',
    DELETE_TODO: 'DELETE_TODO',
    EDIT_TODO: 'EDIT_TODO',
    TOGGLE_TODO: 'TOGGLE_TODO',
};-
위에서 정의한 액션 타입을 아래의 액션 생성자 파일에서 import하여 해당 객체를 가져와서 사용할 수 있다.
-
액션 생성자는 액션을 생성하여 반환하는 함수다. 각 액션 생성자는 특정 액션 타입을 가지고 있으며, 해당 액션 타입과 함께 액션 객체를 반환한다.
  // action.js

  import ActionTypes from './actionTypes';

  export const addTodo = (text) => ({
    type: ActionTypes.ADD_TODO, // 액션_타입_문자열
    payload: text // 액션에 필요한 데이터
                  // 리듀서에서 이 payload를 활용하여 액션이 수행되는 동작을 구현
  });

  export const deleteTodo = (id) => ({
    type: ActionTypes.DELETE_TODO,
    payload: id
  });

  export const editTodo = (id, newText) => ({
    type: ActionTypes.EDIT_TODO,
    payload: { id, newText }
  });

  export const toggleTodo = (id) => ({
    type: ActionTypes.TOGGLE_TODO,
    payload: id
  });
🪧 리듀서 작성하기
-
아래의 코드는 하나의 리듀서만 다루고 있다. 만약 리듀서가 여러 개일 때는 각각의 리듀서를 작성하고, 이들을 결합하여 루트 리듀서를 만들어야 한다.
-
리덕스는 단일 상태 트리를 사용해 애플리케이션의 상태를 여러 개의 작은 부분으로 나누어 각 리듀서가 관리한다.
-
루트 리듀서가 모든 하위 리듀서의 상태를 관리하고, 각 하위 리듀서가 전체 상태 트리 중 일부를 관리한다.
-
이제 코드를 파악해보자!
1)
initialState상수를 통해 todos 배열을 포함하는 객체의 초기 상태를 정의한다.2)
todoReducer함수는 현재 상태(state)와 액션(action)을 받아 새로운 상태를 반환한다.3) switch문을 사용해 액션의 타입에 따라 다른 동작을 수행한다. 각각의 케이스는 특정한 액션 타입에 대한 처리를 정의한다.
4) 각 케이스에서 처리된 상태 변경사항을 반영해 새로운 상태를 반환한다. 상태를 변경할 때는 기존의 상태를 수정하지 않고, 새로운 객체를 생성해 변경사항을 반영한다.
  // todoReducer.js

  import { ActionTypes } from './actionTypes';

  const initialState = {
    todos: []
  };

  const todoReducer = (state = initialState, action) => {
    switch (action.type) {
      case ActionTypes.ADD_TODO:
        return {
          ...state,
          todos: [...state.todos, action.payload]
        };
      case ActionTypes.DELETE_TODO:
        return {
          ...state,
          todos: state.todos.filter(todo => todo.id !== action.payload)
        };
      case ActionTypes.EDIT_TODO:
        return {
          ...state,
          todos: state.todos.map(todo =>
            todo.id === action.payload.id ? { ...todo, text: action.payload.newText } : todo
          )
        };
      case ActionTypes.TOGGLE_TODO:
        return {
          ...state,
          todos: state.todos.map(todo =>
            todo.id === action.payload ? { ...todo, completed: !todo.completed } : todo
          )
        };
      default:
        return state;
    }
};-
루트 리듀서는 따로 rootReducer.js 파일을 만들어도 되지만, 일반적으로는 store.js 파일 내에서 작성한다.
-
왜? 애플리케이션의 상태 관리를 하나의 파일에서 책임지기에 관리가 쉬워진다.
-
combineReducers함수를 사용해 각각의 리듀서를 하나로 합친 후,createStore함수로 스토어를 생성하고 있다.
  // store.js

  import { createStore, combineReducers } from 'redux';
  import todoReducer from './reducers/todoReducer';
  import userReducer from './reducers/userReducer'; // 리듀서가 여러개일 때

  // 루트 리듀서 생성
  const rootReducer = combineReducers({
    todos: todoReducer,
    users: userReducer,
    // 다른 리듀서들도 추가 가능
  });

  const store = createStore(rootReducer);

  export default store;
🪧 스토어 생성하기
-
스토어는 애플리케이션 상태를 보유한다.
-
createStore함수를 사용해 스토어를 생성한다.
  // store.js

  import { createStore } from 'redux';
  import rootReducer from './rootReducer'; // 루트 리듀서 가져오기

  const store = createStore(rootReducer);

  export default store;
🪧 애플리케이션에 스토어 연결하기
-
리액트 애플리케이션 최상위 컴포넌트에 스토어를 연결한다.
-
보통 Provider 컴포넌트를 사용한다.
  // index.js

  import React from 'react';
  import { createRoot } from 'react-dom/client';
  import { Provider } from 'react-redux';

  import App from './App';
  import store from './store';

  const container = document.getElementById('root');
  const root = createRoot(container);

  root.render(
    <Provider store={store}>
      <App />
    </Provider>,
  );
⚙️ 리액트에서 리덕스 사용하기
🪧 기본 환경 세팅
- 일단 create-react-app으로 프로젝트를 설치 후, 프로젝트명 폴더 안에 리액트용 리덕스를 설치한다.
  npx create-react-app react-redux --template basic-react
  cd react-redux // 깜빡하지 않도록 주의!
  npm install redux
  npm install react-redux
🪧 폴더 구조 생성
- 일단 src 폴더 안에 components 폴더와 actions, reducers 폴더를 만들고 각가 파일을 생성한다.
  💻 Project
  ├─ 📦 public
  ├─ 📦 src
  │  ├─ 📂 components
  │  │  ├─ 🧾 GoodCounter.jsx
  │  │  └─ 📜 StockCounter.jsx
  │  ├─ 📂 redux
  │  │  ├─ 📂 actions
  │  │  │  └─ 📜 actions.js
  │  │  ├─ 📂 reducers
  │  │  │  └─ 📜 reducers.js
  │  │  └─ 📜 store.js
  │  ├─ 📜 App.js
  │  └─ 📜 index.js
🪧 구현하기
-
상품 구매 개수를 관리하는 리듀서와 재고가 다 떨어졌을 때 나오는 메시지를 관리하는 리듀서를 만들어 보자!
-
간단한 프로젝트니까 액션 타입과 액션 생성자 함수를 하나의 파일에 작성하려 한다.
  // actions.js

  // 액션 타입 (객체로 만들어서 파일 분리하는 게 더 좋음)
  export const PLUS = 'PLUS';
  export const MINUS = 'MINUS';
  export const SALE = 'SALE';
  export const SOLD_OUT = 'SOLD_OUT';

  // 액션 생성자 함수
  export const plusNumber = () => {
    return { type: PLUS };
  };

  export const minusNumber = () => {
    return { type: MINUS };
  };

  export const sale = () => {
    return { type: SALE };
  };

  export const soldOut = () => {
    return { type: SOLD_OUT };
};- 리듀서도 원래라면 기능별로 분리하는 게 좋으나, 일단 바쁘니까 하나의 파일에 만드니 참고바란다.
  // reducers.js

  import { PLUS, MINUS, SALE, SOLD_OUT } from '../actions/actions';

  const initialState = {
    stock: 10,
    goods: 1,
    message: '판매중!!',
  };

  export const goodsReducer = (state = initialState, action) => {
    console.log(action);
    console.log(action.type);
    console.log(state);
    switch (action.type) {
      case PLUS:
        return {
          ...state,
          stock: state.stock - 1,
          goods: state.goods + 1,
        };
      case MINUS:
        return {
          ...state,
          stock: state.stock + 1,
          goods: state.goods - 1,
        };
      default:
        return state;
    }
  };

  export const stockReducer = (state = initialState, action) => {
    switch (action.type) {
      case SALE:
        return {
          ...state,
          message: '판매중!!',
        };
      case SOLD_OUT:
        return {
          ...state,
          message: '완판!!',
        };
      default:
        return state;
    }
};- 그 다음, 만든 리듀서를 store.js 파일에 불러와
combineReducers함수를 사용해 각각의 리듀서를 합친 후,createStore함수로 스토어를 생성한다.
  // store.js

  import { combineReducers } from 'redux';
  import { createStore } from 'redux';
  import { goodsReducer } from './reducers/reducers';
  import { stockReducer } from './reducers/reducers';

  const rootReducer = combineReducers({
    goodsReducer,
    stockReducer,
  });

  const store = createStore(rootReducer);

export default store;- 그 다음, 최상위 컴포넌트의 index.js 파일에서 Provider 컴포넌트로 스토어를 제공한다.
  // index.js

  import React from 'react';
  // import ReactDOM from 'react-dom'; //구버전
  import { createRoot } from 'react-dom/client';
  import { Provider } from 'react-redux';

  import App from './App';
  import store from './redux/store';

  const container = document.getElementById('root');
  const root = createRoot(container);
  root.render(
    <Provider store={store}>
      <App />
    </Provider>
);-
그 다음, components 폴더에서 생성한 GoodsCounter 컴포넌트를 만들어주자!
-
판매와 로봇이라는 상품에 대한 카운터 컴포넌트인데,
useSelector훅을 사용해 Redux 상태를 조회하고 있다. 리덕스 스토어의 상태를 가져와서 컴포넌트에서 필요한 부분만 선택적으로 추출할 수 있다. goodsReducer에서 관리되는 stock, goods 값을 선택하고 있다. -
그리고
useDispatch훅을 통해 Redux 스토어에 액션을 디스패치하는데, plusNumber와 minusNumber라는 액션 생성자 함수를 디스패치하여 Redux 스토어에 액션을 전달하고 있다. -
판매 수량을 조절할 때 마이너스로 내려가지 않도록 처리하자!
  // GoodsCounter.jsx

  import React from 'react';
  import styled from 'styled-components';
  import { useSelector, useDispatch } from 'react-redux';
  import { plusNumber, minusNumber } from './../redux/actions/actions';

  const GoodsCounter = () => {
    // useSelector : store의 상태 조회 Hook
    const { stock, goods } = useSelector((state) => ({
      stock: state.goodsReducer.stock,
      goods: state.goodsReducer.goods,
    }));
    console.log(stock, goods);

    // useDispatch : store의 dispatch를 함수 내부에서 사용할 수 있는 Hook
    const dispatch = useDispatch();

    const onPlusNumber = () => {
      if (stock > 0) {
        dispatch(plusNumber());
      }
    };

    const onMinusNumber = () => {
      if (goods > 0) {
        dispatch(minusNumber());
      }
    };

    return (
      <Container>
        <h2>판매왕 로봇</h2>
        <span>
          <strong>50,000</strong>원
        </span>
        <div>
          <Button type="button" onClick={onMinusNumber} disabled={goods <= 0}>
            -
          </Button>
          <span>{goods}</span>
          <Button type="button" onClick={onPlusNumber} disabled={stock <= 0}>
            +
          </Button>
        </div>
        <div>
          총 수량 <strong>{goods}</strong>
        </div>
        <div>
          <strong>{goods * 50000}</strong>원
        </div>
        <div>
          재고 <strong>{stock}</strong>
        </div>
      </Container>
    );
  };

  export default GoodsCounter;

  const Container = styled.div`
    padding: 20px 0px 40px;
    display: flex;
    flex-direction: column;
    gap: 10px;
  `;

  const Button = styled.button`
    margin: 0px 20px;
`;-
그 다음, components 폴더에서 생성한 StockCounter 컴포넌트를 만들어주자!
-
GoodsCounter 컴포넌트 아래 '판매중!!'이 뜰 수 있도록 하는데, stockReducer에 접근해서 message를 출력해야 한다.
-
또 재고가 0이 되면 '완판!!' 이 떠야하며, 이를 위해 재고를 10개로 변경해야 한다.
-
재고 소진되었다가 판매 수량이 줄어들면 다시 '판매중!!' 이 뜰 수 있게 한다.
  // StockCounter.jsx

  import React, { useEffect } from 'react';
  import { useSelector, useDispatch } from 'react-redux';
  import { sale, soldOut } from './../redux/actions/actions';

  const StockCounter = () => {
    // useSelector : store의 상태 조회 Hook
    const { stock } = useSelector((state) => ({
      stock: state.goodsReducer.stock,
    }));

    // useSelector : store의 상태 조회 Hook
    const { message } = useSelector((state) => ({
      message: state.stockReducer.message,
    }));

    // useDispatch : store의 dispatch를 함수 내부에서 사용할 수 있는 Hook
    const dispatch = useDispatch();

    useEffect(() => {
      if (stock <= 0) {
        dispatch(soldOut());
      } else {
        dispatch(sale());
      }
    }, [stock, dispatch]);

    return (
      <>
        <strong>{message}</strong>
      </>
    );
  };

export default StockCounter;- 그 다음, App.js로 와서 컴포넌들과 연결해주고,
npm start를 통해 프로젝트를 구동시킨 다음 확인해 보자!
  // App.js

  import GoodsCounter from './components/GoodsCounter';
  import StockCounter from './components/StockCounter';
  import styled from 'styled-components';

  function App() {
    return (
      <Container>
        <GoodsCounter />
        <StockCounter />
      </Container>
    );
  }
  export default App;

  const Container = styled.div`
    width: 80%;
    margin: 30px auto;
    padding: 20px 0px 40px;
    display: flex;
    flex-direction: column;
    text-align: center;
  `;
⚙️ 리덕스 툴킷 (Redux-Toolkit)
-
리덕스 툴킷은 리덕스를 사용해 상태 관리를 더 쉽게 만들어주는 툴입니다.
-
리덕스를 사용하면서 액션 타입 정의, 액션 생성자 작성, 리듀서 작성, 미들웨어 설정 등 이러한 번거로운 작업들을 최소화하고, 더 짧고 간결한 코드로 상태를 관리할 수 있다.
-
리덕스 툴킷 예제는 위 예제에서 사용한 리덕스로 한다!
🪧 리덕스 툴킷 설정
- 툴킷에는 리덕스가 자동으로 설치된다.
  // Redux 자동
  npm install @reduxjs/toolkit

  // react-redux 리액트와 연결시켜주는 명령어 설치안했다면 함께 설치
  npm install @reduxjs/toolkit react-redux
🪧 리덕스와 리덕스 툴킷 차이점
-
우선 리덕스와 리덕스 툴킷의 가장 큰 차이점은?
1) 액션 생성 함수가 필요 없어진다. 즉, 리덕스 툴킷에서는
createAction및createReducer와 같은 유틸리티 함수를 사용하여 간단하게 액션을 생성하고 처리할 수 있다.2) 불변성을 이용한 상태관리가 사라지는 대신
immer라이브러리를 사용해 불변성을 유지하면서 간단하게 상태를 업데이트할 수 있다.3) reducer에 있던 switch나 if문 대신 함수 형태로 변경된다. 즉, 리덕스 툴킷에서는
createReducer함수를 사용하여 reducer를 간단한 함수 형태로 정의할 수 있다.4) 리덕스 툴킷에서는
configureStore함수를 사용하여 스토어를 설정하므로 combineReducers를 직접 사용하지 않아도 된다.5)
configureStore함수가 createStore 함수를 대체하며, 미들웨어와 기본적인 설정들이 포함되어 있다.
🪧 폴더 구조 생성
- actions, reducers 폴더 대신 slices 폴더를 생성한다.
  💻 Project
  ├─ 📦 public
  ├─ 📦 src
  │  ├─ 📂 components
  │  │  ├─ 🧾 GoodCounter.jsx
  │  │  └─ 📜 StockCounter.jsx
  │  ├─ 📂 redux
  │  │  ├─ 📂 slices
  │  │  │  └─ 📜 slices.js
  │  │  └─ 📜 store.js
  │  ├─ 📜 App.js
  │  └─ 📜 index.js
🪧 구현하기
createSlice함수를 이용해 slice 파일을 생성한다.
  // slices.js

  import { createSlice } from '@reduxjs/toolkit';

  const initialState = {
    stock: 10,
    goods: 1,
    message: '판매중!!',
  };

  export const goodsSlice = createSlice({
    name: 'goods', // 이 슬라이스 이름
    initialState,
    reducers: {
      // 액션의 모습이 객체에서 함수로 변경됨
      // 액션의 선언과 리듀서에 들어있던 액션의 타입에서 해야할 일들에 대한 내용이 통합되어 작성하게 변경됨
      plus: (state) => {
        state.stock -= 1; // 기존의 state를 유지하는 코드가 필요 없어짐
        state.goods += 1;
      },
      minus: (state) => {
        state.stock += 1;
        state.goods -= 1;
      },
    },
  });

  export const stockSlice = createSlice({
    name: 'stock',
    initialState,
    reducers: {
      sale: (state) => {
        state.message = '판매중!!';
      },
      soldOut: (state) => {
        state.message = '완판!!';
      },
    },
  });

  // 리듀서 함수에 대한 액션 생성자가 생성됨
  export const { plus, minus } = goodsSlice.actions;
  export const { sale, soldOut } = stockSlice.actions;

  export const goodsReducer = goodsSlice.reducer;
export const stockReducer = stockSlice.reducer;- 그 다음, rootReducers 처럼 모듈을 합쳐 주었던 코드가 없어지고,
configureStore함수 안에서 합쳐주면 된다.
  // store.js

  import { configureStore } from '@reduxjs/toolkit';
  import { goodsReducer, stockReducer } from './slices/slices';

  const store = configureStore({
    reducer: {
      goods: goodsReducer,
      stock: stockReducer,
    },
  });

  export default store;
// index.js 파일은 코드가 동일함
import React from 'react';
// import ReactDOM from 'react-dom'; //구버전
import { createRoot } from 'react-dom/client';
import { Provider } from 'react-redux';
import App from './App';
import store from './redux/store';
const container = document.getElementById('root');
const root = createRoot(container);
root.render(
<Provider store={store}>
<App />
</Provider>
);- GoodsCounter와 StockCounter 컴포넌트도 변경해보자!
  // GoodsCounter.jsx

  import React from 'react';
  import styled from 'styled-components';
  import { useSelector, useDispatch } from 'react-redux';
  import { plus, minus } from './../redux/slices/slices';  // 액션 import 변경

  const GoodsCounter = () => {
    const { stock, goods } = useSelector((state) => ({
      // useSelector를 통해 스토어의 상태를 가져옴
      stock: state.goods.stock, // 슬라이스 이름으로 변경
      goods: state.goods.goods, // 슬라이스 이름으로 변경
    }));
    console.log(stock, goods);

    // useDispatch를 통해 액션을 디스패치함
    const dispatch = useDispatch();

    const onPlus = () => {
      if (stock > 0) {
        dispatch(plus());
      }
    };

    const onMinus = () => {
      if (goods > 0) {
        dispatch(minus());
      }
    };

    return (
      <Container>
        <h2>판매왕 로봇</h2>
        <span>
          <strong>50,000</strong>원
        </span>
        <div>
          <Button type="button" onClick={onMinus} disabled={goods <= 0}>
            -
          </Button>
          <span>{goods}</span>
          <Button type="button" onClick={onPlus} disabled={stock <= 0}>
            +
          </Button>
        </div>
        <div>
          총 수량 <strong>{goods}</strong>
        </div>
        <div>
          <strong>{goods * 50000}</strong>원
        </div>
        <div>
          재고 <strong>{stock}</strong>
        </div>
      </Container>
    );
  };

  export default GoodsCounter;

  const Container = styled.div`
    padding: 20px 0px 40px;
    display: flex;
    flex-direction: column;
    gap: 10px;
  `;

  const Button = styled.button`
    margin: 0px 20px;
  `;
// StockCounter.jsx
import React, { useEffect } from 'react';
import { useSelector, useDispatch } from 'react-redux';
import { sale, soldOut } from './../redux/slices/slices'; // 액션 import 변경
const StockCounter = () => {
// useSelector를 통해 스토어의 상태를 가져옴
const { stock } = useSelector((state) => ({
stock: state.goods.stock, // 슬라이스 이름으로 변경
}));
const { message } = useSelector((state) => ({
message: state.stock.message, // 슬라이스 이름으로 변경
}));
// useDispatch를 통해 액션을 디스패치함
const dispatch = useDispatch();
useEffect(() => {
if (stock <= 0) {
dispatch(soldOut());
} else {
dispatch(sale());
}
}, [stock, dispatch]);
return (
<>
<strong>{message}</strong>
</>
);
};
export default StockCounter;- 위 코드에서는 없지만, slice 파일에서 액션 생성자 함수에 추가적인 데이터를 전달하고 싶을 때는?
  // slices.js

  export const goodsSlice = createSlice({
    name: 'goods',
    initialState,
    reducers: {
      plus: (state, action) => {
        // action.payload에 추가 데이터가 전달됨
        state.stock -= action.payload;
        state.goods += action.payload;
      },
      minus: (state) => {
        state.stock += 1;
        state.goods -= 1;
      },
    },
});-
그리고
plus액션 생성자 함수에 추가적 데이터를 전달하고자 한다면, dispatch를 호출할 때 객체 형식으로 payload를 넘겨줄 수 있다. -
따라서 액션 객체는 { type: 'plus', payload: 10 } 과 같이 생성되고, 이렇게 전달된 payload는 리듀서 함수에서 사용되어 상태를 업데이트한다.
  // GoodsCounter.jsx

  const dispatch = useDispatch();

  const onPlus = () => {
    if (stock > 0) {
      dispatch(plus(10));
    }
  };