
📢 시작 한마디
드디어 팬명록에 응원을 남길 수 있다!! 해보자고오!! 🐇🐇
✅ 4주차 진행 및 완료 사항
- Flask 프레임워크를 활용해서 API 만들기
- '화성에 땅사기' API 만들고 클라이언트에 연결
- '스파르타피디아' API 만들고 클라이언트와 연결
- 4주차 숙제 : 팬명록 완성하기 (POST, GET)
✅ homework
📍 팬명록 완성하기 - 프로젝트 세팅
-
new project → homework 폴더 선택 후, create 클릭
-
폴더 구조 잡기
   1) 파일 → 새로 작성 → 디렉토리 → templates, static 파일 만들기
   2) templates 폴더 안에 index.html 파일 만들기
3) app.py 파일 만들기- 패키지 설치
   윈도우 : 좌상단 File → setting → python interpreter

   + 버튼 눌러 flask, pymongo, dnspython 3개 패키지 설치
📍 팬명록 완성하기 - 뼈대 준비하기
- 프로젝트 준비 -
app.py
   from flask import Flask, render_template, request, jsonify
   app = Flask(__name__)

   @app.route('/')
   def home():
       return render_template('index.html')

   @app.route("/homework", methods=["POST"])
   def homework_post():
       sample_receive = request.form['sample_give']
       print(sample_receive)
       return jsonify({'msg':'POST 연결 완료!'})

   @app.route("/homework", methods=["GET"])
   def homework_get():
       return jsonify({'msg':'GET 연결 완료!'})

   if __name__ == '__main__':
app.run('0.0.0.0', port=5000, debug=True)- 프로젝트 준비 -
index.html
<!doctype html>
<html lang="en">

<head>
    <meta charset="utf-8">
    <meta name="viewport" content="width=device-width, initial-scale=1, shrink-to-fit=no">

    <link href="https://cdn.jsdelivr.net/npm/bootstrap@5.0.2/dist/css/bootstrap.min.css" rel="stylesheet"
          integrity="sha384-EVSTQN3/azprG1Anm3QDgpJLIm9Nao0Yz1ztcQTwFspd3yD65VohhpuuCOmLASjC" crossorigin="anonymous">
    <script src="https://ajax.googleapis.com/ajax/libs/jquery/3.5.1/jquery.min.js"></script>
    <script src="https://cdn.jsdelivr.net/npm/bootstrap@5.0.2/dist/js/bootstrap.bundle.min.js"
            integrity="sha384-MrcW6ZMFYlzcLA8Nl+NtUVF0sA7MsXsP1UyJoMp4YLEuNSfAP+JcXn/tWtIaxVXM"
            crossorigin="anonymous"></script>

    <title>팬명록</title>

    <link href="https://fonts.googleapis.com/css2?family=Gowun+Dodum&display=swap" rel="stylesheet">
    <style>
        * {
            font-family: 'Gowun Dodum', sans-serif;
        }

        body {
            background-color: lightcyan;
        }

        .mytitle {
            width: 100%;
            height: 300px;

            color: white;

            background-image: linear-gradient(0deg, rgba(0, 0, 0, 0.5), rgba(0, 0, 0, 0.5)), url('https://search.pstatic.net/common/?src=http%3A%2F%2Fblogfiles.naver.net%2FMjAyMjEwMTJfMjU5%2FMDAxNjY1NTA1MTUwNDI5.l57z0PaI6ypMd3STNeDcZVSWD6mnEVGevZ2RP3kOpsYg.YccOJ0N8OJ8EbOPxdXjSNSeY2ciDNlZ13Ufi5IoP1xkg.JPEG.sorry4beingperfect%2FIMG_7610.JPG&type=sc960_832');
            background-position: center top;
            background-repeat: no-repeat;
            background-size: cover;

            display: flex;
            flex-direction: column;
            align-items: center;
            justify-content: center;
        }

        .mytitle > h1 {
            font-size: 32px;
            margin-bottom: 25px;
        }

        .mypost {
            max-width: 500px;
            width: 95%;
            margin: 20px auto 20px auto;

            background-color: lightyellow;

            box-shadow: 0px 0px 3px 0px lightgrey;
            padding: 20px;
        }

        .mypost > button {
            margin-top: 15px;
        }

        .mycards {
            max-width: 500px;
            width: 95%;
            margin: auto;
        }

        .mycards > .card {
            margin-top: 10px;
            margin-bottom: 10px;
        }
    </style>
    <script>
        $(document).ready(function () {
            $.ajax({
                type: "GET",
                url: "http://spartacodingclub.shop/sparta_api/weather/seoul",
                data: {},
                success: function (response) {
                    $('#temp').text(response['temp'])
                },
            });
        });
    </script>

</head>

<body>
<div class="mytitle">
    <h1>NewJeans 팬명록🐇</h1>
    <p>현재 기온 : <span id="temp">00.0</span></p>
</div>

<div class="mypost">
    <div class="form-floating mb-3">
        <input type="email" class="form-control" id="name" placeholder="name@example.com">
        <label for="floatingInput">닉네임</label>
    </div>
    <div class="form-floating">
        <textarea class="form-control" placeholder="Leave a comment here" id="comment"
                  style="height: 100px"></textarea>
        <label for="floatingTextarea2">응원댓글</label>
    </div>
    <button onclick="save_comment()" type="button" class="btn btn-secondary">응원 남기기</button>
</div>
<div class="mycards">
    <div class="card">
        <div class="card-body">
            <blockquote class="blockquote mb-0">
                <p>새로운 앨범 수록곡 너무 좋아요!</p>
                <footer class="blockquote-footer">버니즈 1</footer>
            </blockquote>
        </div>
    </div>
    <div class="card">
        <div class="card-body">
            <blockquote class="blockquote mb-0">
                <p>새로운 앨범 수록곡 너무 좋아요!</p>
                <footer class="blockquote-footer">버니즈 1</footer>
            </blockquote>
        </div>
    </div>
    <div class="card">
        <div class="card-body">
            <blockquote class="blockquote mb-0">
                <p>새로운 앨범 수록곡 너무 좋아요!</p>
                <footer class="blockquote-footer">버니즈 1</footer>
            </blockquote>
        </div>
    </div>
</div>
</body>
</html>
📍 팬명록 완성하기 - 응원 남기기 (POST)
- 서버부터 만들기
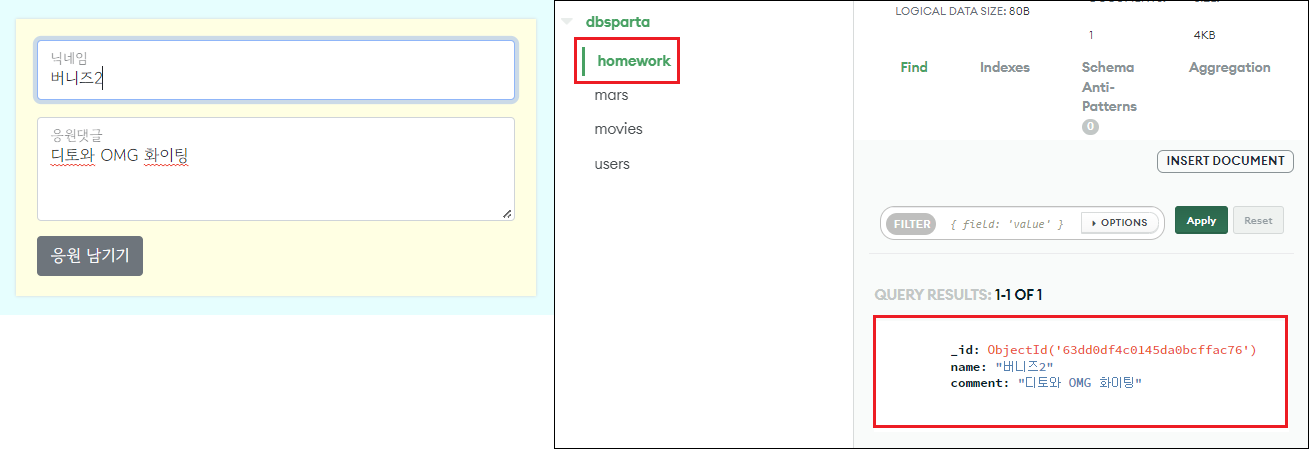
- 정보 입력 후 '응원 남기기' 버튼 클릭 시 목록에 추가
name,comment정보를 받아서 저장- 일전에 만들어둔
dbprac.py파일을 불러와서 만들기insert_one
   @app.route("/homework", methods=["POST"])
   def homework_post():
       name_receive = request.form['name_give']
       comment_receive = request.form['comment_give']

       doc = {
           'name':name_receive,
           'comment':comment_receive
       }
       db.homework.insert_one(doc)
return jsonify({'msg':'POST 연결 완료!'})- 클라이언트 만들기
name,comment정보를 보내주기
   function save_comment(){
       let name = $('#name').val()
       let comment = $('#comment').val()

       $.ajax({
           type: 'POST',
           url: '/homework',
           data: {name_give:name, comment_give:comment},
           success: function (response) {
               alert(response['msg'])
               window.location.reload()
           }
       })
}- 완성 확인하기
- DB에 잘 들어갔는지 확인
📍 팬명록 완성하기 - 응원 보기 (GET)
- 서버부터 만들기
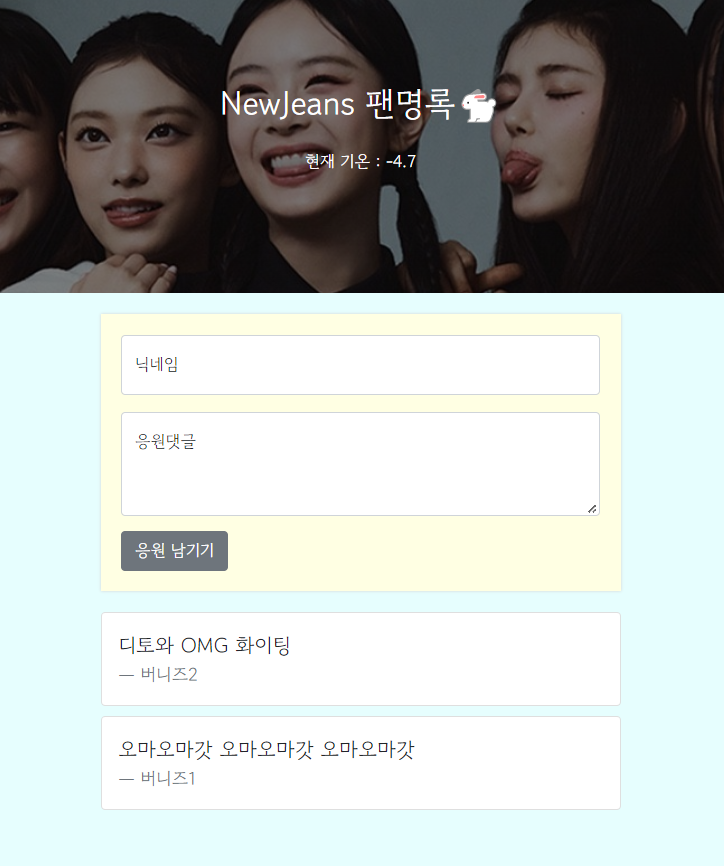
- 페이지 로딩 후 하단 응원 목록이 자동으로 보이기
- 받을 것 없이
comments에 정보를 담아서 내려주기만 하면 됨! - 일전에 만들어둔
dbprac.py파일을 불러와서 만들기
   @app.route("/homework", methods=["GET"])
   def homework_get():
       comment_list = list(db.homework.find({}, {'_id': False}))
return jsonify({'comments':comment_list})- 클라이언트 만들기
- 응답 잘 받아서
for문넣고,temp_html붙여주기!
   function show_comment(){
       $('#comment-list').empty()
       $.ajax({
           type: "GET",
           url: "/homework",
           data: {},
           success: function (response) {
               let rows = response['comments']
               for (let i=0; i<rows.length; i++) {
                   let name = rows[i]['name']
                   let comment = rows[i]['comment']

                   let temp_html = `<div class="card">
                                       <div class="card-body">
                                           <blockquote class="blockquote mb-0">
                                               <p>${comment}</p>
                                               <footer class="blockquote-footer">${name}</footer>
                                           </blockquote>
                                       </div>`
                   $('#comment-list').append(temp_html)
               }
           }
       });
}- 완성 확인하기
- 동작 테스트 : 화면을 새로고침 했을 때, DB에 저장된 리뷰가 화면에 올바르게 나타나는지 확인
`

할 수 있다고 믿는 사람은 결국 그렇게 된다 😄😊