react-native-calendars 헤더 커스터마이징하기 (pnpm patch)

개요
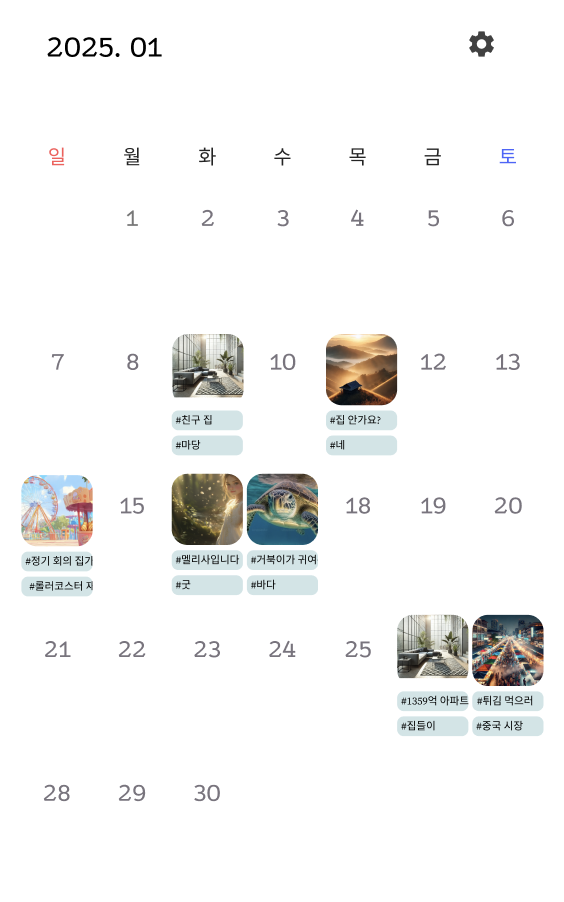
Melissa 앱의 메인 페이지를 개발하기 위한 계획을 세우고, 실제로 구현하는 과정에서 마주쳤던 문제들과 해결한 경험을 정리하려고 한다.
react-native-calendars 라이브러리를 활용해 달력을 커스텀할 때, 이 포스트가 도움이 될 것이다.
처음부터 라이브러리 코드를 직접 수정해 해결하려고 한 것은 아니다.
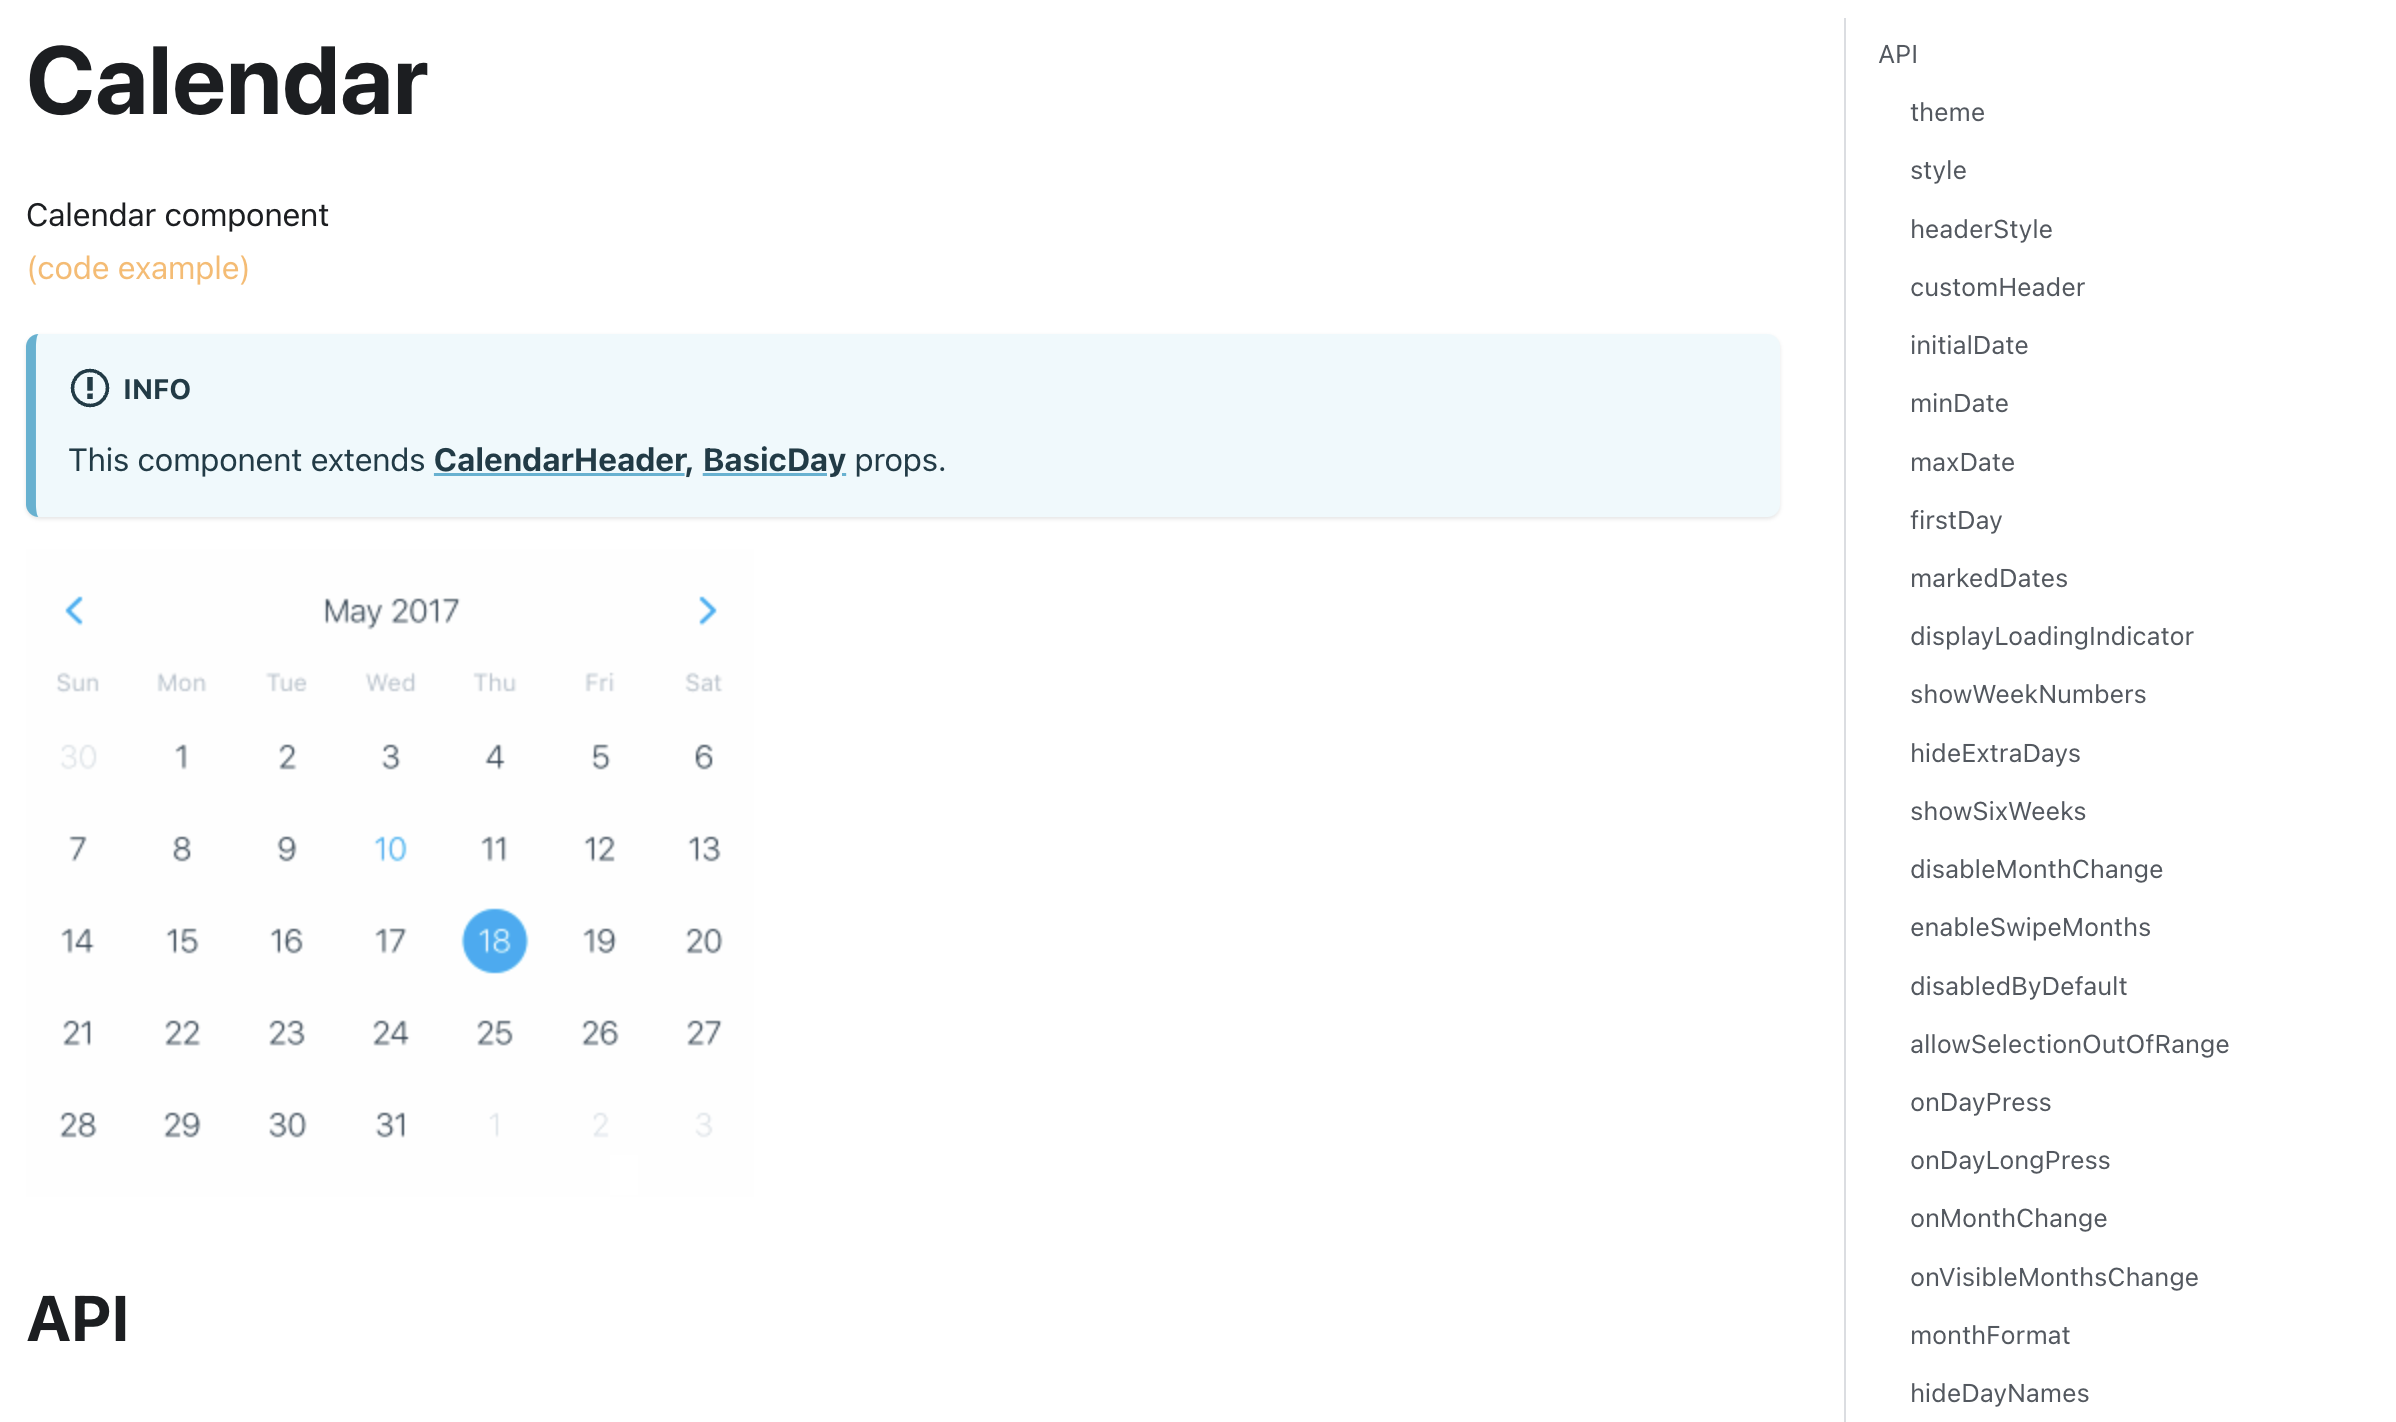
react-native-calendars 공식 문서를 살펴보니 커스텀을 위한 대부분의 props를 제공하고 있었고, 이정도면 충분할거라고 판단했다.
 |  |
|---|
먼저 우리 앱의 Figma와 react-native-calendars의 차이점을 정리해보면 다음과 같다.
- 달력 월 이동을 스와이프 제스처로 가능하도록 허용
- 년월 형식 변경 (yyyy. MM)
- 요일 한글로 변경하고, 토요일 일요일 색상 별도로 추가
- 날짜와 버튼을 전체적으로 재배치
라이브러리 코드를 수정할 필요까지 있었는가?
본격적으로 어떻게 커스텀했는지 다루기 전, 라이브러리 코드를 수정하게 된 결정적인 이유부터 이야기해보려고 한다.
이유는 크게 두 가지다.
1. 헤더 커스터마이징 시 기본 헤더가 잠시 보이는 문제
헤더를 커스텀할 수 있도록 라이브러리가 제공하는 props들은 다음과 같다.
- headerStyle: 스타일시트를 전달해 커스터마이징
- customHeader: 헤더 영역 전체를 커스터마이징
- renderHeader: 헤더의 년, 월 텍스트 부분을 커스터마이징
- customHeaderTitle: 헤더의 년, 월 텍스트 부분을 커스터마이징
customHeader props를 사용해 헤더 전체를 커스텀해보자.
import { Text, View } from "react-native";
import { SafeAreaView } from "react-native-safe-area-context";
import { CalendarList } from "react-native-calendars";

export default function Index() {
  return (
    <SafeAreaView style={{ flex: 1, backgroundColor: "white" }}>
      <CalendarList
        customHeader={() => (
          <View>
            <Text>완전한 커스텀 헤더</Text>
          </View>
        )}
        horizontal={true}
        pagingEnabled={true}
      />
    </SafeAreaView>
  );
}
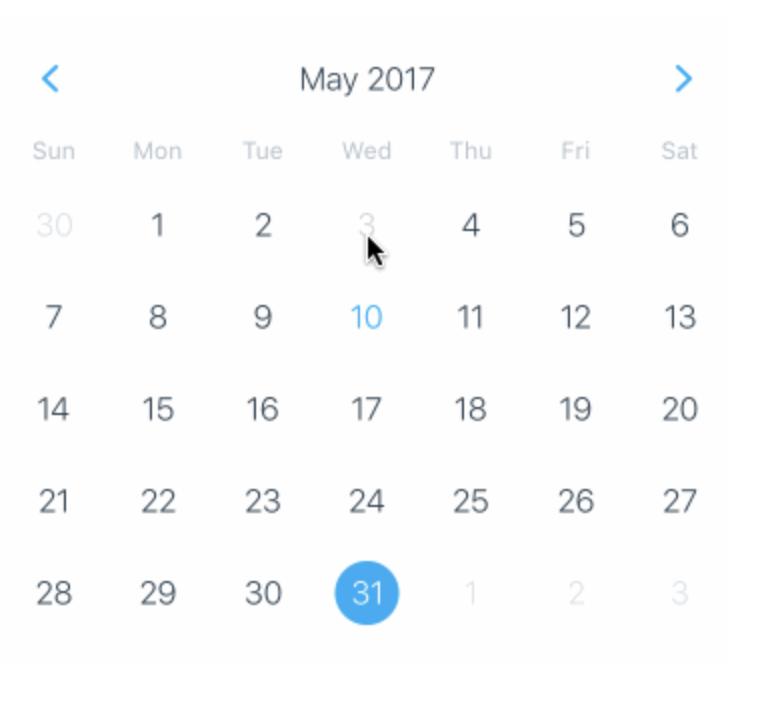
헤더를 커스텀해도, 캘린더가 로딩되는 동안 기본 헤더가 잠시 보이는 문제가 발생하는 것을 알 수 있다.

chaeyun-sim 님의 포스트를 읽어보니, customHeader에 <View></View>를 넣어주고 hideDayNames={true}를 적용하면 헤더를 완전히 없앨 수 있다는 내용이 존재했다.
import { View } from "react-native";
import { SafeAreaView } from "react-native-safe-area-context";
import { CalendarList } from "react-native-calendars";

export default function Index() {
  return (
    <SafeAreaView style={{ flex: 1, backgroundColor: "white" }}>
      <CalendarList
        customHeader={() => <View></View>}
        hideDayNames={true}
        horizontal={true}
        pagingEnabled={true}
      />
    </SafeAreaView>
  );
}
헤더가 잘 없어지는지 확인해보자.
하지만, 여전히 캘린더가 로딩되는 동안 기본 헤더가 잠시 보이는 문제가 지속되었다. 이는 Calendar와 CalendarList의 차이로 인해 발생하는 것으로 보인다.
즉, 커스텀 헤더를 사용해도 CalendarList를 쓰면, 기본 헤더가 잠시 보이는 문제가 발생한다는 것이다.
2. 버튼의 gap, hitSlop 조절이 불가능
커스텀 헤더를 사용하지 않고 레이아웃을 어떻게 수정할지 고민하다가 공식 문서와 Github issue를 발견했다.
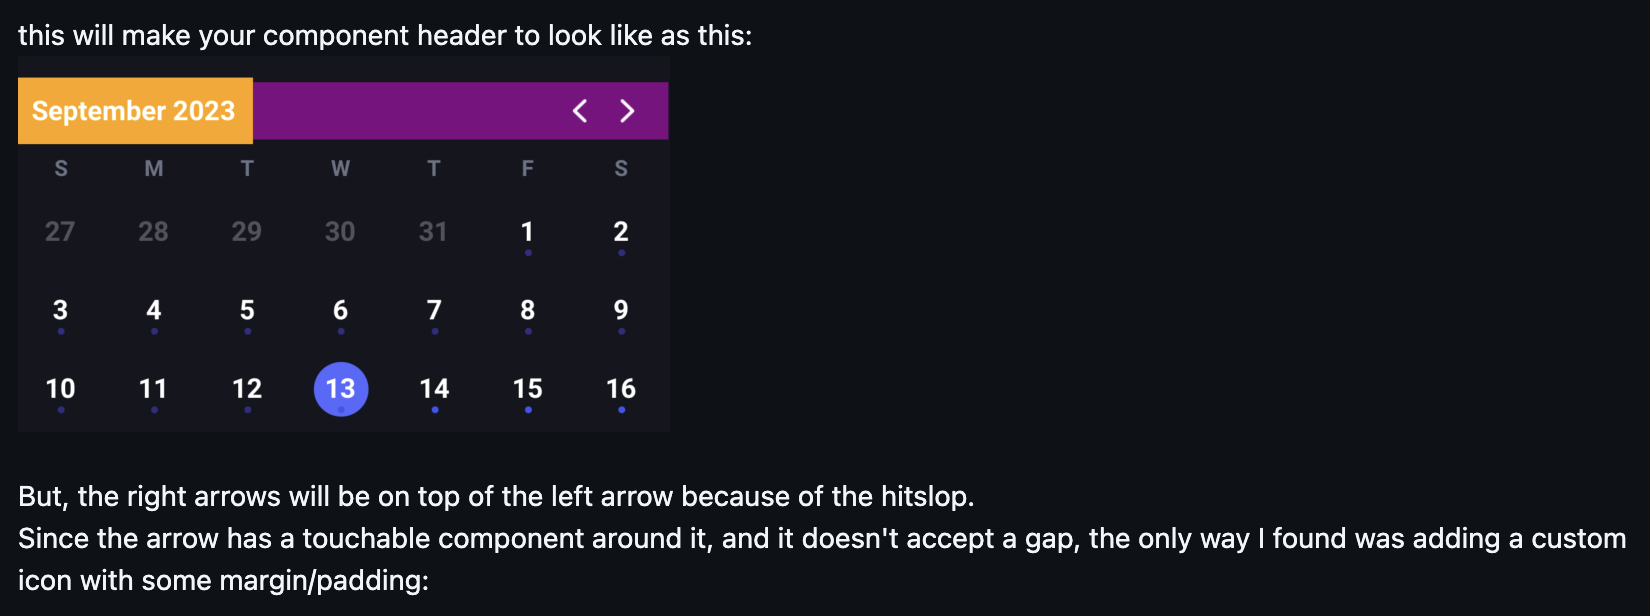
헤더를 없애거나 커스터마이징하는 props를 쓰는 대신, 캘린더 theme에 "stylesheet.calendar.header": { ... }를 전달해 레이아웃을 조작하는 방식이었다.
import { SafeAreaView } from "react-native-safe-area-context";
import { CalendarList } from "react-native-calendars";

const calendarTheme = {
  "stylesheet.calendar.header": {
    headerContainer: {
      backgroundColor: "orange",
      position: "absolute",
      flexDirection: "row",
      left: 0,
      gap: 20,
    },
    header: {
      backgroundColor: "purple",
      flexDirection: "row",
      justifyContent: "flex-end",
      paddingLeft: 10,
      paddingRight: 10,
      marginTop: 6,
      alignItems: "center",
    },
  },
};

export default function Index() {
  return (
    <SafeAreaView style={{ flex: 1, backgroundColor: "white" }}>
      <CalendarList
        theme={calendarTheme}
        horizontal={true}
        pagingEnabled={true}
        staticHeader={true}
      />
    </SafeAreaView>
  );
}
CalendarList라면,staticHeader={true}props를 추가해줘야 레이아웃이 제대로 배치된다.
레이아웃을 원하는대로 변경할 방법을 찾았고, 기본 헤더가 잠시 보이는 문제 역시 해결되었다!
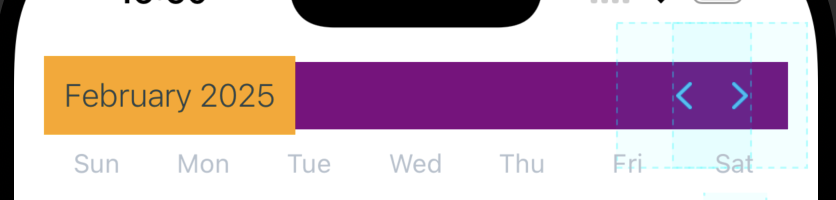
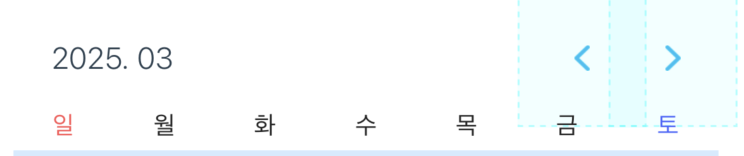
하지만 다른 문제가 발생했는데, 헤더의 < > 버튼 사이에 gap을 줄 방법이 없었고, 버튼의 hitSlop이 20이라 버튼의 터치 영역이 겹쳐지는데 이를 조절하는 arrowsHitSlop props가 적용되지 않는 문제가 존재했다. Github issue
터치 영역이 겹쳐 좌측 화살표를 눌러도 우측 화살표가 눌리는 것은 심각한 접근성 문제기 때문에 추후 앱 심사에서도 리젝될만한 사유라고 생각했다.
결국, 고민 끝에 라이브러리의 헤더 코드를 우리 목적에 맞게 전반적으로 수정해서 사용하기로 결정했다.
여기까지 조사하는데 많은 리소스가 들었으며, 라이브러리 코드와 Github issue를 계속 살펴보다 보니 어디를 고치면 원하는대로 커스텀 할 수 있을지 알 것 같았기 때문이다.
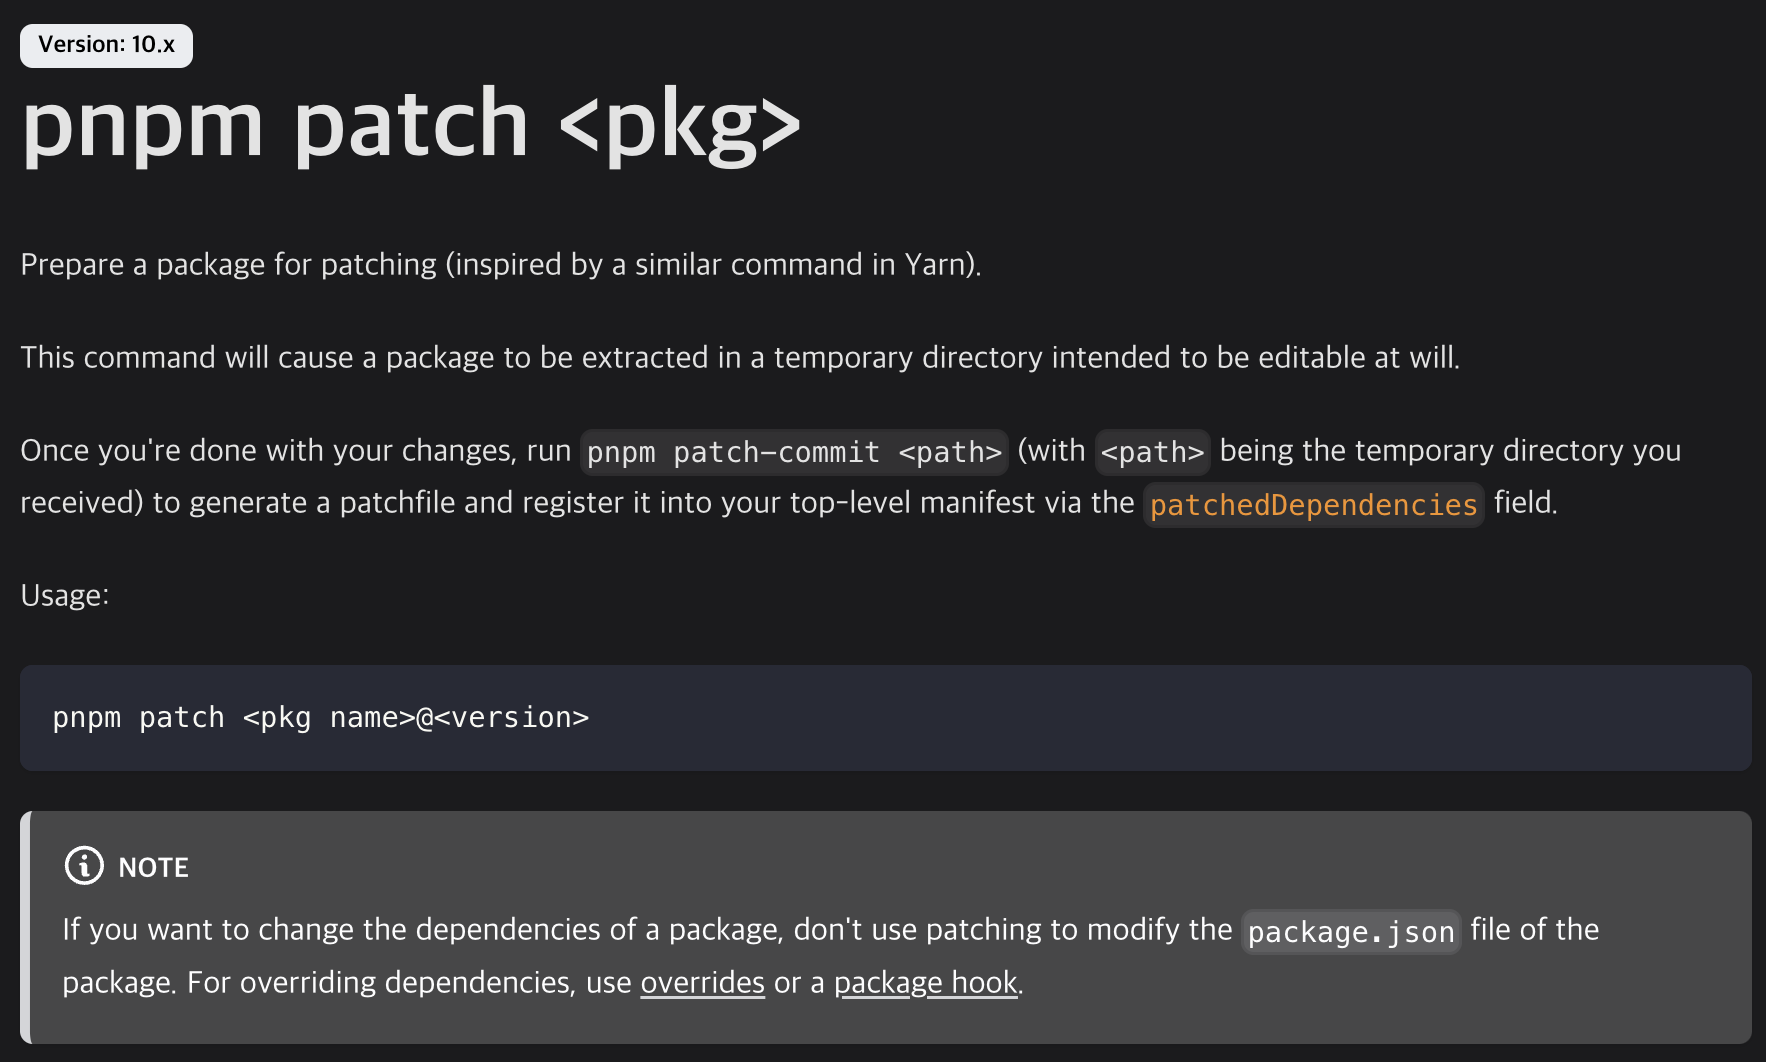
patch-package vs pnpm patch

많은 개발자들이 라이브러리 코드를 수정할 때 사용하는 patch-package에 대해 살펴보던 중, pnpm에 자체적인 patch 기능이 존재한다는 것을 알게 되었다.
하지만 처음 라이브러리 코드를 수정해보는 것이고, pnpm patch와 RN을 함께 사용한 사례가 많지 않아서 다른 개발 환경이나 EAS build에서 잘 적용될지 걱정됐다.
다행히 결론적으로
pnpm patch는EAS build에서 잘 작동하기 때문에 편하게 도입해도 괜찮을 것 같다.
구현
간단하게 다시 한 번 커스터마이징 해보기 위해 pnpm + Expo SDK 52로 프로젝트를 하나 생성하고, react-native-calendars 라이브러리를 설치하자.
pnpm dlx create-expo-app@latest
# 프로젝트 루트로 이동
pnpm dlx expo install expo-dev-client
pnpm add react-native-calendars
pnpm dlx expo prebuild
pnpm run ios|android
1. 달력 월 이동을 스와이프 제스처로 변경
CalendarList를 사용하면 쉽게 할 수 있다.
기본값은 세로 스크롤이지만, horizontal과 pagingEnabled를 true로 전달해 간단히 가로 스크롤 & 페이지네이션 처리가 가능하다.
추가로 헤더는 움직이지 않으며 값만 변경되도록 하기 위해 staticHeader 역시 true로 전달하자.
import { SafeAreaView } from "react-native-safe-area-context";
import { CalendarList } from "react-native-calendars";

export default function Index() {
  return (
    <SafeAreaView style={{ flex: 1, backgroundColor: "white" }}>
      <CalendarList
        horizontal={true}
        pagingEnabled={true}
        staticHeader={true}
      />
    </SafeAreaView>
  );
}
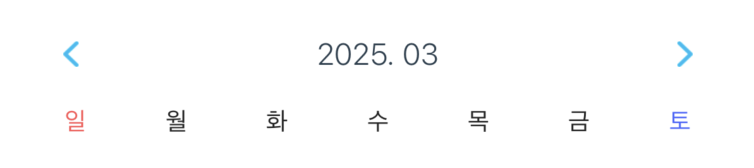
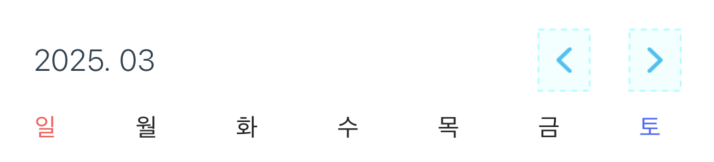
2. 년 월 형식 변경
monthFormat props를 사용해서 간단하게 변경할 수 있다. 포맷 종류는 XDate에서 확인할 수 있다.
2025. 03 과 같은 형태를 위해 yyyy. MM을 사용해보자.
import { SafeAreaView } from "react-native-safe-area-context";
import { CalendarList } from "react-native-calendars";

export default function Index() {
  return (
    <SafeAreaView style={{ flex: 1, backgroundColor: "white" }}>
      <CalendarList
        horizontal={true}
        pagingEnabled={true}
        staticHeader={true}
        monthFormat="yyyy. MM"
      />
    </SafeAreaView>
  );
}
3. 월/요일을 한글로 변경
LocaleConfig를 사용하면 간단하게 현지화 할 수 있다.
import { SafeAreaView } from "react-native-safe-area-context";
import { CalendarList, LocaleConfig } from "react-native-calendars";

LocaleConfig.locales["ko"] = {
  monthNames: ["1월", "2월", "3월", "4월", "5월", "6월", "7월", "8월", "9월", "10월", "11월", "12월"],
  monthNamesShort: ["1", "2", "3", "4", "5", "6", "7", "8", "9", "10", "11", "12"],
  dayNames: ["일요일", "월요일", "화요일", "수요일", "목요일", "금요일", "토요일"],
  dayNamesShort: ["일", "월", "화", "수", "목", "금", "토"],
  today: "오늘",
};

LocaleConfig.defaultLocale = "ko";

export default function Index() {
  return (
    <SafeAreaView style={{ flex: 1, backgroundColor: "white" }}>
      <CalendarList
        horizontal={true}
        pagingEnabled={true}
        staticHeader={true}
        monthFormat="yyyy. MM"
      />
    </SafeAreaView>
  );
}
4. 토요일/일요일만 색상 변경
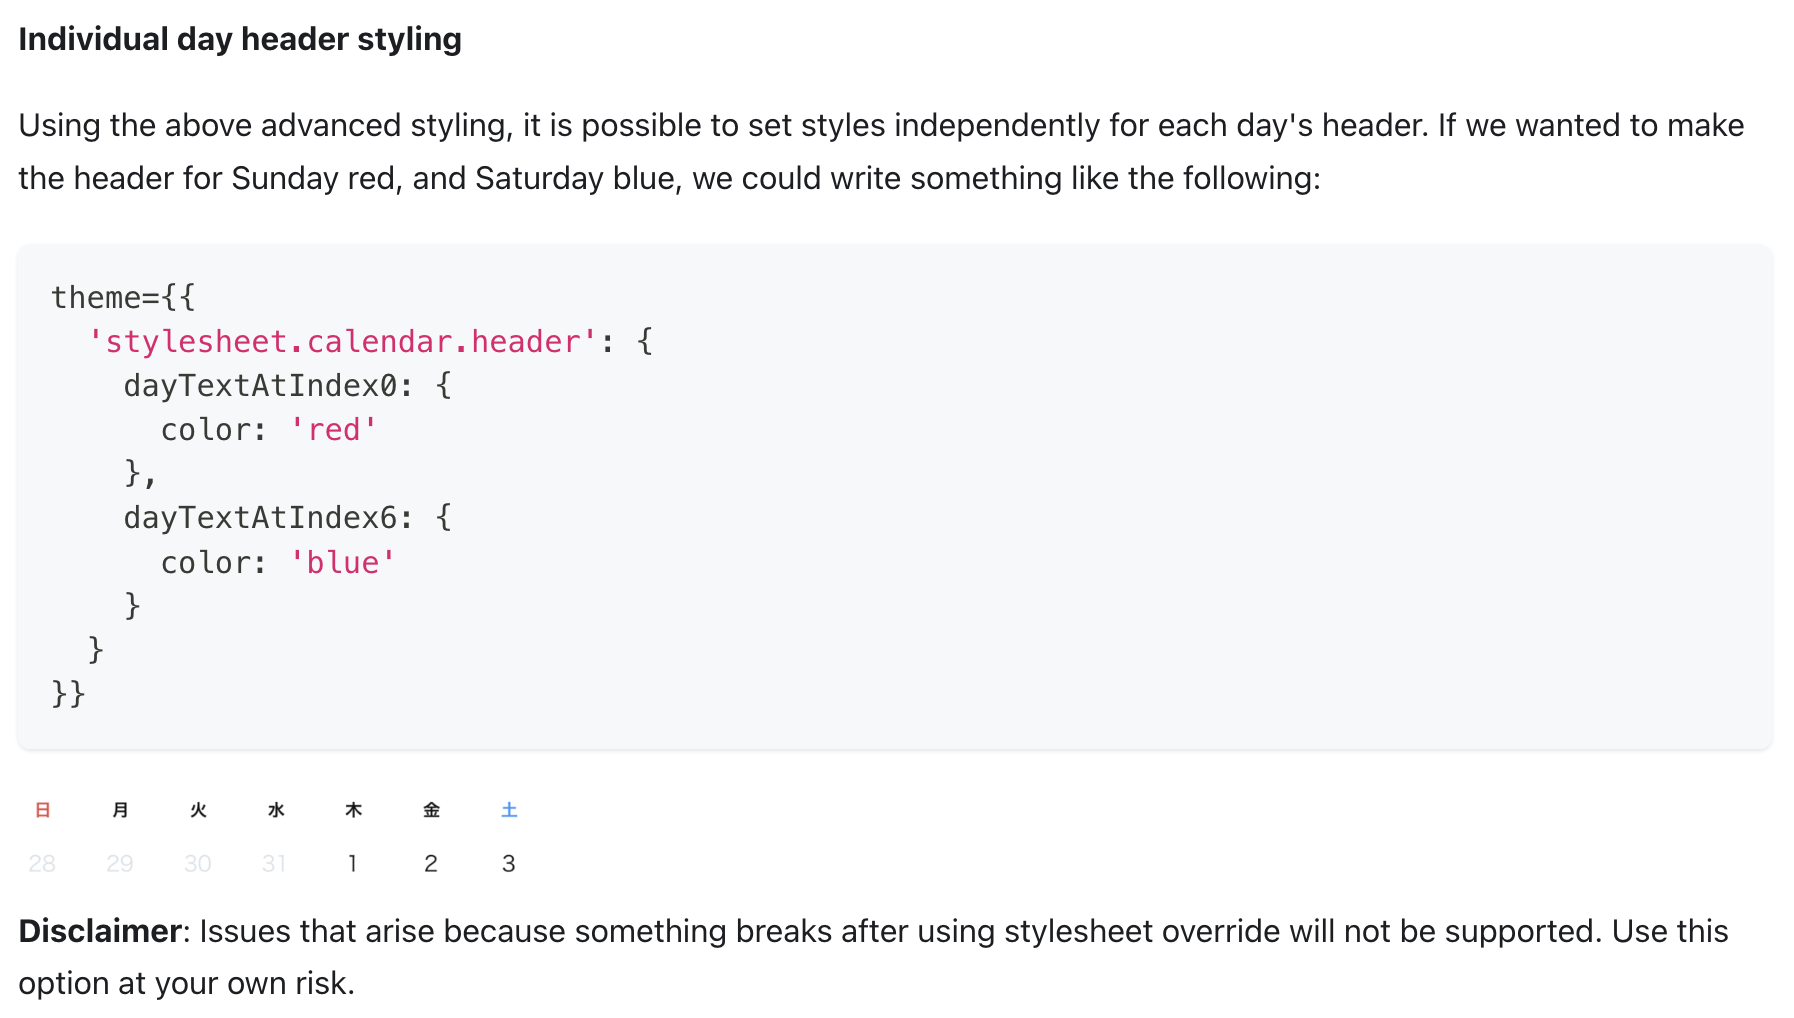
이 부분에서 애를 많이 먹었는데, 공식 문서 구석에 관련 내용이 숨어있다. (왜 목차에서 빠져있을까..)
import { SafeAreaView } from "react-native-safe-area-context";
import { CalendarList, LocaleConfig } from "react-native-calendars";
import type { Theme } from "react-native-calendars/src/types";

...

const calendarTheme = {
  textSectionTitleColor: "#242424", // 전체 색상 지정
  "stylesheet.calendar.header": {
    dayTextAtIndex0: {
      color: "#FF5656", // 일요일 색상 지정
    },
    dayTextAtIndex6: {
      color: "#4766FF", // 토요일 색상 지정
    },
  },
} as Theme;

export default function Index() {
  return (
    <SafeAreaView style={{ flex: 1, backgroundColor: "white" }}>
      <CalendarList
        theme={calendarTheme}
        horizontal={true}
        pagingEnabled={true}
        staticHeader={true}
        monthFormat="yyyy. MM"
      />
    </SafeAreaView>
  );
}
타입 에러가 발생한다면,
as Theme으로 타입 단언을 해주면 된다.
Theme 타입에'stylesheet.calendar.header'키가 없어서 발생하는 문제인데, 빨리 해결되면 좋을 것 같다.
5. 폰트 관련 커스텀
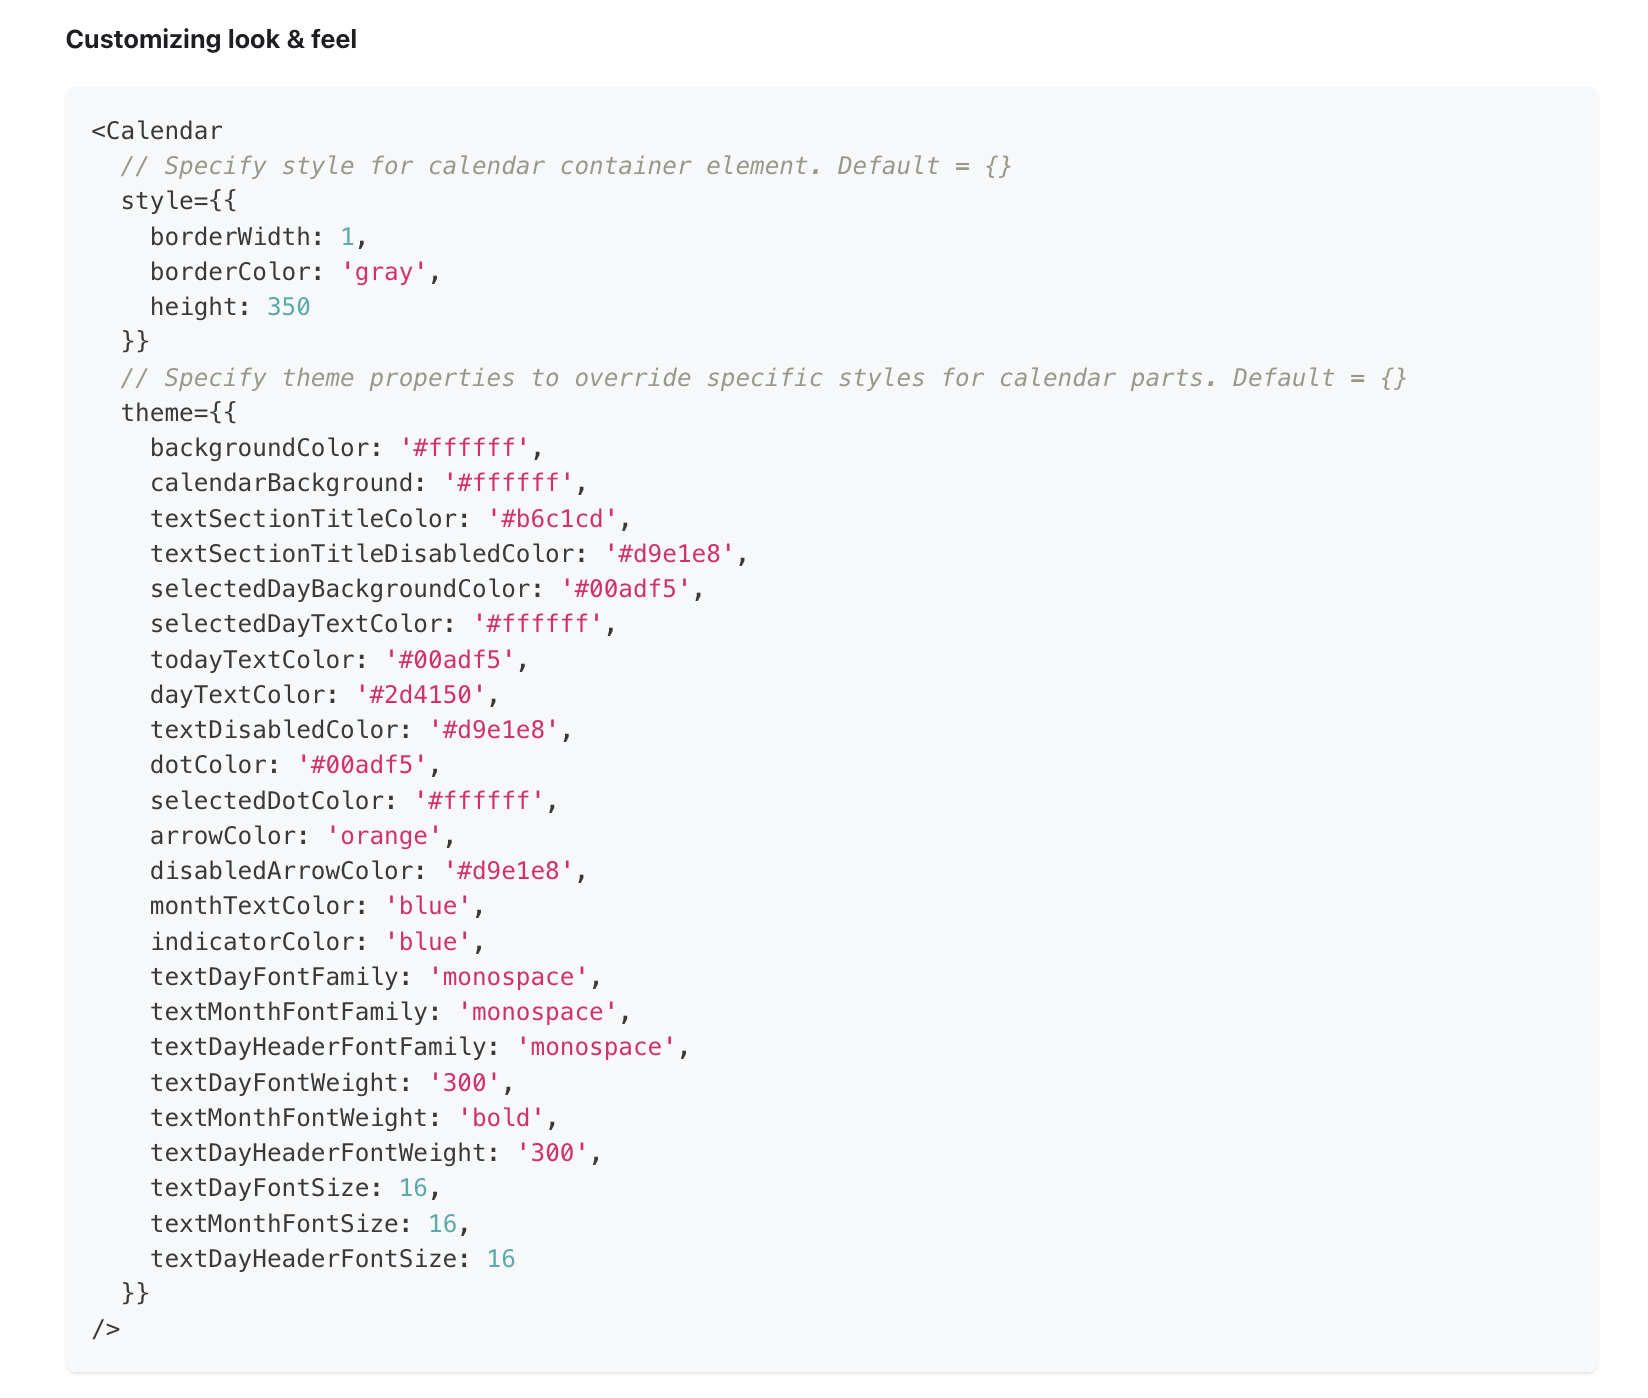
폰트나, 기타 스타일 값을 적용해야 한다면, Theme 내에서 거의 해결된다.
이 부분은 취사선택이다보니, Melissa에서 사용했던 Theme 필드에 대해 간략히 언급하고 넘어가려고 한다.
export const calendarThemeProps = {
  textDayFontFamily: theme.fontFamily.podkovaRegular, // 캘린더 내 날짜 폰트
  textDayFontSize: parseInt(theme.fontSize.lg), // 캘린더 내 날짜 크기
  dayTextColor: theme.colors.calendarGray, // 캘린더 내 날짜 색상
  textMonthFontFamily: theme.fontFamily.podkovaRegular, // 헤더 년월 폰트
  textMonthFontSize: parseInt(theme.fontSize.xl), // 헤더 년월 크기
  textSectionTitleColor: theme.colors.textGray, // 일 ~ 토 텍스트 색상
  ...
};
6. 헤더 레이아웃 커스텀을 위한 라이브러리 코드 수정

라이브러리 코드를 수정하기 전에, 먼저 헤더를 렌더링하는 라이브러리 코드를 살펴보자. calendar/header/index.js를 살펴보면 된다.
우리가 사용하는 CalendarList 역시 헤더로는
calendar/header/index.js를 사용한다.
// node_modules/react-native-calendars/src/calendar/header/index.js

...

const CalendarHeader = forwardRef((props, ref) => {
  const { /* 다양한 props들 */ } = props;

  ...

  // 년 월 텍스트 렌더링 함수
  const _renderHeader = () => { ... };

  // 헤더의 화살표 렌더링 함수
  const _renderArrow = (direction) => { ... };

  ...

  // 실제 헤더 렌더링 부분, 여기를 수정해 레이아웃을 변경하자
  return (
    <View ...>
      <View style={headerStyle}>
        {_renderArrow("left")}
        <View style={style.current.headerContainer}>
          {_renderHeader()}
          {renderIndicator()}
        </View>
        {_renderArrow("right")}
      </View>
      {renderDayNames()}
    </View>
  );
});

export default CalendarHeader;

CalendarHeader.displayName = "CalendarHeader";
CalendarHeader.defaultProps = {
  monthFormat: "MMMM yyyy",
  webAriaLevel: 1,
  arrowsHitSlop: 20, // 기본 hitSlop값이 명시되어 있다
};
pnpm patch로 수정 사항을 저장하기 전, node_modules에서 먼저 라이브러리 코드를 수정하며 변경 사항을 확인하는 것이 편리하다. (Metro 번들러의 fast refresh를 활용)
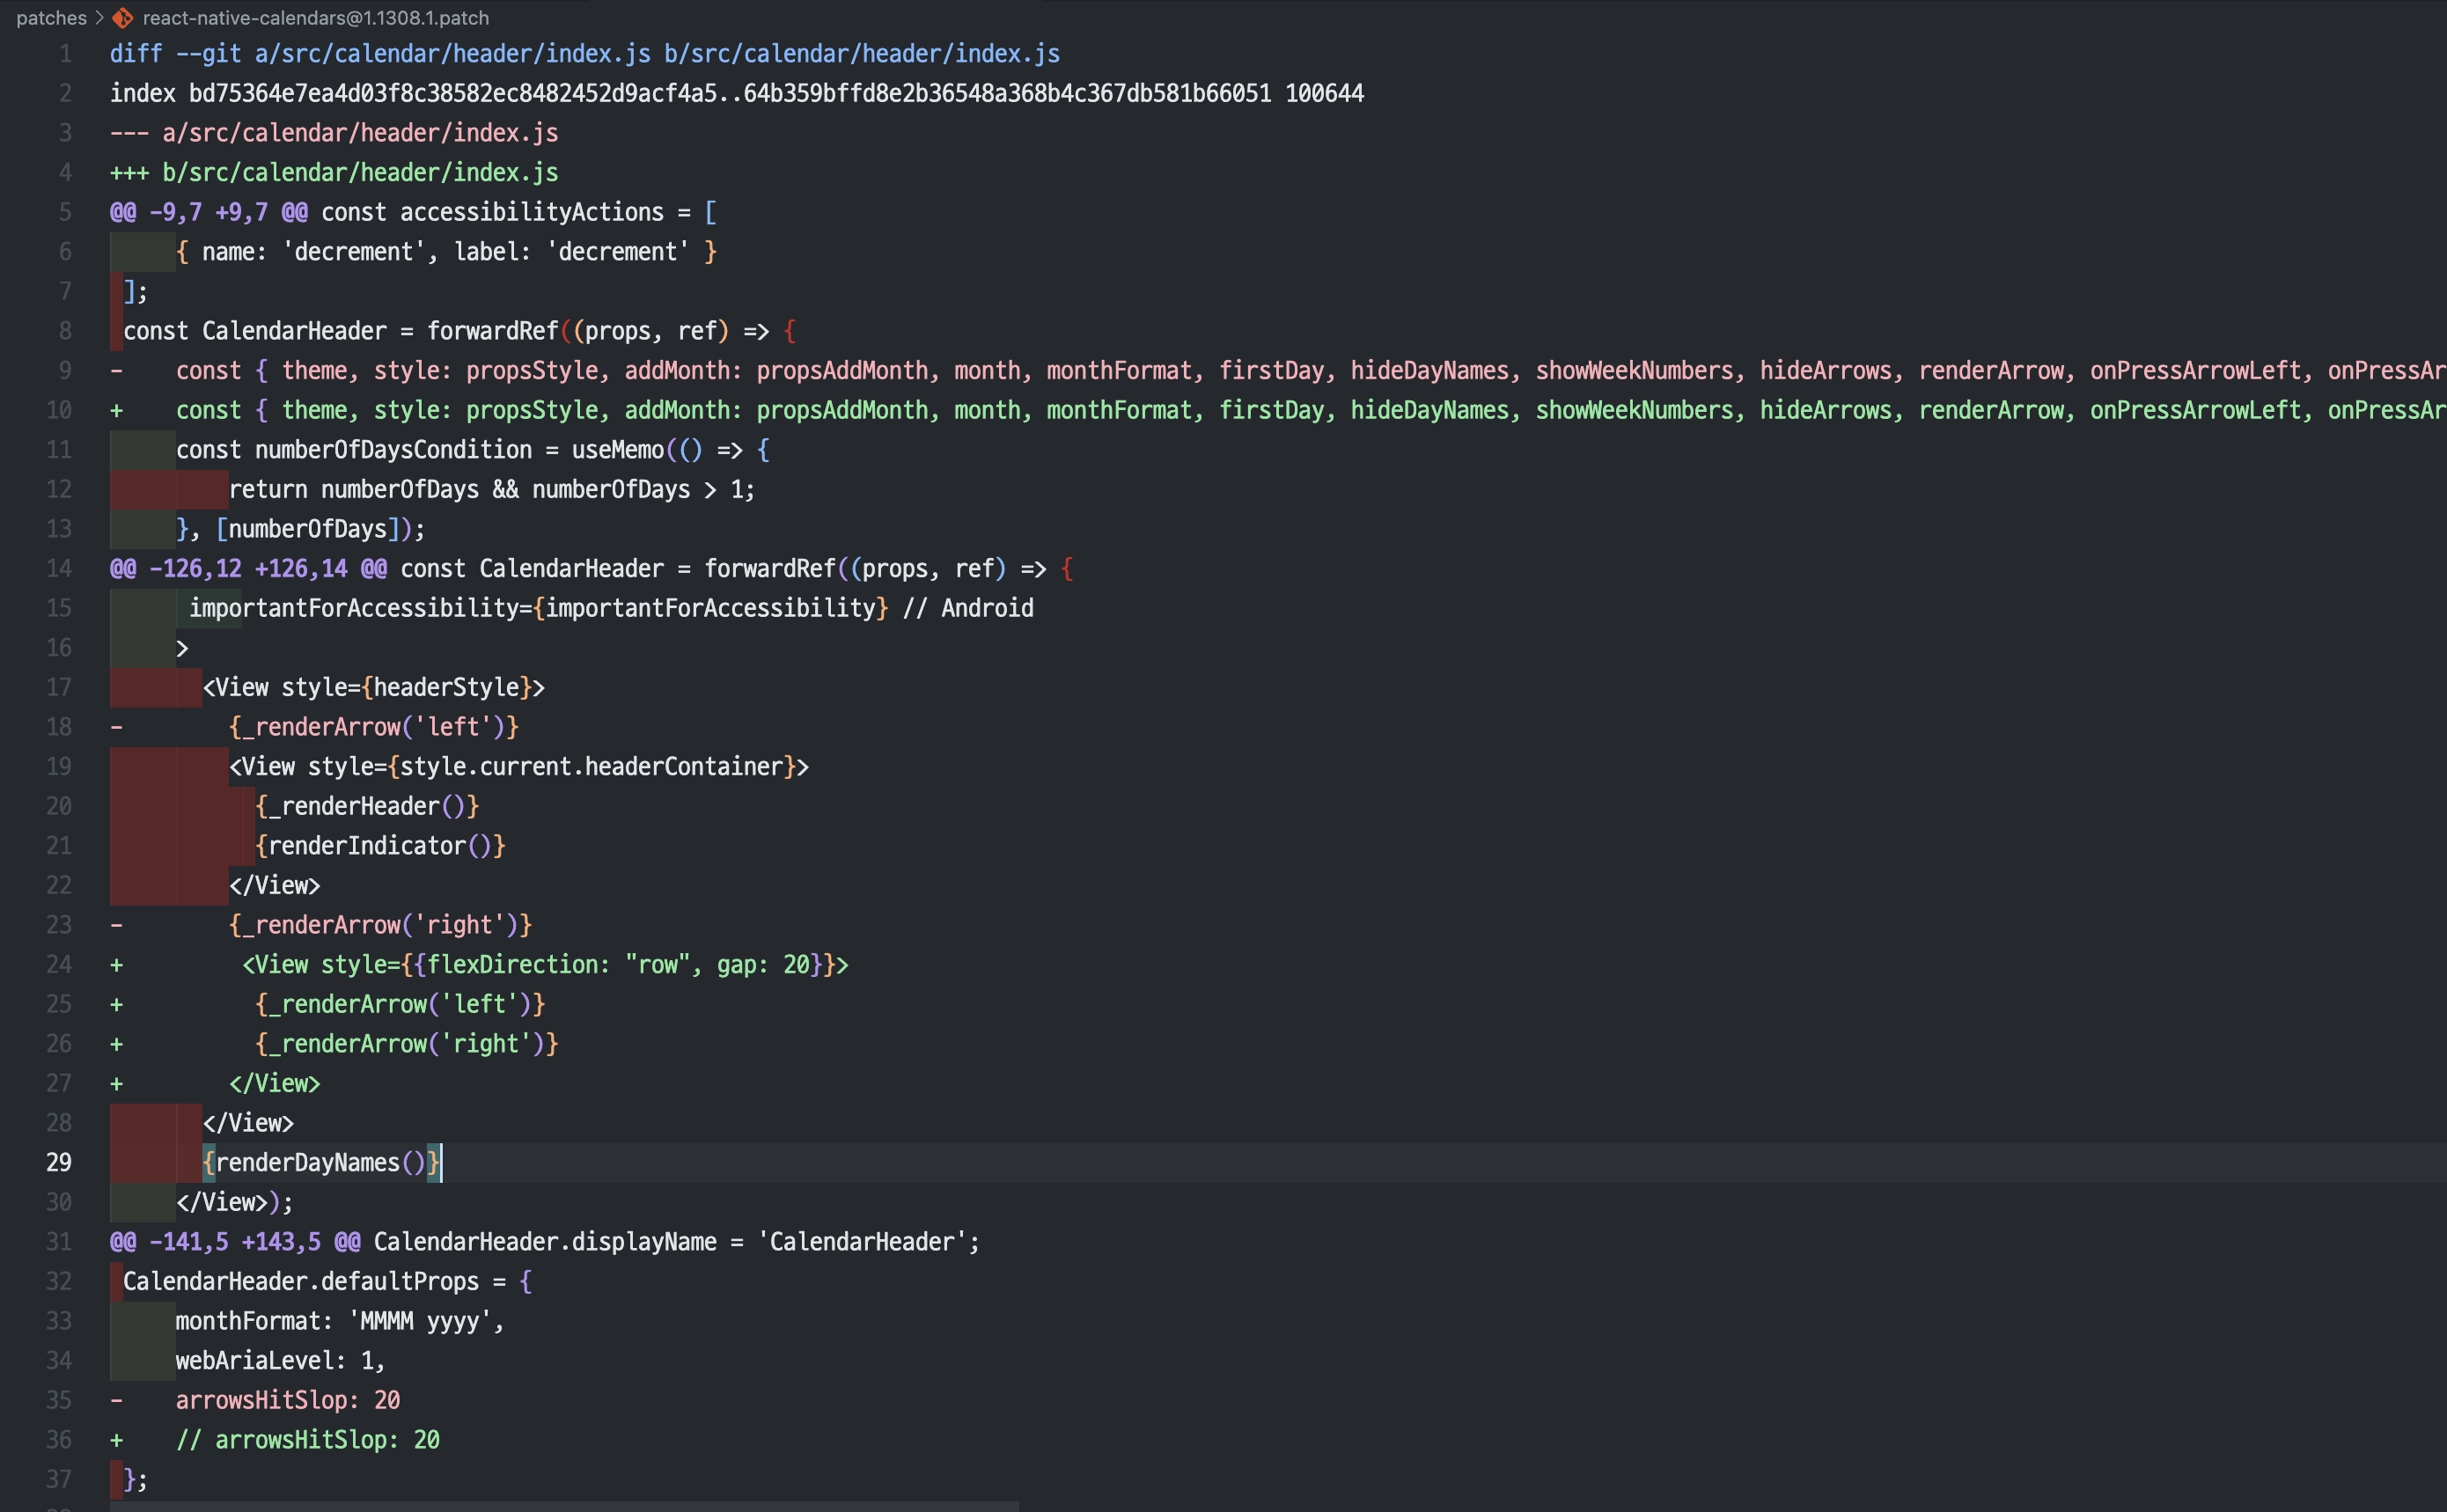
먼저 레이아웃을 수정해보자.
// node_modules/react-native-calendars/src/calendar/header/index.js

const CalendarHeader = forwardRef((props, ref) => {

  ...

  return (
    <View ...>
      <View style={headerStyle}>
        <View style={style.current.headerContainer}>
          {_renderHeader()}
          {renderIndicator()}
        </View>
        <View style={{flexDirection: "row", gap: 20}}>
          {_renderArrow('left')}
          {_renderArrow('right')}
        </View>
      </View>
      {renderDayNames()}
    </View>
  );
});

export default CalendarHeader;

...
레이아웃은 잘 변경되었지만, 아직 arrowsHitSlop이 적용되지 않는 문제가 존재한다. 이를 해결해보자.
// node_modules/react-native-calendars/src/calendar/header/index.js

...

const CalendarHeader = forwardRef((props, ref) => {
    // arrowsHitSlop의 기본값 20 제거
    const { ..., arrowsHitSlop, ... } = props;

    ...

});

export default CalendarHeader;

CalendarHeader.displayName = 'CalendarHeader';
CalendarHeader.defaultProps = {
    monthFormat: 'MMMM yyyy',
    webAriaLevel: 1,
    // arrowsHitSlop: 20
};
props를 구조 분해 할당하는 부분과, defaultProps 부분을 수정하면 된다.
이제 CalendarList의 props로 arrowsHitSlop을 넘겨보면, 제대로 값이 들어가는 것을 확인할 수 있다.
import { SafeAreaView } from "react-native-safe-area-context";
import { CalendarList, LocaleConfig } from "react-native-calendars";
import type { Theme } from "react-native-calendars/src/types";

...

export default function Index() {
  return (
    <SafeAreaView style={{ flex: 1, backgroundColor: "white" }}>
      <CalendarList
        theme={calendarTheme}
        horizontal={true}
        pagingEnabled={true}
        staticHeader={true}
        monthFormat="yyyy. MM"
        arrowsHitSlop={5} // arrowsHitSlop을 5로 설정
      />
    </SafeAreaView>
  );
}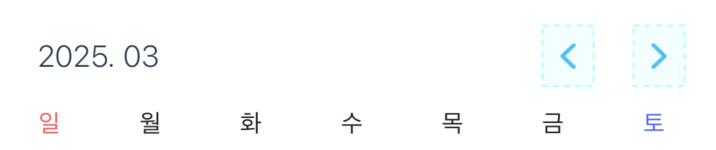
드디어 원하는대로 헤더를 정상화 시킬 수 있었다!
이제 이 수정 사항을 pnpm patch를 활용해 프로젝트에 저장하고, 빌드 시에도 적용되도록 해야 한다.
친절한 영상 가이드도 존재하지만, 한 번 정리해보겠다.
6.1. pnpm patch로 라이브러리 수정사항 저장
프로젝트 루트에서 아래 명령어를 입력한다.
pnpm patch react-native-calendars@version

# Ex) pnpm patch react-native-calendars@1.1308.1
잘 입력했다면, 아래와 같은 출력이 나올 것이다.
Patch: You can now edit the package at:

  /directory../node_modules/.pnpm_patches/react-native-calendars@1.1308.1

To commit your changes, run:

  pnpm patch-commit '/directory../node_modules/.pnpm_patches/react-native-calendars@1.1308.1'
첫 번째로 나온 경로를 VSCode로 열어보자.
code /directory../node_modules/.pnpm_patches/react-native-calendars@1.1308.1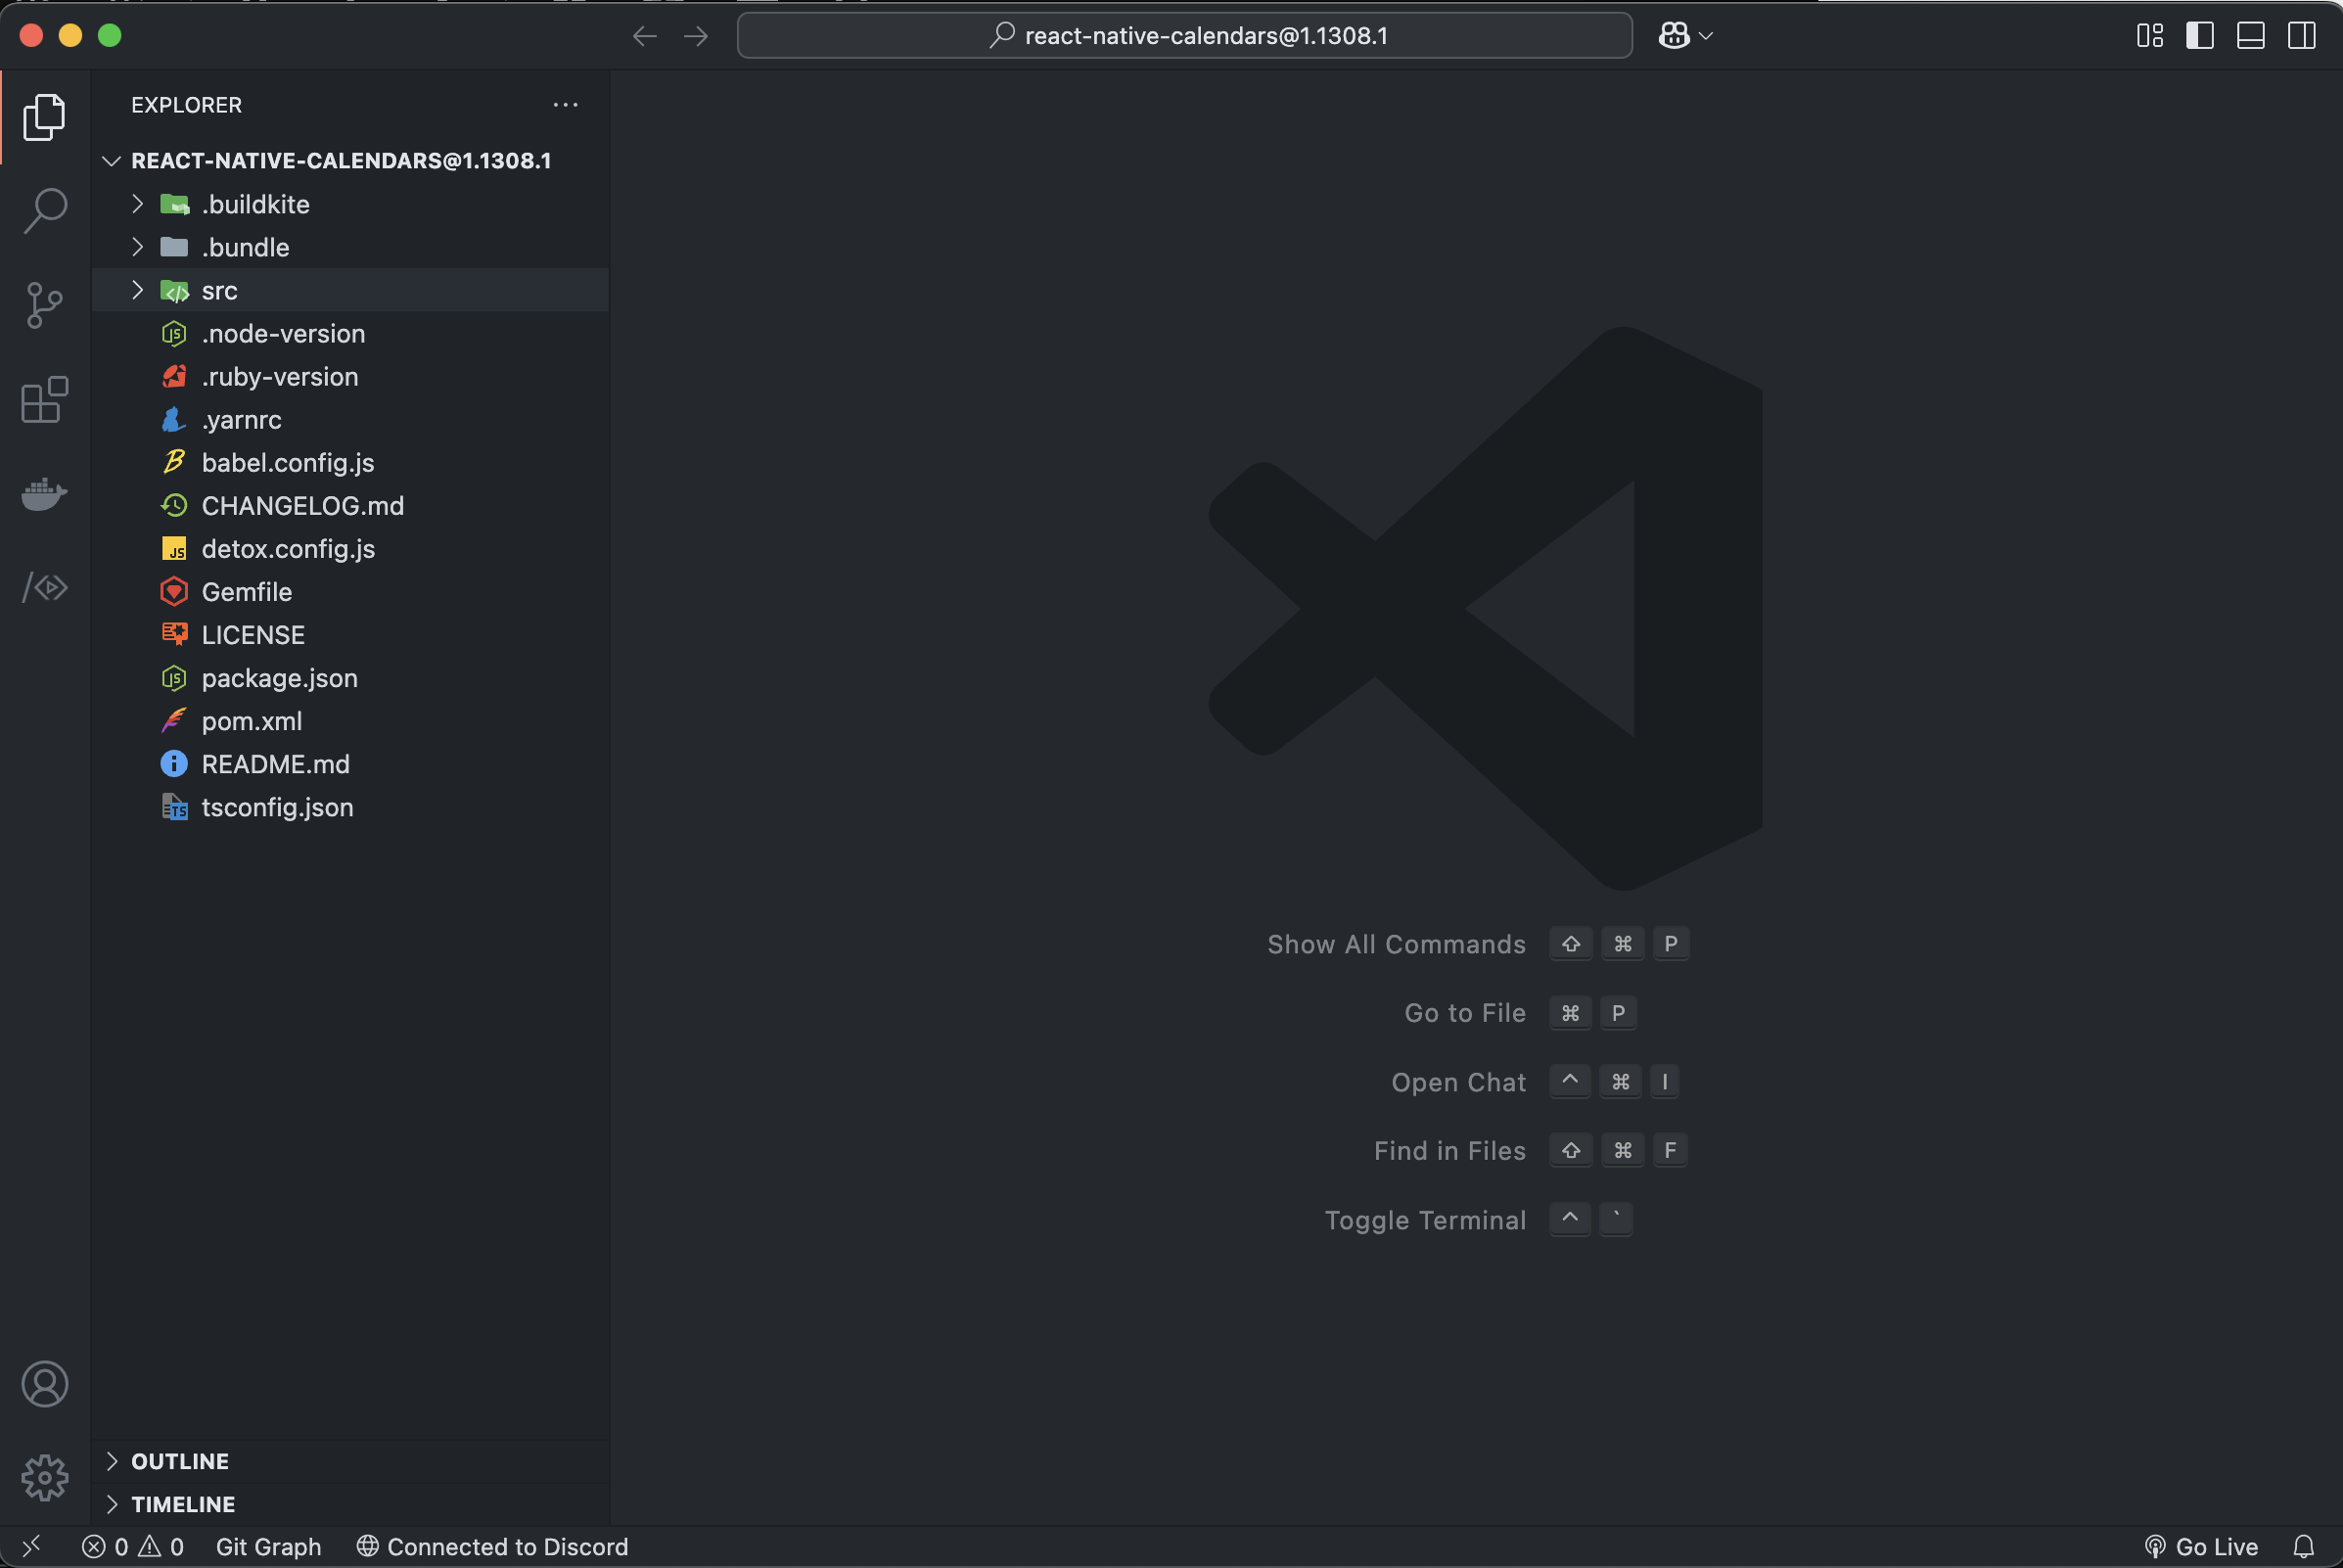
patch하기 위한 라이브러리 코드가 열리게 된다. 여기서 아까 수정한 사항을 반영하자.
VSCode의
format on save,format on paste옵션을 끄고 진행하는게 좋다.
prettier 등을 사용하면 diff가 너무 많아지기 때문이다.
수정했던 사항을 반영했다면, 다시 프로젝트 루트로 돌아와 두 번째 명령어를 실행하면 된다.
pnpm patch-commit '/directory.../node_modules/.pnpm_patches/react-native-calendars@1.1308.1'프로젝트 루트에 patches 폴더와, react-native-calendars@1.1308.1.patch 파일이 생겼다면 성공한 것이다!
patch 파일은 git diff 형태로 관리되는 것 같다. 라이브러리 설치 후 patch에 저장된 diff를 반영시키는 방식인 것 같다.
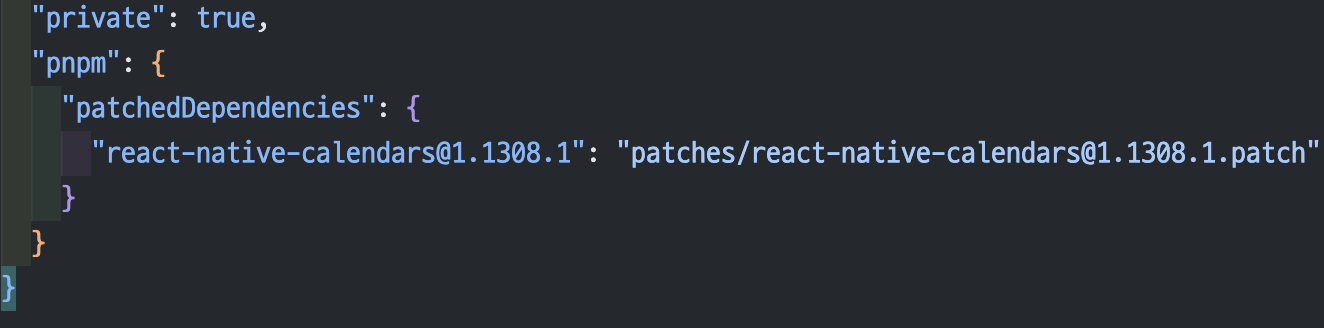
추가로 package.json 하단에도 변화가 생기게 된다.
정말 라이브러리 변경 사항이 잘 적용되는지 테스트해보자.
rm -rf node_modules android ios
pnpm i
pnpm run ios|android
node_modules를 지우고 재설치했음에도, 라이브러리 수정사항이 그대로 반영되어 있는 것을 확인할 수 있다!
EAS build에서도 라이브러리 수정사항이 반영되는지 확인해보자.
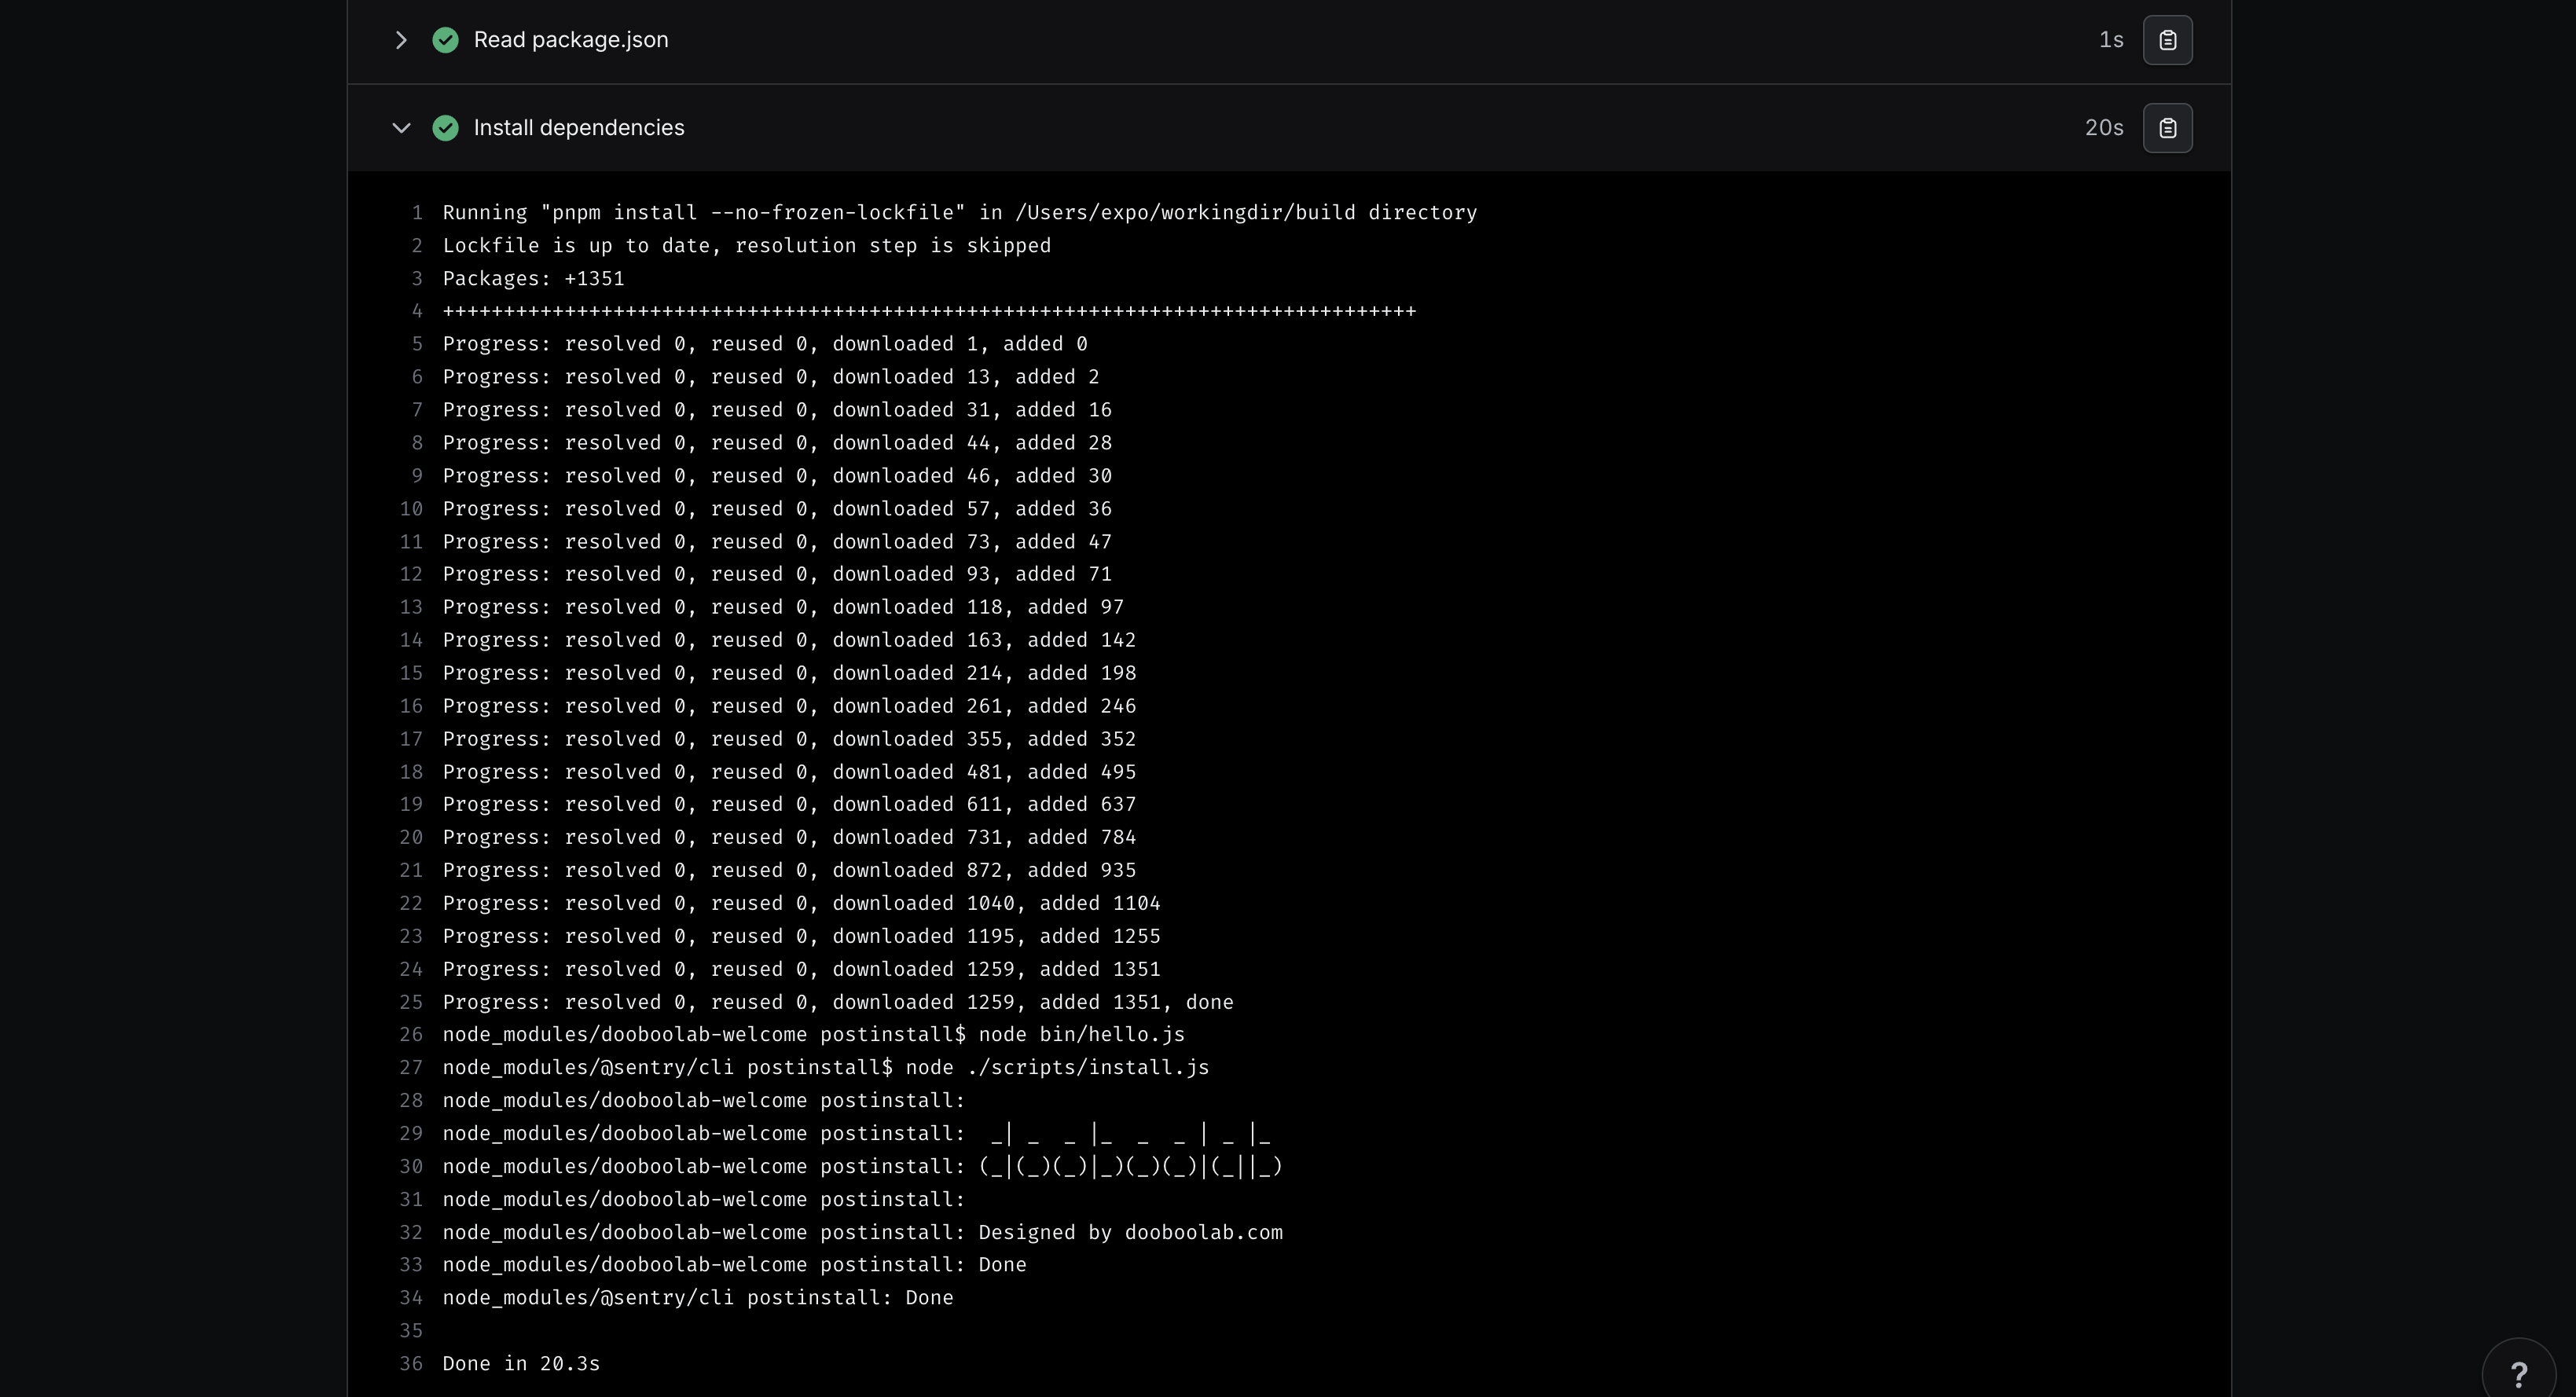
EAS build 콘솔에서 라이브러리 수정 전에는 없던 postinstall phase가 추가된 것을 확인할 수 있으며, 빌드 결과물 역시 라이브러리 수정사항이 잘 반영된다!
7. 화살표 버튼 커스터마이징하기
react-native-calendars에서는 화살표 버튼 관련 props를 제공해주고 있어 쉽게 커스텀할 수 있다.
복사, 설정 아이콘으로 교체 후 onClick 핸들러를 달아보도록 하자.
먼저 아이콘을 쉽게 사용하기 위해 expo-vector-icons를 설치하자.
pnpm dlx expo install expo-vector-icons예전에 cli에서 react-native-vector-icons 설치하는거 참 복잡했는데, Expo한테 참 감사하다...
import { SafeAreaView } from "react-native-safe-area-context";
import { CalendarList, LocaleConfig } from "react-native-calendars";
import type { Theme } from "react-native-calendars/src/types";
import Ionicons from "@expo/vector-icons/Ionicons";

...

export default function Index() {
  const handleCopyClick = () => {
    console.log("복사 클릭");
  };

  const handleSettingClick = () => {
    console.log("설정 클릭");
  };

  return (
    <SafeAreaView style={{ flex: 1, backgroundColor: "white" }}>
      <CalendarList
        theme={calendarTheme}
        horizontal={true}
        pagingEnabled={true}
        staticHeader={true}
        monthFormat="yyyy. MM"
        arrowsHitSlop={5}
        onPressArrowLeft={handleCopyClick}
        onPressArrowRight={handleSettingClick}
        renderArrow={(direction) =>
          direction === "left" ? (
            <Ionicons name="copy-outline" size={24} color="black" />
          ) : (
            <Ionicons name="settings-outline" size={24} color="black" />
          )
        }
      />
    </SafeAreaView>
  );
}
(버튼 gap이 좀 큰 것 같아 아쉽다...)
정리
RN에서 캘린더를 사용하려면 선택지가 많지 않고, 대부분 react-native-calendars를 사용하는 것 같다.
그런데 header 커스터마이징에 대한 레퍼런스를 찾기 쉽지 않아, props들을 하나하나 확인해보며 구현했던 기억이 난다.
또, 라이브러리 코드를 수정해서 사용하는 경험도 해볼 수 있었다. 거창하게 수정한 것은 아니지만 좋은 경험이었다고 생각한다.
글 읽어주셔서 감사합니다. 혹시 react-native-calendars로 캘린더 헤더 커스터마이징을 시도하고 계시다면, 도움이 되었길 바랍니다.
이 글에 대한 가독성, 오탈자/오개념, 코드 오타 등 다양한 지적을 환영합니다!