
REST API
: REST API란 REST를 기반으로 만들어진 API를 의미합니다.
REST?
Representational State Transfer 의 약자로 자원을 이름으로 구분하여 해당 자원의 상태를 주고 받는 모든 것을 의미합니다.
즉,
- HTTP URI를 통해 자원을 명시하고,
- HTTP Method(GET,POST,DELETE,PATCH 등)를 통해
- 해당 자원에 대한 CRUD(Create,Read,Update,Delete) Operation을 적용하는 것을 의미합니다.
REST API?
: REST의 원리를 따르는 API를 의미합니다.
REST API 설계 예시
- URI는 동사보다는 명사를, 대문자보다는 소문자를 사용
- 마지막에 슬래시(/)를 포함하지 않는다.
- 언더바 대신 하이폰을 사용한다.
- 파일 확장자는 URI에 포함하지 않는다.
- 행위를 포함하지 않는다.
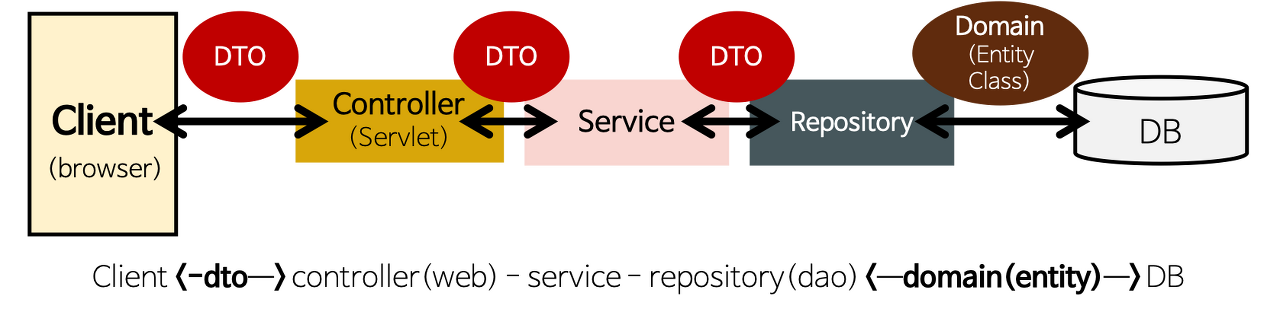
Controller, Service, Repository, Domain, DTO
출처: https://annajin.tistory.com/69
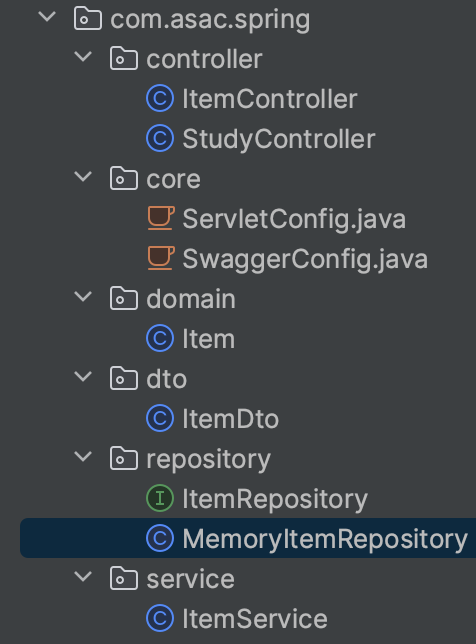
폴더구조
controller
- Client의 요청을 받았을 때 그 요청에 대해 실제 업무를 수행하는 Service를 호출
- Client가 보낸 데이터가 있다면 Service를 호출할 때 전달하기 쉽게 데이터의 가공
- 모델의 업무 수행이 완료되면 그 결과를 바탕으로 화면을 구성하도록 View에 전달
Service
- Controller의 요청을 받아 알맞은 정볼르 가공 Controller에게 재전달
- Repository를 상속받아 .findByID, .save()등의 함수 사용이 가능해진다.
DAO / Repository
- Entity에 의해 생성된 DB에 접근하는 메서드를 사용하기 위한 interface
- JPA를 상속받음으로써 기본적인 CRUD의 동작이 가능해집니다.
DTO
- 계층간의 데이터 교환을 위한 객체
Domain(Entity)
- DB의 테이블과 매핑되며 Entity class라고도 부릅니다.
- 실제 DB에 저장되는 내용들을 구현하는 class
- 하나의 객체가 DB의 하나의 Column처럼 작용
DTO랑 Domain이 뭐가 달라?
Domain(Entity)
- DB의 정보를 매핑하기 위한 클래스
- 핵심 비지니스 로직을 담는 영역이므로 비지니스 로직을 가질 수 있음
DTO- 각 계층 간을 이동할 때 데이터를 전달해주는 클래스
- 어떤 로직도 갖지 않는 순수하게 필드만 존재하는 클래스
따라서
Domain과 DTO는 서로 관심사가 달라서 분리해서 봐야할 것!
예시)
View에 접근할 때 Entity 클래스를 사용하게 되면 DB의 데이터를 변경할 위험이 있습니다.
DTO는 View와 통신하면서 자주 변경이 일어나므로 분리를 해서 Entity 클래스를 보호해주어야 합니다.
API 짜보기!
이 블로그 글을 보고 따라서 API를 만들어봤습니다.
폴더구조
domain
Item
Item 클래스를 생성하고
Item 객체 수정을 위한 updateItem 메소드를 작성합니다.
package com.asac.spring.domain;

import lombok.Builder;
import lombok.Data;

@Data
public class Item {

    private Long id;
    private String name;
    private Long count;

    @Builder
    public Item(Long id,String name, Long count){
        this.id = id;
        this.name = name;
        this.count = count;
    }

    public void initId(Long id)
    {
        this.id=id;
    }

    public void updateItem(String name, Long count){
        this.name = name;
        this.count =count;
    }

}
DTO
데이터를 주고 받을 때 사용할 dto를 작성합니다.
@Builder 어노테이션을 이용해 무분별한 settet 사용을 지양합니다.
Builder 패턴이 필요한 이유
아래 처럼 생성자를 사용하게 되면 가독성 문제가 발생합니다.
@Getter
class User {
  private Long id;
  private String email;
  private String password;
  private String name;
  private String address;
}

public User (String email, String password, String name, String address) {
  this(null, email, password, name, address);
}

public User (Long id, String email, String password, String name, String address) {
  this.id = id;
  this.email = email;
  this.password = password;
  this.name = name;
  this.address = address;
}
package com.asac.spring.dto;

import lombok.Builder;
import lombok.Data;

//데이터를 주고받을 때 사용
@Data
public class ItemDto {

    private Long id;
    private String name;
    private Long count;

    @Builder
    public ItemDto(Long id,String name, Long count){
        this.id = id;
        this.name = name;
        this.count = count;
    }

}
이름 혹은 주소입력이 필수가 아니라면?
private String email = "test@gmail.com";
private String pwd = "1234"

@Test
public void 테스트() {
  String name = "길동이"

  User user1 = new User(email, pwd, name, null); // 주소 빼고
  User user2 = new User(email, pwd, null, null); // 이름, 주소 제외
  // ...
}
null로 값을 채우거나, 주소를 뺀 생성자 함수를 다시 만들어야 하는 번거로움이 발생합니다.
Lombok을 이용한 Builder 패턴을 쓴다면?
@Getter @Builder // ✨ 클래스 전체 필드를 빌더로 사용 가능!
public class UserLombok {

  private Long id;
  private String email;
  private String password;
  private String name;
}

// 사용예제
public User join(String email, String password, String name) {
  UserLombok build = UserLombok.builder()
            .email(email)
            .password(password)
            .name(name)
            .build();
  ...
}
요런식으로 간편하게 사용이 가능하게 됩니다! 굳
repository
데이터베이스와 연관되어 있는 계층
즉, 다른 데이터베이스로 변경될 가능성이 비교적 높습니다.
MemoryItemRepository
이번 예시는 데이터베이스 기술을 따로 사용하지 않습니다.
따라서 메모리에 저장하는 방식인 MemoryItemRepository를 작성합니다.
package com.asac.spring.repository;

import com.asac.spring.domain.Item;
import org.springframework.stereotype.Repository;

import java.util.HashMap;
import java.util.List;
import java.util.Map;

@Repository
public class MemoryItemRepository implements ItemRepository {

    private static Map<Long,Item> store = new HashMap<>();
    //id를 생성하기 위한 sequence
    private static Long sequence =0L;


    @Override
    public void save(Item item){
        item.setId(++sequence);
        store.put(item.getId(),item);
    }

    @Override
    public Item findById(Long id){
        return store.get(id);
    }

    @Override
    public List<Item> findAll(){
        return store.values().stream().toList();
    }

    @Override
    public void updateById(Long id, Item item){
            store.put(id,item);
    }

    @Override
    public void deleteById(Long id){
            store.remove(id);
    }

}
@Repository: 스프링에서 지원하지 않는 Exception을 Spring Exception으로 전환하기 위해서 @Repository 어노테이션을 사용합니다.
ItemRepository
이 인터페이스에 Repository 구현체가 가져야 할 메소드들을 정의해둠으로서 구현체를 변경하거나 다른 구현체로 교체할 때, 새로운 구현체가 인터페이스를 준수하기만 하면, 내부 코드를 수정할 필요가 없어집니다.
예시)
MySQL DB를 사용하는 구현체에서 Oracle DB를 사용하는 구현체로 변경할 때,
인터페이스만 따라주면 코드를 크게 변경하지 않아도 된다.
package com.asac.spring.repository;

import com.asac.spring.domain.Item;
import org.springframework.stereotype.Repository;

import java.util.List;

public interface ItemRepository {

    void save(Item item);
    Item findById(Long id);
    List<Item> findAll();
    void updateById(Long id , Item item);
    void deleteById(Long id);

}
save(): 새로운 Item 객체를 저장할 때마다 sequence 변수를 1씩 증가시켜 고유한 id 값을 만들어준다. 해시맵에 key는 고유 id값 , Value에는 Item 객체를 담아서 저장findById(): id 값을 기준으로 해시맴에 저장된 Item 객체를 찾아서 반환findAll(): 해시맵에 저장된 모든 Item 객체들을 ArrayList 객체에 담아서 반환updateById(): 해시맵에 이미 저장되어 있는 것과 key가 같을 경우 새로운 값으로 덮어 씌워지기 때문에 구현deleteById(): id 값을 기준으로 해시맵에 저장된 Item 객체를 제거
오류 발생 시!
Implement methods를 누르고 추상 메소드를 구현해주면 됩니다.
Service
ItemService
package com.asac.spring.service;

import com.asac.spring.domain.Item;
import com.asac.spring.dto.ItemDto;
import com.asac.spring.repository.ItemRepository;
import org.springframework.beans.factory.annotation.Autowired;
import org.springframework.stereotype.Service;

import java.util.List;

import static java.util.stream.Collectors.toList;

@Service
public class ItemService {

    private ItemRepository itemRepository;

    @Autowired
    public ItemService(ItemRepository itemRepository){
        this.itemRepository = itemRepository;
    }

    //item 객체 생성 후 itemDto의 내용을 item에 저장
    public void saveItem(ItemDto itemDto){
       Item item = Item.builder()
               .name(itemDto.getName())
               .count(itemDto.getCount())
               .build();
       itemRepository.save(item); //itemRepository를 통해 item 저장
    }

    //itemRepository를 통해 id에 해당하는 item을 찾아서 반환
    public ItemDto findItemById(Long id){
        Item item = itemRepository.findById(id);

        return ItemDto.builder()
                .id(item.getId())
                .name(item.getName())
                .count(item.getCount())
                .build(); // itemDto 반환
    }

    //itmeRepository를 통해 모든 item을 찾아서 반환
    public List<ItemDto> findAllItem(){
       return itemRepository.findAll()
               .stream()
               .map(item ->
                 ItemDto.builder()
                         .id(item.getId())
                         .name(item.getName())
                         .count(item.getCount())
                         .build()
               ).toList();
    }

    public void updateItemById(Long id, ItemDto itemDto){

        Item findItem = itemRepository.findById(id); // itemRepository를 통해 id에 해당하는 item을 찾아서 반환
        findItem.updateItem(itemDto.getName(), itemDto.getCount()); // item의 내용을 수정

        itemRepository.updateById(id, findItem); // itemRepository를 통해 id에 해당하는 item을 찾아서 내용 수정


    }

    public void deleteItemById(Long id){
        itemRepository.deleteById(id); //itemRepository를 통해 id에 해당하는 item을 찾아서 삭제
    }

}
Controller
ItemController
package com.asac.spring.controller;

import com.asac.spring.dto.ItemDto;
import com.asac.spring.service.ItemService;
import org.springframework.web.bind.annotation.*;

import java.util.List;

@RestController
public class ItemController {

    private final ItemService itemService;

    public ItemController(ItemService itemService){
        this.itemService = itemService;
    }

    @PostMapping("items")
    public void save(@RequestBody ItemDto itemDto){
        itemService.saveItem(itemDto);
    }

    @GetMapping("items/{id}")
    public ItemDto findItemById(@PathVariable Long id){
        return itemService.findItemById(id);
    }

    @GetMapping("items")
    public List<ItemDto> findAllItem(){
        return itemService.findAllItem();
    }

    @PatchMapping("items/{id}")
    public void updateItemById(@PathVariable Long id, @RequestBody ItemDto itemDto){
        itemService.updateItemById(id,itemDto);
    }

    @DeleteMapping("items/{id}")
    public void deleteItemById(@PathVariable Long id){
        itemService.deleteItemById(id);
    }

}
@ResponseBody: 자바객체를 HTTP 요청의 바디 내요으로 매핑하여 클라이언트로 전송@RequestBody: HTTP 요청의 본문(json)을 자바 객체로 변환해주는 어노테이션 , @ResponseBody와 반대@PathVariable: URI에 변수를 넣을 수 있게 해줍니다. "item/1" 경로로 GET 요청을 보내면 id가 1인 물건을 조회할 수 있게 됩니다.
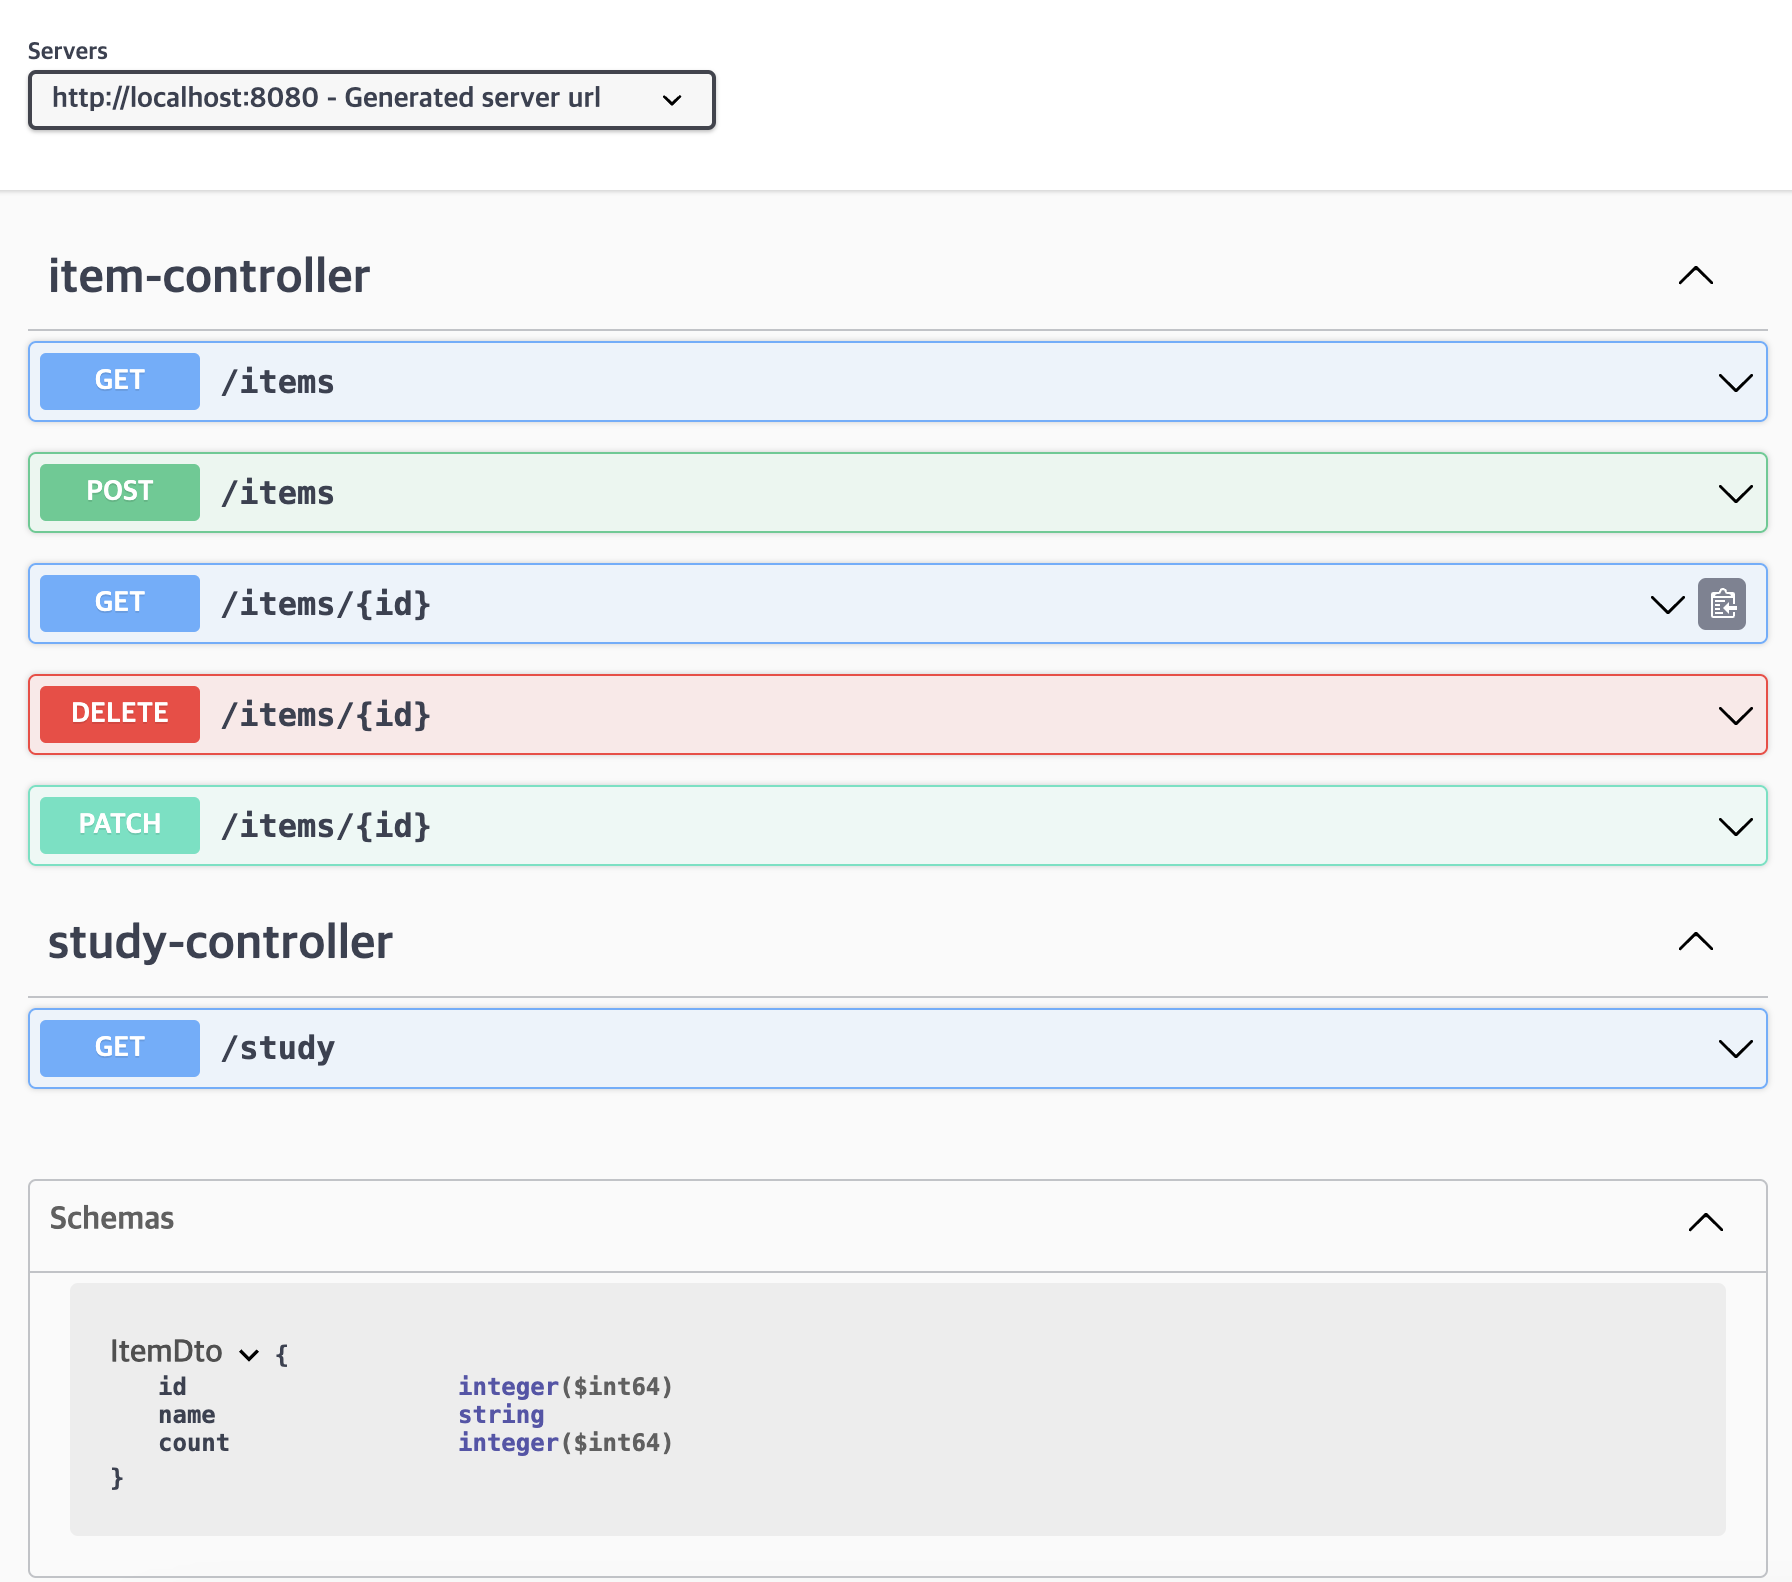
결과를 Swagger로 확인해봅시다!
참고블로그
[네트워크] REST API란? REST, RESTful이란?
Spring Controller , Service , Repository , Domain , DTO
[TIL] 06/03 항해99 26일차 - domain & DTO
Builder 패턴 - 필요성과 사용법
