Day13,
어제에 이어서 웹사이트 'kidsgao'를 따라 만들어봤다.
오늘 무엇을 배웠지?
Kidsgao 사이트 따라 만들어보기2
Kidsgao : http://sisikiller.dothome.co.kr/
forest 2 페이지
- forest1 페이지는 forest2 페이지를 만들 때와 크게 다르지 않음 더 다양한 forest2로 복습
html
- new file-save(index0714.html), save(style0714.css, animation0714.css, mobile0714.css) (css파일은 편의상 css 폴더를 만들어 그안에 저장)
- 기본 설정 + html, css 파일을 연동, 미디어쿼리를 사용할 수 있도록
<meta name="viewport" content="width=device-width, initial-scale=1.0">태그 입력
<link>
<!DOCTYPE html>
<html>
<head>
	<meta charset="utf-8">
	<meta name="description" content="우리쌀 점토로 만든 키즈가오 웹사이트 소개">
	<meta name="keywords" content="키즈가오, 점토, 장난감">
	<meta name="author" content="키즈가오,정혜리">
	<meta name="viewport" content="width=device-width, initial-scale=1.0">
	<title>키즈가오</title>
	<link rel="stylesheet" type="text/css" href="css/style0714.css">
	<link rel="stylesheet" type="text/css" href="css/animation0714.css">
	<link rel="stylesheet" type="text/css" href="css/mobile0714.css">
</head>
<body>

</body>
</html><div>태그로 forest2 페이지 영역을 설정하고 id를 입력한다.<div>태그로 들어갈 이미지의 영역을 설정하고 class를 설정한다.
	<div id="forest2">
		<div class="frog"></div>
		<div class="machineWrap2">
			<div class="machineBottom"></div>
			<div class="machineLeft"></div>
			<div class="machineRight"></div>
		</div>
		<img class="forestBubble" src="../img/forest/forest2/forestbubble.png" alt="기계를 통해서 쌀을 고운 가루로 만든답니다.">
		<div class="forest2Tree"></div>
	</div>
CSS-Style
- Default CSS
html, body { margin: 0; padding: 0; }
body { overflow-x: hidden; } /*->가로 스크롤 생성방지*/
h1, h2, h3, h4, h5, h6, p { margin: 0; padding: 0; }
button { border: none; background-color: transparent; }
.clearfix { clear: both; }
으로 웹브라우저의 경계에 주어진 기본값을 없애고, 각 영역의 경계에 주어진 기본값을 없앤다. 또, button 태그, 자식관계의 태그들의 기본값을 모두 없앤다.
2. forest2 페이지 영역<div>태그인 #forest2의 너비와 높이를 설정하고 이미지를 연결한다.
#forest2 { width: 100%; height: 750px;
background-image: url(../../img/forest/forest2/forest2_bg.png); }<div>태그 .frog의 이미지를 연결하고 너비 높이를 설정한다. position을 absolute로 설정하고 margin 값으로 위치를 고정한다.
#forest2 .frog { position: absolute; width: 153px; height: 257px;
	background-image: url(../../img/forest/forest2/frog.png);
margin: 50px 0 0 100px; } - .machineWrap2 안의 자식 태그들의 위치와 영향을 받도록 position: relative로 설정하고 너비, 높이를 설정한다. 또 left,top, margin-left등으로 위치를 설정한다.
#forest2 .machineWrap2 { position: relative; width: 400px; height: 400px;
left: 50%; margin-left: -200px; top: 180px; }- .machineBottom, .machineLeft, .machineRight 각각의 이미지를 연결하고 너비, 높이 등을 설정하고 position은 absolute로 위치를 설정해 고정한다. 이때, 이미지들의 앞,뒤 위치가 있기 때문에(3차원적 성격) z-index를 설정한다. (z-index를 설정 안할 경우 기본값은 0)
#forest2 .machineWrap2 .machineBottom { position: absolute; width: 374px;
	height: 162px; background-image: url(../../img/forest/forest2/machinebottom.png);
margin-top: 220px; z-index: 200; }- .forestBubble position을 relative, float:right;로 설정해 브라우저 크기에 따라 브라우저에서 항상 오른쪽에서 위치하지만 사이즈에 따라 일정한 간격을 띄우고 위치가 변경되도록 설정한다.
.forest2Tree는 위치를 왼쪽으로 설정(float:left;) 하고도 동일하게 설치한다.
#forest2 .forestBubble { position: relative; float: right;
	top: -100px; margin-right: 100px; }
#forest2 .forest2Tree {	position: relative; float: left;
	width: 304px; height: 282px; top: 50px;
	background-image: url(../../img/forest/forest2/forest2tree.png);
CSS-Animation
- forest2 페이지에서 움직이는 이미지(왼쪽 기계, 오른쪽 기계)에 애니메이션을 적용한다. 모든 애니메이션은 일정한 속도로 계속해서 반복적으로 효과가 적용되도록 설정한다.
#forest2 .machineWrap2 .machineLeft {
	animation: moveLeft 1000ms linear infinite alternate; }
@keyframes moveLeft {
	from {left: 30px}
	to {left: 0;}
}
#forest2 .machineWrap2 .machineRight {
	animation: moveRight 1000ms linear infinite alternate; }
@keyframes moveRight {
	from {left: -30px}
	to {left: 0;}
}
CSS-Mobile
- 미디어쿼리를 적용해 모바일 사이즈(최대 767px-> 768px부터는 pc버전 화면)의 화면에서는 다르게 적용되도록 설정한다.
@media (max-width: 767px) {

	#forest2 { position: relative; height: 400px;
		background-image: url(../../img/mobile/forest/forest2/mobile_forest2_bg.png); }

        #forest2 .frog { width: 34px; height: 57px; margin: 0 0 0 20px;
		background-image: url(../../img/mobile/forest/forest2/mobile_frog.png); }
	#forest2 .machineWrap2 { width: 200px; height: 110px; top: 70px;
		margin-left: -97px; }
	#forest2 .machineWrap2 .machineBottom { width: 141px; height: 60px;
		left: 50%; margin: 50px 0 0 -70.5px;
        	background-image: url(../../img/mobile/forest/forest2/mobile_machinebottom.png); }
	#forest2 .machineWrap2 .machineLeft { width: 46px; height: 85px;
		background-image: url(../../img/mobile/forest/forest2/mobile_machineleft.png);
		margin: 0 0 0 20px; }
	#forest2 .machineWrap2 .machineRight { width: 46px; height: 93px;
		background-image: url(../../img/mobile/forest/forest2/mobile_machineright.png);
		margin: -10px 0 0 130px; }

	#forest2 .forestBubble { position: absolute; width: 161px; left: 50%;
		top: 290px; margin-left: -83px; }

	#forest2 .forest2Tree { width: 69px; height: 76px; float: right;
		background-image: url(../../img/mobile/forest/forest2/mobile_forest2tree.png);
top: 130px; margin-right: 20px; }- #forest의 높이를 재설정하고 이미지를 연결한다. pc버전에서 position을 설정하지 않았기 때문에 position을 relative로 설정한다.
<div>태그들의 높이와 너비를 재설정하고 이미지를 연결한다. 또, .machineBottom의 중앙정렬을 위해 left:50%, margin을 설정한다.- .forestBubble의 중앙정렬을 위해 left:50%, margin을 설정한다. 항상 위치가 고정되어 있으므로 absolute로 position을 설정하고 위치와 크기를 재설정하고 이미지를 연결한다.
- .forest2Tree 이미지는 항상 우측에 있으므로 float: right;로 설정하고 너비, 크기를 설정하고 top, margin-right 등으로 위치를 설정한다.
Science 페이지
(forest3페이지는 어제 배운 farm3와 비슷해서 생략)
html
(forest1,2,3 html에 이어서)
1. <div> 태그로 Science 페이지 영역을 설정하고 id를 설정한다.
2. 삽입할 이미지 각각의 영역을 <div>태그로 설정하고 class를 설정한다.
3. <img>태그로 이미지를 입력하고 글자를 입력하기 위해 <p>태그를 이용한다. <br>태그는 글에 줄바꿈을 설정할 수 있다.
<div id="science">
	<div class="scienceWrap">
		<div class="scienceLeftWrap">
			<div class="gly"></div>
			<img src="../img/science/leftTitle.png" alt="자초, 어성초, 감초">
			<p>
				자초 어성초 감초를 넣어서<br>
				피부진정 및 항염 효과가 있답니다.
			</p>
		</div>
		<div class="scienceCenterWrap">
			<div class="purpleSteam"></div>
			<div class="funnelBack"></div>
			<div class="funnelFront"></div>
		</div>
		<div class="scienceRightWrap">
			<div class="water"></div>
			<img src="../img/science/rightTitle.png" alt="글리세린,올리브유">
			<p>
				빵의 표면을 촉촉하게 해주는<br>
				글리세린과 오메가-9 지방산이<br>
				풍부한 올리브를 넣어서<br>
				보습 효과도 뛰어나답니다.
			</p>
		</div>
	</div>
</div>
CSS-Style
(forest1,2,3의 css에 이어서)
1. <div>태그인 #Science와 .scienceWrap의 너비와 높이를 설정하고 이미지를 연결한다. 이때 position을 relative로 설정해 자식태그들과 영향을 받을수 있도록 한다.
#science { position: relative; width: 100%; height: 800px;
	background-image: url(../../img/science/science_bg.png); }
#science .scienceWrap {	position: relative; width: 1068px;
height: 655px; margin: 0 auto; }<div>태그 .scienceRightWrap, .scienceCenterWrap의 position을 relative로 설정하고 너비와 높이를 설정한다. 이때, float: left;를 차례로 적용해 순서대로 좌->우 정렬되도록 설정한다.
#science .scienceWrap .scienceLeftWrap { float: left; width: 288px;
	height: 100%; }
#science .scienceWrap .scienceCenterWrap { position: relative; float: left;
	width: 488px; height: 100%; }
#science .scienceWrap .scienceRightWrap { position: relative; float: left;
width: 292px; height: 100%; }- .scienceLeftWrap에 속한 각 태그의 높이와 너비를 설정해주고 이미지를 연결한다.
<p>태그의 글에 대한 디자인을 한다.
#science .scienceWrap .scienceLeftWrap .gly { width: 230px;
	height: 192px; margin: 0 0 130px 55px;
	background-image: url(../../img/science/gly.png); }
#science .scienceWrap .scienceLeftWrap p,
#science .scienceWrap .scienceRightWrap p  {
	color: #8e7577; font-size: 18px; line-height: 26px;
padding-top: 10px; }- .scienceCenterWrap에 속한 태그들의 너비, 높이 등을 설정하고 이미지를 연결한다. .scienceCenterWrap이라는 부모태그에 높이값 영향을 주기 위해 position을 relative로 설정하고 .funnelBack은 위치를 고정하기 위해 absolute로 설정한다. 위치를 left, margins 등으로 설정한다. .scienceRightWrap에 속한 태그도 동일하게 너비, 높이, 위치 설정, 이미지 연결한다.
#science .scienceWrap .scienceCenterWrap .purpleSteam {
	position: relative; width :241px; height: 216px;
	background-image: url(../../img/science/grape.png);
	left: 50%; margin-left: -120px; }
#science .scienceWrap .scienceCenterWrap .funnelBack {
	position: absolute; width: 488px; height: 438px;
	background-image: url(../../img/science/funnelback.png); }
#science .scienceWrap .scienceCenterWrap .funnelFront {
	position: relative; width: 485px; height: 390px;
	background-image: url(../../img/science/funnelfront.png);
	margin-top: 48px; }
#science .scienceWrap .scienceRightWrap .water { width: 204px; height: 191px;
	background-image: url(../../img/science/water.png);
	margin-bottom: 130px; }
CSS-Animation
- #science 페이지에서 움직이는 이미지(왼쪽 플라스크, 오른쪽 비커)에 애니메이션을 적용한다. 모든 애니메이션은 일정한 속도로 계속해서 반복적으로 효과가 적용되도록 설정한다.
#science .scienceWrap .gly { animation: spinGly 1500ms linear infinite alternate; }
@keyframes spinGly {
	from {transform: rotate(0);}
	to {transform: rotate(50deg);}
}
#science .scienceWrap .water { animation: spinWater 1500ms linear infinite alternate; }
@keyframes spinWater {
	from {transform: rotate(0);}
	to {transform: rotate(-50deg);}
}
CSS-Mobile
(forest1,2,3의 css에 이어서)
#science { height: 580px;
	background-image: url(../../img/mobile/science/mobile_science_bg.png); }

#science .scienceWrap {	width: 360px; height: auto; overflow: hidden;
	top: 180px; }

#science .scienceWrap .scienceLeftWrap { width: 100px; }
#science .scienceWrap .scienceLeftWrap .gly { width: 76px; height: 63px;
	background-image: url(../../img/mobile/science/mobile_gly.png);
	margin: 0 0 10px 0; }
#science .scienceWrap .scienceLeftWrap img,
#science .scienceWrap .scienceRightWrap img { height: 15px; }
#science .scienceWrap .scienceLeftWrap p,
#science .scienceWrap .scienceRightWrap p { display: none; }

#science .scienceWrap .scienceCenterWrap { width: 160px; height: 222px; }
#science .scienceWrap .scienceCenterWrap .purpleSteam { width: 80px;
	height: 71px; margin-left: -40px;
	background-image: url(../../img/mobile/science/mobile_grape.png); }
#science .scienceWrap .scienceCenterWrap .funnelBack { width: 173px;
	height: 151px;
	background-image: url(../../img/mobile/science/mobile_hopperback.png); }
#science .scienceWrap .scienceCenterWrap .funnelFront { width: 160px;
	height: 122px; left: 50%; margin: 20px 0 0 -80px;
	background-image: url(../../img/mobile/science/mobile_hopperfront.png); }

#science .scienceWrap .scienceRightWrap { width: 100px; }
#science .scienceWrap .scienceRightWrap .water { width: 67px; height: 63px;
	margin : 0 0 13px 32px
background-image: url(../../img/mobile/science/mobile_water.png); }<div>태그인 #science의 높이를 재설정하고 이미지를 연결한다.- .scienceWrap의 너비와 높이를 설정하고 overflow:hidden 을 통해 자식태그의 높이값에 대한 영향을 받을 수 있도록 한다.
- .scienceLeftWrap의 너비를 설정한다. 이에 속한 태그들의 높이와 위치 등 을 설정하고 이미지를 연결한다.
- .sciencCenterWrap의 너비를 설정하고 자식태그들의 너비와 높이 등을 설정한다. left와 margin 으로 태그들의 위치를 설정하고 이미지를 연결한다.
- .scienceLeftWrap의 너비를 설정한다. 이에 속한 태그의 높이와 위치 등 을 설정하고 이미지를 연결한다.
Night1 페이지
html
(science의 html에 이어서)
1. <div> 태그로 night1 페이지 영역을 설정하고 id를 설정한다.
2. 삽입할 이미지 각각의 영역을 <div>태그로 설정하고 class를 설정한다.
	<div id="night1">
		<div class="owl"></div>
		<div class="starWrap">
			<div class="star1"></div>
			<div class="star2"></div>
			<div class="star3"></div>
		</div>
	</div>
CSS-Style
(science의 css에 이어서)
1. <div>태그인 #night1의 너비와 높이를 설정하고 이미지를 연결한다.
#night1 { width: 100%; height: 700px;
background-image: url(../../img/oneday/night1/night1_bg.png); }<div>태그 .owl의 position을 absolute로 설정하고 위치를 margin으로 위치를 고정한다. 각 태그에 맞는 이미지를 연결하고 너비와 높이를 설정한다.
#night1 .owl { position: absolute; width: 334px; height: 571px;
	background-image: url(../../img/oneday/night1/owl.png);
margin-top: 50px; }- .starWrap의 이미지를 연결하고 너비, 높이를 설정한다. 2.와 같이 위치를 동일하게 position: absolute로 고정하고, top, margin 값으로 위치를 설정한다.
#night1 .starWrap { position: relative; width: 750px; height: 400px;
top: 150px; margin-left: 600px; }- .starWrap의 .star1, .star2, .star3의 위치를 absolute로 설정하고 너비, 높이를 정한다.이미지를 연결하고 각각의 위치를 margin 값으로 설정한다.
#night1 .starWrap .star1,
#night1 .starWrap .star2,
#night1 .starWrap .star3 { position: absolute;
	width: 53px; height: 50px;
	background-image: url(../../img/oneday/night1/star1.png); }

#night1 .starWrap .star1 { margin-top: 350px; }
#night1 .starWrap .star2 { margin-left: 650px; }
#night1 .starWrap .star3 { margin : 250px 0 0 500px }
CSS-Animation
(science의 css에 이어서)
1. Night1 페이지에서 움직이는 이미지(star1, star2, star3)에 애니메이션을 적용한다. 모든 애니메이션은 일정한 속도로 계속해서 반복적으로 효과가 적용되도록 설정한다. (크기변화 ->scale)
#night1 .starWrap .star1,
#night1 .starWrap .star2,
#night1 .starWrap .star3 { animation : pulseStar 1s linear infinite alternate; }
@keyframes pulseStar {
	from { transform: scale(1.0); }
	to { transform: scale(0.8); }
}
CSS-Mobile
(science의 css에 이어서)
#night1 { position : relative; height: 500px;
	background-image: url(../../img/mobile/oneday/night1/mobile_night1_bg.png); }
#night1 .owl { width: 88px; height: 151px; margin-top: 0;
		background-image: url(../../img/mobile/oneday/night1/mobile_owl.png); }
#night1 .starWrap { position: absolute; width: 308px; height: 157px;
		background-image: url(../../img/mobile/oneday/night1/mobile_star.png);
		top: 300px; margin-left: 50px; }

#night1 .starWrap .star1, #night1 .starWrap .star2,
#night1 .starWrap .star3 { display: none; }<div>태그인 #night1의 높이를 재설정하고 이미지를 연결한다. 높이값을 영향을 주기 위해 position을 relative로 설정한다. #night1에 속한<div>태그들의 높이와 너비를 재설정하고 이미지를 연결한다.- 이 때, margin, top 등을 이용해 각영역의 위치를 재설정한다.
- .star1, .star2, .star3는 이미 .starWrap에 속해있는 이미지로 재설정했기 때문에 모바일버전에서는 나타나지 않도록 display:none;으로 설정한다.
무엇이 어려웠지?
처음에 forest1 페이지를 만들때
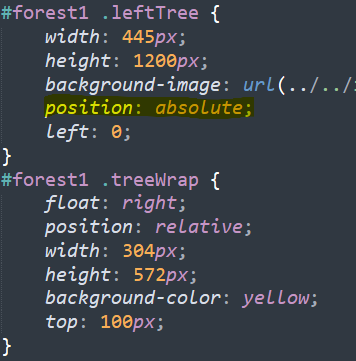 #forest1 .leftTree에 position:absolute를 적용하지 않으면 #forest1 .treeWrap에 float: right를 적용해도 아래 줄에 (div 태그의 block속성이 그대로 살아나 float의 기능은 무시된 것 처럼)오른쪽에 붙어서 나타난다.
.leftTree에 position:absolute 대신 float: left를 적용하고, .treeWrap에 float: right를 적용하면 postion:absolute를 적용한 결과와 동일한 결과를 보여주는데, position: absolute; left:0; 대신 float: left를 사용해도 되는 건지 사용했을 때 다른 코드와 겹쳐졌을 때 레이아웃이 변경되지는 않는지 궁금해졌다.
어떻게 해결했지?
처음에는 내가 모르는 개념이 더 있어서 차이를 모르는 거라고 판단했다. 열심히 구글링했지만, 그 차이를 잘 모르겠더라, 그래서 멘토님께 문의를 했다. "float 속성은 탄생 배경은 글과 이미지가 같이 있을 때 이미지 배치를 하기 위해서 나타났지만 이 전에 이미지 배치, 요소들의 가로로 배치하기 힘들던 시절에 많이 사용하던 트릭이지만 엄청 많이 쓰는 방법입니다. 최근에는 배치를 할 수 있는 속성들이 있기 때문에 float 지양하고 position을 사용해서 배치 하는 게 더 좋습니다"라고 말씀하셨다. float는 편의를 위해서 최소한으로 쓰고 가능하면 position으로 배치하는 편이 좋다고 이해했다.
그래서?
와 어제 오늘 수업량이 좀 많았다. 숨돌릴 틈도 없이 수업을 들었고 잠깐 한눈 팔면 이해없이 코드만 받아적는 기계가 되기 때문에 왜 그렇지? 다른 방법은 안될까? 하는 응용으로 생각을 확장할 수 없다. 그렇지만..! 조금더 시간을 들여서 차근차근 공부를 했다. 오늘은 시간이 오래 걸릴거야. 그렇지만 진도에 급급해하지말고 배운걸 잘 소화해보자. 그렇지만 이렇게 오래 걸릴 줄 몰랐다. 2번 반복해서 듣는 것을 권장한다고 하는데, 한 번 듣는데도 6시간 가까이 걸렸다...! 정말 눈도 피로하고 뇌도 너덜너덜해진 기분이다...
sublime3를 이용해 오늘 만들어본 파일
https://github.com/hyeriJUNG/Daegu_AI_School/tree/main/0714
