Redux란?
Redux는 자바스크립트 상태관리 라이브러리, props drilling issue를 해결하기 위해 React에서도 상태관리 react-redux 라이브러리를 사용합니다.
Redux 원리
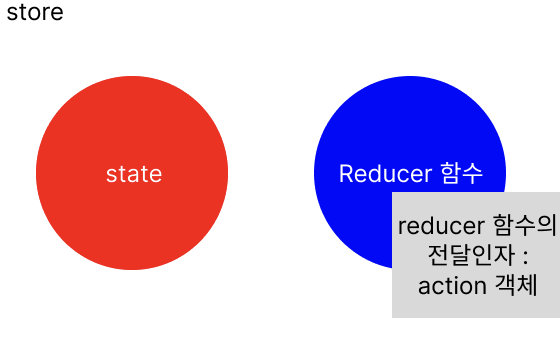
- store: 모든 state를 가지고 있는 전역 저장소. state와 state 변경 메소드인
reducer을 저장한다. - state 변경 방법 :
reducer실행reducer를 실행하는 메서드 :useDispatch
- state 값 참조하는 메서드 :
useSelector
위의 내용이 기본적인 React-Redux의 원리입니다.
React-Redux를 실습해보자.
실습 내용 요약
- Styled Component를 이용해서
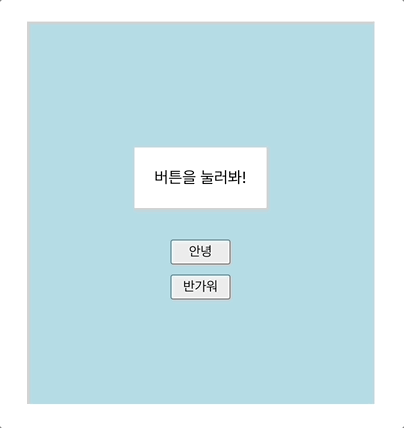
FirstComponent,SecondComponent,Button컴포넌트를 구현해주었습니다.FirstComponent:SecondComponent,Button2개를 감싸주는 컴포넌트입니다.SecondComponent: state 값을 출력해주는 컴포넌트입니다.Button: 누르면 State 값을 변경합니다.
이 프로젝트에선 '안녕' 버튼을 누르면 state를 '안녕!'으로,
'반가워' 버튼을 누르면 state를 '반가워!'로 바꿔줄 것입니다.
👉🏻 전체 코드 깃허브 리포지토리 바로가기
튜토리얼
1. 아주아주 빠르게 create-react-app 해주시고, 다음의 설치를 모두 진행해주세요. 같이 만들어볼 예제에서는 styled component와 react-redux를 사용합니다!
- styled component :
npm install --save styled-components@latest - react-redux :
npm i redux react-redux - redux-devtools :
npm i --save-dev redux-devtools-extension
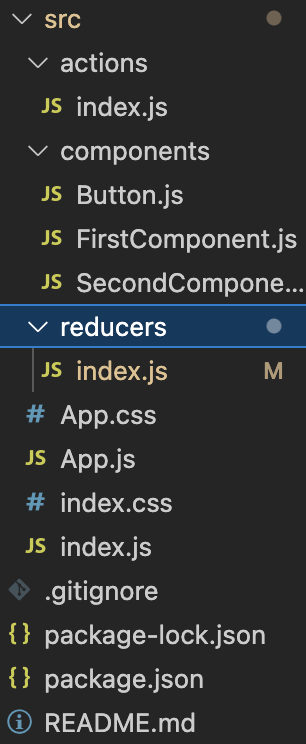
2. 폴더 구조는 아래와 같이 세팅합니다.
3. 먼저, styled component를 이용해서 전체 UI를 구현하는 코드입니다.
UI먼저 그려놓고, react-redux를 이용해봅시다.
- App.js
import './App.css';
import FirstComponent from './components/FirstComponent';

function App() {
  return (
    <div className='App'>
      <FirstComponent>
      </FirstComponent>
    </div>
  );
}

export default App;
compnents/ FirstComponent.js
import React from 'react';
import styled from "styled-components"
import SecondComponent from './SecondComponent';
import Button from './Button';

const FirstComponentStyle = styled.section`
    display: flex;
    flex-direction: column;
    justify-content: center;
    align-items: center;
    border-style: solid;
    width: 50vw;
    height: 50vh;
    background-color: lightblue;
    border-color: lightgrey;
`

const FirstComponent = () => {
    return (
        <FirstComponentStyle>
            <SecondComponent/>
            <Button label='안녕'/>
            <Button label='반가워'/>
        </FirstComponentStyle>
    );
};

export default FirstComponent;- components/ SecondComponent.js
import React from 'react';
import styled from "styled-components"

const SecondComponentStyle = styled.section`
    display: flex;
    flex-direction: row;
    margin: 20px;
    padding: 20px;
    border-style: solid;
    border-color: lightgray;
    background-color: white;
`;

const SecondComponent = () => {
    return (
        <SecondComponentStyle>
            여기에서 state를 출력할 것임!
        </SecondComponentStyle>
    );
};

export default SecondComponent;- components/ Button.js
import React from 'react';
import styled from "styled-components"

const ButtonStyle = styled.button`
    width: 60px;
    height: 25px;
    text-align: center;
    margin-top: 10px;
`;

const Button = ({label}) => {
    const dispatch = useDispatch();
//버튼을 눌렀을 때 실행됩니다.
    const buttonClickHandler = (e) => {
    	//버튼에 쓰여있는 글자가 브라우저 콘솔에 출력됩니다.
		console.log(e.target.textContent)
    }

    return (
        <ButtonStyle onClick={buttonClickHandler}>
            {label}
        </ButtonStyle>
    );
};

export default Button;
4. 이제 react-redux를 적용합니다.
원리를 다시 기억해봅시다!
- store: 모든 state를 가지고 있는 전역 저장소. state와 state 변경 메소드인
reducer을 저장한다. - state 변경 방법 :
reducer실행reducer를 실행하는 메서드 :useDispatch
- state 값 참조하는 메서드 :
useSelector
이제, 반영해봅시다.
먼저, actions/ index.js에서
action을 작성합니다.
action은reducer함수에 전달할 전달인자로, 객체 형식이어야 합니다.- action객체의 형식
{ type: ~~, payload: ~~ }payload는 이름이payload일 필요는 없습니다.- reducer 값을 바꿀 때 type 을 제외한 나머지부분을 newState 관련 데이터처럼 사용할 수 있습니다. (이건 이 예제에선 사용 X)
reducer에 다양한action객체를 전달해 주어야 하기 때문에, 보통action을 생성하는 메소드를 작성해서 사용합니다.- 얘를 액션생성자라고 합니다.
- actions /index.js
//app에서 store에 운반할 데이터, 자바스크립트 객체 형식이다.
export const hello = () => (
    { type: 'HELLO' }
);
export const longTimeNoSee = () => (
    { type: 'LONG_TIME_NO_SEE' }
);
이제, reducers/ index.js에 reducer를 작성합니다.
- state의 초기값은 '버튼을 눌러봐!' 입니다.
- reducer은
action.type값을 참조해서 실행할 코드를 분기합니다.
- reducers/ index.js
const initialState = '버튼을 눌러봐!';

const reducer = (state=initialState, action) => {
    switch(action.type) {
        case 'HELLO':
            return '안녕!';
        case 'LONG_TIME_NO_SEE':
            return '반가워!';
        default: return state;
    }
}

export default reducer;
다음으로, index.js에 store를 만듭니다.
createStore,Provider를 import 해주어야 합니다.createStore: store을 생성해주는 메소드입니다.Provider: 이게 없으면 모든 컴포넌트에store을 props로 전달해줘야 합니다. 그렇게 쓰지 않으려고 사용하는 겁니다.
createStore메소드의 인자로 위에서 작성한reducer메소드를 줍니다.- store에는 state와 state를 변경하는 reducer 메소드가 있다고 했죠~?
import React from 'react';
import ReactDOM from 'react-dom/client';
import './index.css';
import App from './App';

import { createStore } from 'redux';
import { Provider } from 'react-redux';
import reducer from './reducers';

const store = createStore(reducer)

const root = ReactDOM.createRoot(document.getElementById('root'));
root.render(
    <Provider store={store}>
        <App/>
    </Provider>
);
이제 모든 준비는 끝났군요! 생성된 state를 사용만 하면 되겠습니다.
어디에서 state를 사용해야 할까요?
SecondComponent: state를 출력해줘야 합니다.
->useSelector메소드를 사용해서 변경할 수 있습니다.Button: 클릭했을 때 state를 변경해줘야 합니다.
->useDispatch(action)을 사용해서 변경할 수 있습니다.
- components/ SecondComponent.js
import React from 'react';
import styled from "styled-components"
import { useSelector } from 'react-redux'

const SecondComponentStyle = styled.section`
    display: flex;
    flex-direction: row;
    margin: 20px;
    padding: 20px;
    border-style: solid;
    border-color: lightgray;
    background-color: white;
`;

const SecondComponent = () => {
    const 출력값 = useSelector(state=>state);

    return (
        <SecondComponentStyle>
            {출력값}
        </SecondComponentStyle>
    );
};

export default SecondComponent;
- components/ Button.js
import React from 'react';
import styled from "styled-components"
import { useDispatch } from 'react-redux';
import { hello, longTimeNoSee } from '../actions';

const ButtonStyle = styled.button`
    width: 60px;
    height: 25px;
    text-align: center;
    margin-top: 10px;
`;

const Button = ({label}) => {
    const dispatch = useDispatch();

    const buttonClickHandler = (e) => {
        switch(e.target.textContent){
            case '안녕':
                dispatch( hello() );
                return;
            case '반가워':
                dispatch( longTimeNoSee() );
                return;
            default: return;
        }
    }

    return (
        <ButtonStyle onClick={buttonClickHandler}>
            {label}
        </ButtonStyle>
    );
};

export default Button;
이렇게 작성하면 실습은 끝이 납니다.
도움이 되었으면 좋겠어용~~

우당탕탕.. 살려줘... 개발일기