목표
유저의 프로필 화면이 출력 되도록 서버쪽 로직을 구현 해보도록 할거에요.
유저의 프로필 이미지, 이름, 간단한 메시지 이렇게 3개를 출력하기 위한 View 로직을 중점적으로 다뤄 볼게요.
이전에 했던것
- profile앱 생성
- settings.py, 프로젝트 urls.py 설정
- models.py 클래스 및 필드 정의
- forms.py form생성
profileapp/models.py
from django.contrib.auth.models import User
from django.db import models

class Profile(models.Model):
    user = models.OneToOneField(User, on_delete=models.CASCADE, related_name='profile')

    image = models.ImageField(upload_to='profile/', null=True)
    nickname = models.CharField(max_length=20, unique=True, null=True)
    message = models.CharField(max_length=100, null=True)
View
모델을 만들었으면 view를 만들어 봐야겠조?
class ProfileCreateView(CreateView):
    model = Profile							# 연결할 클래스 or table명
    context_object_name = 'target_profile' # context 변수명 지정
    form_class = ProfileCreationForm # 우리가 만든 폼 클래스를 form_class에 할당!
    success_url = reverse_lazy('accountapp:hello_world')	# 성공시 연결할 페이지
    template_name = 'profileapp/create.html'				# 구현할 Template
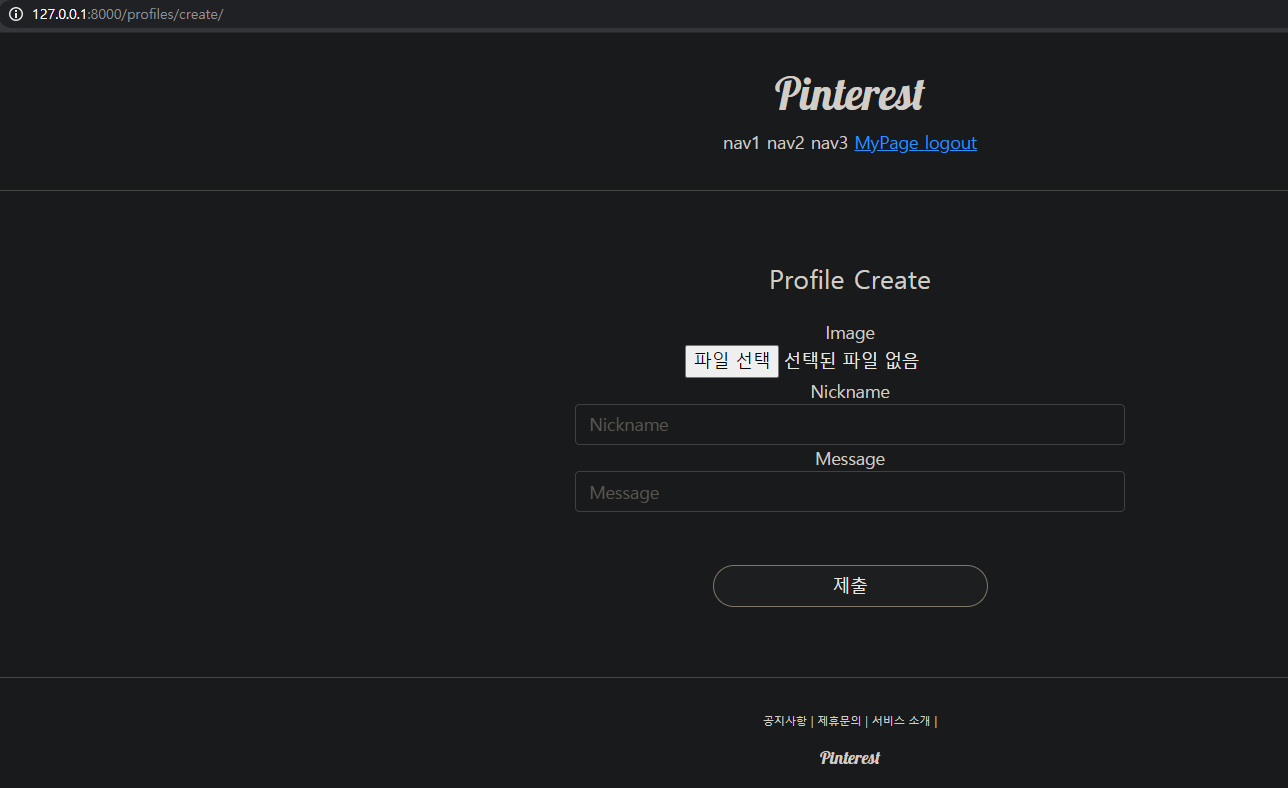
Template
위에서 template_name 만든거 보이조? 그럼 실제 해당 경로에 디렉토리와 html파일을 생성해 보도록 할게요.
이름은 create.html로 하고요. 기존 템플릿인 accountapp/templates/accountapp/create.html 경로에 있는 html파일을 복붙할거에요.
form메소드의 url 값만 profileapp으로 바꿔주세요.
enctype
파일을 업로드 할때 <form>태그에서 ENCTYPE="multipart/form-data"라는 애트리뷰트를 반드시 써야해요.그렇게 하지 않으면 웹 서버로 데이터를 넘길때 파일의 경로명만 전송되고 파일 내용이 전송되지 않기 때문
그리고 이때 METHOD 애트리뷰트에는 'POST' 값을 지정해야 해요.
<form>태그의 속성인 method, action, enctype 등은 입력받은 데이터를 어떻게 처리할 것인지 세부적으로 설정하는 데 사용되요
- method는 전송 방식
- action은 전송 목적지
- enctype은 전송되는 데이터 형식
enctype
enctype 속성은 다음 세가지의 값으로 지정될 수 있어요
- application/www-form-urlencoded
디폴트값enctype을 따로 설정하지 않으면 이 값이 설정. 폼데이터는 서버로 전송되기 전에 URL-Encode로 됨.
- multipart/form-data 파일이나 이미지를 서버로 전송할 경우 이 방식을 사용.
- text/plain 이 형식은 인코딩을 하지 않은 문자 상태로 전송.
{% extends 'base.html' %}
{% load bootstrap4 %}

{% block content %}
<div style="text-align: center; max-width: 500px; margin: 4rem auto">
    <div class="mb-4">
        <h4>Profile Create</h4>
    </div>

	<form action="{% url 'profileapp:create' %}" method="post" enctype="multipart/form-data">
        {% csrf_token %}
            {% bootstrap_form form %}
        <input type="submit" class="btn btn-dark rounded-pill col-6 mt-5">
    </form>
</div>

{% endblock %}
urls설정
주소창에 127.0.0.1:8000/profiles/create/
입력해줘야하는데. 즉 view에 진입하기 위한 절차가 필요합니다.
여기서 입력해주어야 할 것은 app_name과 ProfileCreateView.as_view() 요렇게입니다.
from django.contrib import admin
from django.urls import path, include

from profileapp.views import ProfileCreateView

app_name = 'profileapp'

urlpatterns = [
    path('create/', ProfileCreateView.as_view(), name='create'),
]
구현된 화면 모습
구현된 화면이 아래와 같이 잘 보이나요?
안되었다면 다시 한번 차근차근 확인해 보세요.
생각해 보면 해당 화면으로 가려면 MyPage에서 버튼 클릭하고 가야 할 것 같은 느낌같은 느낌 안 드나요?
그럴려면 해당 template 손좀 볼게요.
Template
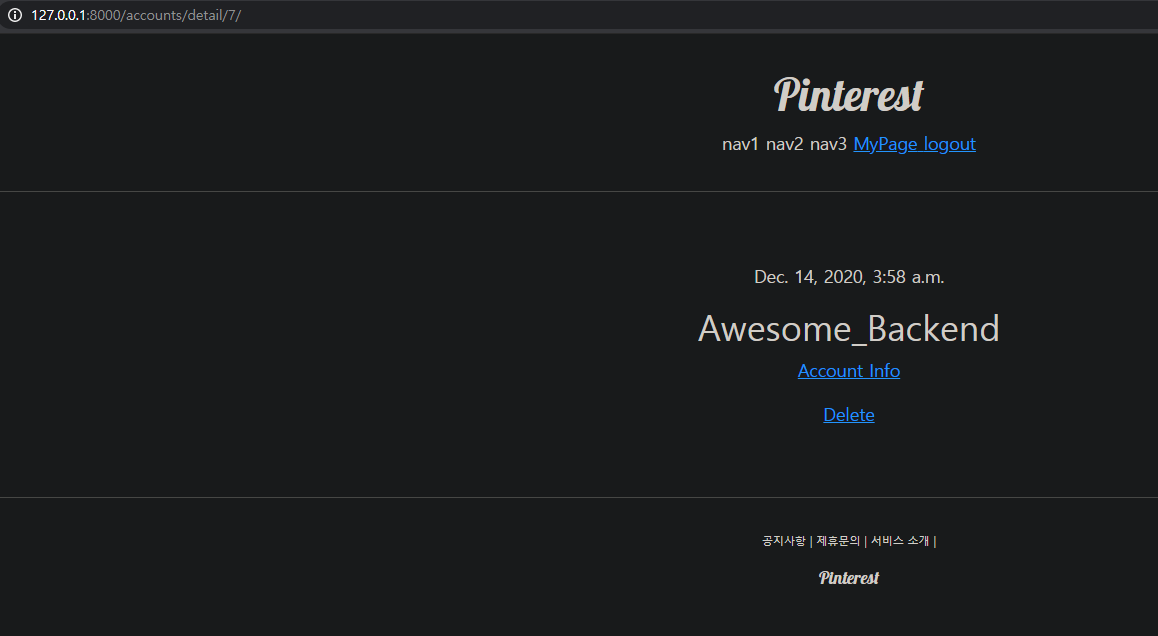
accoun앱의 detail.html로 가볼게요.
여기서 짚어 봐야할 로직은 {% if %} , {% else %} 로직입니다.
target_user 인스턴스에 profile이 있다면! 이 말이 뭘까요?
여기서 target_user는 앞서서 우리가 profile앱 view ->context_object_name에서 정의한 문자열값인데요.
이 값은 Profile 클래스의 객체에요.(좀 어렵조?) 해당 객체의 속성 값 중(user, image, nickname, message,id)에 profile값에 다시 접근한다는 말이에요. 근데 profile은 user변수의 또 다른 이름이에요(related_name으로 값 할당한거 기억나조? 안나면 다시보세요.)
짧게 얘기하면, 해당 객체가 있으면 target_user.profile.nickname 값을 보여주겠다는 말이고
만약 없다면 Create Profile이라는 text를 보여주게되요.
하~~ 의식의 흐름대로 설명한것 같아 찜찜합니다.
어쨋든 프로필 페이지로 접속하여서 이미지와 닉네임, 메시지를 입력하고 저장 버튼을 눌러보세요.
{% extends 'base.html' %}

{% block content %}

    <div>
	    <div style="text-align: center; max-width: 500px; margin: 4rem auto;">
	    	<p>
                {{target_user.date_joined}}
            </p>

            {% if target_user.profile %}
	    	    <h2 style="font-family: 'NanumSquareB'">
                    {{target_user.profile.nickname }}
                </h2>
            {% else %}
                <a href="{% url 'profileapp:create' %}"> <h4 style="font-family: 'NanumSquareB'">Create Profile</h4> </a>
            {% endif %}

            {% if target_user == user %}
            <a href="{% url 'accountapp:update' pk=target_user.pk %}">
                <p>Account Info</p>
            </a>
            <a href="{% url 'accountapp:delete' pk=target_user.pk %}">
                <p>Delete</p>
            </a>
            {% endif %}
	    </div>
</div>


{% endblock %}
오류 발생
오류가 발생합니다.
IntegrityError at /profiles/create/
NOT NULL constraint failed:
profileapp/forms.py
from django import forms
from profileapp.models import Profile


class ProfileCreationForm(forms.ModelForm):
    class Meta:
        model = Profile
        fields = ['image', 'nickname', 'message']
Error Soluction -1
결론적으로 해당 에러를 해결하기 위해서는 form_valid 메서드를 ProfileCreateView클래스 안에 정의 해주어야 해요.
profileapp/views.py
from django.shortcuts import render
from django.urls import reverse_lazy
from django.views.generic import CreateView

from profileapp.forms import ProfileCreationForm
from profileapp.models import Profile


class ProfileCreateView(CreateView):
    model = Profile
    context_object_name = 'target_profile'
    form_class = ProfileCreationForm
    success_url = reverse_lazy('accountapp:hello_world')
    template_name = 'profileapp/create.html'

    def form_valid(self, form): # ProfileCreationForm의 data가 2번째 파라미터에 들어 있어요.
        temp_profile = form.save(commit=False) # 임시로 저장함.<commit=False> 키워드 인자를 이용해서
        temp_profile.user = self.request.user # self는 view에서 가져온 self임. 또, 웹브라우저에서 입력 받은 값이 우항 좌항이 db에서 가져온값
        temp_profile.save()
        return super().form_valid(form) profileapp_profile.user_id
일차적으로 아래 화면까지 구현 되면 이제 어느정도 유저프로필 페이지가 모습을 서서히 잡아가고 있는 거에요.