현재 개발중인 프로젝트에 QueryDSL을 적용하면서 학습했던 내용을 정리해본다.
목차
- 들어가며
- QueryDSL이란?
- 개념 및 배경지식
- 필요성 및 장단점
- 적용 방법
- 코드 작성 방법
- 최적화 방법
- 결론
0. 들어가며

현재 진행중인 프로젝트에서는 JPQL을 사용하여 레포지토리 단 코드를 작성하고 있었다.
다만 쿼리가 길어지고 많아지며 불편함을 느끼고 개발에 어려움이 많아지게 된다.
이때, QueryDSL을 사용해보라는 피드백을 받아 학습하게 되었다.
1. QueryDSL이란?
Querydsl is a framework which enables the construction of type-safe SQL-like queries for multiple backends including JPA, MongoDB and SQL in Java. (QueryDSL Github)
Querydsl은 Java에서 JPA, MongoDB, SQL을 포함한 여러 백엔드에 대해 타입 안전한 SQL 유사 쿼리를 구성할 수 있게 해주는 프레임워크입니다.
QueryDSL은 JPQL(Java Persistence Query Language)를 사용해 쿼리를 작성하는데에 도움을 주는 프레임워크이다.
JPQL은 SQL과 유사하지만, DB 테이블이 아닌 엔티티 객체를 대상으로 쿼리를 작성한다.
QueryDSL은 이 JPQL 쿼리를 타입세이프 할 뿐만 아니라, 다양한 편의성과 이점을 갖고 사용할 수 있도록 해준다.
2. 개념 및 배경지식
JPQL의 한계
JPQL은 SQL과 유사한 문법의 쿼리를 작성하게 된다.
하지만 다음과같이 문자열 형태로 쿼리를 작성하게 된다.
@Query("SELECT r FROM Reservation r WHERE r.reservationStartAt >= :startOfDay AND r.reservationStartAt < :startOfNextDay AND r.contentsId = :contentsId")
List<Reservation> findAllByResDateAndContentsId(
	@Param("startOfDay") LocalDateTime startOfDay,
    @Param("startOfNextDay") LocalDateTime startOfNextDay,
    @Param("contentsId") Long contentsId
);
위와 같이 String으로 쿼리를 작성하게 되면 다음과같은 단점이 있다
- 런타임 시점에 오류 확인 가능: 컴파일 시점에 문법 오류를 검출할 수 없다.
- 쿼리 가독성 저하: 복잡한 쿼리를 문자열로 작성하여 가독성이 떨어진다.
- 코드 자동완성 사용 불가: IDE 에서 문자열 내에 쿼리문을 작성하기 때문에, 자동완성 기능의 도움을 받는 데에 한계가 있다.
QueryDSL의 등장
위와 같은 JPQL 코드의 단점을 해결하기 위해 QueryDSL이 등장하게 된다.
QueryDSL은 쿼리를 메서드 호출 형식으로 작성할 수 있게된다.
3. 필요성 및 장단점
아래와 같은 필요성으로 프로젝트에 QueryDSL을 도입하기로 하였다.
필요성
- 타입 세이프: 쿼리 작성 시 타입 오류를 방지하여 애플리케이션 런타임 안정성을 높인다.
- 생산성 향상: 쿼리 작성시간을 단축하고 생산성을 높인다.
- 유지보수 용이성: 복잡한 쿼리를 모듈화하여 코드 유지보수를 용이하게 한다.
뿐만 아니라 현재는 MySQL만 사용중인 프로젝트이지만, 서비스 확장 시 추가 DB 사용 계획이 있는만큼, 다양한 DB를 지원하는 점도 사용 근거중 하나이다.
장점
- 컴파일 시점 오류 검출: 쿼리 문법 오류를 컴파일 시점에 검출 가능하다.
- 코드 재사용성: 자주 사용되는 쿼리를 메서드로 만들어 재사용 가능하다.
- 쿼리 가독성 향상: 복잡한 쿼리를 메서드 호출 형태로 표현하여 가독성을 높일 수 있다.
단점
- 학습 곡선: QueryDSL API를 익히는데는 추가적인 학습이 약간 필요하다.
- 쿼리 성능: JPQL쿼리와 비교시, QueryDSL의 성능이 항상 더 좋지는 않다. (추후 직접적인 성능 비교를 해보고자 한다)
4. 적용방법
프로젝트 환경은 아래와 같다.
- JAVA 17
- Spring boot 3.3.4
- QueryDSL 5.0.0
4.1. 의존성 추가
build.gradle 파일 내에 QueryDSL 의존성을 추가한다.
// Query DSL 관련 스크립트 및 설정
buildscript {
    ext {
        queryDslVersion = "5.0.0"
    }
}

plugins {
    id "com.ewerk.gradle.plugins.querydsl" version "1.0.10"
}

dependencies {
    //QueryDSL 관련 라이브러리
    implementation "com.querydsl:querydsl-jpa:${dependencyManagement.importedProperties['querydsl.version']}:jakarta"
    implementation "com.querydsl:querydsl-core"
    implementation "com.querydsl:querydsl-collections"
    annotationProcessor "com.querydsl:querydsl-apt:${dependencyManagement.importedProperties['querydsl.version']}:jakarta"
    // querydsl JPAAnnotationProcessor 사용 지정
    annotationProcessor "jakarta.annotation:jakarta.annotation-api"
    // java.lang.NoClassDefFoundError (javax.annotation.Generated) 대응 코드
    annotationProcessor "jakarta.persistence:jakarta.persistence-api"
    // java.lang.NoClassDefFoundError (javax.annotation.Entity) 대응 코드
}

def querydslDir = 'build/generated/querydslDir'

querydsl {
    jpa = true
    querydslSourcesDir = querydslDir}

sourceSets {
    main.java.srcDir querydslDir
}

compileQuerydsl {
    options.annotationProcessorPath = configurations.querydsl
}

configurations {
    compileOnly {
        extendsFrom annotationProcessor
    }
    querydsl.extendsFrom compileClasspath
}
만약 스프링 부트 버전이 2.X. 버전이라면 빌드시, 아래와 같은 에러가 발생하게 된다.
Unable to load class 'javax.persistence.Entity'.
다음 링크를 참고하여 버전에 맞는 build.gradle 파일을 작성하도록 하자.
[QueryDSL][Spring] Unable to load class 'javax.persistence.Entity' 에러 해결 방법
4.2. gradle reload 실행
gradle reload를 실행한다.
4.3. Q-Type 클래스 생성
QueryDSL은 엔티티 클래스를 기반으로 Q-Type 클래스를 생성한다.
이는 쿼리 작성시 엔티티 속성을 참조하는데 사용되기 때문에, QueryDSL 사용에 필수이다.
아래 두 방법 중 하나를 선택하여 Q-Type 클래스를 생성하도록 한다.
- Bash Shell 사용
프로젝트 경로에서 다음 명령어를 실행한다.
./gradlew compileQuerydsl- IDE 등 내부 기능 사용
Gradle Tasks > other > compileQuerydsl를 실행
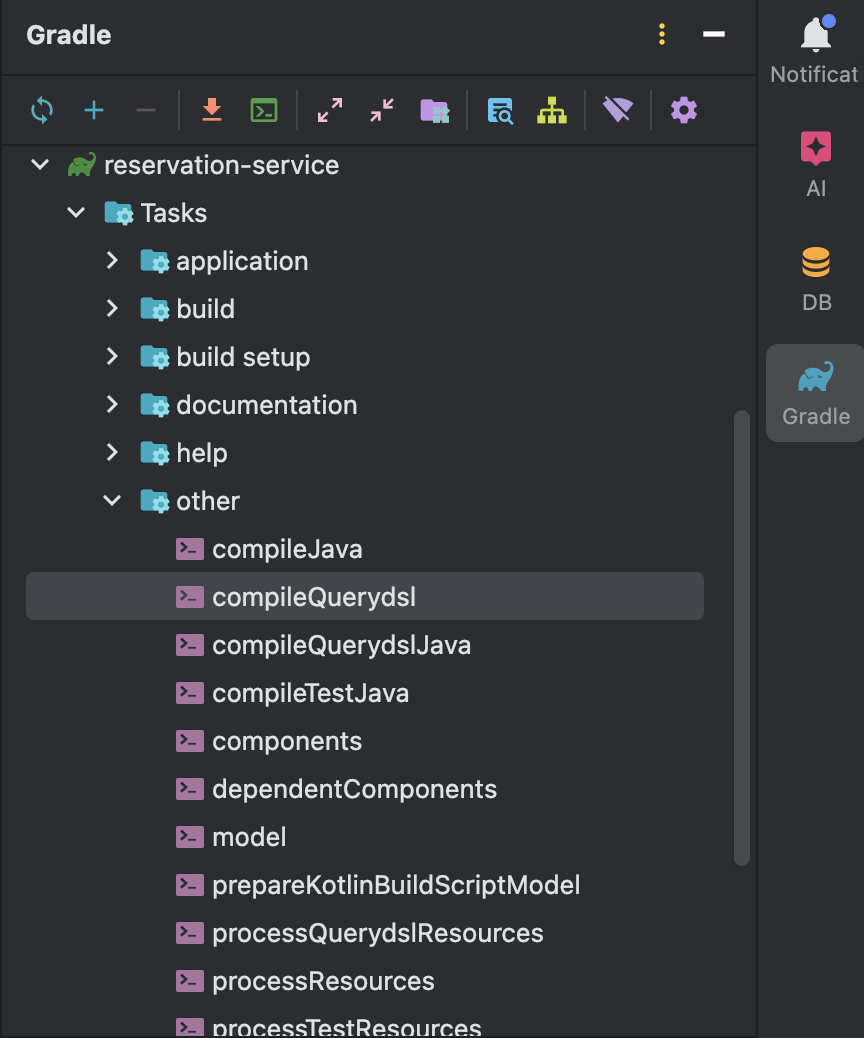
4.4. 클래스 생성 확인
위에서 build.gradle 파일에 정의한 경로( 위 파일에서는 build/generated/querydsl)내부에 Q 로 시작하는 클래스가 생성되었는지 확인한다.
4.5. 설정 시 발생 할 수 있는 에러
- querydsl cannot find symbol
annotation Processor 설정이 잘못되었을 경우 발생 할 수 있는 문제이다.
원인 1) Q 클래스가 제대로 생성되지 않음.
경로를 다시 확인하고, Q 클래스를 다시 생성 해준다.
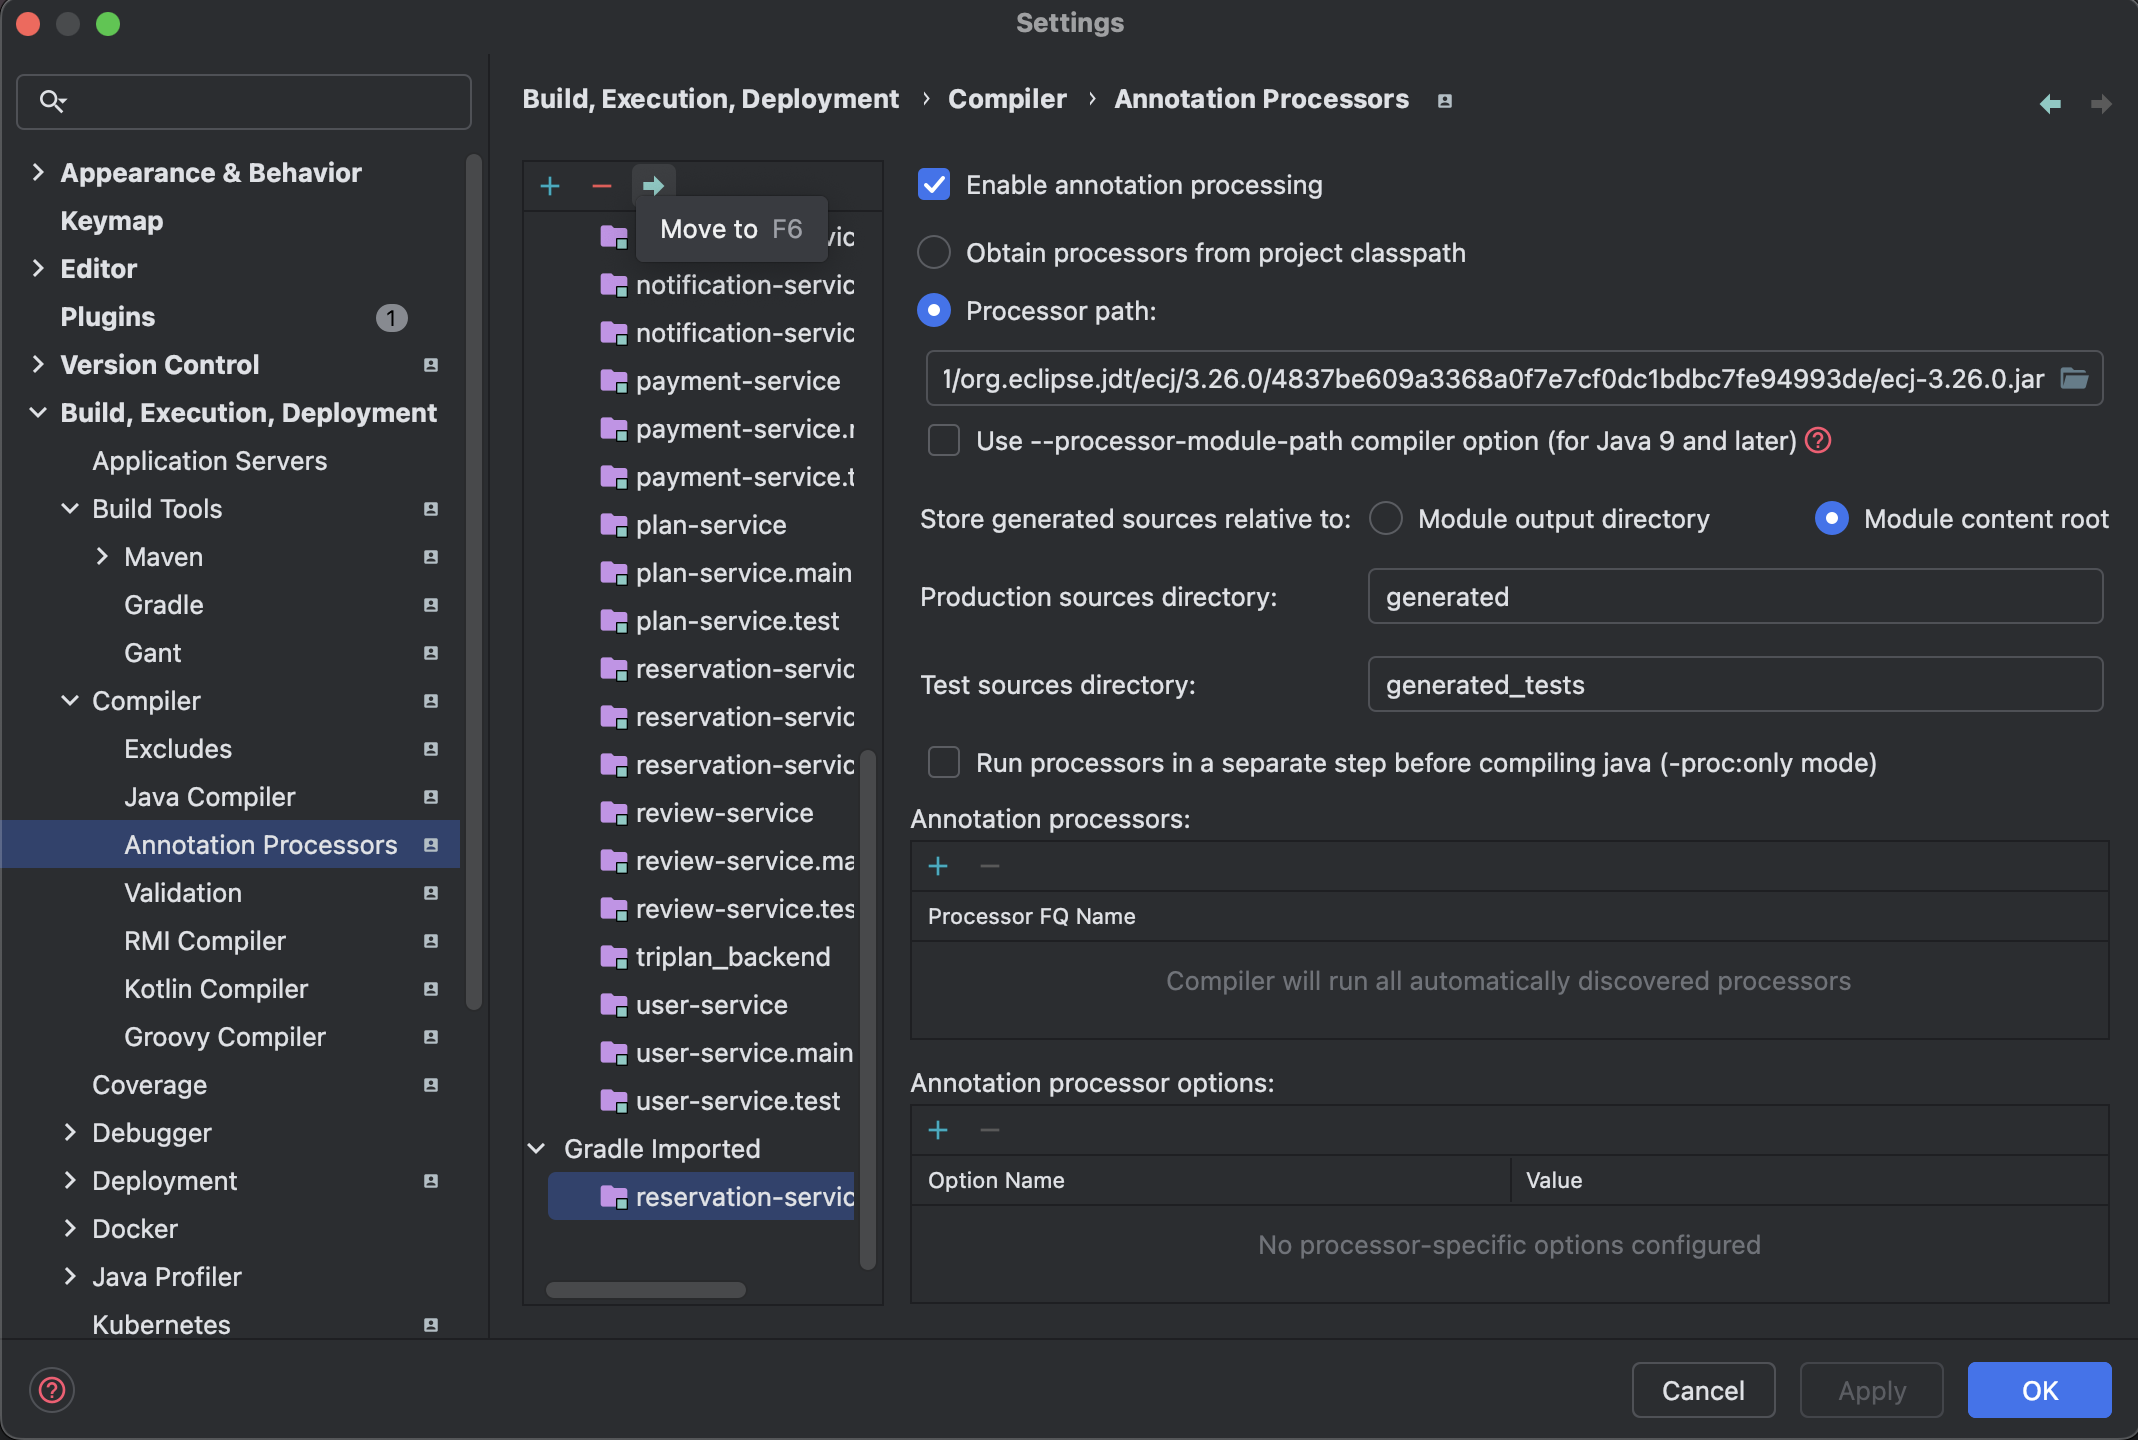
원인 2) Annotation Processor 설정을 확인
설정 > Build,Execution,Deployment > Compiler > Annotation Processor 설정에서
Enable annotation processing 설정이 활성화되어있는지 확인하고,
왼쪽에 gradle Imported로 되어있는 그룹을 화살표를 클릭해 Default 그룹으로 이동해준다.
설정 적용 후 재실행 시 문제없이 빌드 된다.
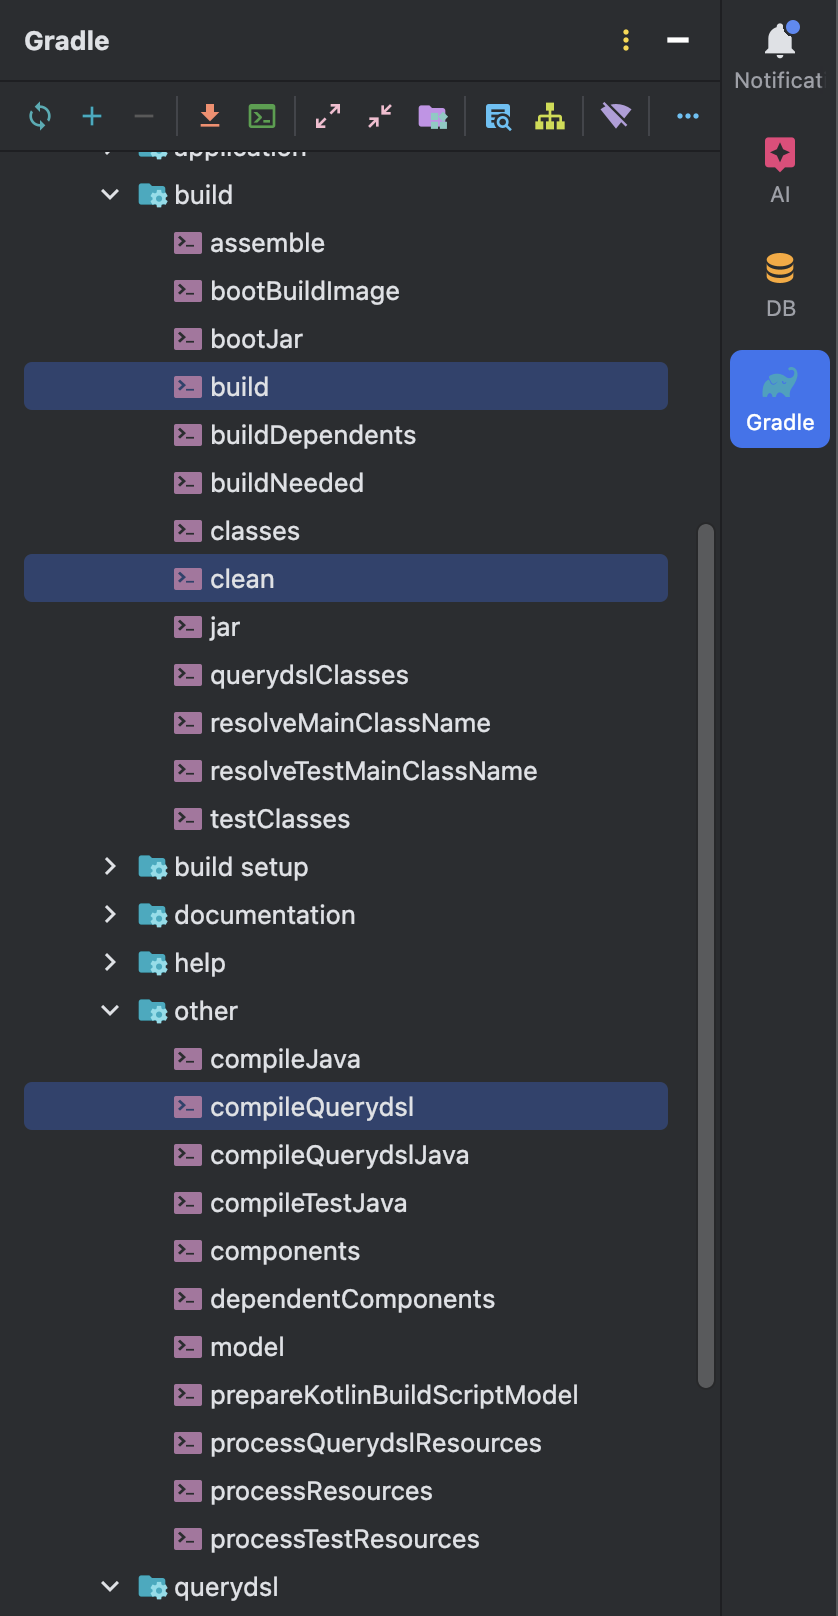
- attempt to recreate a file for type querydsl
Q 파일을 재 생성하며 생기는 문제이다.
build clean을 통해 Q 파일을 모두 제거하고 새로 build를 하였다.
이렇게 한 후에도 빌드가 제대로 되지 않는다면 빌드 환경을 Gradle에서 InteliJ로 변경 해 보는 것도 해결에 도움이 된다고 한다.
(설정 > build tools -> gradle : gradle -> intellj)
참고: query dsl 파일 중복생성, 파일을 찾지 못하는오류
- Could not find class file for 에러
위 두 에러를 해결 한 후에도 이러한 에러가 발생하는 경우가 있다.
이런 경우 build clean을 통해 생성된 Q-class를 모두 삭제하고 직접 빌드 하지 않고 바로 애플리케이션을 실행하면 실행 된다.
참고: QueryDSL - build.gradle 설정, QClass 생성하기
5. 코드 작성 방법
5.1. QueryDSL 기본 사용법
다음은 가장 기본적인 QueryDSL을 사용한 JPQL 생성 및 실행 방법이다.
QEntity entity = QEntity.entity;

jpaQueryFactory
            .select(entity)
            .from(entity)
            .where(entity.id.eq(id))
            .fetch();
@Query 에서 String으로 사용하던 Select문, From절, Where절을 모두 메서드 호출하듯 사용한다.
1. select()
- SQL을 통해 가져올 데이터를 지정
- 클래스 접근자를 통해 특정 데이터만 가져올 수 있음(e.g. entity.name)
2. from()
- 조회 할 테이블을 지정
3. where()
- 어떤 조건으로 데이터를 검색할지 지정
- 제공 값과 동일, 범위연산, 포함 등 다양한 조건 검색
- 여러 조건을 걸 수 있으며, AND, OR연산 모두 가능
member.username.eq("member1") // username = 'member1'
member.username.ne("member1") //username != 'member1'
member.username.eq("member1").not() // username != 'member1'
member.username.isNotNull() //이름이 is not null
member.age.in(10, 20) // age in (10,20)
member.age.notIn(10, 20) // age not in (10, 20)
member.age.between(10,30) //between 10, 30
member.age.goe(30) // age >= 30
member.age.gt(30) // age > 30
member.age.loe(30) // age <= 30
member.age.lt(30) // age < 30
member.username.like("member%") //like 검색
member.username.contains("member") // like ‘%member%’ 검색
member.username.startsWith("member") //like ‘member%’ 검색
위 코드 출처 : 스프링부트에 QueryDSL 적용기 - 2 (설치 및 사용법, Spring Data JPA와 함께 사용하기)
4. fetch()
- 쿼리를 생성하고 조회된 List를 반환하는 역할
- 조회 갯수에 따라 fetchOne(), fetch() 등 사용
- 조회 쿼리가 아닌 실행 쿼리의 경우 execute() 사용해 실행
5.2. QueryDSL 객체 생성
QueryDSL이 쿼리 생성을 할 수 있도록 EntityManager를 주입한다.
@Configuration
public class QueryDslConfig {
    @PersistenceContext
    private EntityManager entityManager;

    @Bean
    public JPAQueryFactory queryFactory() {
        return new JPAQueryFactory(entityManager);
    }
}
5.3. 레포지토리 클래스 생성
기존 Reposistory 코드
기존 Repository 코드는 다음과 같다.
public interface ReservationRepository extends JpaRepository<Reservation, Long>, ReservationCustomRepository {

    @Query("SELECT r FROM Reservation r WHERE r.contentsId = :contentsId")
    List<Reservation> getReservationListByContentsId(@Param("contentsId") Long contentsId);

    @Query("SELECT r FROM Reservation r WHERE r.userId = :userId")
    List<Reservation> getReservationListByUserId(@Param("userId") Long userId);

    @Query("SELECT r FROM Reservation r WHERE r.reservationStartAt >= :startOfDay AND r.reservationStartAt < :startOfNextDay AND r.contentsId = :contentsId")
    List<Reservation> findAllByResDateAndContentsId(
            @Param("startOfDay") LocalDateTime startOfDay,
            @Param("startOfNextDay") LocalDateTime startOfNextDay,
            @Param("contentsId") Long contentsId
    );

    default Reservation findByIdOrElseThrow(Long id) {
        return findById(id).orElseThrow(() -> new ReservationNotFoundException("존재하지 않는 예약입니다."));
    }
}
JPQL의 단점대로 String으로 쿼리를 작성하면서 가독성이 낮고, 빌드 시점에 오류를 알 수 없다.
따라서 아래 방법대로 클래스를 생성하도록 하였다.
위 다이어그램 구조대로 객체를 생성하였다.
CustomRepository 클래스
인터페이스에 사용할 레포지토리 메서드를 작성한다.
public interface ReservationCustomRepository {
    List<Reservation> getReservationListByContentsId(Long contentsId);

    List<Reservation> getReservationListByUserId(Long userId);

    List<Reservation> findAllByReservationDateAndContentsId(LocalDateTime startOfDay, LocalDateTime startOfNextDay, Long contentsId);

    Reservation findByIdOrElseThrow(Long id);
}
CustomRepositoryImpl 클래스
그 후 위 인터페이스 클래스를 구현한다.
설명은 주석 및 아래에서 덧붙이겠다.
@RequiredArgsConstructor
//Spring bean으로 등록하기 위해 Repository 어노테이션 추가
@Repository
public class ReservationCustomRepositoryImpl implements ReservationCustomRepository{

	//QueryDSL 쿼리를 생성하고 실행하는 핵심 클래스.
    private final JPAQueryFactory queryFactory;
    //Reservation 엔티티의 속성을 쿼리에서 사용하기 위해 인스턴스를 생성
    QReservation reservation = QReservation.reservation;

    @Override
    public List<Reservation> getReservationListByContentsId(Long contentsId) {

        return queryFactory
                .selectFrom(reservation)
                .where(reservation.contentsId.eq(contentsId))
                .fetch();
    }

    @Override
    public List<Reservation> getReservationListByUserId(Long userId) {

        return queryFactory
                .selectFrom(reservation)
                .where(reservation.userId.eq(userId))
                .fetch();
    }

    @Override
    public List<Reservation> findAllByReservationDateAndContentsId(
            LocalDateTime startOfDay,
            LocalDateTime startOfNextDay,
            Long contentsId
    ) {
        return queryFactory
                .selectFrom(reservation)
                .where(reservation.reservationStartAt.goe(startOfDay)
                        .and(reservation.reservationEndAt.lt(startOfNextDay))
                        .and(reservation.contentsId.eq(contentsId)))
                .fetch();

    }

    @Override
    public Reservation findByIdOrElseThrow(Long id) {
        Reservation result = queryFactory
                .select(reservation)
                .where(reservation.reservationId.eq(id))
                .fetchOne();

        if(result == null) {
            throw new ReservationNotFoundException("존재하지 않는 예약입니다.");
        }
        return result;
    }
}
6. 최적화 방법
1. 벌크 연산
update() 또는 delete()같은 벌크 연산은 JPQL을 사용하는 것이 효율적이다.
QueryDSL의 벌크연산은 내부적으로 결국 JPQL로 변환하기 때문에 직접 사용하는것이 성능상 유리하다.
2. 인덱스 활용
인덱싱을 활용해 쿼리 성능을 향상시킬 수 있다
3. 쿼리 튜닝
QueryDSL의 쿼리 실행계획을 분석하고 튜닝하여 성능을 최적화 할 수 있다.
4. @Query 어노테이션과 혼용
QueryDSL은 동적 쿼리 생성에 유용하다.
다만, 복잡한 정적 쿼리는 JPQL쿼리를 직접 작성하는 것이 성능상 더 좋을 수 있다.
7. 결론
QueryDSL은 쿼리 작성을 편리하게 해주고, 가독성, 생산성 등을 높여주는 유용한 프레임워크이다.
다만 QueryDSL에 대해 자세히 알고, 상황에 따라 필요에 맞게 잘 사용하는 것이 성능적, 효율적으로 더 이득이 될 수 있다.
필요에 따라 적절한 사용을 통해 좋은 애플리케이션을 개발하도록 하자.
참고자료