원문: Practical Guide to Fp-ts P3: Task, Either, TaskEither
Fp-ts를 사용하는 방법을 알아봅시다. task, either 그리고 taskEither 연산자에 대해 소개할 것입니다. 수학적인 지식은 없어도 됩니다.
Introduction
이 글은 제 '실용적으로 fp-ts 배우기' 시리즈의 세 번째 글입니다. 이전 글에서는 Option 타입과 map, flatten, chain 연산자에 대해 소개했습니다.
이 글에서는 비동기 작업과 에러 처리에 대해 소개할 것입니다. 구체적으로 Task, Either, 그리고 TaskEither 타입에 대해 알아볼 것입니다.
Task
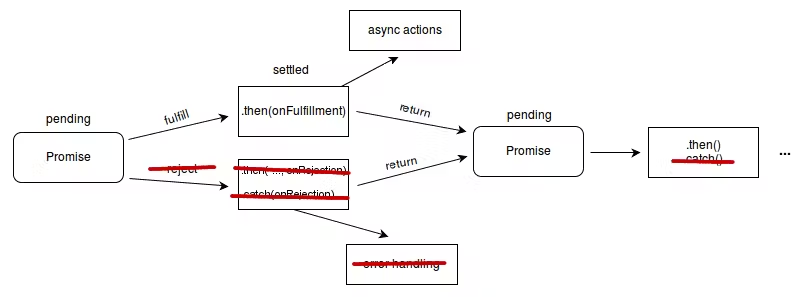
모던 타입스크립트의 모든 비동기 연산은 Promise 객체를 통해 이뤄집니다. task는 절대 reject되지 않을 것으로 예상되는 Promise를 반환하는 함수입니다.
task의 타입 정의는 아래와 같습니다.
interface Task<A> {
  (): Promise<A>
}
task를 정의하는 다른 방법은 함수 타입 정의를 사용하는 것입니다.
type Task<A> = () => Promise<A>Task는 항상 성공할 것으로 기대되지만, 우리의 예상을 벗어난 에러가 발생할 때 실패할 수 있습니다. 이 경우, 에러가 throw하면서 파이프라인이 중단됩니다. 이는 try-catch-finally 블록 없이 에러를 throw하는 Promise를 awaiting한 것과 유사한 상황입니다. Task를 사용하기 전에 가정을 테스트하세요.
Why use Task?
Task는 단순한 Prmoise가 아니라 의도의 표현입니다.
클라이언트 관점에서 라이브러리를 사용할 대, 모든 비동기 함수는 Promise<T>를 반환하는 타입 정의를 갖게 됩니다. 그 중 일부 함수는 결코 실패하지 않을 수 있지만, 필요에 의해 비동기인 경우가 있습니다. Promise는 함수가 실패할 수 있는지에 대한 정보를 제공하지 않습니다. 그래서 명령형 모델에서는 이러한 오류를 try-catch-finally 블록을 사용하여 처리해야 합니다.
Task<T>를 사용함으로써 클라이언트가 존재하지 않는 오류를 처리하는 부담을 덜 수 있습니다.
When can an operation "never fail"?
분산 컴퓨팅 시대에서 오류는 흔한 일입니다. Go나 Rust와 같은 언어는 에러 처리를 강제하여 이 모델을 수용합니다. 언제 작업이 결코 실패하지 않을 수 있는지 이해하기 위해서는 먼저 함수가 일반적으로 어떻게 실패할 수 있는지를 이해해야 합니다.
함수가 실패하는 주된 이유는 유효하지 않은 조건문(invalid preconditions) 때문입니다. 다음과 같은 함수를 살펴보죠. 여기서 전제조건은 id의 길이가 36 이하여야 한다는 것입니다.
async function someTask(id: string) {
  if (id.length > 36) {
    throw new Error('id must have length less than or equal to 36')
  }

  // do async work here
}
만약 함수의 정확한 구현을 알고 있고 모든 오류가 조건문 내부에서 비롯된다면, id의 길이가 <= 36임을 알고 있는 경우 해당 함수가 실패하지 않을 것으로 가정할 수 있습니다. 따라서 해당 함수를 Task로 래핑하고, 이 함수는 결코 실패하지 않는다고 주장할 수 있습니다.
const id = 'abc'
const task: T.Task<void> = () => someTask(id)
일반적으로 이러한 가정을 하지 않습니다. 왜냐하면 우리가 구현을 항상 아는 건 아니기 때문입니다. 또한 우리가 모르는 변경이 있을 수 있기 때문에 이는 위험할 수 있습니다.
Handled Failures Can't Fail
더 현실적인 예제는 실패할 수 있는 작업이지만 성공과 실패 결과를 모두 하나의 타입으로 줄이는 방식으로 처리되는 경우입니다. 오류가 처리되었기 때문에 이 함수는 비동기이지만 항상 이행(fulfilled)된 Promise를 반환합니다.
아래 함수는 성공과 실패를 모두 boolean으로 나타냅니다.
async function boolTask(): Promise<boolean> {
  try {
    await asyncFunction()
    return true
  } catch (err) {
    return false
  }
}
정의에 따르면, 이 함수는 이미 Task 인터페이스를 구현하고 있지만, 반환 타입이 Promise이므로, 결과는 여전히 클라이언트에게 모호합니다. 문법을 조정하여 이러한 모호성을 제거할 수 있습니다.
import { Task } from 'fp-ts/lib/Task'

const boolTask: Task<boolean> = async () => {
  try {
    await asyncFunction()
    return true
  } catch (err) {
    return false
  }
}
Constructors
모호한 값은 of 연산자를 사용해 Task로 들어올릴 수 있습니다.이는 Promise.resolve를 호출하는 것과 동일합니다.
import * as T from 'fp-ts/lib/Task'

const foo = 'asdf' // string
const bar = T.of(foo) // T.Task<string>

// Same As
const fdsa: T.Task<string> = () => Promise.resolve(foo)
Either
Either는 성공하거나 실패할 수 있는 동기적인 연산을 나타냅니다. Some과 None이 있는 Option과 유사하게, Either 타입은 Right와 Left가 있습니다. Right는 성공을 Left는 실패를 나타냅니다. 이는 Rust의 Result와 유사합니다.
따라서, 다음과 같은 타입 정의를 볼 수 있습니다.
type Either<E, A> = Left<E> | Right<A>

export interface Left<E> {
  readonly _tag: 'Left'
  readonly left: E
}

export interface Right<A> {
  readonly _tag: 'Right'
  readonly right: A
}
Either 타입은 Left와 Right의 유니언 타입입니다. _tag 필드는 Left와 Right을 구분할 수 있는 구분자로 사용됩니다.
Why use Eithers
Either는 함수형 프로그래밍에서 에러 상태를 캡쳐하는 데 중요합니다. 에러를 throw해서는 파이프라인을 중단시켜서는 안 되기 때문에 Either가 필요합니다. 에러 상태는 반드시 처리되거나 호출 스택을 따라 올라가야 합니다.
Either는 또한 try-catch-finally에 비해 이점이 있습니다. 에러가 항상 타입 세이프하기 때문입니다. catch 블록을 사용하는 경우, 에러는 항상 unknown 타입입니다. 이는 클라이언트가 항상 instance of를 사용해 타입을 좁혀야 하므로 불편합니다. 더 나쁜 경우는 같은 작업을 수행하기 위해 사용자 정의 타입 가드를 정의해야 하는 경우입니다.
Either를 사용하면, 타입 시그니처를 기반으로 모든 가능한 에러 상태를 알 수 있습니다. 이를 switch 문으로 처리하거나 호출 스택을 계속해서 올릴지 선택할 수 있습니다.
Eithers in Action
보안을 위해 비밀번호 유효성을 검사하는 상황을 가정해보겠습니다. 비밀번호는 최소 8자 이상이어야 하고, 1개의 대문자를 포함해야 합니다. 비밀번호가 유효하다면 매우 불안정한 md5 해시를 사용하여 해시할 것입니다.
- 두 가지 다른 에러 상태를 나타내는 두 개의 에러 클래스를 만들어보겠습니다. 그리고 이를 판별된 유니온으로 결합해보겠습니다.
// password.ts

export class MinLengthValidationError extends Error {
  public _tag: 'PasswordMinLengthValidationError'

  public minLength: number

  private constructor(minLength: number) {
    super('password fails to meet min length requirement: ${minLength}')
    this._tag = 'PasswordMinLengthValidationError'
    this.minLength = minLength
  }

  public static of(minLength: number): MinLengthValidationError {
    return new MinLengthValidationError(minLength)
  }
}

export class CapitalLetterMissingValidationError extends Error {
  public _tag: 'PasswordCapitalLetterMissingValidationError'

  private constructor() {
    super(`password is missing a capital letter`)
    this._tag = 'PasswordCapitalLetterMissingValidationError'
  }

  public static of(): CapitalLetterMissingValidationError {
    return new CapitalLetterMissingValidationError()
  }
}

export type PasswordValidationError =
  | MinLengthValidationError
  | CapitalLetterMissingValidationError
유의해야 할 점은 일반 객체를 사용하는 대신 스택 추적을 제공하는 Error 클래스를 사용했다는 점입니다. 이는 디버깅에 필요한 정보이기 때문입니다.
- Password 타입을 선업합니다.
// password.ts

export interface Password {
  _tag: 'Password'
  value: string
  isHashed: boolean
}- Password 타입을 위한 생성자를 만들겠습니다.
// password.ts

export function of(value: string): Password {
  return { _tag: 'Password', value, isHashed: false }
}

export function fromHashed(value: string): Password {
  return { _tag: 'Password', value, isHashed: true }
}- Password specification을 통해 비밀번호 유효성 검사하기
// password.ts

export type PasswordSpecification = {
  minLength?: number
  capitalLetterRequired?: boolean
}

export function validate({
  minLength = 0,
  capitalLetterRequired = false,
}: PasswordSpecification = {}) {
  return (password: Password): E.Either<PasswordValidationError, Password> => {
    if (password.value.length < minLength) {
      return E.left(MinLengthValidationError.of(minLength))
    }

    if (capitalLetterRequired && !/[A-Z]/.test(password.value)) {
      return E.left(CapitalLetterMissingValidationError.of())
    }

    return E.right({ ...password, isValidated: true })
  }
}
주목할 점은 validate 함수가 직접적으로 Password 타입을 반환하는 것이 아니라 Password 타입을 반환하는 함수를 반환한다는 것입니다. PasswordSpecification와 Password를 한 번에 함수의 매개변수로 둘 수도 있었지만, 이를 분리하고자 하는 이유는 함수 체이닝을 더 쉽게 만들기 위함입니다.
Password를 of 또는 fromHashed를 사용하여 생성할 때, 해당 함수의 결과물인 Password를 직접 다음 함수로 파이프하고 싶습니다. 만약 validate 함수가 두 개의 매개변수 대신 하나를 받도록 되어 있다면, 전체 플로우가 깨질 것입니다. 이 매개변수를 나누는 방법론을 커링(currying)이라고 합니다.
또한 한 번에 하나의 에러만 상위로 전파할 수 있다는 것을 알 수 있습니다. 그러나 여러 검증이 실패할 경우 어떻게 될까요? 모든 실패를 전파하는 것이 더 나을 것입니다. 이에 대해 다음 글에서 배워보겠습니다.
- 커링된 해시 함수를 사용하는 해시 함수를 정의해 봅시다.
// password.ts

export type HashFn = (value: string) => string

export function hash(hashFn: HashFn) {
  return (password: Password): Password => ({
    ...password,
    value: hashFn(password.value),
    isHashed: true,
  })
}- 파이프라인을 만듭니다.
// index.ts

import { flow, identity, pipe } from 'fp-ts/lib/function'
import * as Password from './password'
import crypto from 'crypto'
import * as E from 'fp-ts/lib/Either'

const pipeline = flow(
  Password.of,
  Password.validate({ minLength: 8, capitalLetterRequired: true }),
  E.map(
    Password.hash((value) =>
      crypto.createHash('md5').update(value).digest('hex'),
    ),
  ),
)- 유효하지 않은 패스워드를 사용하여 테스트를 해봅니다.
console.log(pipe('pw123', pipeline))아래와 같은 결과를 얻을 수 있습니다.
{
  _tag: 'Left',
  left: Error: password fails to meet min length requirement: 8
      at new MinLengthValidationError (/tmp/either-demo/password.ts:9:5)
      at Function.MinLengthValidationError.of (/tmp/either-demo/password.ts:15:12)
      at /tmp/either-demo/password.ts:61:46
      at /tmp/either-demo/node_modules/fp-ts/lib/function.js:92:27
      at Object.pipe (/tmp/either-demo/node_modules/fp-ts/lib/function.js:190:20)
      at Object.<anonymous> (/tmp/either-demo/index.ts:16:13)
      at Module._compile (internal/modules/cjs/loader.js:1118:30)
      at Module.m._compile (/tmp/either-demo/node_modules/ts-node/src/index.ts:858:23)
      at Module._extensions..js (internal/modules/cjs/loader.js:1138:10)
      at Object.require.extensions.<computed> [as .ts] (/tmp/either-demo/node_modules/ts-node/src/index.ts:861:12) {
    _tag: 'PasswordMinLengthValidationError',
    minLength: 8
  }
}
Node가 에러를 프린팅하는 방식 때문에 left는 일반적인 타입스크립트 객체처럼 보이지 않습니다. 최종적으로 객체는 다음과 같이 보일 것입니다.
{
  _tag: 'Left',
  left: {
    message: 'password fails to meet min length requirement: 8',
    stack: `Error: password fails to meet min length requirement: 8
      at new MinLengthValidationError (/tmp/either-demo/password.ts:9:5)
      at Function.MinLengthValidationError.of (/tmp/either-demo/password.ts:15:12)
      at /tmp/either-demo/password.ts:61:46
      at /tmp/either-demo/node_modules/fp-ts/lib/function.js:92:27
      at Object.pipe (/tmp/either-demo/node_modules/fp-ts/lib/function.js:190:20)
      at Object.<anonymous> (/tmp/either-demo/index.ts:16:13)
      at Module._compile (internal/modules/cjs/loader.js:1118:30)
      at Module.m._compile (/tmp/either-demo/node_modules/ts-node/src/index.ts:858:23)
      at Module._extensions..js (internal/modules/cjs/loader.js:1138:10)
      at Object.require.extensions.<computed> [as .ts] (/tmp/either-demo/node_modules/ts-node/src/index.ts:861:12)`
    _tag: 'PasswordMinLengthValidationError',
    minLength: 8
  }
}- 이번에는 유효한 비밀번호로 테스트 해보겠습니다.
console.log(pipe('Password123', pipeline))아래와 같은 결과를 얻을 수 있습니다.
{
  _tag: 'Right',
  right: {
    _tag: 'Password',
    value: '42f749ade7f9e195bf475f37a44cafcb',
    isHashed: true,
    isValidated: true
  }
}
Chaining Eithers
만약 hash가 실패할 수 있는 연산이라면, validate와 hash를 하나의 Either 타입으로 연결하기 위해 chainW 연산자를 사용할 수 있습니다. 여기서는 간단함을 위해 기본 Error 타입을 사용하여 이 오류를 나타냅니다.
- hash 함수를 Either를 반환하도록 업데이트합니다.
export type HashFn = (value: string) => E.Either<Error, string>

export function hash(hashFn: HashFn) {
  return (password: Password): E.Either<Error, Password> =>
    pipe(
      hashFn(password.value),
      E.map((value) => ({
        ...password,
        value,
        isHashed: true,
      })),
    )
}chainW를 사용하여 파이프라인을 업데이트합니다.
const pipeline = flow(
  Password.of,
  Password.validate({ minLength: 8, capitalLetterRequired: true }),
  E.chainW(
    Password.hash((value) =>
      E.right(crypto.createHash('md5').update(value).digest('hex')),
    ),
  ),
)
chain 대신 chainW를 사용하는 이유는 validate와 hash에서 나온 최종 타입을 양쪽의 오류를 모두 포함하도록 확장하기 위함입니다. 만약 타입을 검사하기 위해 pipeline 위로 커서를 올려본다면 다음과 같은 타입을 얻게 될 것입니다.
E.Either<
  MinLengthValidationError | CapitalLetterMissingValidationError | Error,
  Password
>
만약 chainW를 chain으로 바꾼다면, 오직 체인의 마지막 에러 타입만 얻을 수 있습니다.
E.Either<Error, Password.Password>주의할 점은 여기서 chain이 작동하는 이유는 Error가 우리의 모든 3개의 에러 클래스의 수퍼클래스이기 때문입니다. 만약 함수 hash의 제네릭의 왼쪽에 오류가 아닌 다른 타입이 있다면, validate에서 나온 두 오류를 처리하기 위해 chainW를 사용해야 할 것입니다.
소스코드는 이곳에서 실행해볼 수 있습니다.
TaskEither
우리는 Task가 실패하지 않는 비동기 연산, Either는 실패할 수 있는 동기 연산이라는 것을 알았습니다. TaskEither는 실패할 수 있는 비동기 연산입니다.
HTTP 요청을 수행하는 것인 이 기능을 잘 보여주는 예시입니다.
import axios from 'axios'
import { pipe } from 'fp-ts/lib/function'
import * as TE from 'fp-ts/lib/TaskEither'
;(async () => {
  const ok = await pipe(
    TE.tryCatch(
      () => axios.get('https://httpstat.us/200'),
      (reason) => new Error(`${reason}`),
    ),
    TE.map((resp) => resp.data),
  )()

  console.log(ok)
  // { _tag: 'Right', right: { code: 200, description: 'OK' } }
})()
여기서는 axios를 사용하여 상태 코드 200을 반환하는 httpstat에 HTTP 요청을 보냈습니다. 200 – Ok이므로 오류가 발생하지 않습니다. 따라서 right가 출력됩니다.
상태 코드 500에 대해서도 같은 작업을 해볼 수 있습니다.
type Resp = { code: number; description: string }
;(async () => {
  const result = await pipe(
    TE.tryCatch(
      () => axios.get('https://httpstat.us/500'),
      (reason) => new Error(`${reason}`),
    ),
    TE.map((resp) => resp.data),
  )()

  console.log(result)
  /**
   * {
   *   _tag: 'Left',
   *   left: Error: Error: Request failed with status code 500
   *       at /tmp/either-demo/taskeither.ts:19:19
   *       at /tmp/either-demo/node_modules/fp-ts/lib/TaskEither.js:94:85
   *       at processTicksAndRejections (internal/process/task_queues.js:97:5)
   * }
   */
})()
Folding
만약 https://httpstatus.us/200 엔드퐁니트에 접근하는 경우, 작업이 성공할 것으로 가정하고 fold 연산자를 사용하여 출력을 Task로 변환할 수 있습니다.
import { absurd, constVoid, pipe, unsafeCoerce } from 'fp-ts/lib/function'

const result = pipe(
  TE.tryCatch(
    () => axios.get('https://httpstat.us/200'),
    () => constVoid() as never,
  ),
  TE.map((resp) => unsafeCoerce<unknown, Resp>(resp.data)),
  TE.fold(absurd, T.of),
) // Not executing the promise

// Result is of type:
// T.Task<Resp>
유의할 점은 T.of를 사용하는 익명함수(ex. (a) => T.of(a))를 사용하지 않고 T.of 함수를 직접 사용했다는 것입니다.
Absurd는 never를 인수로 받아 지네릭 타입 A(이 경우에는 Resp)로 타입캐스트 하는 함수입니다.
Asynchronously Error Handling
때로는 에러 처리도 비동기적일 수 있습니다. 이는 2 Phase Commit을 수행하는 경우 일반적입니다. 좋은 예로는 데이터베이스 트랜잭션을 처리하는 경우입니다.
import { pipe } from 'fp-ts/lib/function'
import * as TE from 'fp-ts/lib/TaskEither'

declare function begin(): Promise<void>
declare function commit(): Promise<void>
declare function rollback(): Promise<void>

const result = pipe(
  TE.tryCatch(
    () => begin(),
    (err) => new Error(`begin txn failed: ${err}`),
  ),
  TE.chain(() =>
    TE.tryCatch(
      () => commit(),
      (err) => new Error(`commit txn failed: ${err}`),
    ),
  ),
  TE.orElse((originalError) =>
    pipe(
      TE.tryCatch(
        () => rollback(),
        (err) => new Error(`rollback txn failed: ${err}`),
      ),
      TE.fold(TE.left, () => TE.left(originalError)),
    ),
  ),
)
이 예시에서, begin이나 commit 작업이 실패하고 originalError를 반환하는 경우 롤백을 시도했습니다. 롤백 역시 실패하면, 롤백 에러를 반환합니다.
Conclusion
에러 처리와 비동기 작업은 어떤 애플리케이션에서든 중요한 구성요소입니다. Task, Either, TaskEither를 이해하면 이제 간단한 애플리케이션을 개발하는 데 필요한 기본 구성 요소를 갖추게 됩니다.
이 글이 도움이 됐다면, Twitter 팔로우 부탁드립니다.