개요
주제 : 스프링의 MVC 기술들을 한번에 빠르게 훑고 간다.
목표 : 이전에 공부했던 스프링 웹 MVC를 복습하면서 전반적인 감을 찾는다!
0. 로깅 간단히 알아보기
앞으로 로그를 사용할 것이기 때문에, 이번시간에는 로그에 대해서 간단히 알아보자.
운영 시스템에서는 System.out.println() 같은 시스템 콘솔을 사용해서 필요한 정보를 출력하지 않고, 별도의 로깅 라이브러리를 사용해서 로그를 출력한다.
스프링 부트 로깅 라이브러리는 기본으로 다음 로깅 라이브러리를 사용한다.
- SLF4J - http://www.slf4j.org
- Logback - http://logback.qos.ch
현재 클래스의 로그를 한번 출력해보자.
@RestController
public class LogTestController {
    private final Logger log = LoggerFactory.getLogger(getClass());

    @RequestMapping("/log-test")
    public String logTest(){
        String name = "Spring";

        // 반드시 {} 사용해줘야한다.
        log.trace("trace log = {}", name);
        log.debug("debug log = {}", name);
        log.info("info log = {}", name);
        log.warn("warn log = {}", name);
        log.error("error log = {}", name);

        //로그를 사용하지 않아도 a+b 계산 로직이 먼저 실행됨, 이런 방식으로 사용하면 X
        log.debug("String concat log=" + name);
        return "ok";
    }
}
매핑 정보
@RestController
@Controller는 반환 값이 String 이면 뷰 이름으로 인식된다. 그래서 뷰를 찾고 뷰가 랜더링 된다.@RestController는 반환 값으로 뷰를 찾는 것이 아니라, HTTP 메시지 바디에 바로 입력한다.올바른 로그 사용법
log.debug("data="+data)
로그 출력 레벨을 info로 설정해도 해당 코드에 있는 "data="+data가 실제 실행이 되어 버린다. 결과적으로 문자 더하기 연산이 발생한다.log.debug("data={}", data)
로그 출력 레벨을 info로 설정하면 아무일도 발생하지 않는다. 따라서 앞과 같은 의미없는 연산이 발생하지 않는다.- 이제부터 코드를 작성해보자!
1. 요청 매핑
MappingController
@RestController
public class MappingController {

    // LoggerFactory 는 logger 들의 유틸리티 클래스
    private Logger log = LoggerFactory.getLogger(getClass());

    @RequestMapping("/hello-basic")
    // 반드시 method 속성으로 http 메서드 지정해야 http 메서드와 관련된 호출 생성
    public String helloBasic(){
        log.info("helloBasic");
        return "ok";
}
1. HTTP 메서드
@RequestMapping에method속성으로 HTTP 메서드를 지정하지 않으면 HTTP 메서드와 무관하게 호출된다. 즉, GET, HEAD, POST, PUT, PATCH, DELETE 모두 허용하게 된다. 이렇게 되면 안된다.2. HTTP 메서드 매핑
@RequestMapping(value = "/mapping-get-v1", method = RequestMethod.GET)
public String mappingGetV1() {
    log.info("mappingGetV1");
    return "ok";
}
- 만약 여기에 POST 요청을 하면 HTTP 405 상태코드(Method Not Allowed)를 반환한다.
3. HTTP 메서드 매핑 축약
@GetMapping(value = "/mapping-get-v2")
public String mappingGetV2() {
    log.info("mapping-get-v2");
    return "ok";
}
4. PathVariable(경로 변수) 사용 - 굉장히 많이 사용
@GetMapping("/mapping/{userId}")
public String mappingPath(@PathVariable("userId") String data) {
    log.info("mappingPath userId={}", data);
    return "ok";
}
@RequestMapping은 URL 경로를 템플릿화 할 수 있는데, @PathVariable 을 사용하면 매칭 되는 부분을 편리하게 조회할 수 있다.@PathVariable의 이름과 파라미터 이름이 같으면 생략할 수 있다.5. PathVariable 사용 - 다중
@GetMapping("/mapping/users/{userId}/orders/{orderId}")
public String mappingPath(@PathVariable String userId, @PathVariable Long
       	orderId) {
    log.info("mappingPath userId={}, orderId={}", userId, orderId);
    return "ok";
}
- 다중으로도 가능
2. 요청 매핑 - API 예시
회원 관리를 HTTP API로 만든다 생각하고 매핑을 어떻게 하는지 알아보자.
회원 관리 API
- 회원 목록 조회: GET /users
- 회원 등록: POST /users
- 회원 조회: GET /users/{userId}
- 회원 수정: PATCH /users/{userId}
- 회원 삭제: DELETE /users/{userId}
@RestController
@RequestMapping("/mapping/users")
public class MappingClassController {
    /**
     * GET /mapping/users
     */
    @GetMapping
    public String users(){
        return "get users";
    }

    /**
     * POST /mapping/users
     */
    @PostMapping
    public String addUser() {
        return "post user";
    }

    /**
     * GET /mapping/users/{userId}
     */
    @GetMapping("/{userId}")
    public String findUser(@PathVariable String userId){
        return "get userId=" +userId;
    }

    /**
     * PATCH /mapping/users/{userId}
     */
    @PatchMapping("/{userId}")
    public String updateUser(@PathVariable String userId) {
        return "update userId=" + userId;
    }

    /**
     * DELETE /mapping/users/{userId}
     */
    @DeleteMapping("/{userId}")
    public String deleteUser(@PathVariable String userId) {
        return "delete userId=" + userId;
    }
}
- 매핑 방법을 이해했으니, 이제부터 HTTP 요청이 보내는 데이터들을 스프링 MVC로 어떻게 조회하는지 알아보자.
3. HTTP 요청 - 기본, 헤더 조회
애노테이션 기반의 스프링 컨트롤러는 다양한 파라미터를 조회한다.
다양한 애노테이션을 기반으로 확인해보자
1) HTTP 요청 파라미터 - 쿼리 파라미터, HTML Form
HTTP 요청 데이터 조회 - 개요
서블릿에서 학습했던 HTTP 요청 데이터를 조회 하는 방법을 떠올려 보자.
클라이언트에서 서버로 요청 데이터를 전달할 때는 주로 3가지 방법을 사용한다.
- 1. GET - 쿼리 파라미터
/url?username=hello&age=20- 메시지 바디 없이, URL의 쿼리 파라미터에 데이터를 포함해서 전달
- 2. POST - HTML Form
- 메시지 바디에 쿼리 파리미터 형식으로 전달
username=hello&age=20- 3. HTTP message body에 데이터를 직접 담아서 전달
HTTP API에서 주로 사용, JSON, XML, TEXT- 데이터 형식은 주로
JSON사용POST,PUT,PATCH
GET 쿼리 파라미터 전송 방식이든, POST HTML Form 전송 방식이든 둘다 형식이 같으므로 구분없이 조회할 수 있다. 이것을 요청 파라미터 조회라 한다.
RequestParamController
requestParamV1
@Slf4j
@Controller
public class RequestParamController {
    @RequestMapping("/request-param-v1")
    public void requestParamV1(HttpServletRequest request, HttpServletResponse response) throws IOException{
        String username = request.getParameter("username");
        int age = Integer.parseInt(request.getParameter("age"));
        log.info("username={}, age={}", username, age);

        response.getWriter().write("ok");
    }
}
request.getParameter(): 여기서는 단순히HttpServletRequest가 제공하는 방식으로 요청 파라미터를 조회했다.- 참고 : Post Form 페이지 생성 : 리소스는
/resources/static아래에 두면 스프링 부트가 자동으로 인식한다.HTTP 요청 파라미터 - @RequestParam
- 스프링이 제공하는
@RequestParam을 사용하면 요청 파라미터를 매우 편리하게 사용할 수 있다.requestParamV2
@ResponseBody
@RequestMapping("/request-param-v2")
public String requestParamV2(
    @RequestParam("username") String memberName,
    @RequestParam("age") int memberAge) {
        log.info("username={}, age={}", memberName, memberAge);
        return "ok";
}
@RequestParam: 파라미터 이름으로 바인딩@ResponseBody: View 조회를 무시하고, HTTP message body에 직접 해당 내용 입력requestParamV3
@ResponseBody
@RequestMapping("/request-param-v3")
public String requestParamV3(
    @RequestParam String username,
    @RequestParam int age) {
        log.info("username={}, age={}", username, age);
        return "ok";
}
requestParamV4
@ResponseBody
@RequestMapping("/request-param-v4")
public String requestParamV4(String username, int age) {
    log.info("username={}, age={}", username, age);
    return "ok";
}
String,int,Integer등의 단순 타입이면@RequestParam도 생략 가능파라미터 필수 여부 - requestParamRequired
@ResponseBody
@RequestMapping("/request-param-required")
public String requestParamRequired(
    @RequestParam(required = true) String username,
    @RequestParam(required = false) Integer age) {
        log.info("username={}, age={}", username, age);
        return "ok";
}
@RequestParam.required
- 파라미터 필수 여부
- 기본값이 파라미터 필수( true )이다.
/request-param요청
- username 이 없으므로 400 예외가 발생한다.
- 주의! - 파라미터 이름만 사용
/request-param?username=- 파라미터 이름만 있고 값이 없는 경우 빈문자로 통과
- 주의! - 기본형(primitive)에 null 입력
/request-param요청@RequestParam(required = false) int age
null을int에 입력하는 것은 불가능(500 예외 발생)
따라서null을 받을 수 있는Integer로 변경하거나, 또는 다음에 나오는defaultValue사용기본 값 적용 - requestParamDefault
@ResponseBody
@RequestMapping("/request-param-default")
public String requestParamDefault(
    @RequestParam(required = true, defaultValue = "guest") String username,
    @RequestParam(required = false, defaultValue = "-1") int age) {
        log.info("username={}, age={}", username, age);
        return "ok";
}
- 파라미터에 값이 없는 경우
defaultValue를 사용하면 기본 값을 적용할 수 있다.파라미터를 Map으로 조회하기 - requestParamMap
@ResponseBody
@RequestMapping("/request-param-map")
public String requestParamMap(@RequestParam Map<String, Object> paramMap) {
        log.info("username={}, age={}", paramMap.get("username"),
                paramMap.get("age"));
        return "ok";
}
파라미터를
Map,MultiValueMap으로 조회할 수 있다.
HTTP 요청 파라미터 - @ModelAttribute
- 실제 개발을 하면 요청 파라미터를 받아서 필요한 객체를 만들고 그 객체에 값을 넣어 주어야 한다. 스프링은 이 과정을 완전히 자동화해주는
@ModelAttribute기능을 제공한다.먼저 요청 파라미터를 바인딩 받을 객체를 만들자
@Data
public class HelloData {
	private String username;
    private int age;
}
- 롬복 :
@Data
@Getter,@Setter,@ToString,@EqualsAndHashCode,@RequiredArgsConstructor를 자동으로 적용해준다.@ModelAttribute 적용 - modelAttributeV1
// ModelAttribute 코드 // 마법처럼 HelloData 객체가 생성되고, 요청 파라미터의 값도 모두 들어가 있다. // get요청만 해주면 된다. @ResponseBody @RequestMapping("/model-attribute-v1") public String modelAttributeV1(@ModelAttribute HelloData helloData) { log.info("username={}, age={}", helloData.getUsername(), helloData.getAge()); return "ok"; }@RequestMapping("/model-attribute-v1") public String modelAttributeV1(@RequestParam String username, @RequestParam int age) { HelloData helloData = new HelloData(); helloData.setUsername(username); helloData.setAge(age); log.info("username={}, age={}", helloData.getUsername(),helloData.getAge()); return "ok"; }
- 이 코드를 엄청나게 줄일 수 있게 만든다.
@ModelAttribute는 생략할 수 있다. 그런데@RequestParam도 생략하면 혼란이 발생할 수 있다. 그냥 사용하자.
2) HTTP 요청 메시지 - 단순 텍스트
requestBodyStringV1
HTTP message body에 데이터를 직접 담아서 요청
요청 파라미터와 다르게, HTTP 메시지 바디를 통해 데이터가 직접 넘어오는 경우는@RequestParam,@ModelAttribute를 사용할 수 없다.- HTTP 메시지 바디의 데이터를
InputStream을 사용해서 직접 읽을 수 있다.@Slf4j @Controller public class RequestBodyStringController { @PostMapping("/request-body-string-v1") public void requestBodyString(HttpServletRequest request, HttpServletResponse response) throws IOException { ServletInputStream inputStream = request.getInputStream(); String messageBody = StreamUtils.copyToString(inputStream, StandardCharsets.UTF_8); log.info("messageBody={}", messageBody); response.getWriter().write("ok"); } }Input, Output 스트림, Reader - requestBodyStringV2
- 스프링 MVC는 다음 파라미터를 지원한다.
- InputStream(Reader): HTTP 요청 메시지 바디의 내용을 직접 조회
- OutputStream(Writer): HTTP 응답 메시지의 바디에 직접 결과 출력
@Slf4j
@Controller
public class RequestBodyStringController {
	@PostMapping("/request-body-string-v2")
    public void requestBodyStringV2(InputStream inputStream, Writer responseWriter) throws IOException {
        String messageBody = StreamUtils.copyToString(inputStream,StandardCharsets.UTF_8);
        log.info("messageBody={}", messageBody);
        responseWriter.write("ok");
    }
}
requestBodyStringV3
- HttpEntity: HTTP header, body 정보를 편리하게 조회
- 메시지 바디 정보를 직접 조회
- 요청 파라미터 조회 기능과 관계 없음 (@RequestParam X, @ModelAttribute X)
@Slf4j
@Controller
public class RequestBodyStringController {
	@PostMapping("/request-body-string-v3")
    public HttpEntity<String> requestBodyStringV3(HttpEntity<String> httpEntity) {
        String messageBody = httpEntity.getBody();
        log.info("messageBody={}", messageBody);
        return new HttpEntity<>("ok");
    }
}
@RequestBody - requestBodyStringV4
@RequestBody를 사용하면 HTTP 메시지 바디 정보를 편리하게 조회할 수 있다. 참고로 헤더 정보가 필요하다면HttpEntity를 사용하거나@RequestHeader를 사용하면 된다.- 이렇게 메시지 바디를 직접 조회하는 기능은 요청 파라미터를 조회하는
@RequestParam,@ModelAttribute와는 전혀 관계가 없다.@ResponseBody @PostMapping("/request-body-string-v4") public String requestBodyStringV4(@RequestBody String messageBody) { log.info("messageBody={}", messageBody); return "ok"; }
- 정리 :
@RequestBody를 사용하면 HTTP 메시지 바디 정보를 편리하게 조회할 수 있다
총 정리 : 요청 파라미터 vs HTTP 메시지 바디
요청 파라미터를 조회하는 기능:
@RequestParam,@ModelAttribute
HTTP 메시지 바디를 직접 조회하는 기능:@RequestBody
3) HTTP 요청 메시지 - JSON
이번에는 HTTP API에서 주로 사용하는 JSON 데이터 형식을 조회해보자.
이때도, 결국에는 @RequestBody를 사용해주면 된다.
requestBodyJsonV5
@ResponseBody
@PostMapping("/request-body-json-v5")
public HelloData requestBodyJsonV5(@RequestBody HelloData data){

        log.info("username={}, age={}", data.getUsername(), data.getAge());
        return data;
    }
}
@ResponseBody
응답의 경우에도@ResponseBody를 사용하면 해당 객체를 HTTP 메시지 바디에 직접 넣어줄 수 있다. 물론 이 경우에도HttpEntity를 사용해도 된다.
@RequestBody요청
- JSON 요청 -> HTTP 메시지 컨버터 -> 객체
@ResponseBody응답
- 객체 -> HTTP 메시지 컨버터 -> JSON 응답
4. HTTP 응답 - 정적 리소스, 뷰 템플릿
응답 데이터는 이미 앞에서 일부 다른 내용들이지만, 응답 부분에 초점을 맞추어서 정리해보자. 스프링에서 응답 데이터를 만든느 방법은 크게 3가지이다.
- 정적 리소스
예) 웹 브라우저에 정적인 HTML, css, js를 제공할 때는, 정적 리소스를 사용한다.- 뷰 템플릿 사용
예) 웹 브라우저에 동적인 HTML을 제공할 때는 뷰 템플릿을 사용한다.- HTTP 메시지 사용
HTTP API를 제공하는 경우에는 HTML이 아니라 데이터를 전달해야 하므로, HTTP 메시지 바디에 JSON 같은 형식으로 데이터를 실어 보낸다.
1) 정적 리소스
스프링 부트는 클래스패스의 다음 디렉토리에 있는 정적 리소스를 제공한다.
/static , /public , /resources , /META-INF/resources
2) 뷰 템플릿(타임리프)
뷰 템플릿을 거쳐서 HTML이 생성되고, 뷰가 응답을 만들어서 전달한다.
3) HTTP 응답 - HTTP API, 메시지 바디에 직접 입력
- HTTP API를 제공하는 경우에는 HTML이 아니라 데이터를 전달해야 하므로, HTTP 메시지 바디에 JSON 같은 형식으로 데이터를 실어 보낸다.
@Slf4j
@Controller
public class ResponseBodyController {

    //서블릿을 직접 다룰 때 처럼
    //HttpServletResponse 객체를 통해서 HTTP 메시지 바디에 직접 ok 응답 메시지를 전달한다.

    @GetMapping("/response-body-string-v1")
    public void responseBodyV1(HttpServletResponse response) throws IOException{
        response.getWriter().write("ok");
    }

    //ResponseEntity 엔티티는 HttpEntity 를 상속 받았음.
    @GetMapping("/response-body-string-v2")
    public ResponseEntity<String> responseBodyV2(){
        return new ResponseEntity<>("ok", HttpStatus.OK);
    }

    //@ResponseBody 를 사용하면 view 를 사용하지 않고, HTTP 메시지 컨버터를 통해서 메시지 입력
    @ResponseBody
    @GetMapping("/response-body-string-v3")
    public String responseBodyV3(){
        return "ok";
    }

    //ResponseEntity 를 반환한다. HTTP 메시지 컨버터를 통해서 JSON 형식으로 변환되어서 반환된다
    @GetMapping("/response-body-json-v1")
    public ResponseEntity<HelloData> responseBodyJsonV1() {
        HelloData helloData = new HelloData();
        helloData.setUsername("userA");
        helloData.setAge(20);
        return new ResponseEntity<>(helloData, HttpStatus.OK);
    }

    //ResponseEntity 는 HTTP 응답 코드를 설정
    @ResponseStatus(HttpStatus.OK)
    @ResponseBody
    @GetMapping("/response-body-json-v2")
    public HelloData responseBodyJsonV2(){
        HelloData helloData = new HelloData();
        helloData.setUsername("userA");
        helloData.setAge(20);

        return helloData;
    }
}
3-1) HTTP 메시지 컨버터
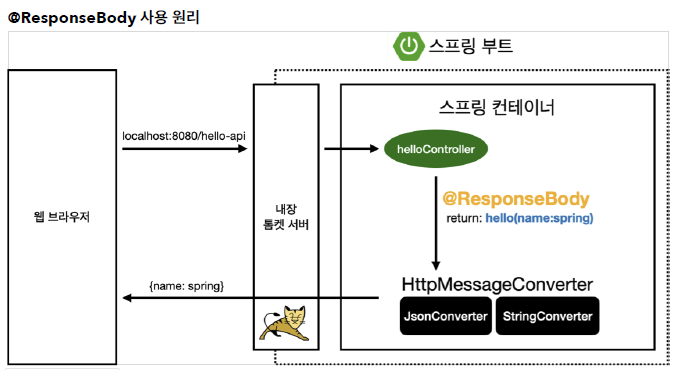
뷰 템플릿으로 HTMl을 생성해서 응답하는 것이 아니라, HTTP API처럼 JSON 데이터를 HTTP 메시지 바디에서 직접 읽거나 쓰는 경우 HTTP 메시지 컨버터를 사용하면 편리하다.
@ResponseBody를 사용
- HTTP의 BODY에 문자 내용을 직접 반환
- viewResolver 대신에 HttpMessageConverter 가 동작
- 기본 문자처리: StringHttpMessageConverter
- 기본 객체처리: MappingJackson2HttpMessageConverter
- byte 처리 등등 기타 여러 HttpMessageConverter가 기본으로 등록되어 있음
3-2) 요청 매핑 핸들러 어뎁터 구조
그렇다면 HTTP 메시지 컨버터는 스프링 MVC 어디쯤에서 사용되는 것일까?
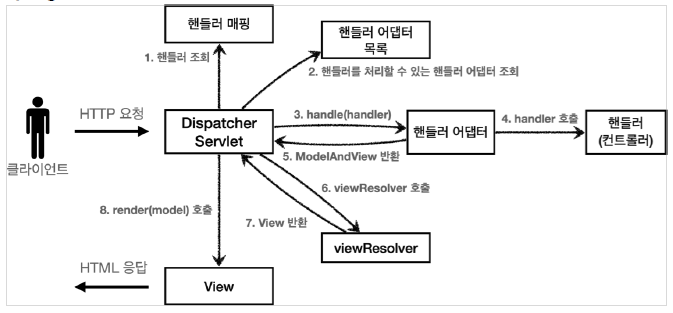
SpringMVC 구조
- 모든 비밀은
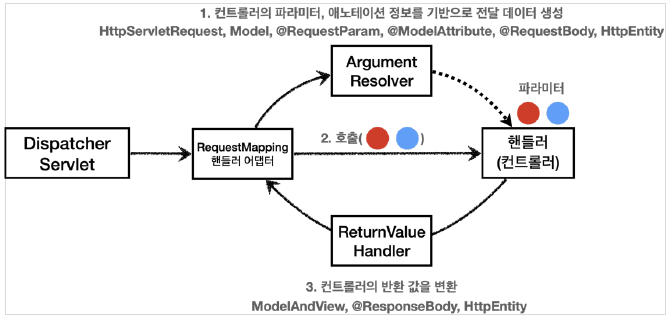
@RequestMapping을 처리하는 핸들러 어댑터인RequestMappingHandlerAdapter(요청 매핑 헨들러 어뎁터)에 있다.RequestMappingHandlerAdapter 동작 방식
HTTP 메시지 컨버터
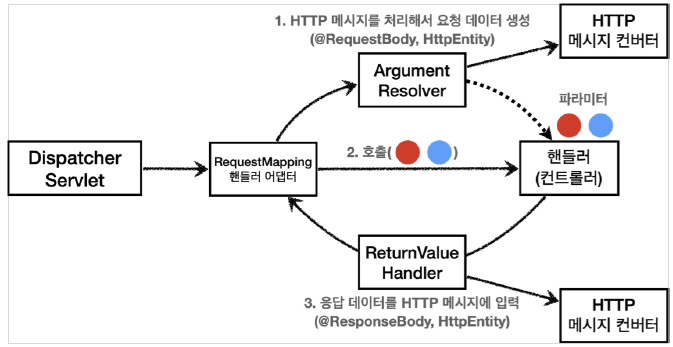
- HTTP 메시지 컨버터를 사용하는
@RequestBody도 컨트롤러가 필요로 하는 파라미터의 값에 사용된다.@ResponseBody의 경우도 컨트롤러의 반환 값을 이용한다.- 요청의 경우
@RequestBody를 처리하는ArgumentResolver가 있고,HttpEntity를 처리하는ArgumentResolver가 있다. 이ArgumentResolver들이HTTP메시지 컨버터를 사용해서 필요한 객체를 생성하는 것이다.- 응답의 경우
@ResponseBody와HttpEntity를 처리하는ReturnValueHandler가 있다. 그리고 여기에서HTTP메시지 컨버터를 호출해서 응답 결과를 만든다.
- 정리
스프링 MVC는@RequestBody@ResponseBody가 있으면
RequestResponseBodyMethodProcessor(ArgumentResolver),
HttpEntity가 있으면HttpEntityMethodProcessor(ArgumentResolver)를 사용한다.