Security tag 라이브러리
인증이 완료되면, 이미 로그인 유저의 정보는 세션에 저장되어 있음
Security ContextHolder[SecurityContext[Authentication[Principal=id][Credentials=pw][Authorities]]]
위의 세션 정보를 활용하여, 태그 라이브러리로 제공
<%@ taglib uri="http://www.springframework.org/security/tags" prefix="s"%>
1.인증과 권한
2.암호화와 CSRF의 이해[암호화와 CSRF의 이해]
암호화 키와 복호화 키를 갖고 있는 객체를 암호화 객체라고 한다.
[암호화(Cipher)]
암호화 : 사용자가 입력한 데이터를 알아볼 수 없는 데이터로 변경하는 과정
*스프링 시큐리티 제공 - 암호화 객체들
| Class Summary | |
|---|---|
| BaseDigestPasswordEncoder | Convenience base for digest password encoders. |
| BasePasswordEncoder | Convenience base for all password encoders. |
| LdapShaPasswordEncoder | A version of ShaPasswordEncoder which supports Ldap SHA and SSHA (salted-SHA) encodings. |
| Md4PasswordEncoder | MD4 implementation of PasswordEncoder. |
| Md5PasswordEncoder | MD5 implementation of PasswordEncoder. |
| MessageDigestPasswordEncoder | Base for digest password encoders. |
| PlaintextPasswordEncoder | Plaintext implementation of PasswordEncoder. |
| ShaPasswordEncoder | SHA implementation of PasswordEncoder. |
*BCryptPasswordEncoder : 가장 많이 사용하는 암호화 모듈
[복호화(Decrypt)]
복호화 : 암호화된 데이터를 정상적인 데이터로 변경하는 과정
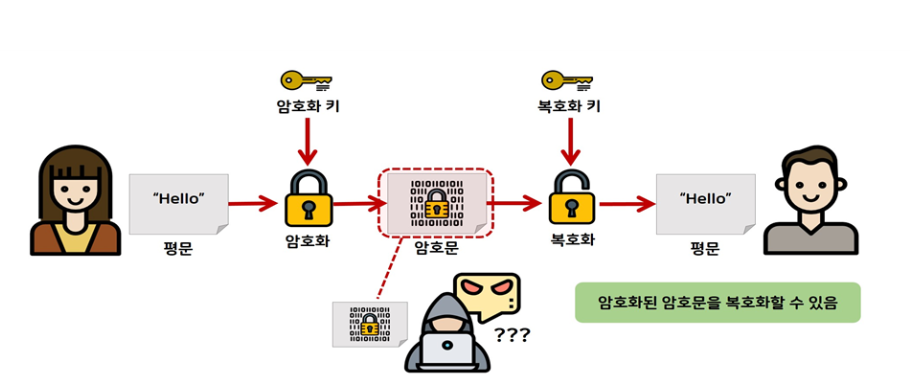
평문 → 암호화 모듈 → 암호문 → 복호화(Decrypt) → 평문
단방향 : 암호화 키와 복호화키가 같음
양방향 : 암호화 키와 복호화키가 다름
assertTrue(new BCryptPasswordEncoder().matches(plainPW, encodedPW));
⇒ boolean타입으로 plainPW와 encodedPW가 같다면 true → 결과 : true1.new → IOC 컨테이너로 관리되지 않음(Spring에서 관리하지 못함)
2.@Component : 스프링 애플리케이션의 부품/Class밖에 생성 → Component가 붙어있는 것들을 IOC 컨테이너로 올림(Spring에서 관리)
- Configuration
3.Bean
IOC 컨테이너에 new 객체 생성함 ⇒ Spring 문법을 사용할 수 있다. @Bean에 등록된 데이터를 @Autowired 등으로 불러온다.
외부 라이브러리에서 가져오는 것은 Bean을 사용하면 좋다.[SecurityConfig.java]
package edu.global.ex.config;
import org.springframework.beans.factory.annotation.Autowired;
import org.springframework.context.annotation.Bean;
import org.springframework.context.annotation.Configuration;
import org.springframework.security.config.annotation.authentication.builders.AuthenticationManagerBuilder;
import org.springframework.security.config.annotation.web.builders.HttpSecurity;
import org.springframework.security.config.annotation.web.configuration.EnableWebSecurity;
import org.springframework.security.config.annotation.web.configuration.WebSecurityConfigurerAdapter;
import org.springframework.security.crypto.bcrypt.BCryptPasswordEncoder;
import org.springframework.security.crypto.password.PasswordEncoder;
import edu.global.ex.security.CustomUserDetailsService;
import edu.global.ex.vo.UserVO;
@Configuration // @Component + 의미(설정할 수 있는 파일)//(객체 생성해서 IOC컨테이너에 넣어라)
@EnableWebSecurity // 스프링 시큐리티 필터가 스프링 필터체인에 등록됨 = 스프링 시큐리티를 작동시키는 파일이라는 것을 알려줌 - 스프링한테.
public class SecurityConfig extends WebSecurityConfigurerAdapter {
@Autowired
private CustomUserDetailsService customUserDetailsService;
@Bean
// IOC 컨테이너에 new 객체 생성함 ⇒ Spring 문법을 사용할 수 있다. @Bean에 등록된 데이터를 @Autowired 등으로 불러온다.
// 외부 라이브러리에서 가져오는 것은 Bean을 사용하면 좋다.
public PasswordEncoder bCryptPasswordEncoder() { // UserMapperTest.java에 return
return new BCryptPasswordEncoder();
}
@Bean
public UserVO userVO() {
return new UserVO();
}
// @Bean
// UserVO의 username과 password 값이 "메롱" 하나로 고정된다.
// public UserVO userVO() {
// UserVO vo = new UserVO();
// vo.setPassword("메롱");
// vo.setUsername("메롱");
// return vo;
// }
@Override
protected void configure(HttpSecurity http) throws Exception {
// 우선 CSRF설정을 해제한다.
// 초기 개발시만 해주는게 좋다.
http.csrf().disable();
http.authorizeRequests().antMatchers("/user/**").hasAnyRole("USER") // DB상에서는 ROLE_USER이다 /user/**(URL) : user로
// 입력하여 들어오는 모든 것에 인증을 시키겠다.
.antMatchers("/admin/**").hasAnyRole("ADMIN") // id: admin, pw:admin /admin/**(URL) : admin으로 들어오는 모든 것에
// 인증을 시키겠다.
.antMatchers("/**").permitAll();
// http.formLogin(); // 스프링 시큐리티에 있는 기본 로그인 폼을 사용하겠다.
http.formLogin().loginPage("/login") // loginPage() 는 말 그대로 로그인 할 페이지(LoginController.java) url 비교이고,
.usernameParameter("id") // login.jsp의 name을 database의 이름인 "username"이 아닌 "id"로 설정
.passwordParameter("pw").permitAll(); // 모든 유저가 로그인 화면을 볼 수 있게 한다.
}
@Override
protected void configure(AuthenticationManagerBuilder auth) throws Exception {
// auth.inMemoryAuthentication().withUser("user").password("{noop}user").roles("USER").and()
// .withUser("admin").password("{noop}admin").roles("ADMIN");
auth.userDetailsService(customUserDetailsService).passwordEncoder(new BCryptPasswordEncoder()); // 암호화 모듈 지정
}
}
-----------------------------------------------------------------------------
[UserMapperTest.java]
package edu.global.ex.mapper;
import static org.junit.jupiter.api.Assertions.assertTrue;
import org.junit.jupiter.api.Test;
import org.springframework.beans.factory.annotation.Autowired;
import org.springframework.boot.test.context.SpringBootTest;
import org.springframework.security.crypto.bcrypt.BCryptPasswordEncoder;
import org.springframework.security.crypto.password.PasswordEncoder;
import edu.global.ex.vo.UserVO;
import lombok.extern.slf4j.Slf4j;
@Slf4j
@SpringBootTest
class UserMapperTest {
@Autowired
private UserMapper userMapper;
// @Test
// void testInserUser() {
//
//// @Insert("insert into users(username,password,enabled) values(#{username},#{password},#{enabled})")
//// public int insertUser(UserVO userVO);
////
//// @Insert("insert into AUTHORITIES (username,AUTHORITY) values(#{username},'ROLE_USER')")
//// public void insertAuthorities(UserVO UserVO);
//
// UserVO user = new UserVO();
// user.setUsername("kim4");
// user.setPassword(new BCryptPasswordEncoder().encode("1234"));
// user.setEnabled(1);
//
// userMapper.insertUser(user);
// userMapper.insertAuthorities(user);
// }
/*
* @Test void testInwerAdminsur() { UserVO user = new UserVO();
* user.setUsername("admin2"); user.setPassword(new
* BCryptPasswordEncoder().encode("admin2")); user.setEnabled(1);
*
* userMapper.insertUser(user); // userMapper.insertAuthorities(user);
* userMapper.insertAdminAuthorities(user); }
*/
@Autowired
private PasswordEncoder passwordEncoder; // SecurityConfig.java에서 받아옴
@Autowired
private UserVO userVO; // SecurityConfig.java에서 받아옴
@Test
void testPassWordEncoder() {
String plainPW = "1234"; // 평문
String encodedPW = passwordEncoder.encode(plainPW);
// String encodedPW = new BCryptPasswordEncoder().encode(plainPW);
// BCryptPasswordEncoder : 암호화 모듈
System.out.println(plainPW + ":" + encodedPW);
System.out.println(passwordEncoder.matches(plainPW, encodedPW));
System.out.println(userVO);
// ==================================================================
// assertNotEquals(plainPW, encodedPW); // plainPW와 encodedPW가 같지 않다면 true → 결과 : true
// assertEquals(plainPW, encodedPW); // plainPW와 encodedPW가 같다면 true → 결과 : false 암호화 하여 값이 같지 않음
// assertTrue(new BCryptPasswordEncoder().matches(plainPW, encodedPW)); // boolean타입으로 plainPW와 encodedPW가 같다면 true → 결과 : true
// matches(평문, DB의 암호화된 문) 암호화 키 복호화 키 둘 다 갖고 있음
// SecurityConfig.java의 customUserDetailsService(암호화 모듈 지정) 객체 안에 matches 함수를 사용하면 평문과 DB의 암호화된 문을 비교하여 true인지 false인지 확인함
}
}
==============================================================================================
[결과]
1234:$2a$10$WMv4BEtPzQE98HTEfavnTesbxn4qBWhFTyzZse7xLGZxFwlP/GpTC
true
UserVO(username=null, password=null, enabled=0, authList=null)[CSRF(Cross Site Request Forgery)]
CSRF : 사이트 간 요청 위조(해커들의 공격 방법)
-피싱을 활용해 사용자 모르게 패스워드 변경
-옥션 해킹 사건에서 사용된 공격 기법
*사용자가 로그인 되어 있는 상태여야한다는 조건
[CSRF 방어방법]
・CAPTCHA사용
1.회원정보 변경, 게시글 작성 등 CSRF의 공격을 막아야하는 페이지에서 캡챠를 사용해 인증이 가능한 것만 요청을 처리해주는 방법이 있다.
2.캡챠는 랜덤 이미지를 통해 인증이 되므로 사용자 몰래 요청하는 것이 불가능하다는 장점이 있다.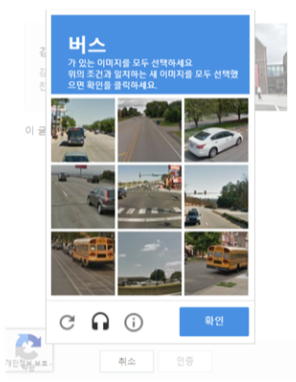
・CSRF 토큰 사용(Spring Security)
token : 랜덤번호생성
1.id와 pw 입력 요청할 때마다 token 번호를 생성해서 제출 버튼에 심어놓는다.
2.id와 pw와 token 번호까지 제출되고 token 번호가 일치하지 않는다면, 로그인 할 수 없다.
[SecurityConfig.java]
http.csrf().disable(); // csrf를 끈다. 키려면 해당 구문을 삭제
[login.jsp 상의 코드]
<input type="hidden" name="${_csrf.parameterName}" value="${_csrf.token}" />
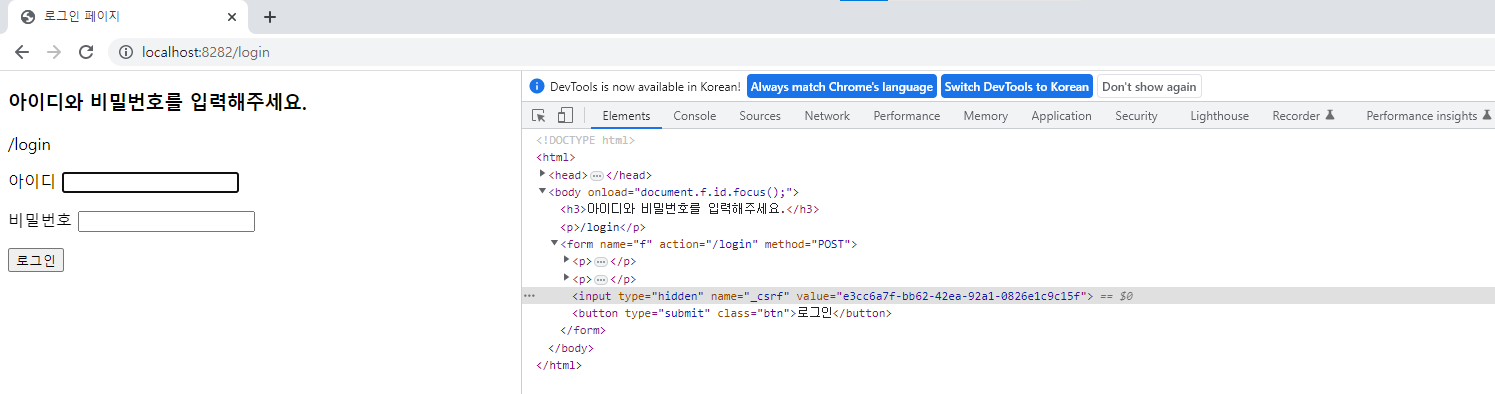
[http://localhost:8282/ 실행 상의 코드]
<input type="hidden" name="_csrf" value="e3cc6a7f-bb62-42ea-92a1-0826e1c9c15f">[SecurityConfig.java]
package edu.global.ex.config;
import org.springframework.beans.factory.annotation.Autowired;
import org.springframework.context.annotation.Bean;
import org.springframework.context.annotation.Configuration;
import org.springframework.security.config.annotation.authentication.builders.AuthenticationManagerBuilder;
import org.springframework.security.config.annotation.web.builders.HttpSecurity;
import org.springframework.security.config.annotation.web.configuration.EnableWebSecurity;
import org.springframework.security.config.annotation.web.configuration.WebSecurityConfigurerAdapter;
import org.springframework.security.crypto.bcrypt.BCryptPasswordEncoder;
import org.springframework.security.crypto.password.PasswordEncoder;
import edu.global.ex.security.CustomUserDetailsService;
import edu.global.ex.vo.UserVO;
@Configuration // @Component + 의미(설정할 수 있는 파일)//(객체 생성해서 IOC컨테이너에 넣어라)
@EnableWebSecurity // 스프링 시큐리티 필터가 스프링 필터체인에 등록됨 = 스프링 시큐리티를 작동시키는 파일이라는 것을 알려줌 - 스프링한테.
public class SecurityConfig extends WebSecurityConfigurerAdapter {
@Autowired
private CustomUserDetailsService customUserDetailsService;
@Bean
// IOC 컨테이너에 new 객체 생성함 ⇒ Spring 문법을 사용할 수 있다. @Bean에 등록된 데이터를 @Autowired 등으로
// 불러온다.
// 외부 라이브러리에서 가져오는 것은 Bean을 사용하면 좋다.
public PasswordEncoder bCryptPasswordEncoder() { // UserMapperTest.java에 return
return new BCryptPasswordEncoder();
}
@Bean
public UserVO userVO() {
return new UserVO();
}
// @Bean
// UserVO의 username과 password 값이 "메롱" 하나로 고정된다.
// public UserVO userVO() {
// UserVO vo = new UserVO();
// vo.setPassword("메롱");
// vo.setUsername("메롱");
// return vo;
// }
@Override
protected void configure(HttpSecurity http) throws Exception {
// 우선 CSRF설정을 해제한다.
// 초기 개발시만 해주는게 좋다.
// http.csrf().disable(); // csrf를 끈다. 키려면 해당 구문을 삭제
http.authorizeRequests().antMatchers("/user/**").hasAnyRole("USER") // DB상에서는 ROLE_USER이다 /user/**(URL) : user로
// 입력하여 들어오는 모든 것에 인증을 시키겠다.
.antMatchers("/admin/**").hasAnyRole("ADMIN") // id: admin, pw:admin /admin/**(URL) : admin으로 들어오는 모든 것에
// 인증을 시키겠다.
.antMatchers("/**").permitAll();
// http.formLogin(); // 스프링 시큐리티에 있는 기본 로그인 폼을 사용하겠다.
http.formLogin().loginPage("/login") // loginPage() 는 말 그대로 로그인 할 페이지(LoginController.java) url 비교이고,
.usernameParameter("id") // login.jsp의 name을 database의 이름인 "username"이 아닌 "id"로 설정
.passwordParameter("pw").permitAll(); // 모든 유저가 로그인 화면을 볼 수 있게 한다.
}
@Override
protected void configure(AuthenticationManagerBuilder auth) throws Exception {
// auth.inMemoryAuthentication().withUser("user").password("{noop}user").roles("USER").and()
// .withUser("admin").password("{noop}admin").roles("ADMIN");
auth.userDetailsService(customUserDetailsService).passwordEncoder(new BCryptPasswordEncoder()); // 암호화 모듈 지정
}
}
-----------------------------------------------------------------------------
[login.jsp]
<%@ page language="java" contentType="text/html; charset=UTF-8"
pageEncoding="UTF-8"%>
<%@ taglib prefix="c" uri="http://java.sun.com/jsp/jstl/core"%>
<%@ taglib prefix="form" uri="http://www.springframework.org/tags/form"%>
<!DOCTYPE html>
<head>
<meta http-equiv="Content-Type" content="text/html; charset=UTF-8" />
<title>로그인 페이지</title>
</head>
<body onload="document.f.id.focus();">
<h3>아이디와 비밀번호를 입력해주세요.</h3>
<c:url value="/login" var="loginUrl" />
<p>${loginUrl}</p>
<form:form name="f" action="${loginUrl}" method="POST"> <%-- action="${loginUrl}" == /login --%>
<c:if test="${param.error != null}"> <!-- CustomUserDetailsService.java와 링크됨. -->
<p>아이디와 비밀번호가 잘못되었습니다.</p>
</c:if>
<c:if test="${param.logout != null}">
<p>로그아웃 하였습니다.</p>
</c:if>
<p>
<label for="username">아이디</label>
<input type="text" id="id" name="id" /> <!-- SecurityConfig.java의 .usernameParameter("id")로 인해 username이 아닌 id로 받아올 수 있다. -->
</p>
<p>
<label for="password">비밀번호</label>
<input type="password" id="password" name="pw" /><!-- SecurityConfig.java의 .usernameParameter("pw")로 인해 password이 아닌 pw로 받아올 수 있다. -->
</p>
<input type="hidden" name="${_csrf.parameterName}" value="${_csrf.token}" />
<!--${_csrf.parameterName}와 ${_csrf.token}은 정해져있는 변수명이다. -->
<!-- form:form = xml에서 디폴트로 제공되는 form 태그를 사용하는 것이 아닌, taglib에서 제공하는 form을 사용하겠다. -->
<!-- form태그만 사용할 시 csrf를 주석처리하면 에러 발생. form:form태그 사용 시 csrf를 주석처리해도 실행됨 -->
<!-- POST방식만 된다 -->
<button type="submit" class="btn">로그인</button>
</form:form>
</body>
</html>