[스프링레거시]
개발자는 Controller와 View(JSP)만 코딩하면 된다.
나머지는 세팅만 하면 자동으로 생성됨.
[스프링 레거시 순서]
-1) pom.xml 을 통하여, 기본적인 라이브러리를 체크(Spring version(3버전), Java version(1.6버전) 등등)
-2) web.xml 체크 → Tomcat이 읽어들이는 환경(설정) 파일
→ 디스패처 서블릿 객체 생성
→ 한글처리(UTF-8)
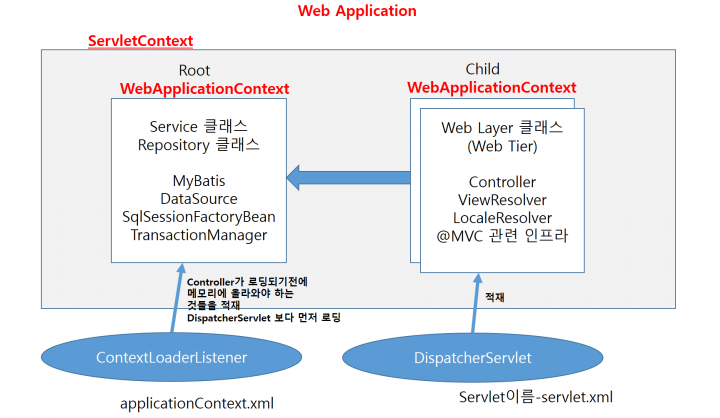
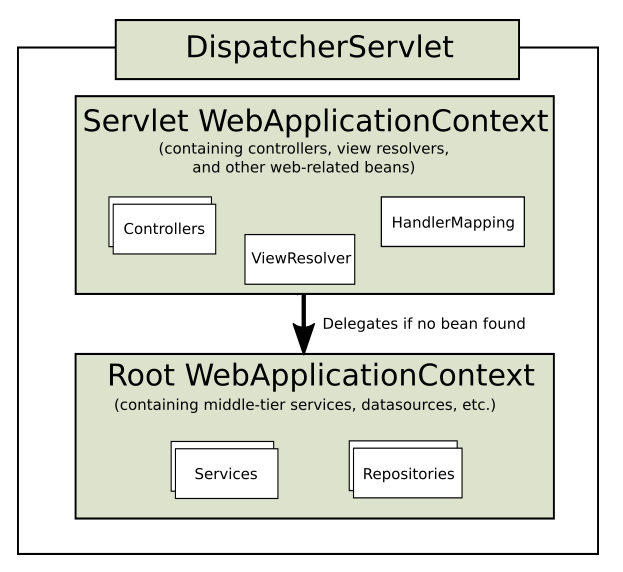
→ root.xml 과 servlet.xml 읽어 들여 IOC Container(스프링) 두개를 만듦
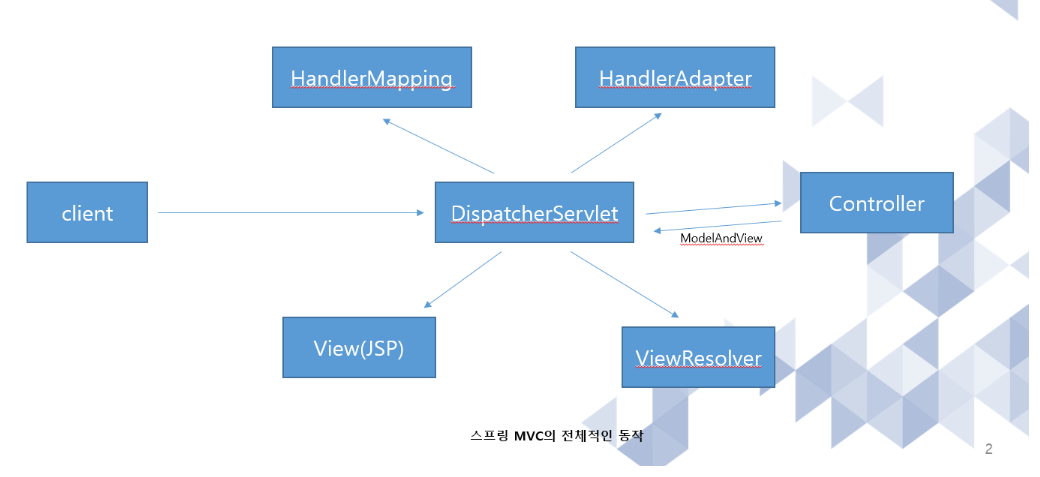
[스프링 MVC의 전체적인 동작 순서]
1.DispatcherServlet 실행
2.HandlerMapping 호출 : 해당 URL에 맞는 Controller 찾는 것
3.HandlerAdapter 호출 : 해당 Controller의 해당 함수 찾는 것
4.Controller 실행
5.Controller에서 DispatcherServlet에 ModelAndView를 return함
6.ViewResolver가 View(JSP)를 찾아서 client에 넘김
1.Tomcat
2.web.xml
3.servlet container 생성
web.xml→톰캣이 읽어오는 주체. 파일 실행 시 맨 처음에 실행됨

bean을 create하는 설정파일을
client > DispatcherServlet(loot로 치고 들어오는 모든것을 dispatcher로 받아냄)>
spring 3.0버전 : 공공기관 사용(레거시o)
spring 4.0버전 : 신규작업 시 사용할 수도(레거시x)
spring 5.0버전 : 많이 사용안함(레거시x)
톰캣이 내장되어 있지 않아서 실행 서버는 run on server
Run As→Run on Server
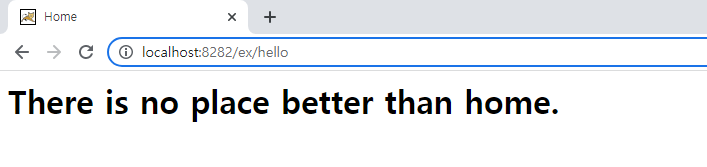
ex ⇒ 스프링레거시에서는 ex가 context명(메모리영역)으로 들어간다.(원래는 패키지명)
톰캣이 여러 프로젝트를 돌리기에 관리하기위해 context명이 중요하다.스프링 레거시
실무에서 꼭 봐야하는 것
root-context.xml
servlet-context.xml : IOC컨테이너 부분(HandlerMapping, HandlerAdapter, ViewResolver)[web.xml]
<?xml version="1.0" encoding="UTF-8"?>
<web-app version="2.5" xmlns="http://java.sun.com/xml/ns/javaee"
xmlns:xsi="http://www.w3.org/2001/XMLSchema-instance"
xsi:schemaLocation="http://java.sun.com/xml/ns/javaee https://java.sun.com/xml/ns/javaee/web-app_2_5.xsd">
<!-- The definition of the Root Spring Container shared by all Servlets
and Filters -->
<context-param>
<param-name>contextConfigLocation</param-name>
<param-value>/WEB-INF/spring/root-context.xml</param-value>
</context-param>
<!-- Creates the Spring Container shared by all Servlets and Filters -->
<listener>
<listener-class>org.springframework.web.context.ContextLoaderListener
</listener-class>
</listener>
<!-- Processes application requests -->
<!-- DistpatcherServlet appServlet = new DispathcerServlis(); -->
<servlet> <!-- <bean> + servlet을 상속받은 클래스 (예시:BoardController)-->
<servlet-name>appServlet</servlet-name>
<servlet-class>org.springframework.web.servlet.DispatcherServlet
</servlet-class>
<init-param>
<param-name>contextConfigLocation</param-name>
<param-value>/WEB-INF/spring/appServlet/servlet-context.xml
</param-value>
</init-param>
<load-on-startup>1</load-on-startup>
</servlet>
<!-- @WebServlet("/board/*")과 동일 -->
<servlet-mapping>
<servlet-name>appServlet</servlet-name>
<url-pattern>/</url-pattern>
</servlet-mapping>
<!-- 한글처리(UTF-8) -->
<filter>
<filter-name>encoding</filter-name>
<filter-class>org.springframework.web.filter.CharacterEncodingFilter
</filter-class>
<init-param>
<param-name>encoding</param-name>
<param-value>UTF-8</param-value>
</init-param>
</filter>
<filter-mapping>
<filter-name>encoding</filter-name>
<servlet-name>/*</servlet-name>
</filter-mapping>
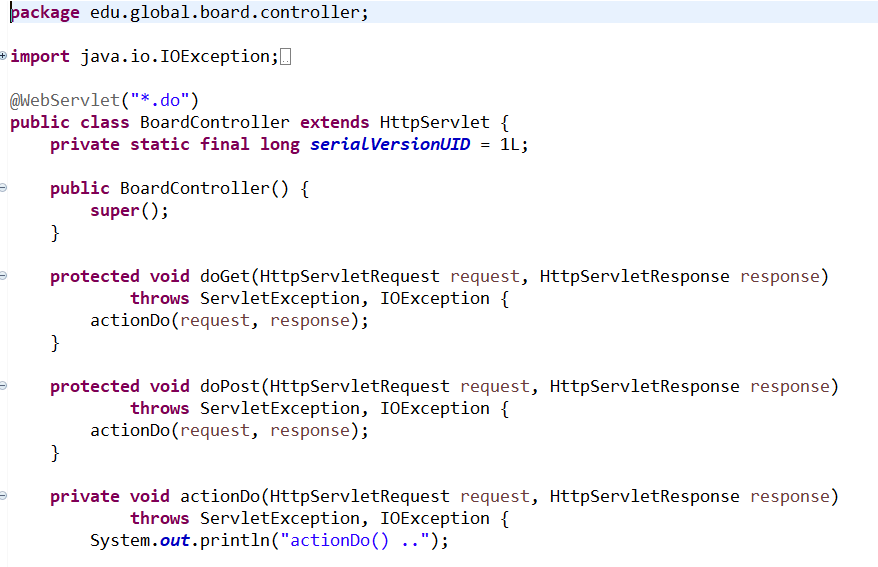
</web-app>DispatcherServlet의 역할 = 하기 사진의 함수를 미리 만들어 놓은 것
[servlet-context.xml]
<?xml version="1.0" encoding="UTF-8"?>
<beans:beans
	xmlns="http://www.springframework.org/schema/mvc"
	xmlns:xsi="http://www.w3.org/2001/XMLSchema-instance"
	xmlns:beans="http://www.springframework.org/schema/beans"
	xmlns:context="http://www.springframework.org/schema/context"
	xsi:schemaLocation="http://www.springframework.org/schema/mvc https://www.springframework.org/schema/mvc/spring-mvc.xsd
		http://www.springframework.org/schema/beans https://www.springframework.org/schema/beans/spring-beans.xsd
		http://www.springframework.org/schema/context https://www.springframework.org/schema/context/spring-context.xsd">

	<!-- DispatcherServlet Context: defines this servlet's request-processing
		infrastructure -->

	<!-- Enables the Spring MVC @Controller programming model -->
	<annotation-driven />
	<!-- annotation-driven : @Controller를 읽어들이기 위한 객체를 생성하는 태그 -->
	<!-- HandlerMapping HandlerAdapter를 기본적으로 생성함 -->

	<!-- Handles HTTP GET requests for /resources/** by efficiently serving
		up static resources in the ${webappRoot}/resources directory -->
	<resources mapping="/resources/**" location="/resources/" />
	<!-- 정적 리소스 세팅 -->

	<!-- Resolves views selected for rendering by @Controllers to .jsp resources
		in the /WEB-INF/views directory -->
	<beans:bean
		class="org.springframework.web.servlet.view.InternalResourceViewResolver">
		<beans:property name="prefix" value="/WEB-INF/views/" />
		<beans:property name="suffix" value=".jsp" />
		<!-- application.properties의 세팅과 동일 -->
		<!-- ViewResolver 생성 -->
		<!-- HomeController.java에서 return "hello"만 적어도 ⇒ "/WEB-INF/views/hello.jsp"으로 자동으로 바꿔준다. -->
	</beans:bean>

	<context:component-scan
		base-package="edu.global.ex" />
	<!-- edu.global.ex 밑에 있는 @component를 모두 읽어들여라 (컨트롤러, 서비스, 레포지토리, 매퍼) -->
</beans:beans>
[HomeController.java] package edu.global.ex; import java.text.DateFormat; import java.util.Date; import java.util.Locale; import org.springframework.stereotype.Controller; import org.springframework.ui.Model; import org.springframework.web.bind.annotation.GetMapping; import org.springframework.web.bind.annotation.RequestMapping; import org.springframework.web.bind.annotation.RequestMethod; import lombok.extern.slf4j.Slf4j; /**Handles requests for the application home page.**/ @Slf4j @Controller public class HomeController { /**Simply selects the home view to render by returning its name.**/ @RequestMapping(value = "/", method = RequestMethod.GET) public String home(Locale locale, Model model) { log.info("Welcome home! The client locale is {}.", locale); Date date = new Date(); DateFormat dateFormat = DateFormat.getDateTimeInstance(DateFormat.LONG, DateFormat.LONG, locale); String formattedDate = dateFormat.format(date); model.addAttribute("serverTime", formattedDate); return "home"; } @GetMapping("/hello") public String hello(Model model) { log.info("hello().."); return "hello"; } } ------------------------------------------------------------------------------- [hello.jsp] <%@ page language="java" contentType="text/html; charset=UTF-8" pageEncoding="UTF-8"%> <%@ taglib uri="http://java.sun.com/jsp/jstl/core" prefix="c"%> <%@ page session="false"%> <html> <head> <title>Home</title> </head> <body> <h1>There is no place better than home.</h1> </body> </html>[결과값] http://localhost:8282/ex/hello