스프링 부트에서 음성 캡차 구현하기: Google TTS API 활용 🔊
스프링 부트에서 음성 캡차 구현하기: Google TTS API 활용 🔊
안녕하세요! 이번 포스팅에서는 접근성을 높이는 중요한 기능인 음성 캡차를 Spring Boot에서 어떻게 구현하는지 알아볼게요.
캡차(CAPTCHA)는 우리가 자주 보는 그 귀찮은(?) "로봇이 아닙니다" 인증이죠. 하지만 시각 장애가 있는 분들은 어떻게 이용할까요? 그래서 필요한 게 바로 음성 캡차 기능입니다! 👂
이 글에서는 Google Cloud의 Text-to-Speech API를 활용해서 스프링 부트에서 음성 캡차 기능을 구현하는 전체 과정을 설명할게요.
📚 목차
1. Google Cloud TTS API 키 발급하기
일단 Google의 Text-to-Speech API를 사용하기 위해 API 키가 필요해요. 차근차근 따라해봅시다.

1️⃣ Google Cloud Platform 계정 만들기
- Google Cloud Console에 접속하세요
- Google 계정으로 로그인합니다
- 처음이라면 무료 평가판을 시작해볼 수 있어요
2️⃣ 새 프로젝트 생성하기
- 콘솔 상단에 있는 프로젝트 드롭다운 메뉴 클릭
- "새 프로젝트" 선택
- 적당한 이름(예: "captcha-audio-service")을 넣고 "만들기" 클릭
3️⃣ Text-to-Speech API 켜기
- 왼쪽 메뉴에서 "API 및 서비스" > "라이브러리" 선택
- 검색창에 "Text-to-Speech" 입력
- "Cloud Text-to-Speech API" 클릭 후 "사용 설정" 버튼 클릭
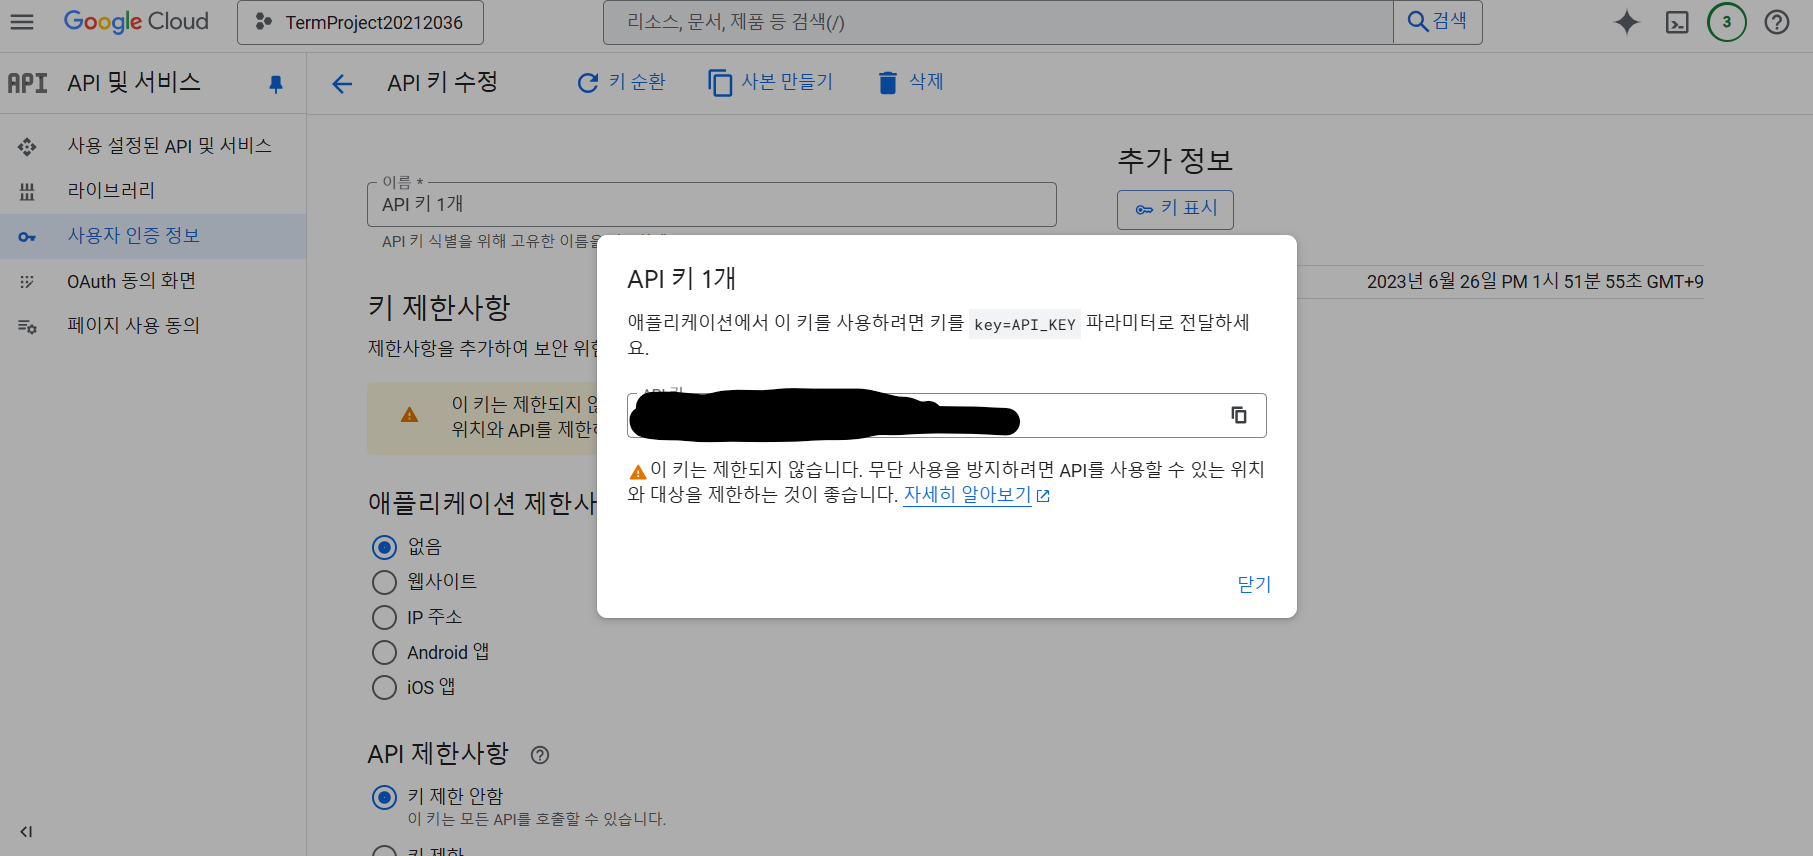
4️⃣ API 키 발급받기
- "API 및 서비스" > "사용자 인증 정보"로 이동
- "사용자 인증 정보 만들기" 클릭 후 "API 키" 선택
- 생성된 키를 잘 저장해둡니다 (이게 우리의 소중한 열쇠에요! 🔑)
5️⃣ API 키 제한 설정하기 (선택사항)
- 생성된 API 키의 편집 아이콘 클릭
- "API 제한"에서 "키 제한" 선택
- "Cloud Text-to-Speech API"만 선택해서 다른 API에선 이 키를 못 쓰게 할 수 있어요
- "저장"을 클릭해서 적용하기
2. 프로젝트 설정 및 의존성 추가
이제 스프링 부트 프로젝트에 필요한 의존성을 추가해봅시다.
build.gradle 설정
plugins {
    id 'java'
    id 'org.springframework.boot' version '3.3.9'
    id 'io.spring.dependency-management' version '1.1.4'
}

group = 'com.example'
version = '0.0.1-SNAPSHOT'

java {
    sourceCompatibility = '17'
}

repositories {
    mavenCentral()
}

dependencies {
    // 웹 관련 의존성
    implementation 'org.springframework.boot:spring-boot-starter-web'
    implementation 'org.springframework.boot:spring-boot-starter-webflux'

    // Google TTS 라이브러리 (선택적)
    implementation 'com.google.cloud:google-cloud-texttospeech:2.19.0'

    // 기타 필요한 의존성
    implementation 'org.projectlombok:lombok'
    annotationProcessor 'org.projectlombok:lombok'

    // 테스트
    testImplementation 'org.springframework.boot:spring-boot-starter-test'
}참고: Spring WebFlux는 비동기 HTTP 요청을 위해 추가했어요. RestTemplate 대신 WebClient를 사용할 수도 있습니다.
application.properties 설정
# Google Cloud TTS 설정
google.tts.api-key=YOUR_API_KEY_HERE
⚠️ 주의: 실제 서비스에서는 API 키를 이렇게 직접 넣지 말고, 환경 변수나 보안 저장소(Vault 등)를 통해 관리하세요!
3. 음성 캡차 서비스 구현하기
이제 핵심 로직인 Text-to-Speech API를 사용하는 서비스를 구현해볼게요.
package com.example.login.service;

import org.springframework.beans.factory.annotation.Value;
import org.springframework.http.*;
import org.springframework.stereotype.Service;
import org.springframework.web.client.RestTemplate;

import java.io.IOException;
import java.util.Base64;

@Service
public class AudioCaptchaService {

    // application.properties에서 API 키 가져오기
    @Value("${google.tts.api-key}")
    private String apiKey;

    // HTTP 요청을 위한 RestTemplate
    private final RestTemplate restTemplate;

    public AudioCaptchaService(RestTemplate restTemplate) {
        this.restTemplate = restTemplate;
    }

    /**
     * 캡차 텍스트를 음성으로 변환하는 메서드
     */
    public byte[] generateAudio(String captchaText) throws IOException {
        try {
            System.out.println("생성 중인 캡차 텍스트: " + captchaText);

            // 캡차 텍스트 포맷팅 (글자 사이에 공백 추가하여 발음 명확하게)
            StringBuilder enhancedText = new StringBuilder();
            for (char c : captchaText.toCharArray()) {
                enhancedText.append(c).append(" ");
            }
            String textToSpeech = enhancedText.toString().trim();

            // Google TTS API 요청 URL
            String url = "https://texttospeech.googleapis.com/v1/text:synthesize?key=" + apiKey;

            // 요청 헤더 설정
            HttpHeaders headers = new HttpHeaders();
            headers.setContentType(MediaType.APPLICATION_JSON);

            // 요청 본문 구성
            String requestBody = String.format(
                    "{\"input\":{\"text\":\"%s\"},\"voice\":{\"languageCode\":\"ko-KR\",\"ssmlGender\":\"FEMALE\"},\"audioConfig\":{\"audioEncoding\":\"MP3\",\"speakingRate\":0.8}}",
                    textToSpeech);

            // HTTP 요청 엔티티 생성
            HttpEntity<String> request = new HttpEntity<>(requestBody, headers);

            // API 호출
            ResponseEntity<GoogleTtsResponse> response = restTemplate.postForEntity(
                    url,
                    request,
                    GoogleTtsResponse.class);

            // 응답 확인
            if (response.getStatusCode() == HttpStatus.OK && response.getBody() != null) {
                // Base64 인코딩된 오디오 데이터를 디코딩
                byte[] audioData = Base64.getDecoder().decode(response.getBody().getAudioContent());
                System.out.println("생성된 오디오 데이터 길이: " + audioData.length + " bytes");
                return audioData;
            } else {
                System.err.println("Google TTS API 호출 실패: " + response.getStatusCode());
                throw new IOException("오디오 생성 실패: " + response.getStatusCode());
            }
        } catch (Exception e) {
            System.err.println("오디오 생성 중 오류 발생: " + e.getMessage());
            e.printStackTrace();
            throw new IOException("오디오 생성 중 오류: " + e.getMessage(), e);
        }
    }

    // Google TTS API 응답을 위한 내부 클래스
    private static class GoogleTtsResponse {
        private String audioContent; // Base64 인코딩된 오디오 컨텐츠

        public String getAudioContent() {
            return audioContent;
        }

        public void setAudioContent(String audioContent) {
            this.audioContent = audioContent;
        }
    }
}
위 코드에서 중요한 부분을 살펴볼까요?
- 텍스트 포맷팅: 캡차 텍스트의 각 글자 사이에 공백을 넣어 더 명확하게 발음되도록 했어요
- 한국어 설정:
languageCode를 "ko-KR"로 설정해 한국어 음성을 사용합니다 - 속도 조절:
speakingRate를 0.8로 설정해 조금 천천히 말하도록 했어요 - MP3 인코딩: 오디오는 MP3 형식으로 인코딩하도록 설정했습니다
4. 컨트롤러 구현하기
이제 서비스를 호출하는 컨트롤러를 만들어볼게요.
package com.example.login.controller;

import com.example.login.service.AudioCaptchaService;
import org.springframework.beans.factory.annotation.Autowired;
import org.springframework.http.HttpHeaders;
import org.springframework.http.HttpStatus;
import org.springframework.http.MediaType;
import org.springframework.http.ResponseEntity;
import org.springframework.web.bind.annotation.GetMapping;
import org.springframework.web.bind.annotation.RequestMapping;
import org.springframework.web.bind.annotation.RestController;

import jakarta.servlet.http.HttpServletRequest;
import java.io.IOException;

@RestController
@RequestMapping("/api/captcha-audio")
public class AudioCaptchaController {

    @Autowired
    private AudioCaptchaService audioCaptchaService;

    /**
     * 캡차 음성 파일을 제공하는 엔드포인트
     */
    @GetMapping("/audio")
    public ResponseEntity<byte[]> getCaptchaAudio(HttpServletRequest request) {
        try {
            // 세션에서 캡차 텍스트 가져오기
            String captchaText = (String) request.getSession().getAttribute("captchaText");

            if (captchaText == null) {
                return ResponseEntity.status(HttpStatus.BAD_REQUEST)
                        .body("캡차가 생성되지 않았습니다. 이미지 캡차를 먼저 요청해주세요.".getBytes());
            }

            // 텍스트를 음성으로 변환
            byte[] audioData = audioCaptchaService.generateAudio(captchaText);

            // HTTP 응답 헤더 설정
            HttpHeaders headers = new HttpHeaders();
            headers.setContentType(MediaType.parseMediaType("audio/mpeg"));
            headers.setContentLength(audioData.length);
            headers.set("Content-Disposition", "inline; filename=captcha.mp3");

            return new ResponseEntity<>(audioData, headers, HttpStatus.OK);

        } catch (IOException e) {
            return ResponseEntity.status(HttpStatus.INTERNAL_SERVER_ERROR)
                    .body(("음성 캡차 생성 중 오류가 발생했습니다: " + e.getMessage()).getBytes());
        }
    }
}
컨트롤러의 주요 역할
- 세션에서 이미 생성된 캡차 텍스트를 가져온다
- 서비스를 통해 텍스트를 오디오로 변환한다
- 적절한 HTTP 헤더와 함께 오디오 데이터를 응답으로 반환한다
5. 데이터 흐름 이해하기
음성 캡차가 어떻게 동작하는지 전체 흐름을 이해하는 게 중요해요. 특히 바이트 배열(byte[])을 사용하는 이유와 과정을 알아봅시다.
서버 측 처리 과정 (텍스트 → 바이트 배열)
- 텍스트 준비: 캡차 텍스트(예: "A1B2C3")가 있습니다
- Google TTS API 호출: 이 텍스트를 음성으로 바꿔달라고 요청합니다
- MP3 변환: API가 텍스트를 음성으로 변환하고 MP3로 인코딩합니다
- Base64 응답 수신: API는 바이너리 데이터를 Base64 문자열로 인코딩해서 줍니다
- Base64 디코딩: 서버에서 Base64 문자열을 디코딩해 원래 MP3 데이터를 얻습니다
- 바이트 배열 저장: 디코딩된 MP3 데이터는 바이트 배열로 저장됩니다
💡 왜 바이트 배열(byte[])을 쓰나요?
1. 효율적인 바이너리 데이터 처리가 가능해요
2. 메모리를 효율적으로 사용할 수 있어요
3. HTTP 응답으로 바로 전송할 수 있어요
4. 추가 변환 없이 직접 처리할 수 있어요
클라이언트 측 처리 (바이트 배열 → 오디오 재생)
- HTTP 요청: 브라우저가 '/api/captcha-audio/audio' 엔드포인트로 요청을 보냅니다
- 바이트 데이터 수신: 서버로부터 바이트 배열 데이터를 받아요
- 오디오 재생: 브라우저가 MP3 데이터를 재생합니다
// 오디오 요청 및 재생 예시
function playCaptchaAudio() {
    fetch('/api/captcha-audio/audio')
        .then(response => response.arrayBuffer())
        .then(audioData => {
            const audioBlob = new Blob([audioData], { type: 'audio/mpeg' });
            const audioUrl = URL.createObjectURL(audioBlob);
            const audio = new Audio(audioUrl);
            audio.play();
        })
        .catch(error => console.error('음성 캡차 재생 오류:', error));
}
6. 테스트와 마무리
음성 캡차 서비스를 다 구현했다면, 테스트를 통해 확인해봐야겠죠?
테스트 단계
- 단계별 테스트:
- 이미지 캡차 생성 → 세션에 텍스트 저장 → 음성 캡차 요청 → 오디오 재생
- 각 단계가 잘 연결되어 있는지 확인합니다

2. UI 구현:
- 음성 캡차 버튼 추가 (🔊 아이콘 많이 쓰죠)
- 버튼 클릭 시 위의 JS 함수 호출하여 오디오 재생
-
접근성 테스트:
- 스크린 리더와 같은 보조 기술로 테스트
- 시각 장애가 있는 사용자도 쉽게 사용할 수 있는지 확인
-
성능 체크:
- API 호출 지연 시간 확인
- 오디오 파일 크기와 로딩 시간 체크
마무리 🎉
지금까지 Spring Boot에서 Google Cloud Text-to-Speech API를 활용한 음성 캡차 서비스 구현 방법을 알아봤어요. 이런 기능은 접근성을 높이는 정말 중요한 요소입니다!
요약하자면:
1. Google Cloud API 키 발급받기
2. Spring Boot 프로젝트 설정하기
3. 텍스트 → 음성 변환 서비스 구현하기
4. REST 컨트롤러 만들기
5. 클라이언트에서 음성 재생 구현하기
이렇게 음성 캡차를 추가하면 보안을 유지하면서도 접근성을 높일 수 있어, 더 많은 사용자에게 좋은 경험을 제공할 수 있어요! 👍
다음에는 이미지 캡차와 음성 캡차를 함께 사용하는 전체 시스템 구현에 대해 더 자세히 다뤄볼게요. 질문이나 의견 있으시면 댓글로 남겨주세요! 💬