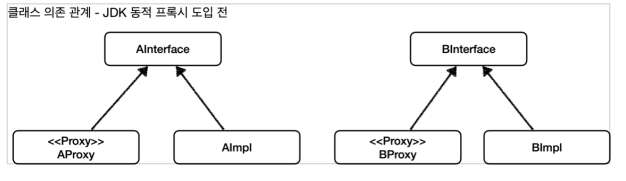
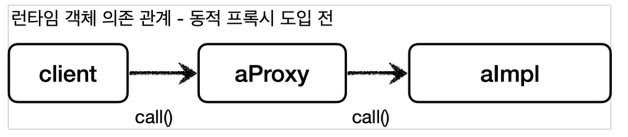
기존 프록시
기존의 프록시는 프록시를 적용하기 위해 적용 대상의 숫자 만큼 많은 프록시 클래스를 만들었다.
예를 들어 적용 대상이 100개면 프록시 클래스도 100개를 만들었다.
동적 프록시
동적 프록시 기술을 사용하면 개발자가 직접 프록시 클래스를 만들지 않아도 된다.
이름 그대로 프록시 객체를 동적으로 런타임에 개발자 대신 만들어준다.
그리고 동적 프록시에 원하는 실행 로직을 지정할 수 있다.
cf) 주의
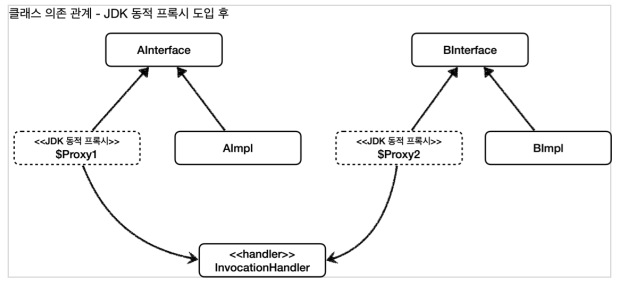
JDK 동적 프록시는 인터페이스를 기반으로 프록시를 동적으로 만들어준다.
따라서 인터페이스가 필수다.
JDK 동적 프록시 InvocationHandler
JDK 동적 프록시에 적용할 로직은 InvocationHandler 인터페이스를 구현해서 작성하면 된다.
public interface InvocationHandler {

    public Object invoke(Object proxy, Method method, Object[] args) throws Throwable;
}- Object proxy : 프록시 자신
- Method method : 호출한 메소드
- Object[] args : 메소드를 호출할 때 전달한 인수
예제 코드
@Slf4j
public class TimeInvocationHandler implements InvocationHandler {

    private final Object target;

    public TimeInvocationHandler(Object target) {
        this.target = target;
    }

    @Override
    public Object invoke(Object proxy, Method method, Object[] args) throws Throwable {
        log.info("TimeProxy 실행");
        final long startTime = System.currentTimeMillis();

        final Object result = method.invoke(target, args);

        final long endTime = System.currentTimeMillis();
        final long resultTime = endTime - startTime;
        log.info("TimeProxy 종료 resultTime = {}", resultTime);

        return result;
    }
}

public interface AInterface {
    String call();
}

@Slf4j
public class AImpl implements AInterface{
    @Override
    public String call() {
        log.info("A 호출");
        return "A";
    }
}

public interface BInterface {
    String call();
}

@Slf4j
public class BImpl implements BInterface{
    @Override
    public String call() {
        log.info("B 호출");
        return "B";
    }
}
TimeInvocationHandler는 InvocationHandler 인터페이스를 구현한다. 이렇게해서 JDK 동적 프로깃에 적용할 공통 로직을 개발할 수 있다.
Object target : 동적 프록시가 호출할 대상
method.invoke(target, args) : 리플렉션을 사용해서 target 인스턴스의 메소드를 실행한다. args는 메소드 호출시 넘겨줄 인수다.
@Slf4j
public class JdkDynamicProxyTest {

    @Test
    void dynamicA() {
        final AInterface target = new AImpl();
        final TimeInvocationHandler handler = new TimeInvocationHandler(target);

        final AInterface proxy = (AInterface) Proxy.newProxyInstance(AInterface.class.getClassLoader(), new Class[]{AInterface.class}, handler);

        proxy.call();
        log.info("targetClass = {}", target.getClass());
        log.info("proxyClass = {}", proxy.getClass());

    }

    @Test
    void dynamicB() {
        final BInterface target = new BImpl();
        final TimeInvocationHandler handler = new TimeInvocationHandler(target);

        final BInterface proxy = (BInterface) Proxy.newProxyInstance(BInterface.class.getClassLoader(), new Class[]{BInterface.class}, handler);

        proxy.call();
        log.info("targetClass = {}", target.getClass());
        log.info("proxyClass = {}", proxy.getClass());

    }
}
new TimeInvocationHandler(target) : 동적 프록시에 적용할 핸들러 로직이다.
Proxy.newProxyInstance(AInterface.class.getClassLoader(), new Class[]{AInterface.class}, handler) :
1. 동적 프록시는 java.lang.reflect.Proxy를 통해서 생성할 수 있다.
2. 클래스 로더 정보, 인터페이스, 그리고 핸들러 로직을 넣어주면 된다. 그러면 해당 인터페이스를 기반으로 동적 프록시를 생성하고 그 결과를 반환한다.
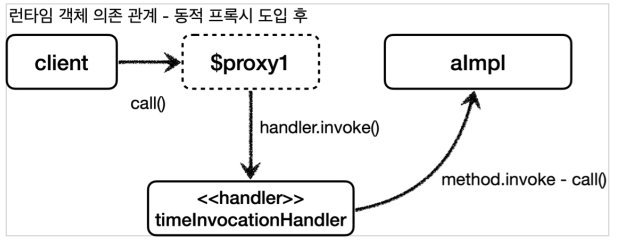
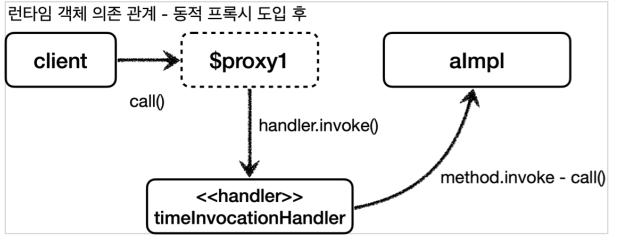
실행 순서
- 클라이언트는 JDK 동적 프록시 call()을 실행한다.
- JDK 동적 프록시는 InvocationHandler.invoke()를 호출한다. TimeInvocationHandler가 구현체로 있으므로 TimeInvocationHandler.invoke()가 호출된다.
- TimeInvocationHandler가 내부 로직을 수행하고 method.invoke(target, args)를 호출해서 target인 실제 객체(AImpl)를 호출한다.
- AImpl 인스턴스의 call()이 실행된다.
- AImpl 인스턴스의 call()의 실행이 끝나면 TimeInvocationHandler로 응답이 돌아온다. 시간 로그를 출력하고 결과를 반환한다.
정리
위의 예제 코드를 보면 AImpl, BImpl 각각 프록시를 만들지 않았다.
프록시는 JDK 동적 프록시를 사용해서 동적으로 만들고 TimeInvocationHandler는 공통으로 사용했다.
JDK 동적 프록시 기술 덕분에 적용 대상 만큼 프록시 객체를 만들지 않아도 된다. 그리고 같은 부가 기능 로직을 한번만 개발해서 공통으로 적용할 수 있다.
만약 적용 대상이 100개여도 동적 프록시를 통해서 생성하고, 각각 필요한 InvocationHandler만 만들어서 넣어주면 된다.
결과적으로 프록시 클래스를 수 없이 만들어야 하는 문제도 해결하고, 부가 기능 로직도 하나의 클래스에 모아서 단일 책임 원칙도 지킬 수 있게 되었다.
동적 프록시 도입 전
동적 프록시 도입 후