K6로 성능테스트 수행하기
성능 테스트는 현대 웹 애플리케이션 개발에서 필수적인 과정입니다. 이번 글에서는 K6를 사용하여 실제로 성능 테스트를 수행하는 방법을 단계별로 알아보겠습니다. 실제 예제와 함께 초보자도 쉽게 따라할 수 있도록 구성했습니다.
목차
K6 설치
🖥️ 운영체제별 설치 방법
macOS
brew install k6Windows
# Chocolatey 사용
choco install k6

# 또는 Scoop 사용
scoop install k6
Linux (Ubuntu/Debian)
sudo gpg -k
sudo gpg --no-default-keyring --keyring /usr/share/keyrings/k6-archive-keyring.gpg --keyserver hkp://keyserver.ubuntu.com:80 --recv-keys C5AD17C747E3415A3642D57D77C6C491D6AC1D69
echo "deb [signed-by=/usr/share/keyrings/k6-archive-keyring.gpg] https://dl.k6.io/deb stable main" | sudo tee /etc/apt/sources.list.d/k6.list
sudo apt-get update
sudo apt-get install k6
Docker 사용
docker run --rm -i grafana/k6 run - <script.js✅ 설치 확인
k6 version첫 번째 테스트 작성
🚀 기본 HTTP GET 테스트
가장 간단한 형태의 성능 테스트부터 시작해보겠습니다:
// basic-test.js
import http from 'k6/http';
import { sleep } from 'k6';

export default function () {
  http.get('https://test.k6.io');
  sleep(1);
}
실행 명령:
k6 run basic-test.js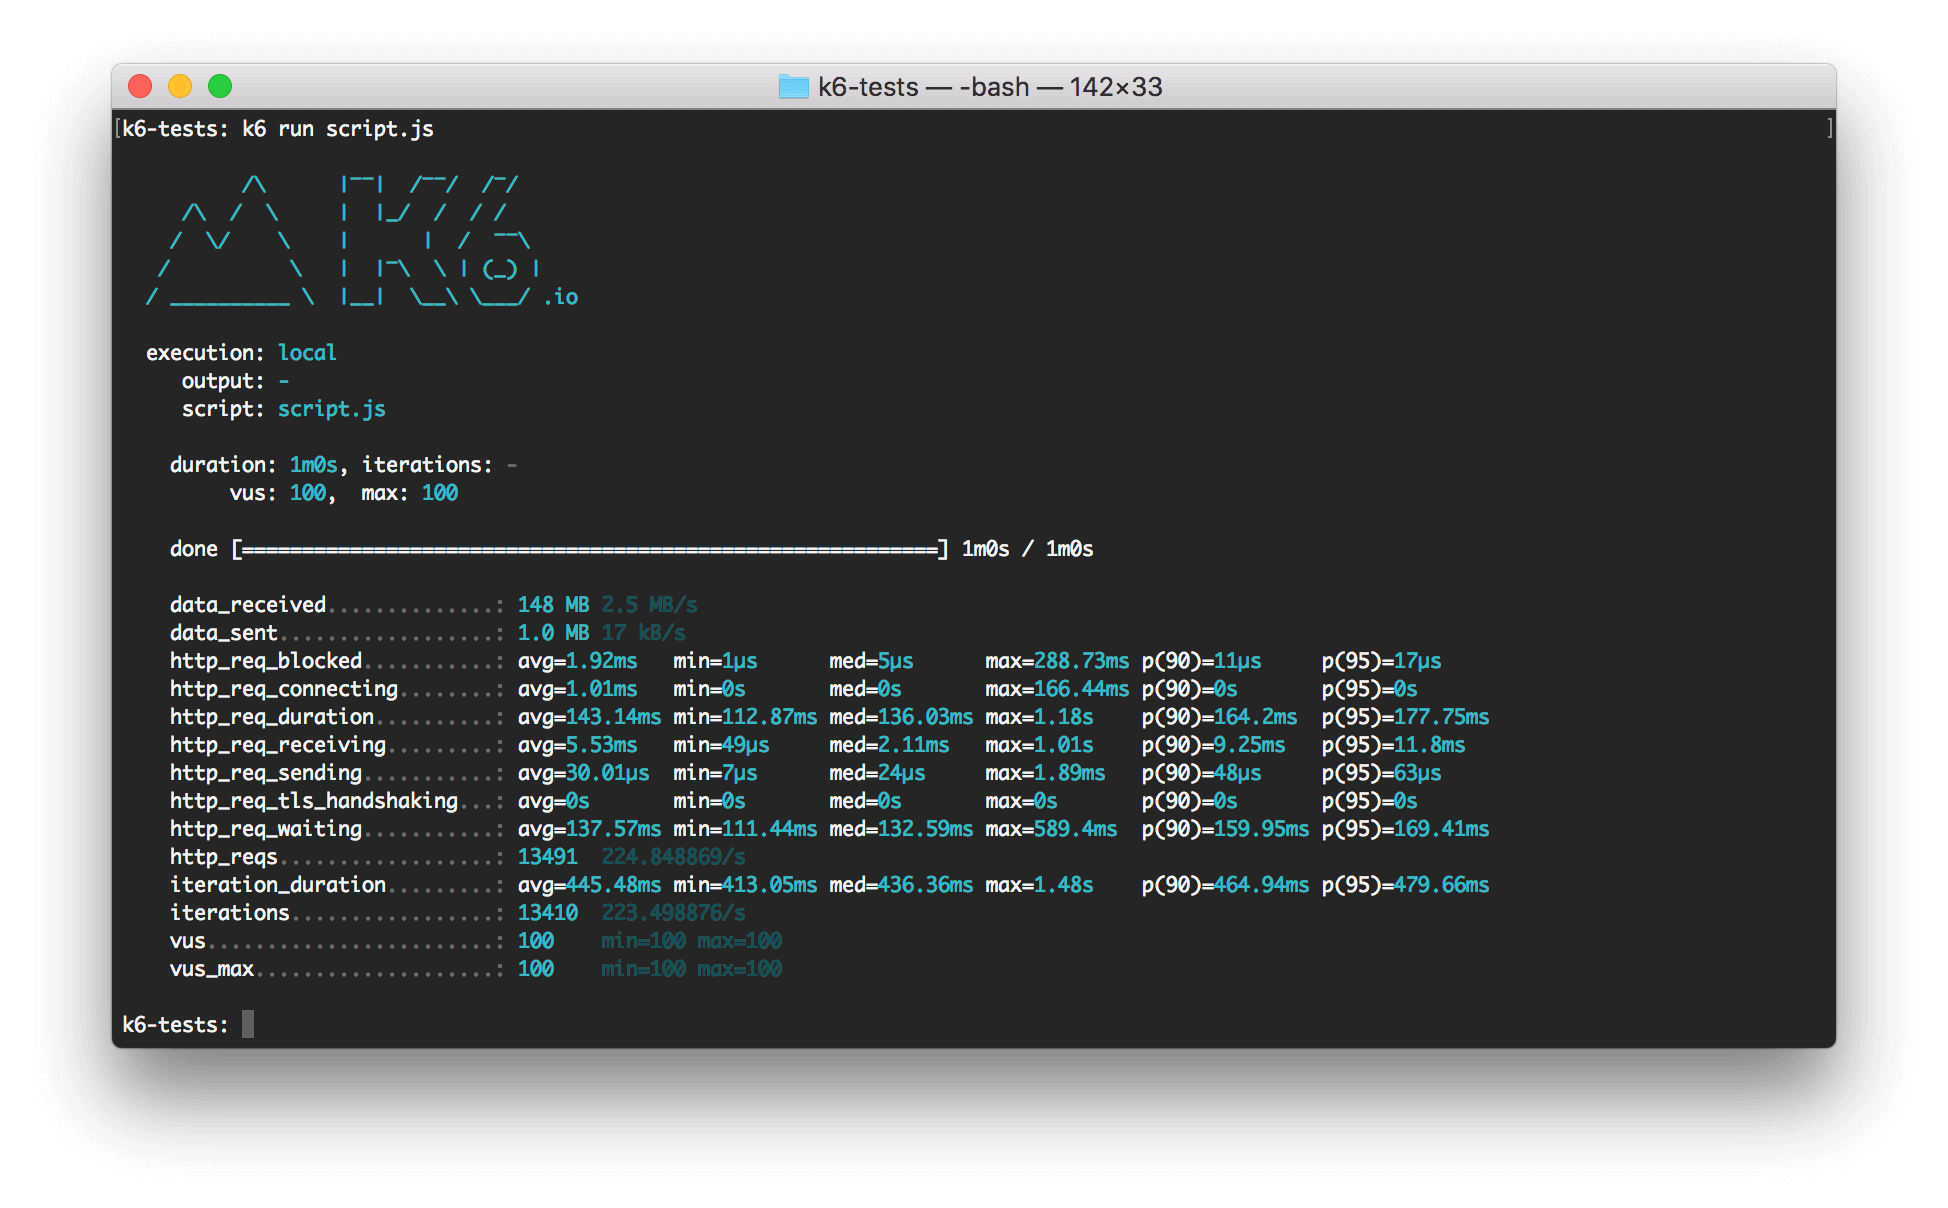
실행하면 위와 같은 결과를 볼 수 있습니다. 기본적으로 1명의 가상 사용자가 1회 실행됩니다.
📊 테스트 옵션 설정
더 실용적인 테스트를 위해 옵션을 추가해보겠습니다:
// load-test.js
import http from 'k6/http';
import { sleep } from 'k6';

export let options = {
  vus: 10,        // 가상 사용자 수
  duration: '30s', // 테스트 지속 시간
};

export default function () {
  http.get('https://test.k6.io');
  sleep(1);
}
이 설정으로 10명의 가상 사용자가 30초 동안 동시에 테스트를 수행합니다.
다양한 테스트 시나리오
🔥 1. Smoke Testing (연기 테스트)
시스템의 기본 기능을 최소한의 부하로 검증:
// smoke-test.js
import http from 'k6/http';
import { check, sleep } from 'k6';

export let options = {
  vus: 1,
  duration: '1m',
};

export default function () {
  let response = http.get('https://api.example.com/health');

  check(response, {
    'status is 200': (r) => r.status === 200,
    'response time < 500ms': (r) => r.timings.duration < 500,
  });

  sleep(1);
}
📈 2. Load Testing (부하 테스트)
정상적인 예상 트래픽에서의 성능 검증:
// load-test.js
import http from 'k6/http';
import { check, sleep } from 'k6';

export let options = {
  stages: [
    { duration: '2m', target: 100 },  // 2분 동안 100명까지 증가
    { duration: '5m', target: 100 },  // 5분 동안 100명 유지
    { duration: '2m', target: 0 },    // 2분 동안 0명까지 감소
  ],
};

export default function () {
  let response = http.get('https://api.example.com/users');

  check(response, {
    'status is 200': (r) => r.status === 200,
    'response time < 1000ms': (r) => r.timings.duration < 1000,
  });

  sleep(1);
}
⚡ 3. Stress Testing (스트레스 테스트)
시스템의 한계점을 찾기 위한 고부하 테스트:
// stress-test.js
import http from 'k6/http';
import { check, sleep } from 'k6';

export let options = {
  stages: [
    { duration: '2m', target: 100 },   // 정상 부하
    { duration: '5m', target: 400 },   // 스트레스 부하
    { duration: '2m', target: 100 },   // 복구
    { duration: '3m', target: 0 },     // 램프 다운
  ],
};

export default function () {
  let response = http.get('https://api.example.com/products');

  check(response, {
    'status is 200': (r) => r.status === 200,
  });

  sleep(Math.random() * 3 + 1);
}
🚀 4. Spike Testing (스파이크 테스트)
갑작스러운 트래픽 증가 시뮬레이션:
// spike-test.js
import http from 'k6/http';
import { check, sleep } from 'k6';

export let options = {
  stages: [
    { duration: '10s', target: 100 },  // 정상 부하
    { duration: '1m', target: 1400 },  // 급격한 증가
    { duration: '10s', target: 100 },  // 정상으로 복귀
  ],
};

export default function () {
  let response = http.get('https://api.example.com/search');

  check(response, {
    'status is 200': (r) => r.status === 200,
    'response time < 2000ms': (r) => r.timings.duration < 2000,
  });

  sleep(1);
}
고급 테스트 구성
🎯 시나리오 기반 테스트
복잡한 시나리오를 위한 고급 설정:
// scenario-test.js
import http from 'k6/http';
import { check, sleep } from 'k6';

export let options = {
  scenarios: {
    // 일반 사용자 시나리오
    normal_users: {
      executor: 'ramping-vus',
      startVUs: 0,
      stages: [
        { duration: '1m', target: 20 },
        { duration: '3m', target: 20 },
        { duration: '1m', target: 0 },
      ],
      gracefulRampDown: '30s',
      tags: { test_type: 'normal_load' },
    },

    // 관리자 사용자 시나리오
    admin_users: {
      executor: 'constant-vus',
      vus: 3,
      duration: '5m',
      tags: { test_type: 'admin_load' },
    },

    // API 헬스체크
    health_check: {
      executor: 'constant-arrival-rate',
      rate: 1,
      timeUnit: '1s',
      duration: '5m',
      preAllocatedVUs: 1,
      tags: { test_type: 'health_check' },
    },
  },

  thresholds: {
    http_req_duration: ['p(95)<1000'],
    http_req_failed: ['rate<0.05'],
    'http_req_duration{test_type:normal_load}': ['p(95)<800'],
  },
};

export default function () {
  const testType = __VU <= 20 ? 'normal' : 'admin';

  if (testType === 'normal') {
    // 일반 사용자 흐름
    let response = http.get('https://api.example.com/products');
    check(response, {
      'products loaded': (r) => r.status === 200,
    });

    sleep(2);

    response = http.get('https://api.example.com/cart');
    check(response, {
      'cart loaded': (r) => r.status === 200,
    });

  } else {
    // 관리자 사용자 흐름
    let response = http.get('https://api.example.com/admin/dashboard');
    check(response, {
      'admin dashboard loaded': (r) => r.status === 200,
    });
  }

  sleep(1);
}
🔐 인증이 필요한 API 테스트
// auth-test.js
import http from 'k6/http';
import { check, sleep } from 'k6';

export let options = {
  vus: 10,
  duration: '2m',
};

let authToken = '';

export function setup() {
  // 로그인 수행
  let loginRes = http.post('https://api.example.com/auth/login', {
    username: 'testuser',
    password: 'testpass123'
  });

  check(loginRes, {
    'login successful': (r) => r.status === 200,
  });

  authToken = JSON.parse(loginRes.body).token;
  return { token: authToken };
}

export default function (data) {
  const params = {
    headers: {
      'Authorization': `Bearer ${data.token}`,
      'Content-Type': 'application/json',
    },
  };

  // 보호된 엔드포인트 테스트
  let response = http.get('https://api.example.com/profile', params);

  check(response, {
    'profile loaded': (r) => r.status === 200,
    'has user data': (r) => r.json('user') !== null,
  });

  sleep(1);
}

export function teardown(data) {
  // 로그아웃 (선택사항)
  http.post('https://api.example.com/auth/logout', {}, {
    headers: { 'Authorization': `Bearer ${data.token}` }
  });
}
📝 POST 요청과 데이터 처리
// post-test.js
import http from 'k6/http';
import { check, sleep } from 'k6';

export let options = {
  vus: 5,
  duration: '1m',
};

const users = [
  { name: 'Alice', email: 'alice@example.com' },
  { name: 'Bob', email: 'bob@example.com' },
  { name: 'Charlie', email: 'charlie@example.com' },
];

export default function () {
  const user = users[Math.floor(Math.random() * users.length)];

  const payload = JSON.stringify({
    name: user.name,
    email: user.email,
    timestamp: new Date().toISOString(),
  });

  const params = {
    headers: {
      'Content-Type': 'application/json',
    },
  };

  let response = http.post('https://api.example.com/users', payload, params);

  check(response, {
    'user created': (r) => r.status === 201,
    'response has id': (r) => r.json('id') !== null,
  });

  sleep(1);
}
결과 분석 및 모니터링
📊 메트릭 이해하기
K6에서 제공하는 주요 메트릭들:
HTTP 관련 메트릭
http_reqs: 총 HTTP 요청 수http_req_duration: HTTP 요청 응답 시간http_req_failed: 실패한 요청 비율http_req_blocked: 연결 대기 시간http_req_connecting: TCP 연결 시간
일반 메트릭
vus: 활성 가상 사용자 수iterations: 완료된 반복 실행 수data_received: 수신된 데이터 양data_sent: 전송된 데이터 양
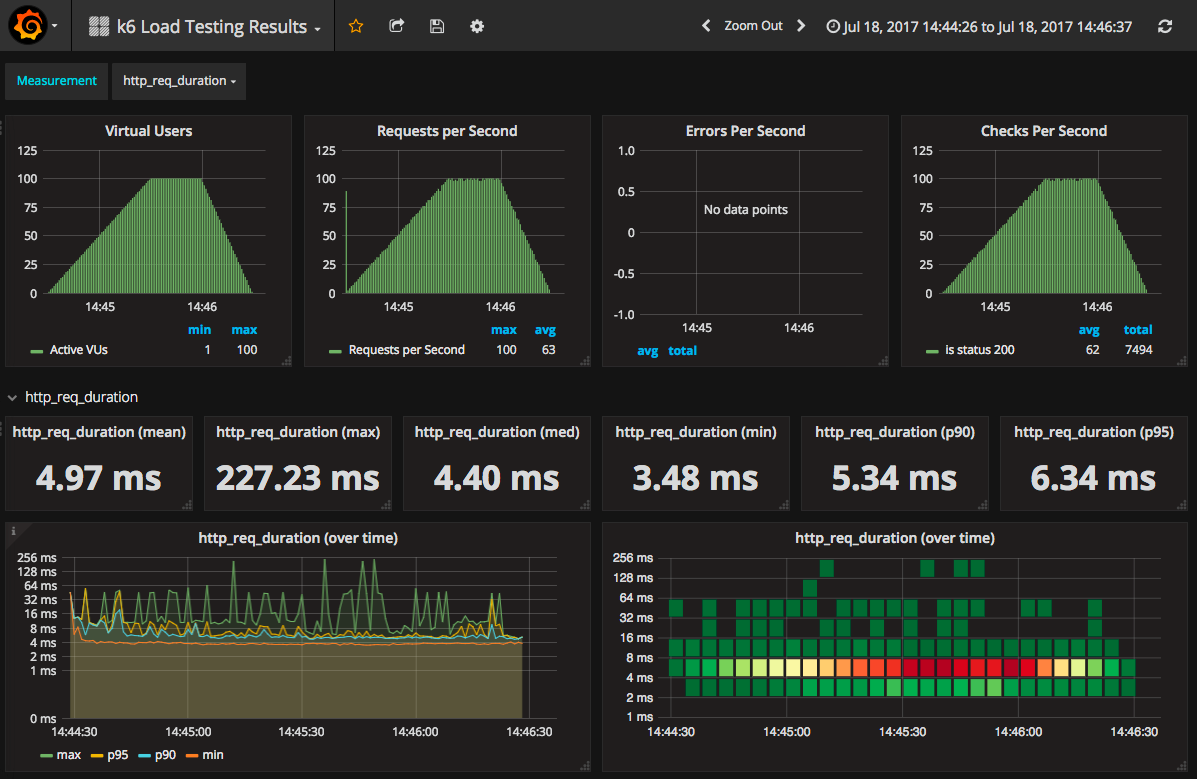
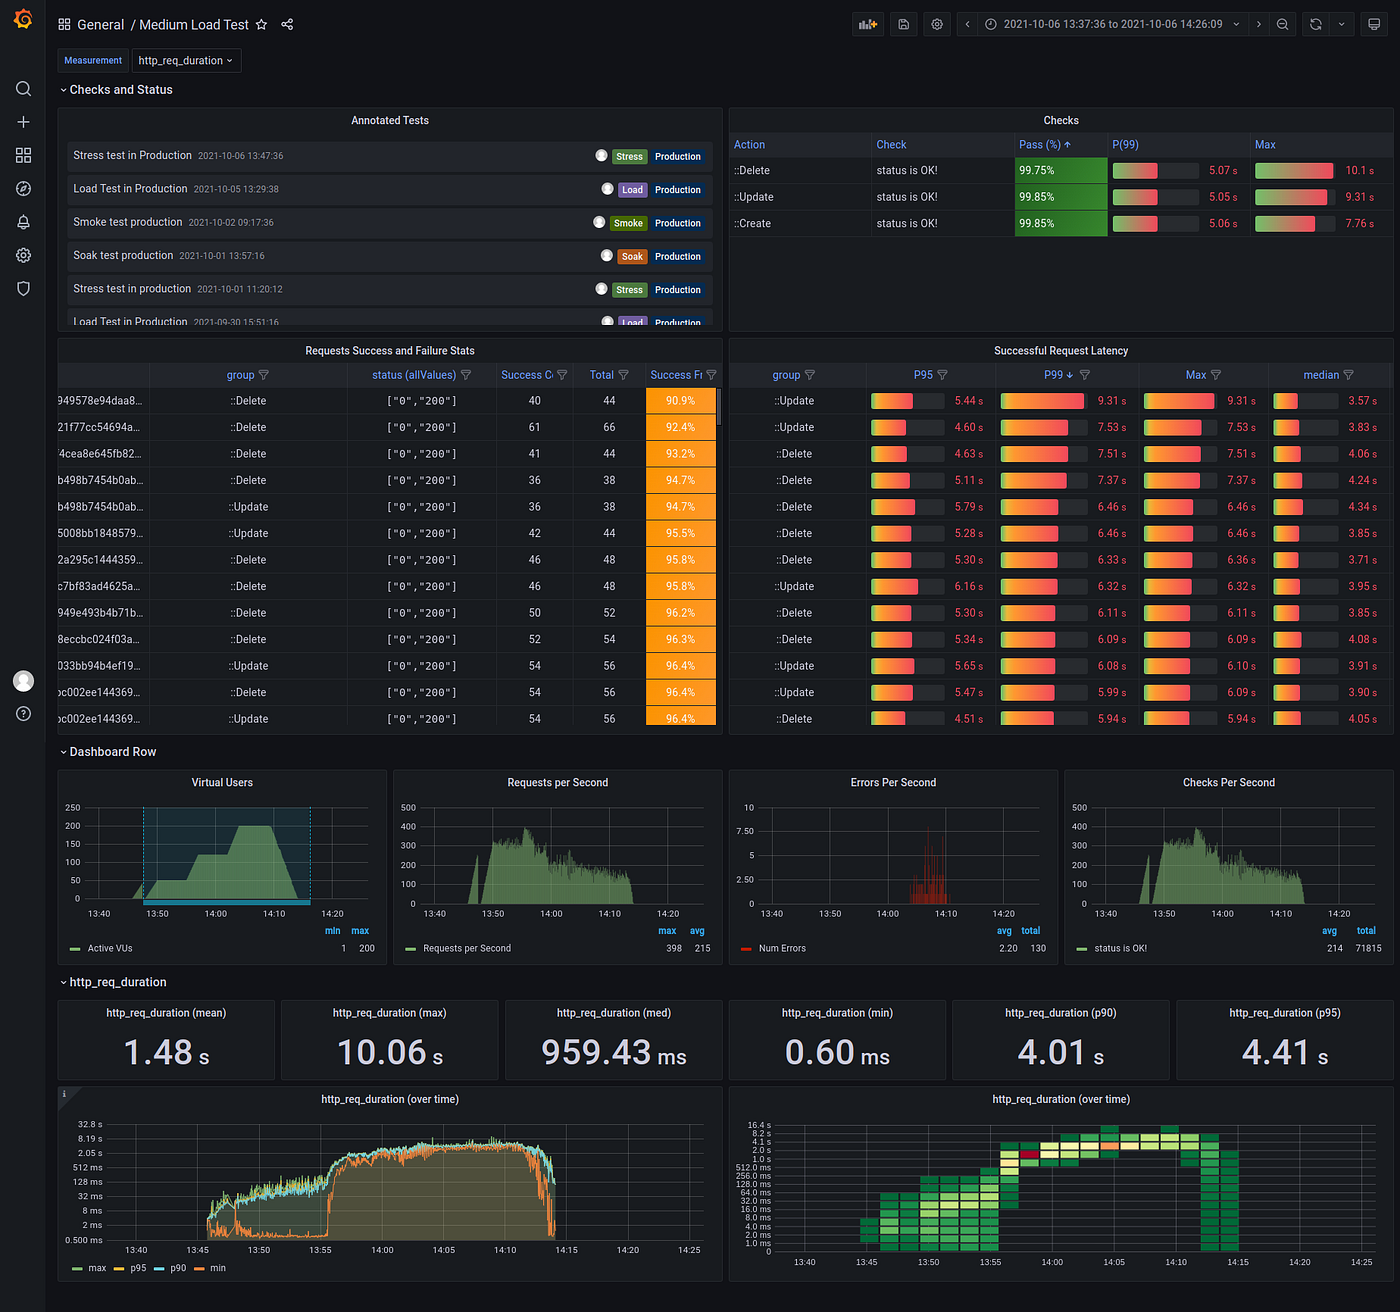
📈 실시간 대시보드
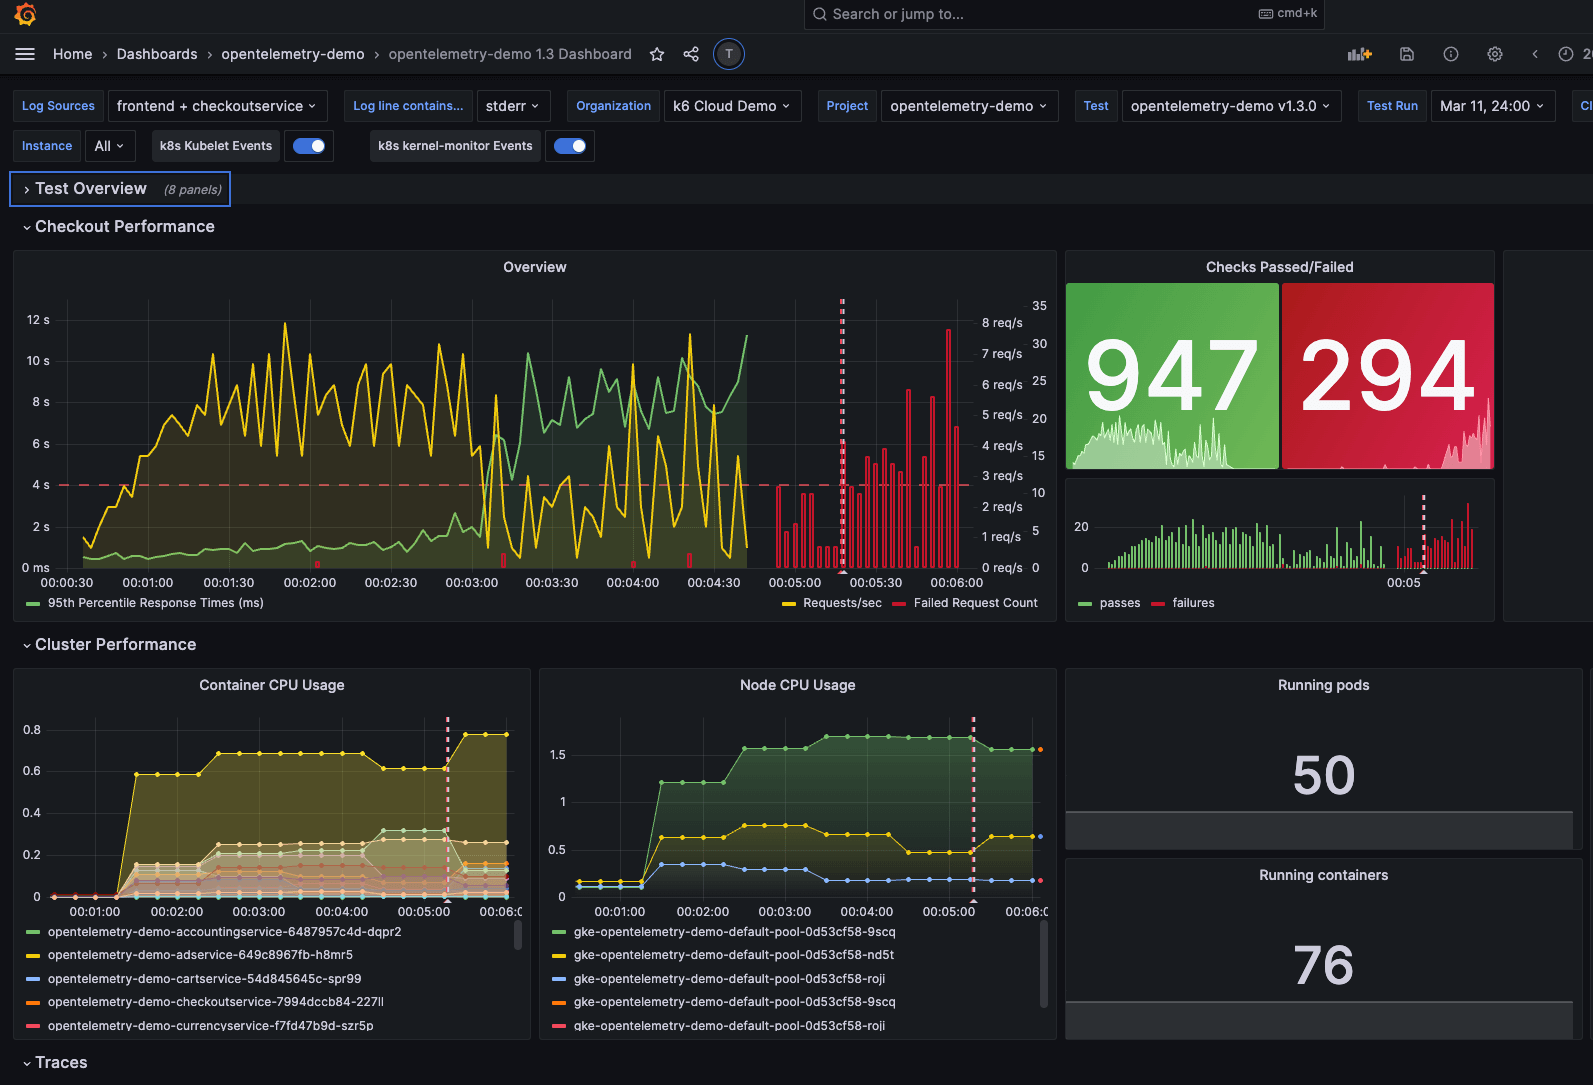
InfluxDB + Grafana 연동
// monitoring-test.js
import http from 'k6/http';
import { check, sleep } from 'k6';
import { Counter, Trend } from 'k6/metrics';

// 커스텀 메트릭 정의
let customCounter = new Counter('custom_requests');
let customTrend = new Trend('custom_response_time');

export let options = {
  vus: 10,
  duration: '5m',
};

export default function () {
  let response = http.get('https://api.example.com/data');

  // 커스텀 메트릭 기록
  customCounter.add(1);
  customTrend.add(response.timings.duration);

  check(response, {
    'status is 200': (r) => r.status === 200,
  });

  sleep(1);
}
실행 명령 (InfluxDB 출력):
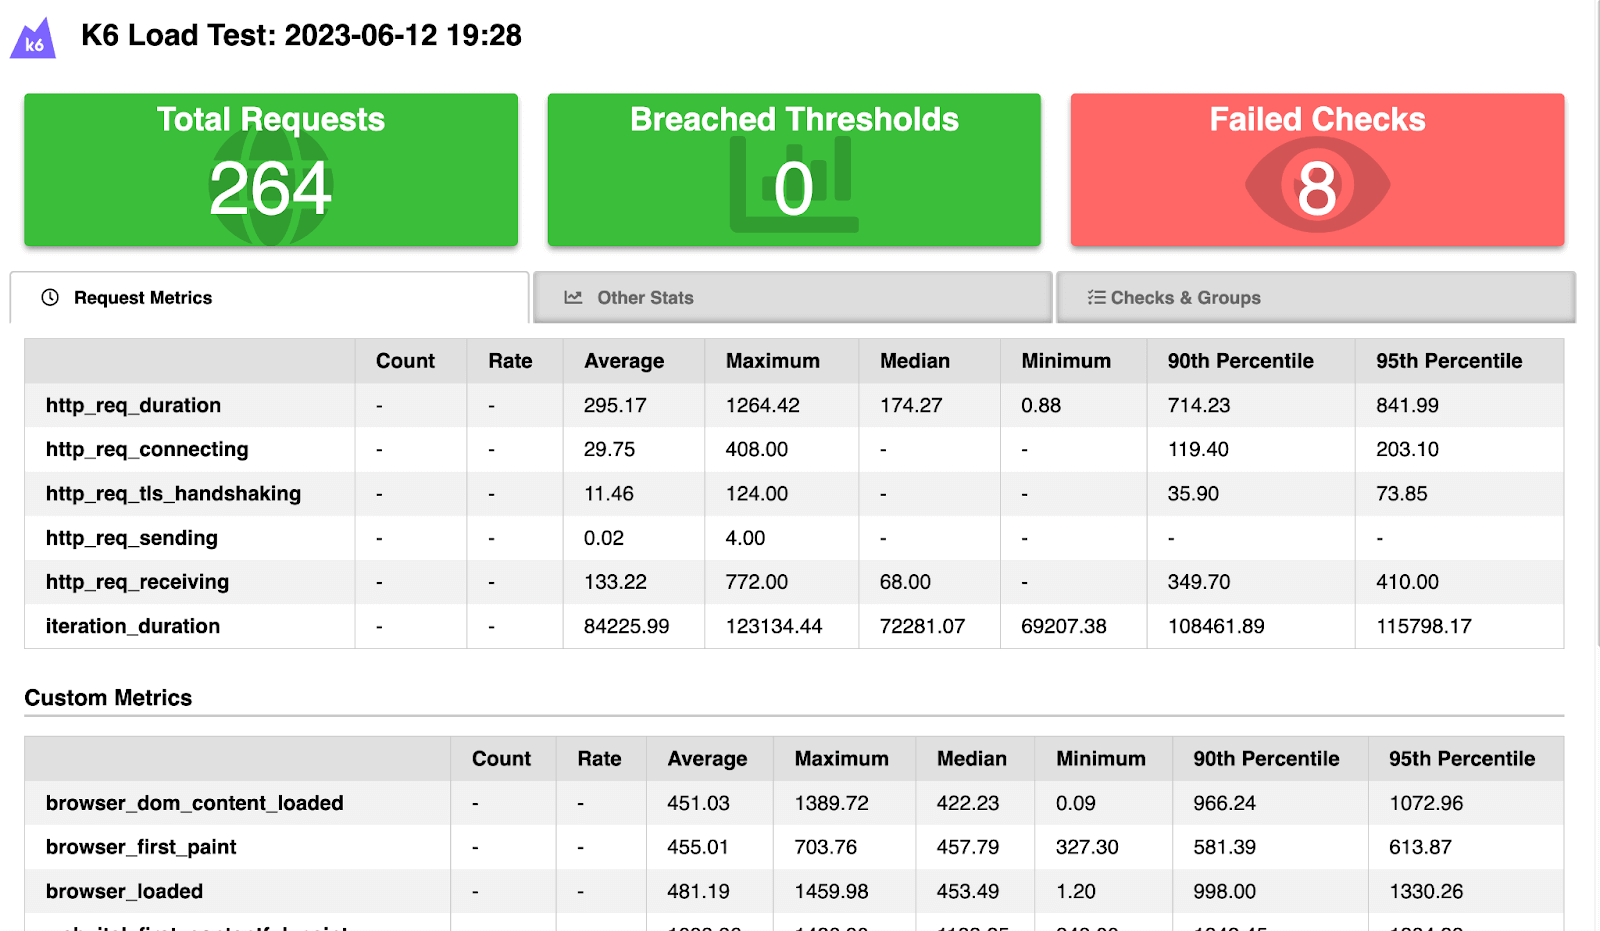
k6 run --out influxdb=http://localhost:8086/k6db monitoring-test.js📋 HTML 리포트 생성
// report-test.js
import http from 'k6/http';
import { check, sleep } from 'k6';
import { htmlReport } from 'https://raw.githubusercontent.com/benc-uk/k6-reporter/main/dist/bundle.js';

export let options = {
  vus: 10,
  duration: '1m',
};

export default function () {
  let response = http.get('https://test.k6.io');

  check(response, {
    'status is 200': (r) => r.status === 200,
    'response time < 500ms': (r) => r.timings.duration < 500,
  });

  sleep(1);
}

export function handleSummary(data) {
  return {
    'summary.html': htmlReport(data),
    'result.json': JSON.stringify(data),
  };
}
실전 예제
🛒 전자상거래 사이트 테스트
실제 전자상거래 시나리오를 시뮬레이션:
// ecommerce-test.js
import http from 'k6/http';
import { check, group, sleep } from 'k6';
import { SharedArray } from 'k6/data';

// 테스트 데이터 로드
const products = new SharedArray('products', function () {
  return [
    { id: 1, name: 'Laptop' },
    { id: 2, name: 'Mouse' },
    { id: 3, name: 'Keyboard' },
  ];
});

export let options = {
  scenarios: {
    browse_products: {
      executor: 'ramping-vus',
      startVUs: 0,
      stages: [
        { duration: '2m', target: 50 },
        { duration: '5m', target: 50 },
        { duration: '2m', target: 0 },
      ],
      gracefulRampDown: '30s',
    },
  },

  thresholds: {
    http_req_duration: ['p(95)<2000'],
    http_req_failed: ['rate<0.02'],
    'group_duration{group:::Browse Products}': ['p(95)<3000'],
    'group_duration{group:::Checkout Process}': ['p(95)<5000'],
  },
};

export default function () {
  group('Browse Products', function () {
    // 홈페이지 방문
    let response = http.get('https://api.example.com/products');
    check(response, {
      'products page loaded': (r) => r.status === 200,
      'has products': (r) => r.json('products.length') > 0,
    });

    sleep(Math.random() * 3 + 1);

    // 특정 제품 상세 보기
    const product = products[Math.floor(Math.random() * products.length)];
    response = http.get(`https://api.example.com/products/${product.id}`);
    check(response, {
      'product detail loaded': (r) => r.status === 200,
      'product has name': (r) => r.json('name') === product.name,
    });

    sleep(Math.random() * 2 + 1);
  });

  // 30% 확률로 구매 프로세스 진행
  if (Math.random() < 0.3) {
    group('Checkout Process', function () {
      // 장바구니에 추가
      const product = products[Math.floor(Math.random() * products.length)];
      let payload = JSON.stringify({
        productId: product.id,
        quantity: Math.floor(Math.random() * 3) + 1,
      });

      let response = http.post('https://api.example.com/cart', payload, {
        headers: { 'Content-Type': 'application/json' },
      });

      check(response, {
        'added to cart': (r) => r.status === 201,
      });

      sleep(1);

      // 결제 정보 입력
      payload = JSON.stringify({
        email: 'test@example.com',
        address: '123 Test St',
        paymentMethod: 'credit_card',
      });

      response = http.post('https://api.example.com/checkout', payload, {
        headers: { 'Content-Type': 'application/json' },
      });

      check(response, {
        'checkout successful': (r) => r.status === 200,
        'has order id': (r) => r.json('orderId') !== null,
      });

      sleep(2);
    });
  }

  sleep(1);
}
🔄 CI/CD 통합 예제
# .github/workflows/performance-test.yml
name: Performance Tests

on:
  push:
    branches: [ main, develop ]
  pull_request:
    branches: [ main ]

jobs:
  performance-test:
    runs-on: ubuntu-latest

    steps:
    - uses: actions/checkout@v3

    - name: Install k6
      run: |
        sudo gpg -k
        sudo gpg --no-default-keyring --keyring /usr/share/keyrings/k6-archive-keyring.gpg --keyserver hkp://keyserver.ubuntu.com:80 --recv-keys C5AD17C747E3415A3642D57D77C6C491D6AC1D69
        echo "deb [signed-by=/usr/share/keyrings/k6-archive-keyring.gpg] https://dl.k6.io/deb stable main" | sudo tee /etc/apt/sources.list.d/k6.list
        sudo apt-get update
        sudo apt-get install k6

    - name: Run Smoke Tests
      run: k6 run tests/smoke-test.js

    - name: Run Load Tests
      run: k6 run tests/load-test.js

    - name: Upload Results
      if: always()
      uses: actions/upload-artifact@v3
      with:
        name: k6-results
        path: results/
베스트 프랙티스
🎯 1. 테스트 구조화
// 프로젝트 구조 예제
/*
tests/
├── config/
│   ├── environments.js
│   ├── workloads.js
│   └── thresholds.js
├── scenarios/
│   ├── user-journey.js
│   ├── api-calls.js
│   └── admin-tasks.js
├── utils/
│   ├── helpers.js
│   └── data-generators.js
└── tests/
    ├── smoke-test.js
    ├── load-test.js
    └── stress-test.js
*/

// config/environments.js
export const environments = {
  dev: {
    baseUrl: 'https://dev-api.example.com',
    timeout: '30s',
  },
  staging: {
    baseUrl: 'https://staging-api.example.com',
    timeout: '15s',
  },
  prod: {
    baseUrl: 'https://api.example.com',
    timeout: '10s',
  },
};

// config/workloads.js
export const workloads = {
  smoke: {
    vus: 1,
    duration: '30s',
  },
  load: {
    stages: [
      { duration: '2m', target: 100 },
      { duration: '5m', target: 100 },
      { duration: '2m', target: 0 },
    ],
  },
  stress: {
    stages: [
      { duration: '2m', target: 100 },
      { duration: '5m', target: 400 },
      { duration: '2m', target: 0 },
    ],
  },
};
🔧 2. 환경별 설정 관리
// environment-aware-test.js
import { environments } from './config/environments.js';
import { workloads } from './config/workloads.js';

const env = __ENV.ENVIRONMENT || 'dev';
const workload = __ENV.WORKLOAD || 'smoke';

export let options = {
  ...workloads[workload],
  thresholds: {
    http_req_duration: env === 'prod' ? ['p(95)<500'] : ['p(95)<1000'],
    http_req_failed: ['rate<0.01'],
  },
};

const baseUrl = environments[env].baseUrl;

export default function () {
  // 테스트 로직
}
실행 명령:
k6 run -e ENVIRONMENT=staging -e WORKLOAD=load environment-aware-test.js📊 3. 커스텀 메트릭 활용
// custom-metrics-test.js
import http from 'k6/http';
import { check } from 'k6';
import { Counter, Trend, Rate, Gauge } from 'k6/metrics';

// 비즈니스 메트릭 정의
let loginAttempts = new Counter('login_attempts');
let loginErrors = new Counter('login_errors');
let pageLoadTime = new Trend('page_load_time');
let successRate = new Rate('success_rate');
let activeUsers = new Gauge('active_users');

export default function () {
  // 로그인 시도 카운트
  loginAttempts.add(1);

  let response = http.post('https://api.example.com/login', {
    username: 'user',
    password: 'pass'
  });

  let success = check(response, {
    'login successful': (r) => r.status === 200,
  });

  // 메트릭 기록
  if (!success) {
    loginErrors.add(1);
  }

  successRate.add(success);
  pageLoadTime.add(response.timings.duration);
  activeUsers.set(__VU);
}
🚨 4. 에러 핸들링
// error-handling-test.js
import http from 'k6/http';
import { check, sleep } from 'k6';

class ErrorHandler {
  constructor() {
    this.errorLog = [];
  }

  logError(response, context = {}) {
    if (response.status >= 400) {
      this.errorLog.push({
        timestamp: new Date().toISOString(),
        url: response.url,
        status: response.status,
        error: response.error || 'Unknown error',
        context: context,
      });

      console.error(`Error: ${response.status} at ${response.url}`);
    }
  }

  getSummary() {
    return {
      totalErrors: this.errorLog.length,
      errors: this.errorLog,
    };
  }
}

const errorHandler = new ErrorHandler();

export default function () {
  let response = http.get('https://api.example.com/data');

  errorHandler.logError(response, { user: __VU });

  check(response, {
    'status is 200': (r) => r.status === 200,
  });

  sleep(1);
}

export function handleSummary(data) {
  const errorSummary = errorHandler.getSummary();

  return {
    'stdout': textSummary(data, { indent: ' ', enableColors: true }),
    'error-report.json': JSON.stringify(errorSummary, null, 2),
  };
}
🔄 5. 데이터 매개변수화
// data-driven-test.js
import http from 'k6/http';
import { check, sleep } from 'k6';
import { SharedArray } from 'k6/data';

// CSV 파일에서 테스트 데이터 로드
const testData = new SharedArray('users', function () {
  return papaparse.parse(open('./test-data/users.csv'), { header: true }).data;
});

export let options = {
  vus: 10,
  duration: '2m',
};

export default function () {
  // 각 VU가 다른 사용자 데이터 사용
  const userData = testData[(__VU - 1) % testData.length];

  let response = http.post('https://api.example.com/login', {
    username: userData.username,
    password: userData.password,
  });

  check(response, {
    'login successful': (r) => r.status === 200,
  });

  if (response.status === 200) {
    const token = response.json('token');

    // 인증이 필요한 API 호출
    response = http.get('https://api.example.com/profile', {
      headers: { 'Authorization': `Bearer ${token}` },
    });

    check(response, {
      'profile loaded': (r) => r.status === 200,
      'correct user': (r) => r.json('username') === userData.username,
    });
  }

  sleep(Math.random() * 2 + 1);
}
실행 팁 및 주의사항
⚙️ 성능 최적화
-
적절한 sleep 시간 설정
// 너무 짧은 sleep은 비현실적 sleep(Math.random() * 3 + 1); // 1-4초 랜덤 -
메모리 효율적인 데이터 사용
// SharedArray 사용으로 메모리 절약 const data = new SharedArray('data', () => generateLargeDataset()); -
불필요한 로깅 제거
// 프로덕션에서는 console.log 최소화
if (__ENV.DEBUG) {
  console.log('Debug info:', response.body);
}
🎯 임계값(Thresholds) 설정
export let options = {
  thresholds: {
    // 95% 요청이 1초 이내 완료
    http_req_duration: ['p(95)<1000'],

    // 에러율 1% 미만
    http_req_failed: ['rate<0.01'],

    // 특정 시나리오별 임계값
    'http_req_duration{scenario:user_journey}': ['p(90)<800'],

    // 체크 성공률
    checks: ['rate>0.99'],
  },
};
결론
K6를 사용한 성능 테스트는 현대적인 웹 애플리케이션의 안정성과 확장성을 보장하는 핵심 도구입니다. 이 가이드에서 다룬 내용들을 바탕으로:
✅ 시작하기
- 간단한 smoke 테스트부터 시작
- 점진적으로 복잡한 시나리오 추가
- 모니터링 및 결과 분석 시스템 구축
🚀 다음 단계
- CI/CD 파이프라인에 성능 테스트 통합
- 실시간 모니터링 대시보드 구축
- 다양한 환경에서의 성능 기준선 설정
📚 추가 학습 자료
성능 테스트는 한 번으로 끝나는 작업이 아닙니다. 지속적이고 반복적인 과정을 통해 애플리케이션의 성능을 지속적으로 개선해 나가시기 바랍니다.
참고 자료

AI를 꿈꾸는 BackEnd개발자