개요
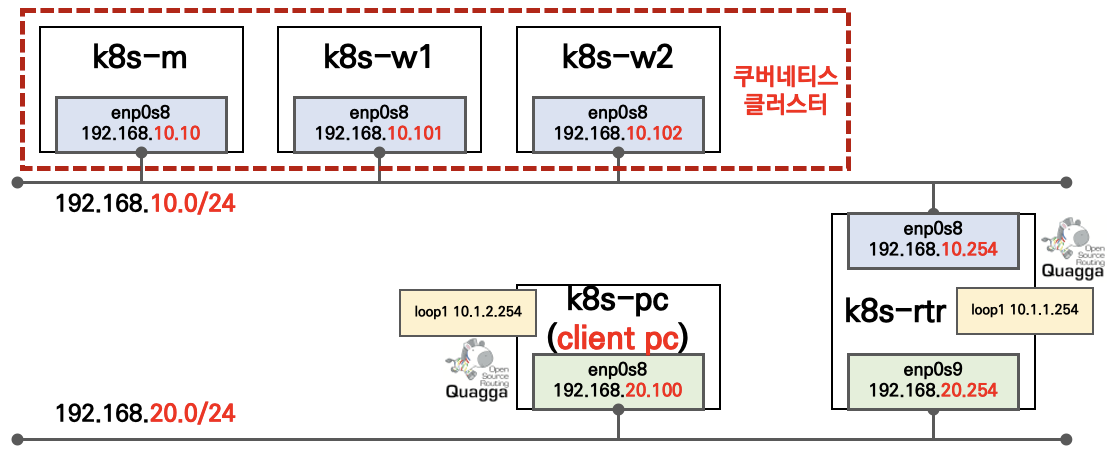
👉🏻 실습 환경은 K8S v1.22.6 , 노드 OS(Ubuntu 20.04.3) , CNI(Calico v3.21, VXLAN mode) , IPTABLES proxy mode
CoreDNS
CoreDNS는 쿠버네티스 클러스터의 DNS 역할을 수행할 수 있는, 유연하고 확장 가능한 DNS 서버이다. 쿠버네티스와 동일하게, CoreDNS 프로젝트도 CNCF가 관리한다.
사용자는 기존 디플로이먼트인 kube-dns를 교체하거나, 클러스터를 배포하고 업그레이드하는 kubeadm과 같은 툴을 사용하여 클러스터 안의 kube-dns 대신 CoreDNS를 사용할 수 있다.
CoreDNS 기본
CoreDNS 확인
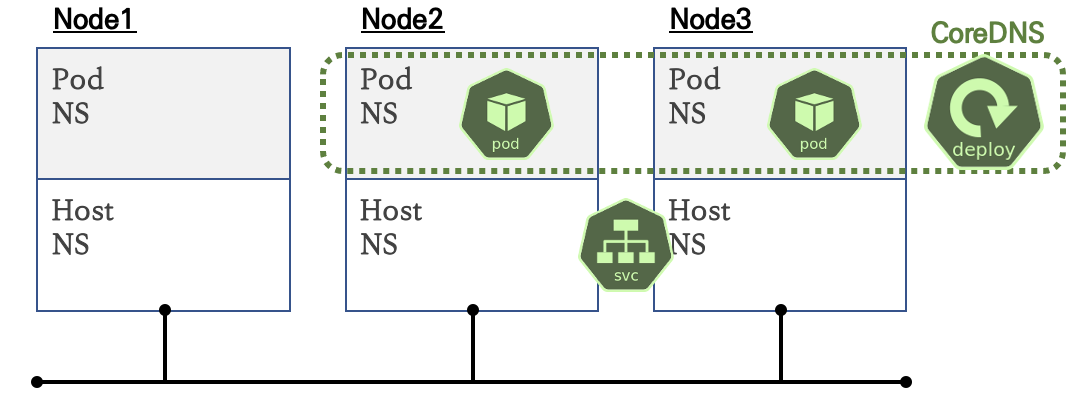
- 클러스터 안에서 서비스와 파드가 도메인을 통해 접근이 가능하게 DNS 서비스를 제공, 그외 외부 도메인 Query 처리
- 디플로이먼트(기본 파드 2개)로 배포되고, 서비스(Cluster IP)를 제공
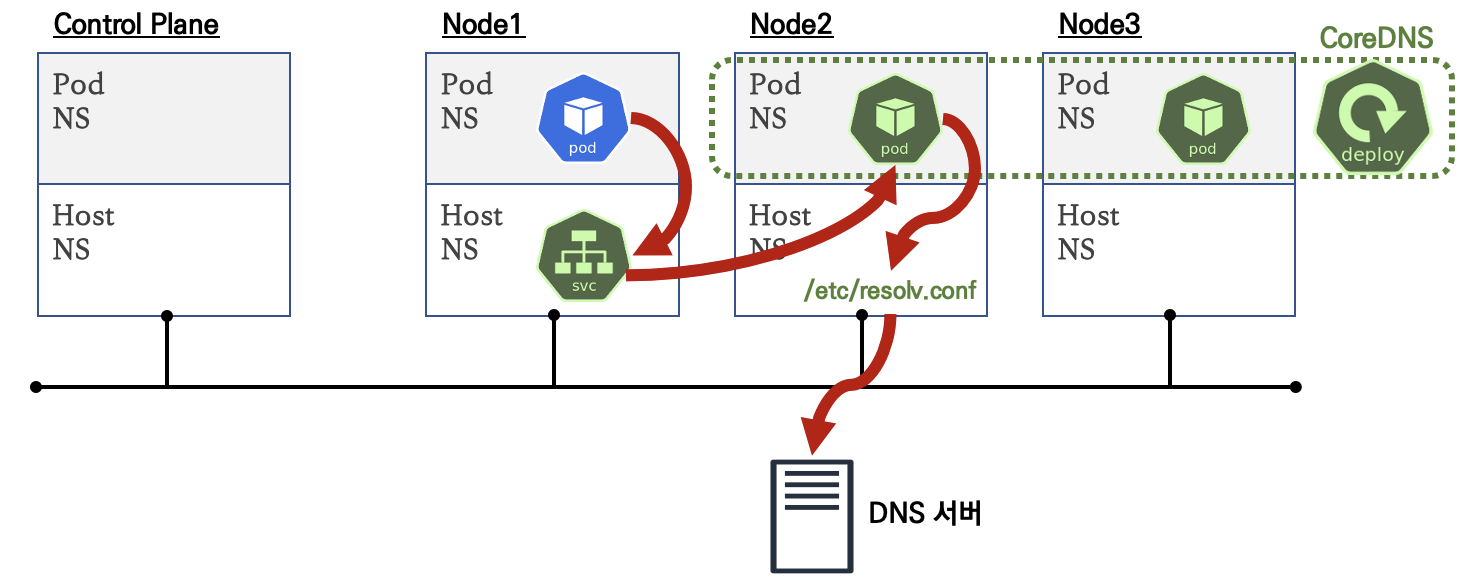
- 기본 파드는 도메인 Query 를 CoreDNS 서비스(Cluster IP)에 보내서 응답을 받음
실습
# 디플로이먼트(파드) 확인
kubectl get deployments.apps -n kube-system
root@k8s-m:~# kubectl get deployments.apps -n kube-system
NAME                      READY   UP-TO-DATE   AVAILABLE   AGE
coredns                   2/2     2            2           30h

kubectl get pod -n kube-system -o wide -l k8s-app=kube-dns
NAME                       READY   STATUS    RESTARTS   AGE     IP             NODE     NOMINATED NODE   READINESS GATES
coredns-78fcd69978-27zbl   1/1     Running   0          4d      172.16.116.3   k8s-m    <none>           <none>
coredns-78fcd69978-ttq9j   1/1     Running   0          6m35s   172.16.184.3   k8s-w2   <none>           <none>

# CoreDNS 서비스(Cluster IP) 확인
kubectl get svc -n kube-system kube-dns
root@k8s-m:~# kubectl get svc -n kube-system kube-dns
NAME       TYPE        CLUSTER-IP   EXTERNAL-IP   PORT(S)                  AGE
kube-dns   ClusterIP   10.96.0.10   <none>        53/UDP,53/TCP,9153/TCP   30h

# coredns 컨피그맵 확인
kubectl describe configmaps -n kube-system coredns
root@k8s-m:~# kubectl describe configmaps -n kube-system coredns
Name:         coredns
Namespace:    kube-system
Labels:       <none>
Annotations:  <none>

Data
====
Corefile:
----
.:53 {           # {플러그인 명시} - 링크
    errors       # 표준 출력으로 에러 로그 남김
    health {     # http://<Pod-IP>:8080/health 으로 CoreDNS 헬스 체크 가능
       lameduck 5s
    }
    ready        # http://<Pod-IP>8181/ready 으로 CoreDNS 준비 체크 가능
    kubernetes cluster.local in-addr.arpa ip6.arpa {   # 쿠버네티스의 Service 도메인과 POD IP 기반으로 DNS 쿼리를 응답
       pods insecure     # pods verified 는 같은 네임스페이스에 속한 파드끼리만 A 레코드에 관한 DNS 쿼리에 응답, # pods disabled 파드간 질의 불가능
       fallthrough in-addr.arpa ip6.arpa    # 도메인 찾을 시 실패했을 때 동작을 설정
       ttl 30    # ttl 설정으로 타임아웃을 제어
    }
    prometheus :9153  # http://<Pod-IP>9153/metrics 으로 프로메테우스 형식의 메트릭 정보를 제공
    forward . /etc/resolv.conf {  # 클러스터 도메인으로 설정되지 않은 DNS 쿼리를 호스트의 /etc/resolv.conf 에 설정된 외부 DNS 서버로 보내서 처리
       max_concurrent 1000
    }
    cache 30     # DNS 쿼리의 캐시 유지 시간을 30초로 설정
    loop         # 간단한 전달 루프(loop)를 감지하고, 루프가 발견되면 CoreDNS 프로세스를 중단(halt) - 링크
    reload       # Corefile 변경 감지하여 자동으로 설정 내용을 반영 (보통 2분 정도 이내)
    loadbalance  # 응답에 대하여 A, AAAA, MX 레코드의 순서를 무작위로 선정하는 라운드-로빈 방식 사용
}

# (옵션) 헬스체크(Liveness) , 준비체크(Readiness)
COREDNSPOD1=$(kubectl get pod -n kube-system -l k8s-app=kube-dns -o jsonpath='{.items[0].status.podIP}')

echo $COREDNSPOD1
172.16.116.3

curl $COREDNSPOD1:8080/health; echo
OK

curl $COREDNSPOD1:8181/ready; echo
OK- 파드마다 .spec.dnsPolicy를 사용하여 도메인 이름을 어떤 우선순위로 찾을 수 있는지 설정할 수 있다 - CoreDNS configmap 옵션 - 링크
| .spec.dnsPolicy | 동작방법 |
|---|---|
| Default | 파드가 실행중인 노드의 DNS 설정 사용 |
| ClusterFirst(기본값) | 클러스터와 일치하지 않는 경우, 외부 DNS 인 업스트립 DNS 에 도메인 이름을 질의 |
| ClusterFirstWithHostNet | 파드를 hostNetwork 실행할 때 반드시 사용해야하는 필드 |
| None | 클러스터 안의 DNS 설정을 무시하고 .spec.dnsPolicy 하위 필드로 DNS 설정 |
파드에서 DNS Query 과정
-
.spec.dnsPolicy = ClusterFirst경우
-
테스트용 파드 생성 후 DNS 정보 확인
❓ 파드 내 resolv.conf 의 nameserver 의 IP는 무엇일까요? options ndots:5 의 의미는 무엇일까요?
❗ The search domains and ndots value are configured so that any non-FQDN DNS query made by a Pod is first tried in all of the specified domains,
which allows for internal cluster DNS schema to take precedence over the external DNS.
# 파드 생성
kubectl run -it --rm netdebug --image=nicolaka/netshoot --restart=Never -- zsh

-------------
# 파드에서 네임서버 확인
cat /etc/resolv.conf
nameserver 10.96.0.10
search default.svc.cluster.local svc.cluster.local cluster.local
options ndots:5

# 도메인 쿼리 기본 방식 : ndots:5 설정으로 최종 호출 전에 설정되어 있는 검색 도메인(search)을 추가하여 먼저 쿼리 호출
nslookup -type=A google.com -debug | grep QUESTIONS -A1
    QUESTIONS:
        google.com.default.svc.cluster.local, type = A, class = IN
--
    QUESTIONS:
        google.com.svc.cluster.local, type = A, class = IN
--
    QUESTIONS:
        google.com.cluster.local, type = A, class = IN
--
    QUESTIONS:
        google.com, type = A, class = IN
-------------
# coreDNS 파드가 동작하는 노드에서 cali 인터페이스 패킷 캡쳐 확인
lsns -t net
ip -c link
CoreDNSveth=$(calicoctl get workloadEndpoint -n kube-system | grep coredns | awk '{print $5}' | cut -d "/" -f 1)
tcpdump -i $CoreDNSveth -nn udp port 53
# 혹은
ngrep -tW byline -d $CoreDNSveth '' 'udp port 53'
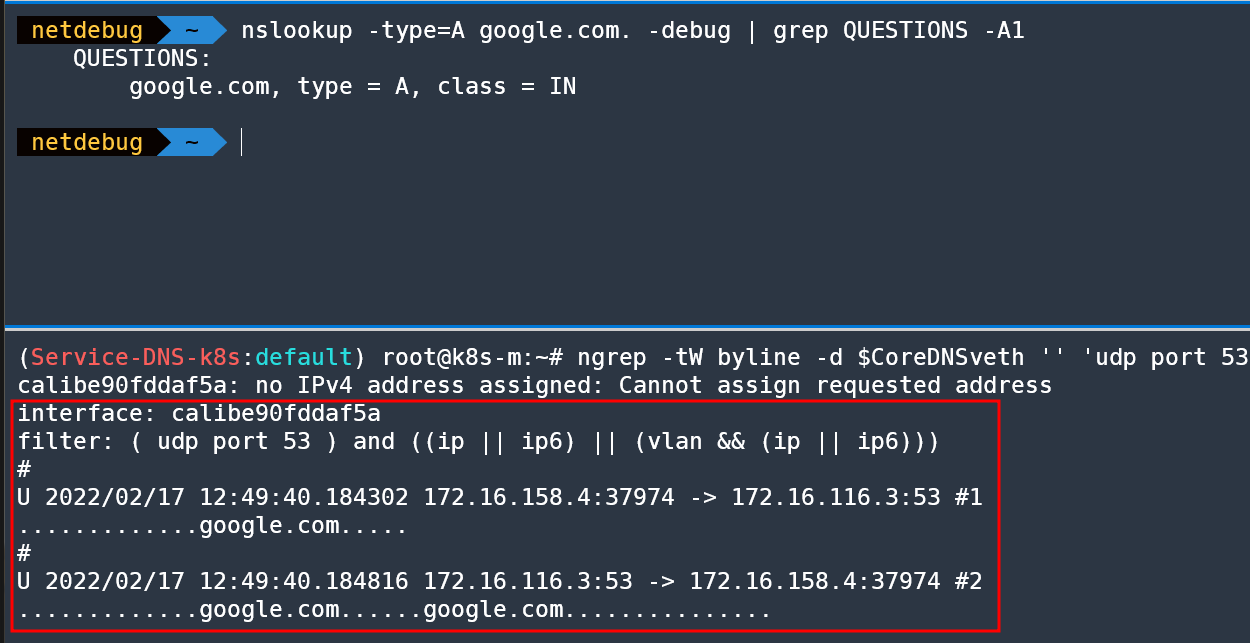
# 외부 도메인일 경우 맨 끝. 입력을 통해 빠르게 쿼리 가능 (위 쿼리 후 30초 후 아래 쿼리 할 것!) 이유는?
# absolute domain name 절대 도메인 이름 : 도메인 이름을 TLD 까지 생략하지 않고 표기하며 끝에 루트를 나타나는 '.'을 붙인 도메인 이름.
# Relative Domain Name 상대 도메인 이름 : 도메인 이름을 생략해서 표기. 예시) test.kr 기준 'www' 등
# FQDN (Fully Qualified Domain Name) 전체 주소 도메인 이름 : TLD 까지의 모든 라벨을 포함한 도메인 이름. 절대 도메인 이름과는 달리 끝에 '.' 을 붙이는 것을 설정하는 상황에 따라 구분. URL 이나 메일 주소 표기 등 모든 라벨을 포함한 정보를 반드시 설정해야 할 때는 끝에 '.' 을 붙이지 않는 것이 일반적.
nslookup -type=A google.com. -debug
nslookup -type=A google.com. -debug | grep QUESTIONS -A1
QUESTIONS:
google.com, type = A, class = IN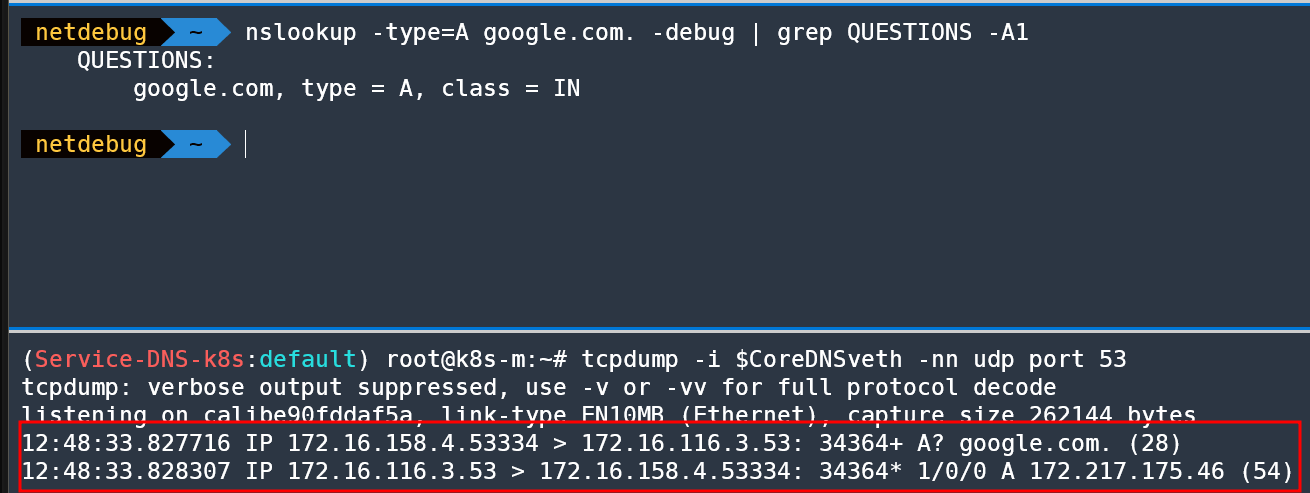
💡 DNS 확인 도구 : nslookup(석유) → dig(고인물) ⇒ drill 는 dig 와 거의 동일 기능 제공 및 BIND 를 포함하지 않는 OS에서도 탑재가 가능, kdig (Knot DNS)
DNS for Services 실습
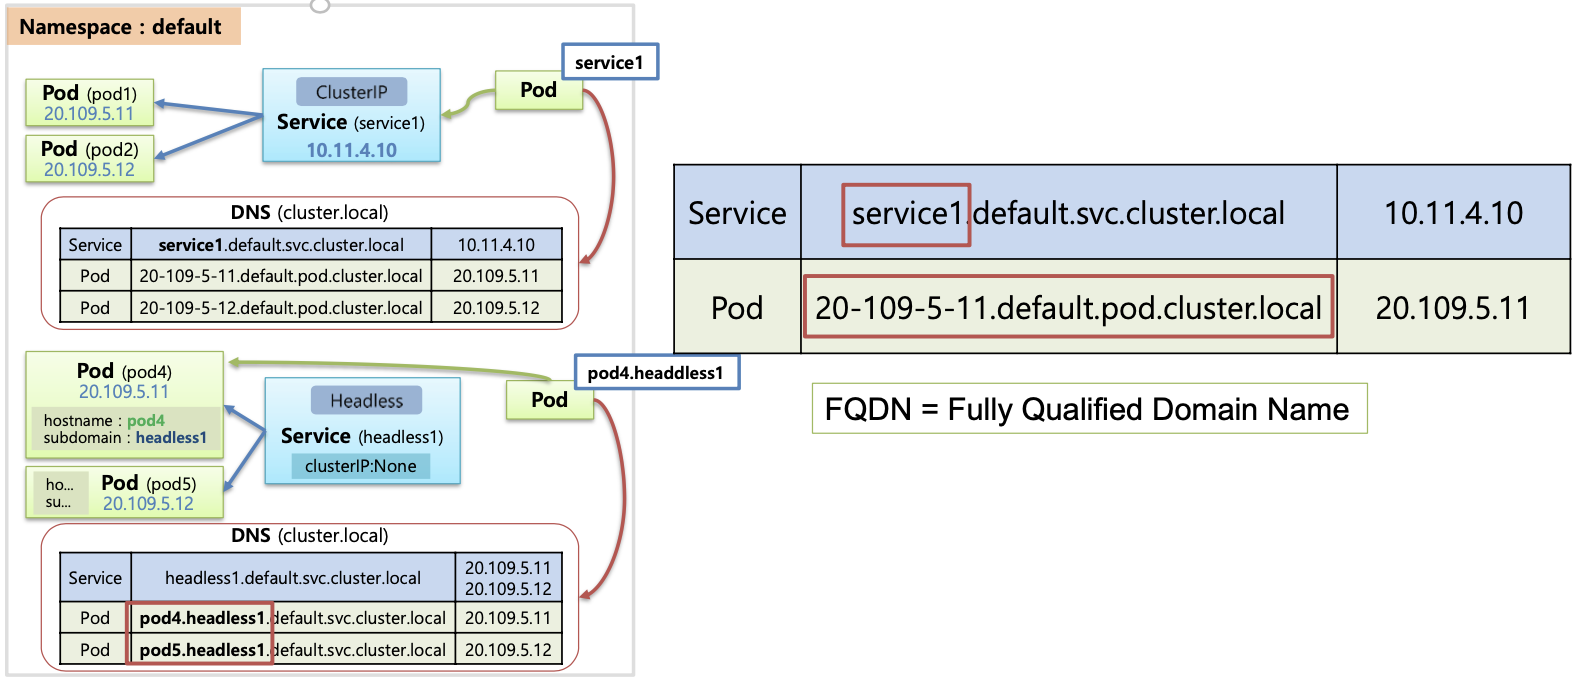
- 쉽게 호출할 수 있도록 서비스 EndPoint를 미리 정의된 Name(A Record)으로 제공해주는 기능
- CoreDNS 는 서비스에 대해서 A 레코드 생성 :
<service-name>.<namespace-name>.svc.cluster.local
(생략)
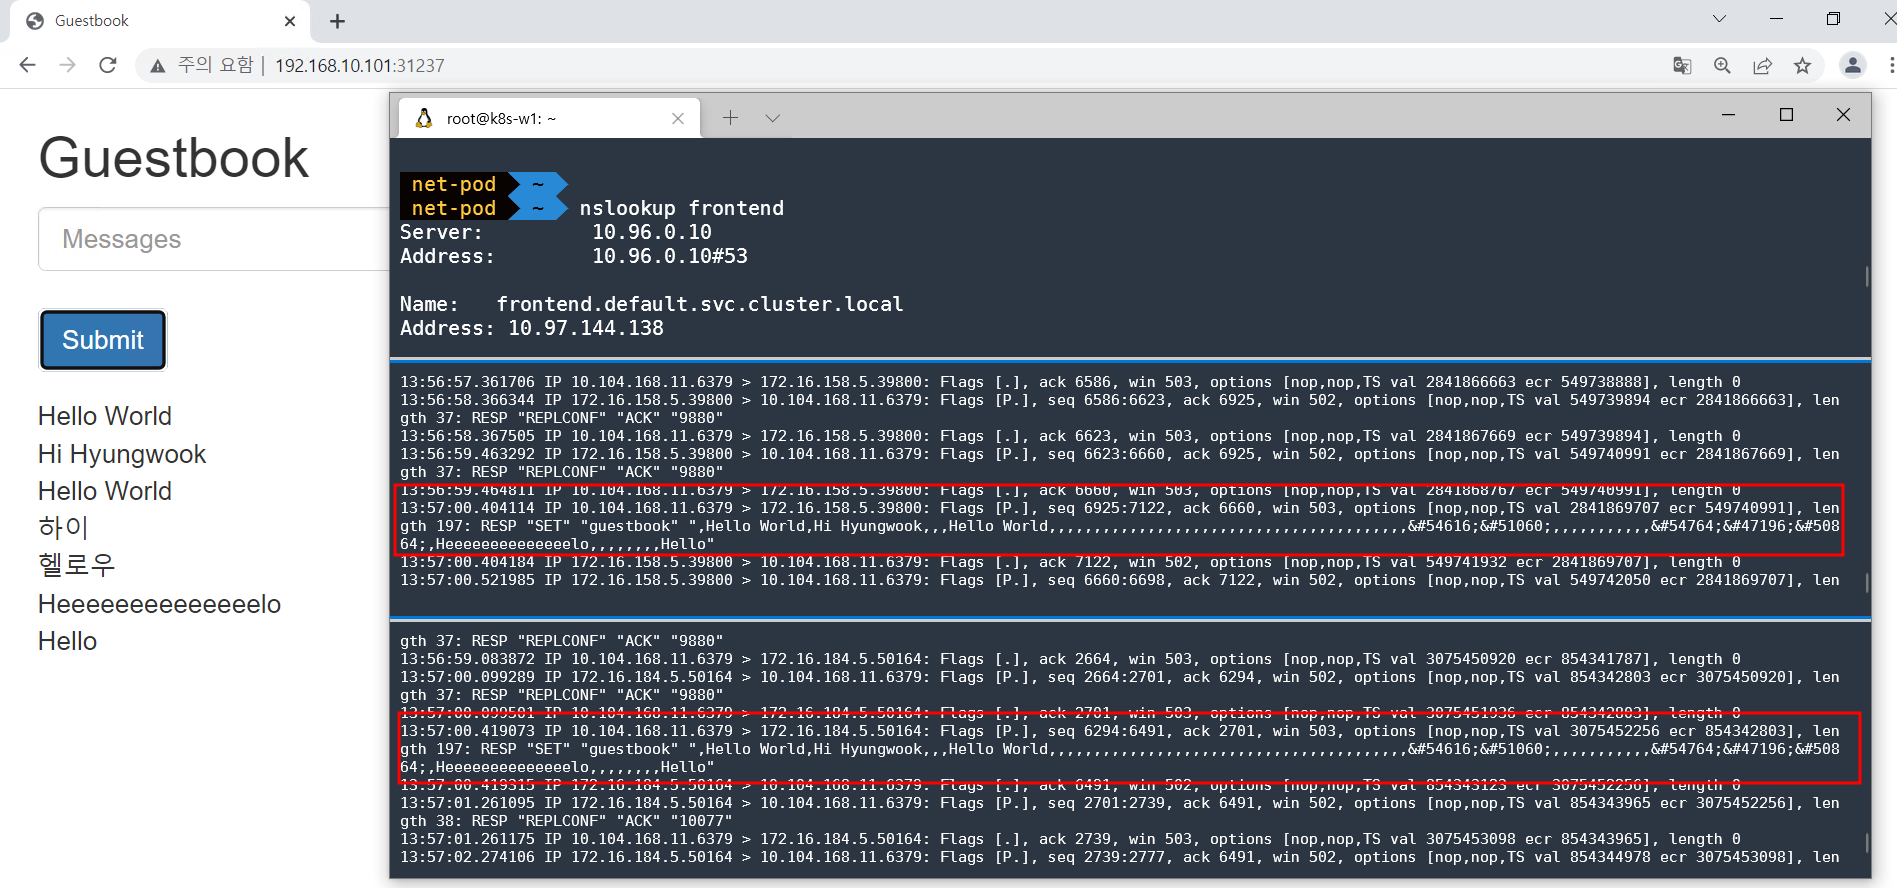
📝 [실습 과제 1] PHP 방명록 애플리케이션 샘플 애플리케이션 실습 후 DNS 쿼리 동작을 확인해보자
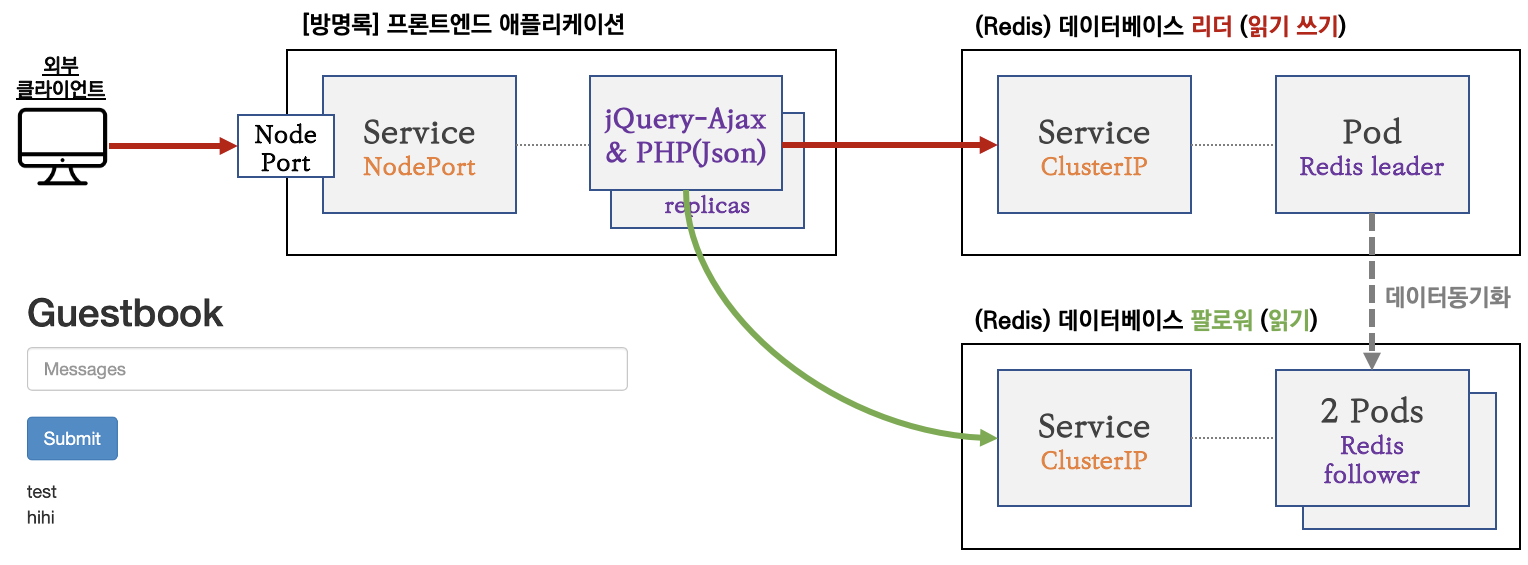
- Service + Redis(Leader)
# Redis 리더 파드 생성(TCP 6379)
kubectl apply -f https://raw.githubusercontent.com/kubernetes/website/main/content/ko/examples/application/guestbook/redis-leader-deployment.yaml

# 확인
kubectl get pod -owide
kubectl logs -f deployment/redis-leader

# Redis 리더 서비스 생성(TCP 6379) : 프런트애플리케이션에서 데이터 접근 하기 위함
kubectl apply -f https://raw.githubusercontent.com/kubernetes/website/main/content/ko/examples/application/guestbook/redis-leader-service.yaml- Service + Redis(Follower) 2Pods
# Redis 팔로워 파드 생성(TCP 6379)
kubectl apply -f https://raw.githubusercontent.com/kubernetes/website/main/content/ko/examples/application/guestbook/redis-follower-deployment.yaml

# 확인
kubectl get pod -owide

# 리더와 동기화 성공 로그 확인!
kubectl logs -f deployment/redis-follower

# Redis 팔로워 서비스 생성(TCP 6379) : 프런트애플리케이션에서 데이터 읽기 접근 하기 위함(부하분산)
kubectl apply -f https://raw.githubusercontent.com/kubernetes/website/main/content/ko/examples/application/guestbook/redis-follower-service.yaml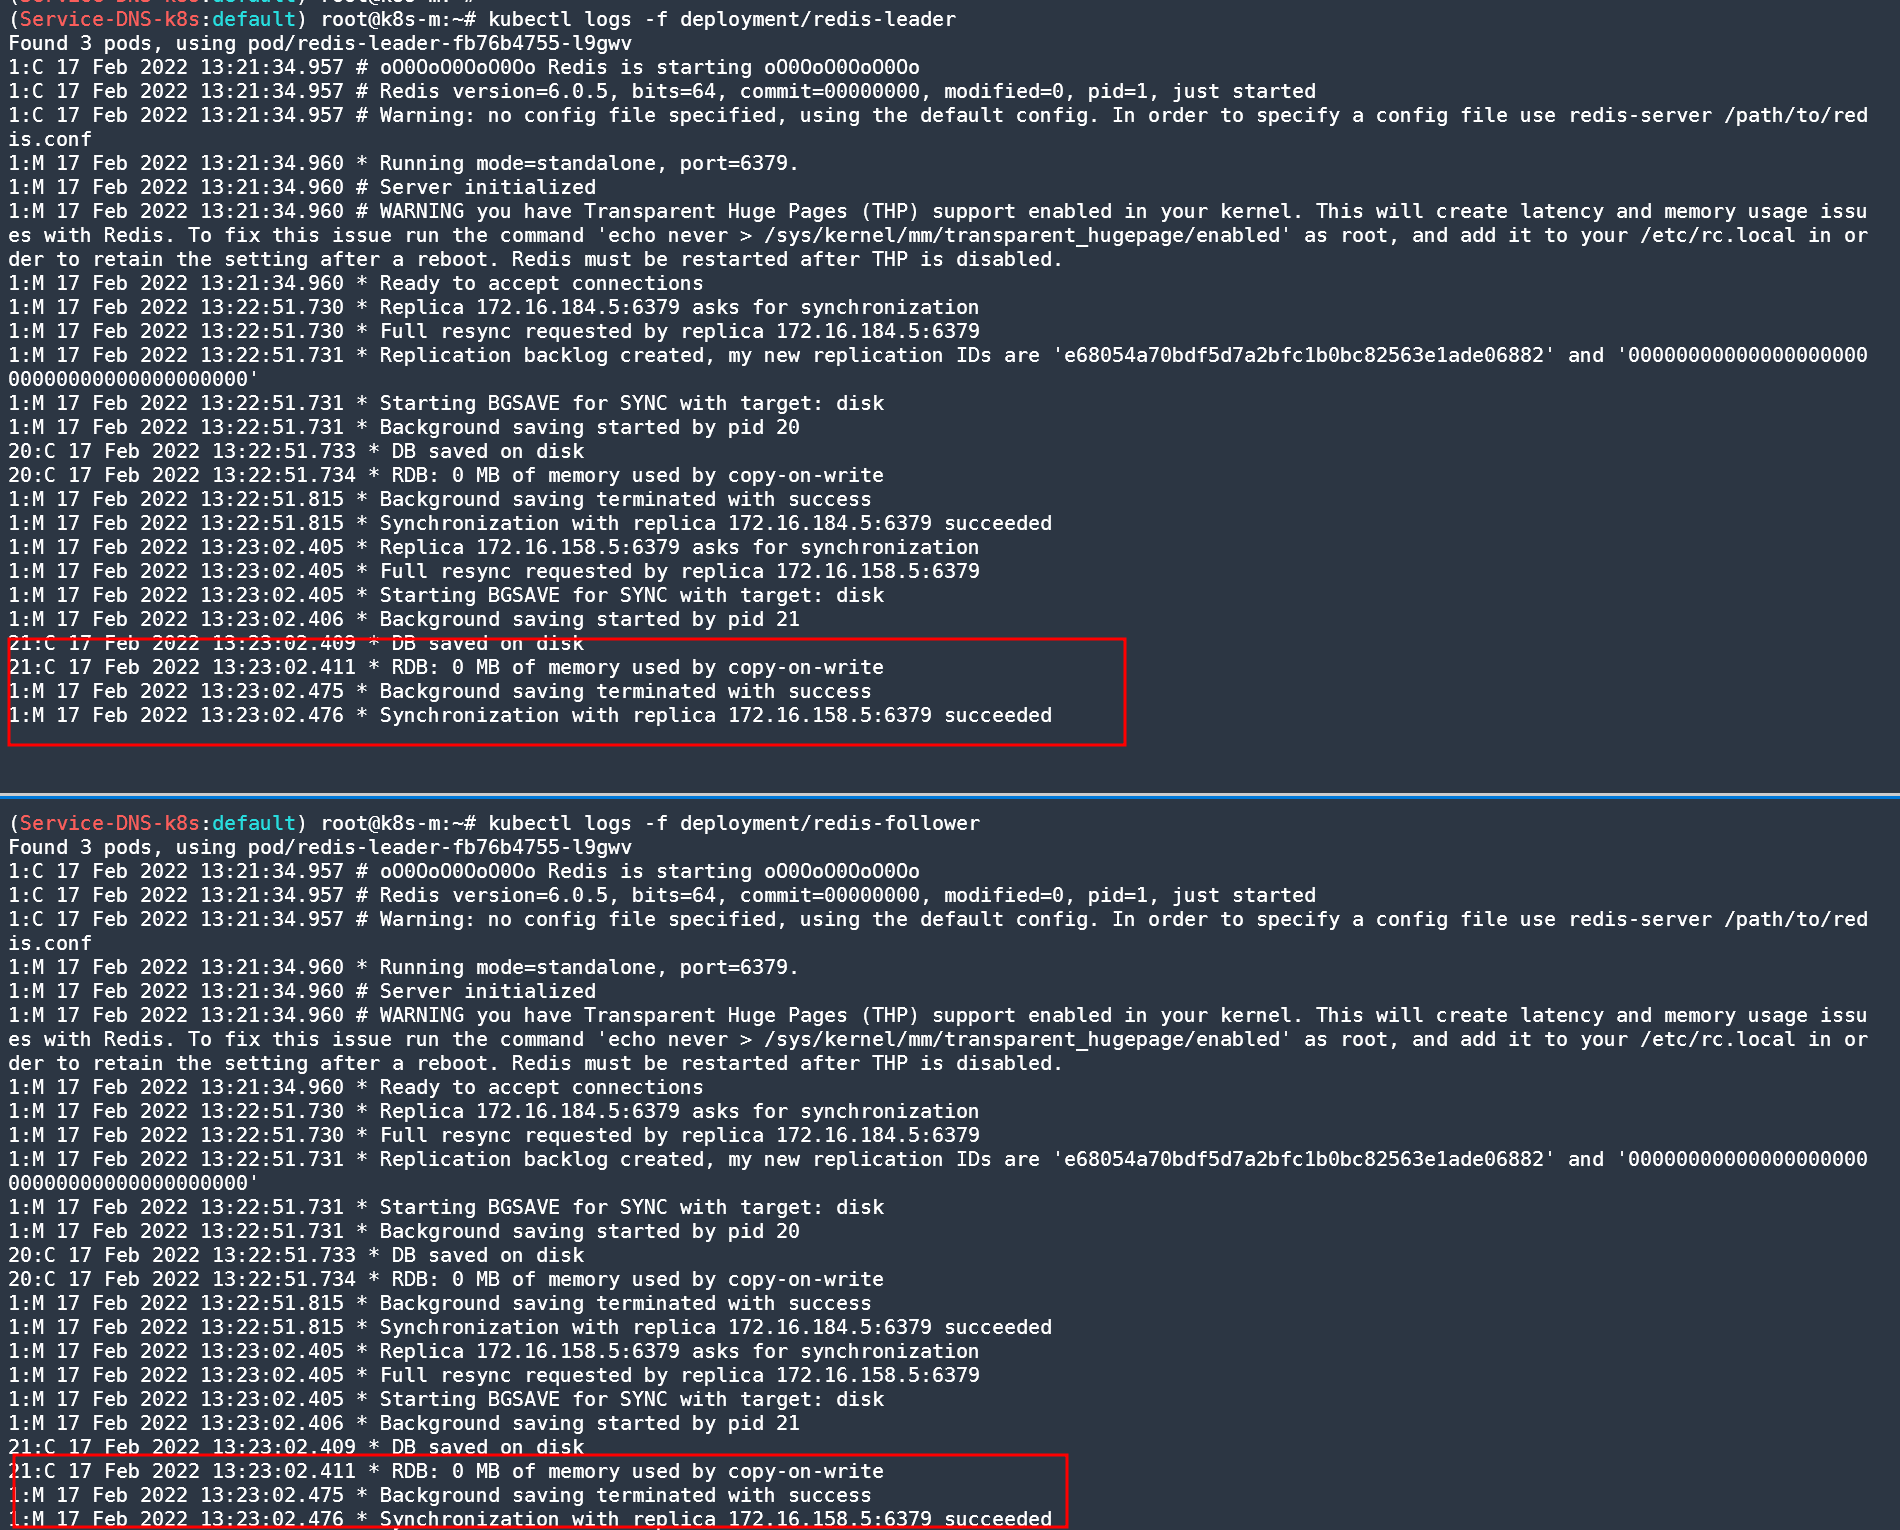
- 방명록 프론트엔드 파드(웹) 생성 : PHP(DB 읽기 시 follower redis service 로 전달, 쓰기 시 leader redis service 로 전달), JSON 인터페이스 노출, jQuery-Ajax 기반 UX
# 프론트엔드 파드 생성
kubectl apply -f https://raw.githubusercontent.com/kubernetes/website/main/content/ko/examples/application/guestbook/frontend-deployment.yaml

# 확인
kubectl get pods -l app=guestbook -l tier=frontend

# 프론트엔드 외부 접속을 위한 서비스 생성
cat <<EOF | kubectl create -f -
apiVersion: v1
kind: Service
metadata:
  name: frontend
  labels:
    app: guestbook
    tier: frontend
spec:
  ports:
  - port: 80
  selector:
    app: guestbook
    tier: frontend
  type: NodePort
EOF

# 확인
kubectl get svc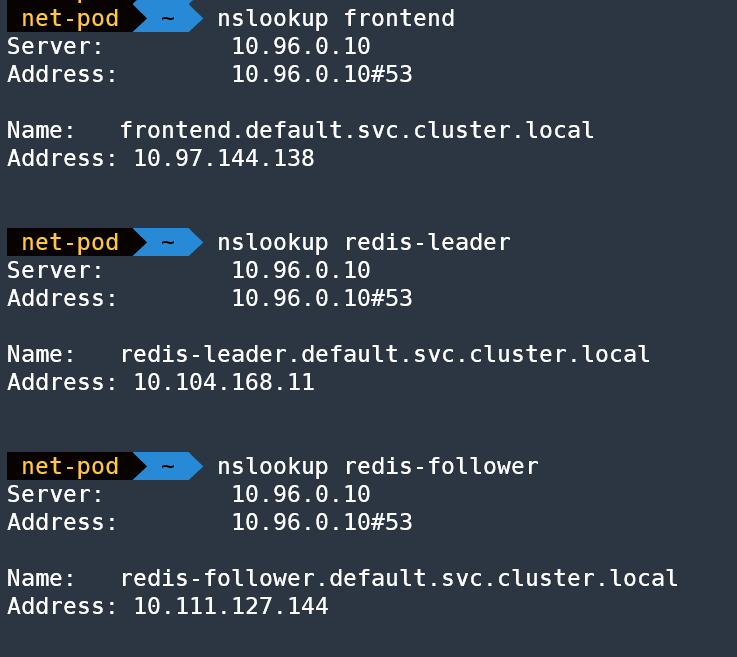
스테이트풀셋(StatefulSets) & 헤드리스서비스(Headless Service)

헤드리스(Headless) 서비스 - 링크
헤드리스(Headless) 서비스는 대상이 되는 개별 파드의 IP 주소가 직접 반환되는 서비스 ⇒ 즉, 쉽게 이해해서 VIP가 없다!
| 서비스 종류 | 서비스 DNS 응답값 |
|---|---|
| ClusterIP, NodePort, LoadBalancer | ClusterIP value |
| Headless | List of Endpoint IPs |
| ExternalName | CNAME pointing to the value of spec.externalName |
기본은 DNS RR 로 파드의 IP 주소가 직접 반환, 스테이트풀셋의 경우에만 추가로 파드명으로 이름 해석이 가능
헤드리스 서비스 조건
- 서비스의 spec.type 이 ClusterIP 일 것
- 서비스의 spec.clusterIP 가 None 일 것
- 스테이트풀렛 + 헤드리스 서비스 사용으로 스테이트풀렛으로 생성된 파드명으로 이름 해석 시 추가 조건
- 서비스의 metadata.name 이 스테이트풀셋의 spec.serviceName 과 같을 것
- 헤드리스 서비스의 이름은 SRV 레코드로 쓰이기 때문에 헤드리스 서비스의 이름을 통해 포드에 접근할 수 있는 IP를 반환할 수 있다 - SRV 레코드
- SRV(Service record)는 DNS(Domain Name System)에서 서비스의 위치(호스트네임 과 포트번호)를 저장하기 위해서 사용하는 레코드
LoadBalancer 소개
2.1 통신 흐름
💡 요약 : 외부 클라이언트가 '로드밸런서' 접속 시 부하분산 되어 노드 도달 후 iptables 룰로 목적지 파드와 통신됨

- 외부에서 로드밸런서 (부하분산) 처리 후 → 노드(NodePort) 이후 기본 과정은 NodePort 과정과 동일하다!
부하분산 최적화 : 노드에 파드가 없을 경우 '로드밸런서'에서 노드에 헬스 체크(상태 검사)가 실패하여 해당 노드로는 외부 요청 트래픽을 전달하지 않는다

Node 3에는 배치된 파드가 없으므로 외부 트래픽 전달 X

2.2 서비스(LoadBalancer) 부족한 점
- 서비스(LoadBalancer) 생성 시 마다 LB(예 AWS NLB)가 생성되어 자원 활용이 비효율적임 ⇒ HTTP 경우 인그레스(Ingress) 를 통해 자원 활용 효율화 가능!
- 서비스(LoadBalancer)는 HTTP/HTTPS 처리에 일부 부족함(TLS 종료, 도메인 기반 라우팅 등) ⇒ 인그레스(Ingress) 를 통해 기능 동작 가능!
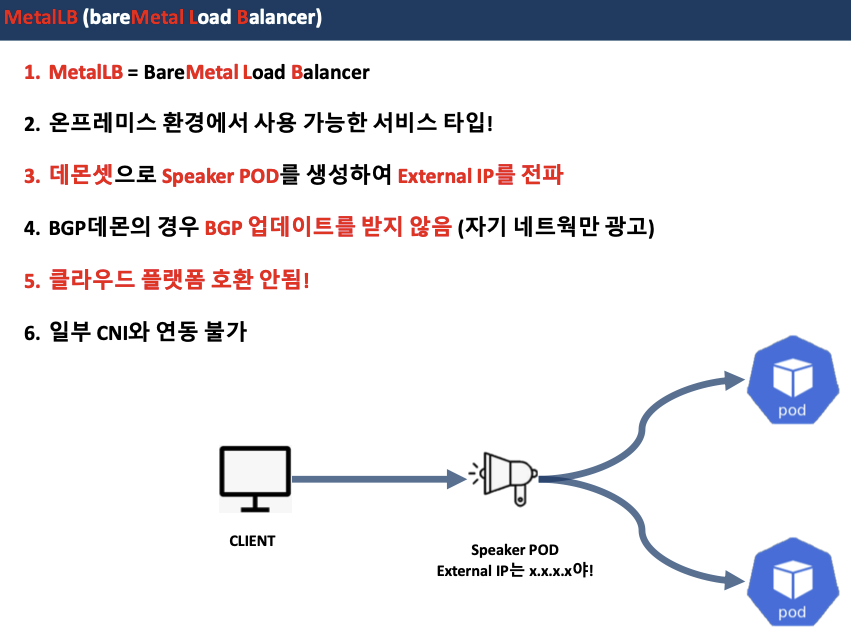
0. MetalLB 요약

- MetalLB 는 온프레미스 환경(IDC)에서 사용할 수 있는 서비스(로드밸런서 타입)입니다 ← 클라우드 환경의 서비스(로드밸런서 타입)와는 동작이 조금 다릅니다!
- MetalLB는 BareMetalLoadBalancer 약자!
- 서비스(로드 밸런서)의 'External IP' 전파를 위해서 표준 프로토콜인 ARP(IPv4)/NDP(IPv6), BGP 를 사용합니다.
- 데몬셋으로 speaker 파드를 생성하여 'External IP' 전파합니다
- 일반적인 BGP 데몬과 다르게 BGP 업데이트(외부에서 광고하는 네트워크 대역)을 받지 않습니다.
- Unlike standard BGP daemons, MetalLB BGP speakers do not accept any incoming updates,
- 클라우드 플랫폼 호환 : 대부분의 클라우드 플랫폼(예 AWS, Azure, GCP 등)과 호환되지 않습니다 - 링크
- CNI(네트워크 플러그인) 호환 : 일부 CNI와 연동에 이슈가 있습니다 - 링크
- 예시) Calico IPIP(BGP)와 MetalLB BGP 모드를 상단 라우터와 동시 사용 시 문제 발생 - 링크
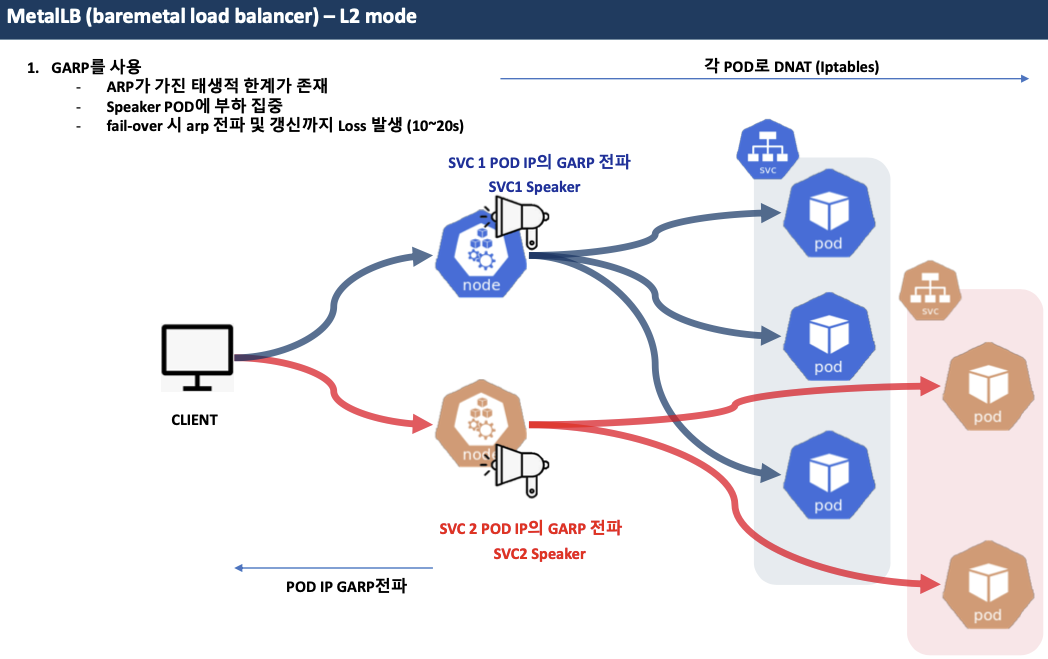
MetalLB - Layer2 모드
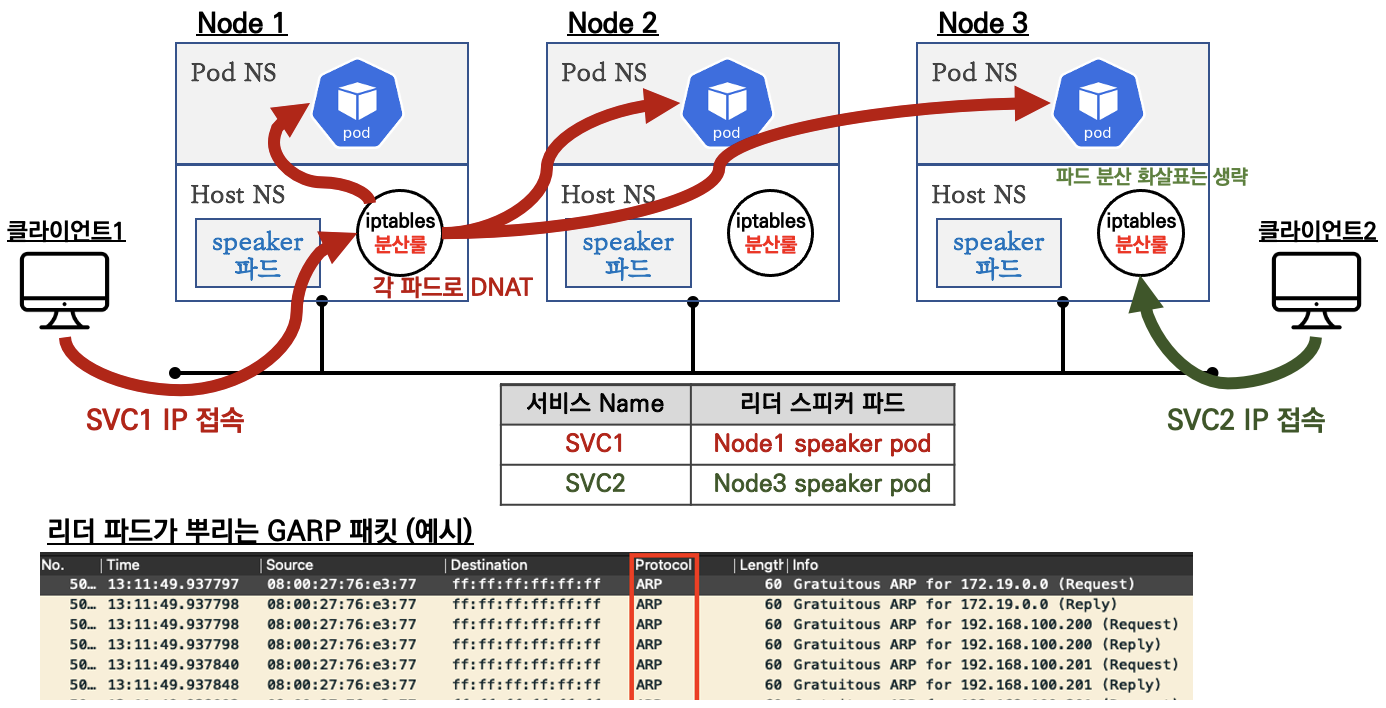
- 리더 파드가 선출되고 해당 리더 파드가 생성된 노드로만 트래픽이 인입되어 해당 노드에서 iptables 분산되어 파드로 접속
- 권장 사용 환경 : 테스트 및 소규모의 환경(동일 네트워크 1개 사용)에서 클라이언트 IP 보존이 필요 없을 때
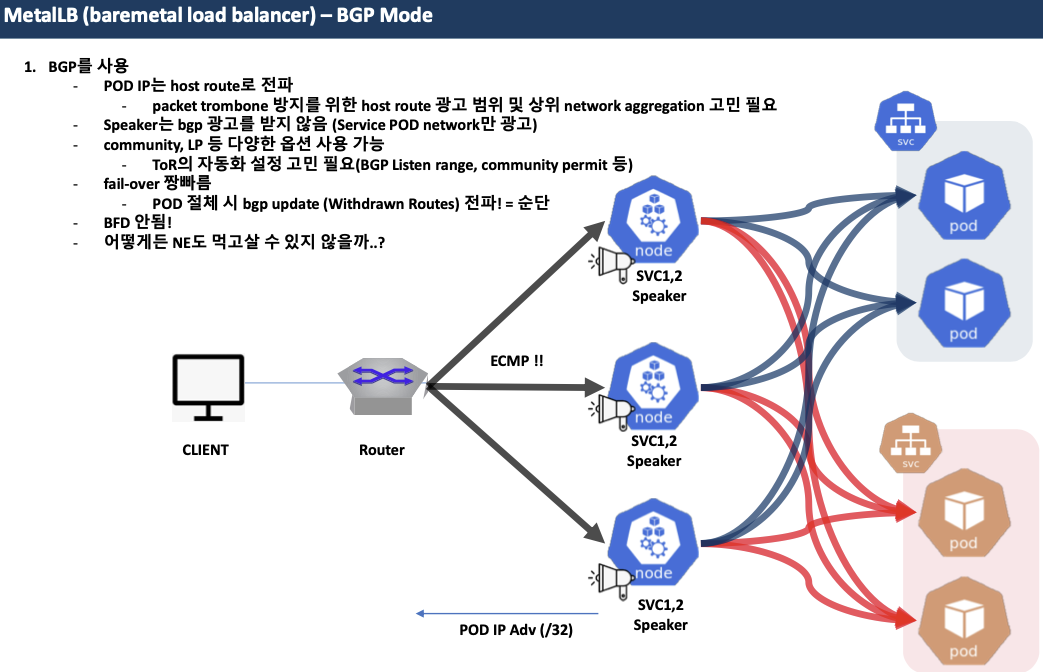
MetalLB - BGP 모드
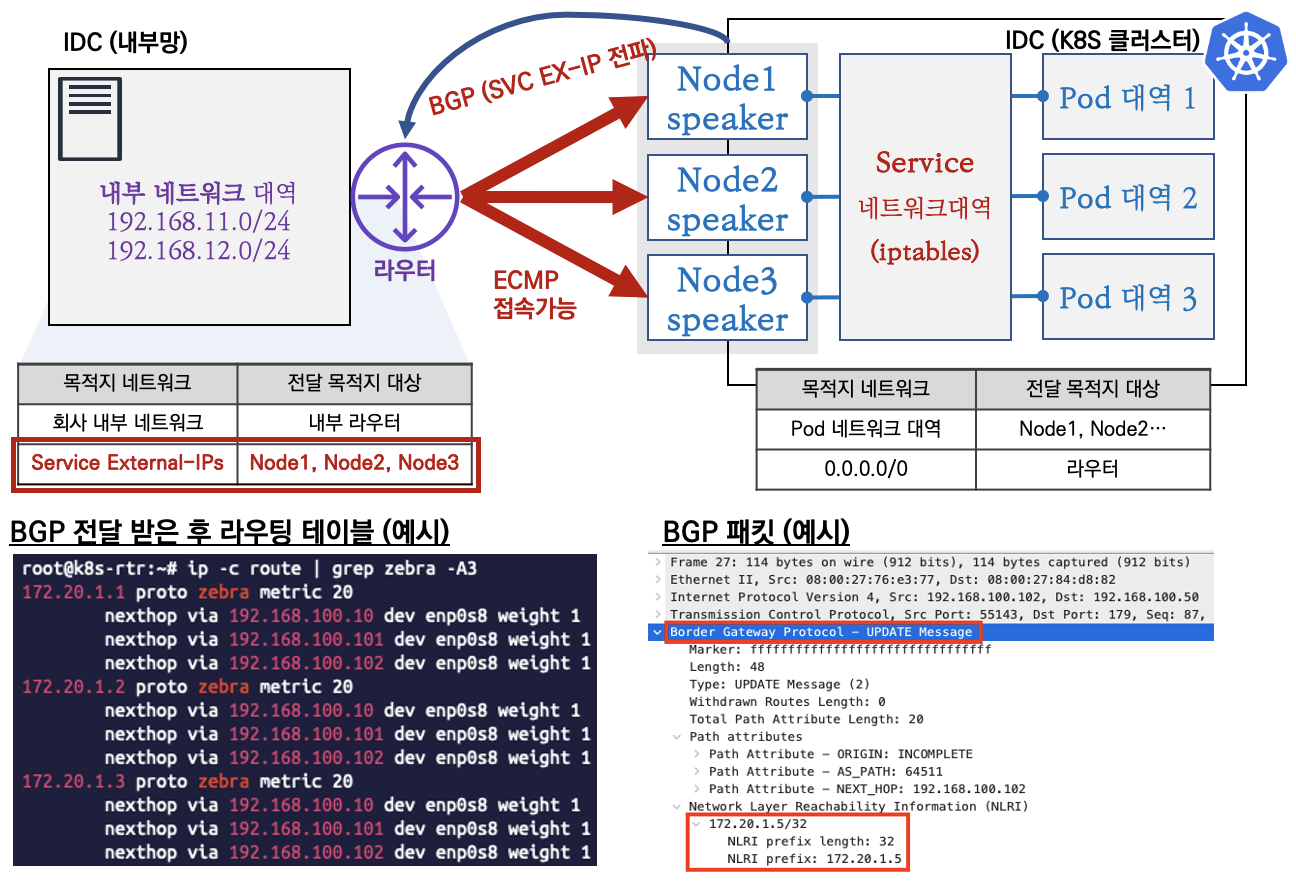
- speaker 파드가 BGP로 서비스 정보(EXTERNAL-IP)를 전파 후, 외부에서 라우터를 통해 ECMP 라우팅으로 부하 분산 접속
- 권장 사용 환경 : 규모가 있고, 클라이언트 IP보존과 장애 시 빠른 절체가 필요하며, 네트워크 팀 협조가 가능할때
1. MetalLB 소개
- 그림 소개
- L2 mode (ARP)
- BGP mode
실습 환경 소개
- 기본 정보 확인
# 파드와 서비스 사용 가능 네트워크 대역
kubectl cluster-info dump | grep -m 2 -E "cluster-cidr|service-cluster-ip-range"
                            "--service-cluster-ip-range=10.96.0.0/12",
                            "--cluster-cidr=172.16.0.0/16",

# kube-proxy 모드 확인 : "" 기본값은 iptables proxy 모드
kubectl describe  configmap -n kube-system kube-proxy | grep mode
mode: ""

# calico 정보 확인
calicoctl get ippool -o wide
NAME                  CIDR            NAT    IPIPMODE   VXLANMODE   DISABLED   SELECTOR
default-ipv4-ippool   172.16.0.0/16   true   Never      Always      false      all()

calicoctl ipam show --show-blocks
+----------+-----------------+-----------+------------+--------------+
| GROUPING |      CIDR       | IPS TOTAL | IPS IN USE |   IPS FREE   |
+----------+-----------------+-----------+------------+--------------+
| IP Pool  | 172.16.0.0/16   |     65536 | 15 (0%)    | 65521 (100%) |
| Block    | 172.16.116.0/24 |       256 | 4 (2%)     | 252 (98%)    |
| Block    | 172.16.158.0/24 |       256 | 5 (2%)     | 251 (98%)    |
| Block    | 172.16.184.0/24 |       256 | 6 (2%)     | 250 (98%)    |
+----------+-----------------+-----------+------------+--------------+- 파드 생성
cat <<EOF | kubectl create -f -
apiVersion: v1
kind: Pod
metadata:
  name: webpod1
  labels:
    app: webpod
spec:
  #nodeName: k8s-w1
  containers:
  - name: container
    image: traefik/whoami
  terminationGracePeriodSeconds: 0
---
apiVersion: v1
kind: Pod
metadata:
  name: webpod2
  labels:
    app: webpod
spec:
  #nodeName: k8s-w2
  containers:
  - name: container
    image: traefik/whoami
  terminationGracePeriodSeconds: 0
EOF- 확인
# 파드 정보 확인
calicoctl get wep
WORKLOAD   NODE     NETWORKS           INTERFACE
webpod1    k8s-w1   172.16.158.11/32   cali778ba511bf9
webpod2    k8s-w2   172.16.184.9/32    cali798bceab6f5

kubectl get pod -owide
NAME      READY   STATUS    RESTARTS   AGE   IP              NODE     NOMINATED NODE   READINESS GATES
webpod1   1/1     Running   0          23s   172.16.158.11   k8s-w1   <none>           <none>
webpod2   1/1     Running   0          23s   172.16.184.9    k8s-w2   <none>           <none>

# 파드 IP주소를 변수에 지정
WPOD1=$(calicoctl get workloadEndpoint | grep pod1 | awk '{print $3}' | cut -d "/" -f 1)
echo $WPOD1
WPOD2=$(calicoctl get workloadEndpoint | grep pod2 | awk '{print $3}' | cut -d "/" -f 1)
echo $WPOD2

# 접속 확인
curl -s --connect-timeout 1 $WPOD1 | egrep 'Hostname|RemoteAddr|Host:'
Hostname: webpod1
RemoteAddr: 172.16.116.0:36812
Host: 172.16.158.11

curl -s --connect-timeout 1 $WPOD2 | egrep 'Hostname|RemoteAddr|Host:'
Hostname: webpod2
RemoteAddr: 172.16.116.0:49928
Host: 172.16.184.9
2. MetalLB - Layer 2 모드
2.1 MetalLB 설치
-
설치 방법 지원 : Kubernetes manifests, using Kustomize, or using Helm
-
간단하게 manifests 로 설치 진행!
# 생성
# metallb-system 네임스페이스 생성, 파드(컨트롤러, 스피커) 생성, RBAC(서비스/파드/컨피그맵 조회 등등 권한들) 생성
# kubectl apply -f https://raw.githubusercontent.com/metallb/metallb/<version>/manifests/namespace.yaml
# kubectl apply -f https://raw.githubusercontent.com/metallb/metallb/<version>/manifests/metallb.yaml
kubectl apply -f https://raw.githubusercontent.com/metallb/metallb/v0.11.0/manifests/namespace.yaml
kubectl apply -f https://raw.githubusercontent.com/metallb/metallb/v0.11.0/manifests/metallb.yaml

# 확인 : 데몬셋으로 배포되는 metallb 스피커 파드의 IP는 네트워크가 host 모드이므로 노드의 IP를 그대로 사용
kubectl get pod -n metallb-system -o wide
NAME                          READY   STATUS    RESTARTS   AGE   IP               NODE     NOMINATED NODE   READINESS GATES
controller-7dcc8764f4-9cmq2   1/1     Running   0          32h   172.16.184.8     k8s-w2   <none>           <none>
speaker-fbw9j                 1/1     Running   0          32h   192.168.10.102   k8s-w2   <none>           <none>
speaker-l55ht                 1/1     Running   0          32h   192.168.10.10    k8s-m    <none>           <none>
speaker-vjzcf 1/1 Running 0 32h 192.168.10.101 k8s-w1 <none> <none>- 컨피그맵 생성 : 모드 및 서비스 대역 지정
- 서비스(External-IP) 대역을 노드가 속한 eth0의 대역이 아니여도 상관없다! → 다만 이 경우 GW 역할의 라우터에서 노드들로 라우팅 경로 지정 필요
# 컨피그맵 생성
cat <<EOF | kubectl create -f -
apiVersion: v1
kind: ConfigMap
metadata:
  namespace: metallb-system
  name: config
data:
  config: |
    address-pools:
    - name: default
      protocol: layer2
      addresses:
      - 192.168.10.200-192.168.10.210
EOF

# 컨피그맵 확인
kubectl get cm -n metallb-system
2.2 서비스 생성 및 확인
- 서비스 확인 및 리더 Speaker 파드 확인
kubectl get service
NAME         TYPE           CLUSTER-IP       EXTERNAL-IP      PORT(S)        AGE
svc1         LoadBalancer   10.111.149.51    192.168.10.200   80:31688/TCP   11m
svc2         LoadBalancer   10.102.57.182    192.168.10.201   80:32441/TCP   11m
svc3         LoadBalancer   10.100.104.175   192.168.10.202   80:32331/TCP   11m

[k8s-rtr/k8s-pc] 현재 SVC EXTERNAL-IP를 변수에 지정
SVC1EXIP=$(kubectl get svc svc1 -o jsonpath='{.status.loadBalancer.ingress[0].ip}')
echo $SVC1EXIP
SVC2EXIP=$(kubectl get svc svc2 -o jsonpath='{.status.loadBalancer.ingress[0].ip}')
echo $SVC2EXIP
SVC3EXIP=$(kubectl get svc svc3 -o jsonpath='{.status.loadBalancer.ingress[0].ip}')
echo $SVC3EXIP

[k8s-rtr] 현재 SVC EXTERNAL-IP를 담당하는 리더 Speaker 파드 찾는법 : arping 툴 사용
arping -I enp0s8 -f -c 1 $SVC1EXIP
ARPING 192.168.10.200 from 192.168.10.254 enp0s8
Unicast reply from 192.168.10.200 [08:00:27:F2:32:97]  19.019ms
Sent 1 probes (1 broadcast(s))
Received 1 response(s)

arping -I enp0s8 -f -c 1 $SVC2EXIP
ARPING 192.168.10.201 from 192.168.10.254 enp0s8
Unicast reply from 192.168.10.201 [08:00:27:27:13:00]  1.743ms
Sent 1 probes (1 broadcast(s))
Received 1 response(s)

arping -I enp0s8 -f -c 1 $SVC3EXIP
ARPING 192.168.10.202 from 192.168.10.254 enp0s8
Unicast reply from 192.168.10.202 [08:00:27:F2:32:97]  1.955ms
Sent 1 probes (1 broadcast(s))
Received 1 response(s)

ping -c 1 -w 1 -W 1 $SVC1EXIP; ping -c 1 -w 1 -W 1 $SVC2EXIP; ping -c 1 -w 1 -W 1 $SVC3EXIP
PING 192.168.10.200 (192.168.10.200) 56(84) bytes of data.
--- 192.168.10.200 ping statistics ---
1 packets transmitted, 0 received, 100% packet loss, time 1ms

PING 192.168.10.201 (192.168.10.201) 56(84) bytes of data.
--- 192.168.10.201 ping statistics ---
1 packets transmitted, 0 received, 100% packet loss, time 0ms

PING 192.168.10.202 (192.168.10.202) 56(84) bytes of data.
--- 192.168.10.202 ping statistics ---
1 packets transmitted, 0 received, 100% packet loss, time 0ms

ping -c 1 -w 1 -W 1 192.168.10.10; ping -c 1 -w 1 -W 1 192.168.10.101; ping -c 1 -w 1 -W 1 192.168.10.102
PING 192.168.10.10 (192.168.10.10) 56(84) bytes of data.
64 bytes from 192.168.10.10: icmp_seq=1 ttl=64 time=0.928 ms

--- 192.168.10.10 ping statistics ---
1 packets transmitted, 1 received, 0% packet loss, time 0ms
rtt min/avg/max/mdev = 0.928/0.928/0.928/0.000 ms
PING 192.168.10.101 (192.168.10.101) 56(84) bytes of data.
64 bytes from 192.168.10.101: icmp_seq=1 ttl=64 time=1.20 ms

--- 192.168.10.101 ping statistics ---
1 packets transmitted, 1 received, 0% packet loss, time 0ms
rtt min/avg/max/mdev = 1.202/1.202/1.202/0.000 ms
PING 192.168.10.102 (192.168.10.102) 56(84) bytes of data.
64 bytes from 192.168.10.102: icmp_seq=1 ttl=64 time=1.25 ms

--- 192.168.10.102 ping statistics ---
1 packets transmitted, 1 received, 0% packet loss, time 0ms
rtt min/avg/max/mdev = 1.253/1.253/1.253/0.000 ms

[k8s-rtr] arp 테이블 정보 확인 >> SVC IP별로 리더 파드(스피커) 역할의 노드를 확인!
root@k8s-rtr:~# ip -c neigh | grep 192.168.10. | sort
192.168.10.10 dev enp0s8 lladdr 08:00:27:f2:32:97 REACHABLE
192.168.10.101 dev enp0s8 lladdr 08:00:27:27:13:00 REACHABLE
192.168.10.102 dev enp0s8 lladdr 08:00:27:20:89:f9 REACHABLE
192.168.10.200 dev enp0s8 lladdr 08:00:27:f2:32:97 STALE
192.168.10.201 dev enp0s8 lladdr 08:00:27:27:13:00 STALE
192.168.10.202 dev enp0s8 lladdr 08:00:27:f2:32:97 STALE
2.3 서비스 접속 테스트
- 클라이언트(k8s-pc) → 서비스(External-IP) 접속 테스트
k8s-pc 단말에서 테스트 진행
SVC1EXIP=$(kubectl get svc svc1 -o jsonpath='{.status.loadBalancer.ingress[0].ip}')
echo $SVC1EXIP
SVC2EXIP=$(kubectl get svc svc2 -o jsonpath='{.status.loadBalancer.ingress[0].ip}')
echo $SVC2EXIP
SVC3EXIP=$(kubectl get svc svc3 -o jsonpath='{.status.loadBalancer.ingress[0].ip}')
echo $SVC3EXIP

# RemoteAddr 주소는 어떻게 나오나요? 왜 그럴까요?
curl -s --interface 192.168.20.100 $SVC1EXIP | egrep 'Hostname|RemoteAddr|Host:'
Hostname: webpod2
RemoteAddr: 172.16.116.0:50472
Host: 192.168.10.200

curl -s --interface 192.168.20.100 $SVC2EXIP | egrep 'Hostname|RemoteAddr|Host:'
Hostname: webpod2
RemoteAddr: 172.16.158.0:1325
Host: 192.168.10.201

curl -s --interface 192.168.20.100 $SVC3EXIP | egrep 'Hostname|RemoteAddr|Host:'
Hostname: webpod1
RemoteAddr: 172.16.116.0:33912
Host: 192.168.10.202

# 부하분산 접속됨
for i in {1..100}; do curl -s --interface 192.168.20.100 $SVC1EXIP | grep Hostname; done | sort | uniq -c | sort -nr
for i in {1..100}; do curl -s --interface 192.168.20.100 $SVC2EXIP | grep Hostname; done | sort | uniq -c | sort -nr
for i in {1..100}; do curl -s --interface 192.168.20.100 $SVC3EXIP | grep Hostname; done | sort | uniq -c | sort -nr
3. MetalLB - BGP 모드
3.1 MetalLB - BGP 모드 설정
💡 참고 : 필자는 동적반영이 되지않아 controller, speaker 파드를 재기동하였다.
- MetalLB ConfigMap 생성
cat <<EOF | kubectl replace --force -f -
apiVersion: v1
kind: ConfigMap
metadata:
  namespace: metallb-system
  name: config
data:
  config: |
    peers:
    - peer-address: 192.168.10.254
      peer-asn: 64513
      my-asn: 64512
    address-pools:
    - name: default
      protocol: **bgp**
      avoid-buggy-ips: true
      addresses:
      - **172.20.1.0/24**
EOF
configmap "config" deleted
configmap/config replaced
3.2 서비스 생성 및 확인
- 서비스 확인(노드)
ss -tunp | egrep 'Netid|speaker'
Netid  State  Recv-Q  Send-Q      Local Address:Port        Peer Address:Port   Process

tcp    ESTAB  0       0               10.0.2.15:46476          10.96.0.1:443     users:(("speaker",pid=672757,fd=10))

tcp    ESTAB  0       0          192.168.10.102:46035     192.168.10.254:179     users:(("speaker",pid=672757,fd=20))

```bash
# 서비스 확인
kubectl get service

# 현재 SVC EXTERNAL-IP를 변수에 지정
SVC1EXIP=$(kubectl get svc svc1 -o jsonpath='{.status.loadBalancer.ingress[0].ip}')
echo $SVC1EXIP
SVC2EXIP=$(kubectl get svc svc2 -o jsonpath='{.status.loadBalancer.ingress[0].ip}')
echo $SVC2EXIP
SVC3EXIP=$(kubectl get svc svc3 -o jsonpath='{.status.loadBalancer.ingress[0].ip}')
echo $SVC3EXIP

# TCP 179 포트로 BGP 정보 전파(speaker)
ss -tunp | egrep 'Netid|speaker'
Netid State Recv-Q Send-Q          Local Address:Port              Peer Address:Port           Process
tcp   ESTAB 0      0               192.168.10.10:39171           192.168.10.254:179             users:(("speaker",pid=3057,fd=27))
...

# (옵션) 노드에서 BGP 패킷 캡쳐 확인
tcpdump -i <노드NIC> -nnq tcp port 179
tcpdump -i enp0s8 -nnq tcp port 179
ngrep -tW byline -d enp0s8 '' 'tcp port 179'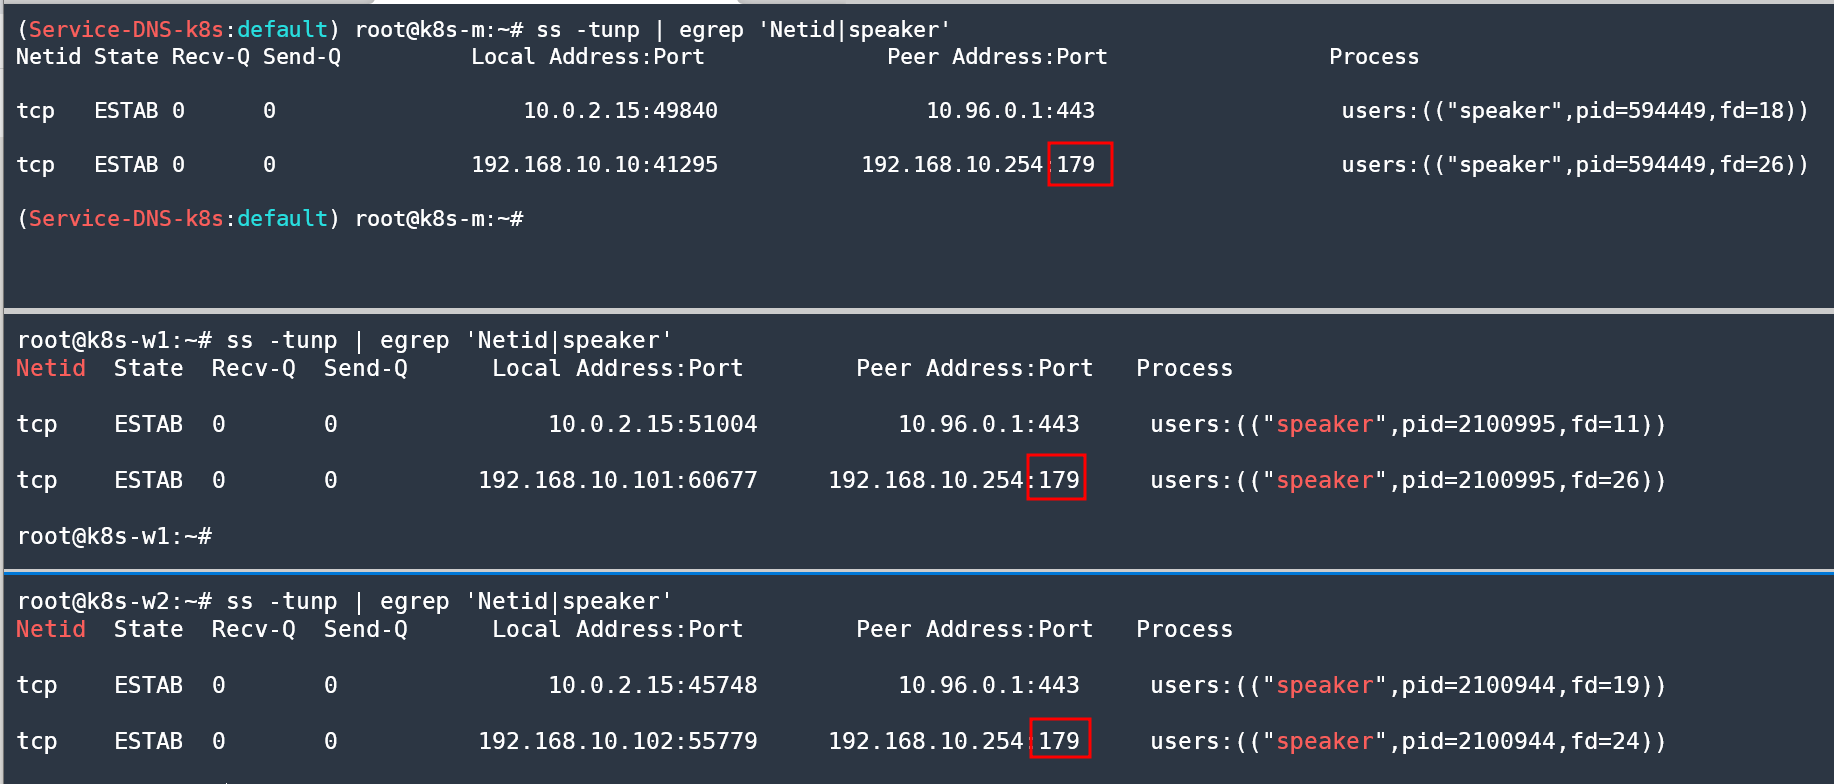
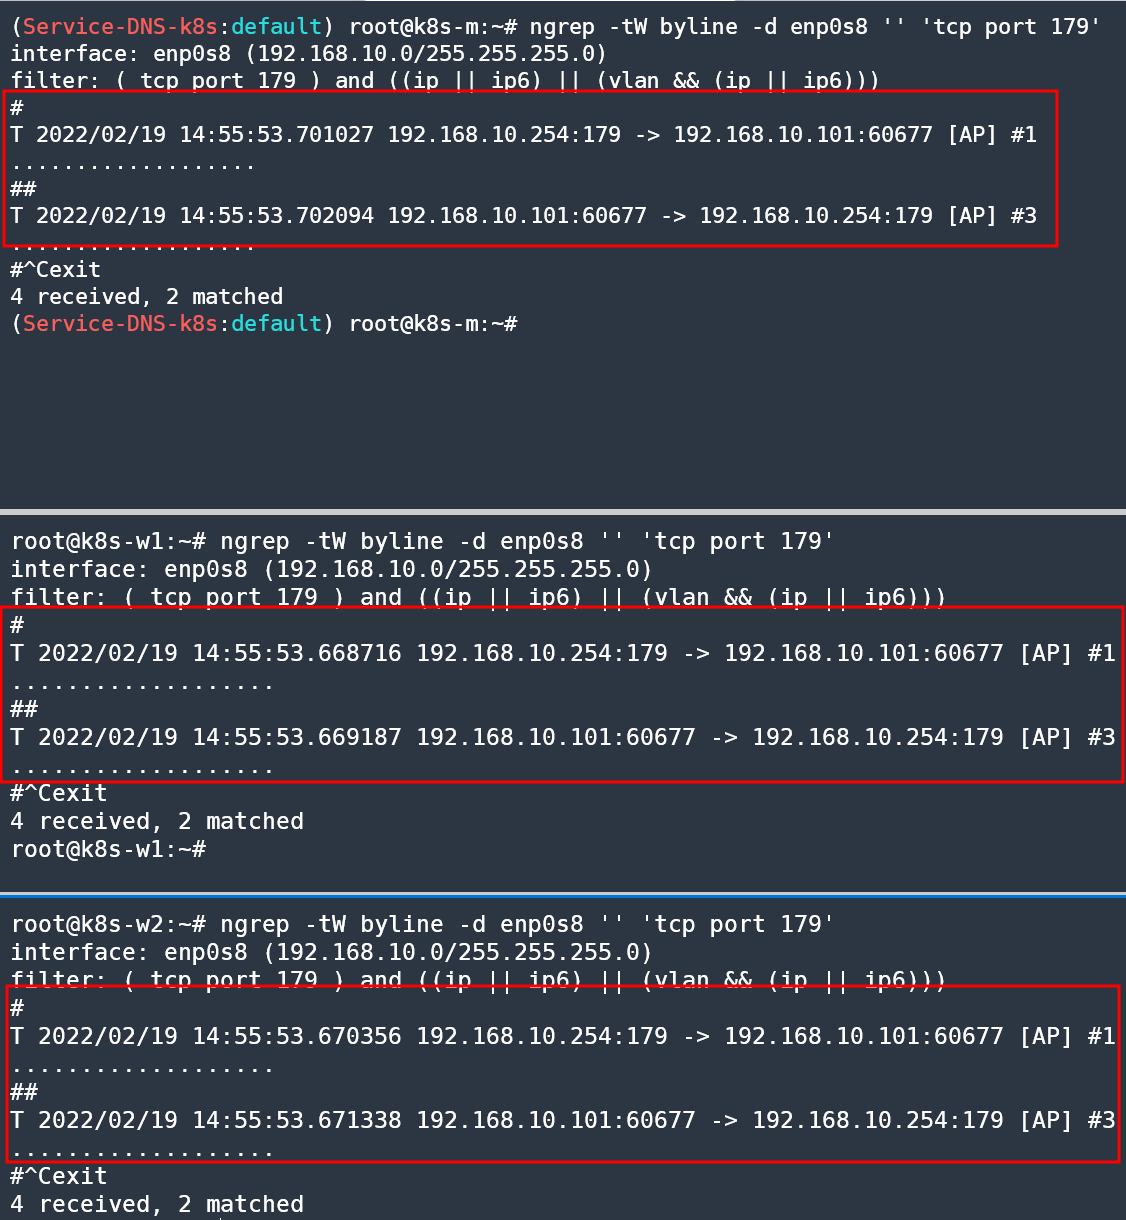
- BGP 정보 확인 (k8s-rtr) : 서비스(EX-IP)들을 32bit IP를 전달 받음 → 축약 대역 전파 설정 가능 ⇒ 다만, 노드들은 상대측 BGP 네트워크 정보를 받지 않는다!
ip -c route | grep 172.20. -A3
172.20.1.1 proto zebra metric 20
        nexthop via 192.168.10.10 dev enp0s8 weight 1
        nexthop via 192.168.10.101 dev enp0s8 weight 1
        nexthop via 192.168.10.102 dev enp0s8 weight 1
172.20.1.2 proto zebra metric 20
        nexthop via 192.168.10.10 dev enp0s8 weight 1
        nexthop via 192.168.10.101 dev enp0s8 weight 1
        nexthop via 192.168.10.102 dev enp0s8 weight 1
172.20.1.3 proto zebra metric 20
        nexthop via 192.168.10.10 dev enp0s8 weight 1
        nexthop via 192.168.10.101 dev enp0s8 weight 1
        nexthop via 192.168.10.102 dev enp0s8 weight 1

---
# vtysh 를 이용한 Quagga 정보 확인
vtysh -c 'show ip route bgp'
Codes: K - kernel route, C - connected, S - static, R - RIP,
       O - OSPF, I - IS-IS, B - BGP, P - PIM, A - Babel, N - NHRP,
       > - selected route, * - FIB route

B>* 10.1.2.0/24 [20/0] via 192.168.20.100, enp0s9, 00:11:11
B>* 172.20.1.1/32 [20/0] via 192.168.10.10, enp0s8, 00:10:41
  *                      via 192.168.10.101, enp0s8, 00:10:41
  *                      via 192.168.10.102, enp0s8, 00:10:41
B>* 172.20.1.2/32 [20/0] via 192.168.10.10, enp0s8, 00:10:41
  *                      via 192.168.10.101, enp0s8, 00:10:41
  *                      via 192.168.10.102, enp0s8, 00:10:41
B>* 172.20.1.3/32 [20/0] via 192.168.10.10, enp0s8, 00:10:41
  *                      via 192.168.10.101, enp0s8, 00:10:41
  *                      via 192.168.10.102, enp0s8, 00:10:41

vtysh -c 'show ip bgp'
BGP table version is 0, local router ID is 192.168.10.254
Status codes: s suppressed, d damped, h history, * valid, > best, = multipath,
              i internal, r RIB-failure, S Stale, R Removed
Origin codes: i - IGP, e - EGP, ? - incomplete

   Network          Next Hop            Metric LocPrf Weight Path
*> 10.1.1.0/24      0.0.0.0                  0         32768 i
*> 10.1.2.0/24      192.168.20.100           0             0 64514 i
*> 172.20.1.1/32    192.168.10.10                          0 64512 ?
*=                  192.168.10.101                         0 64512 ?
*=                  192.168.10.102                         0 64512 ?
*> 172.20.1.2/32    192.168.10.10                          0 64512 ?
*=                  192.168.10.101                         0 64512 ?
*=                  192.168.10.102                         0 64512 ?
*> 172.20.1.3/32    192.168.10.10                          0 64512 ?
*=                  192.168.10.101                         0 64512 ?
*=                  192.168.10.102                         0 64512 ?

Displayed  5 out of 11 total prefixes
3.3 서비스 접속 테스트
- 클라이언트(k8s-pc) → 서비스(External-IP) 접속 테스트
# 라우팅 테이블 정보 확인
ip -c route | grep zebra
	10.1.1.0/24 via 192.168.20.254 dev enp0s8 proto zebra metric 20
	172.20.1.1 via 192.168.20.254 dev enp0s8 proto zebra metric 20
	172.20.1.2 via 192.168.20.254 dev enp0s8 proto zebra metric 20
	172.20.1.3 via 192.168.20.254 dev enp0s8 proto zebra metric 20

# RemoteAddr 주소 확인
curl -s --interface 192.168.20.100 $SVC1EXIP | egrep 'Hostname|RemoteAddr|Host:'
Hostname: webpod1
RemoteAddr: 10.0.2.15:11444
Host: 172.20.1.3

curl -s --interface 192.168.20.100 $SVC2EXIP | egrep 'Hostname|RemoteAddr|Host:'
face 192.168.20.100 $SVC3EXIP | egrep 'Hostname|RemoteAddr|Host:'Hostname: webpod2
RemoteAddr: 10.0.2.15:8489
Host: 172.20.1.1

curl -s --interface 192.168.20.100 $SVC3EXIP | egrep 'Hostname|RemoteAddr|Host:'
Hostname: webpod2
RemoteAddr: 10.0.2.15:11143
Host: 172.20.1.2
3.4 externalTrafficPolicy: Local 테스트
-
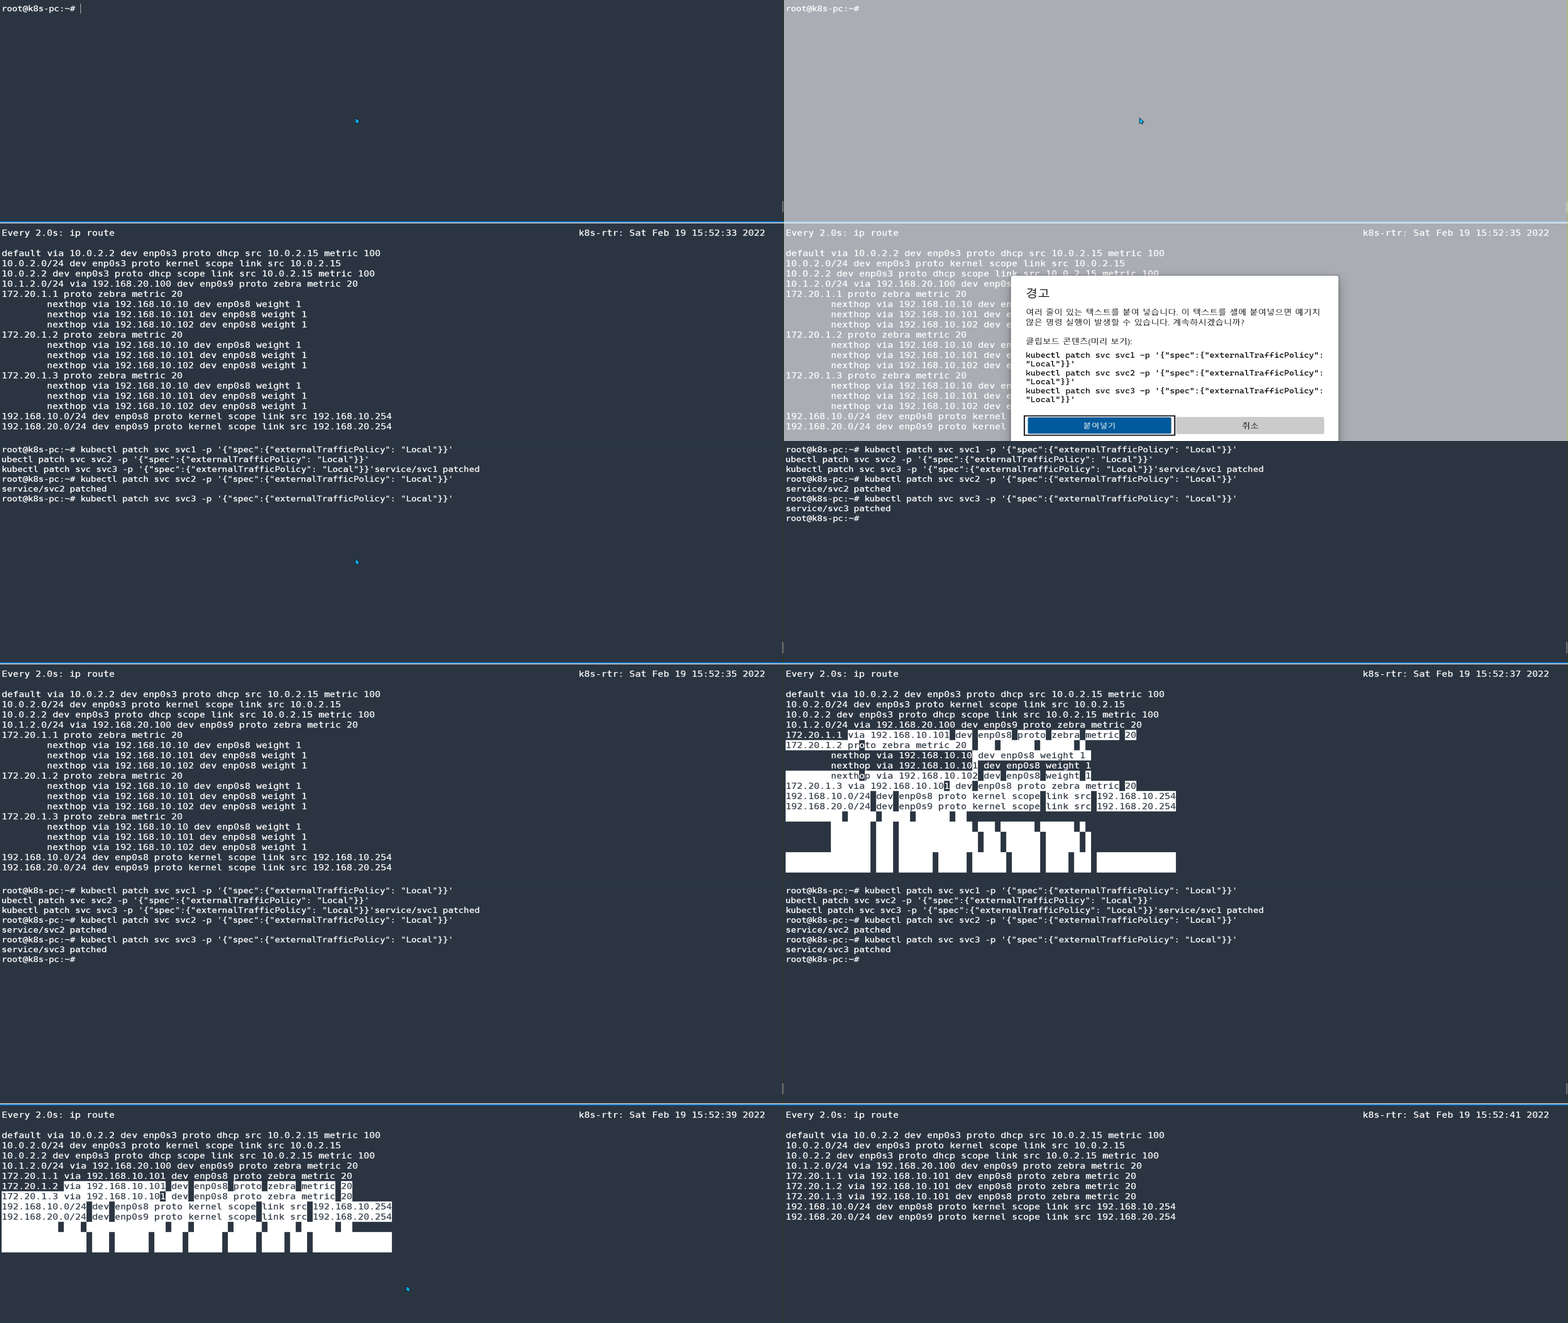
서비스에 externalTrafficPolicy: Local 설정
-
리눅스 라우터에서 BGP 정보 확인
ip -c route
172.20.1.1 proto zebra metric 20
        nexthop via 192.168.10.102 dev enp0s8 weight 1
        nexthop via 192.168.10.101 dev enp0s8 weight 1
172.20.1.2 proto zebra metric 20
        nexthop via 192.168.10.102 dev enp0s8 weight 1
        nexthop via 192.168.10.101 dev enp0s8 weight 1
172.20.1.3 proto zebra metric 20
        nexthop via 192.168.10.102 dev enp0s8 weight 1
        nexthop via 192.168.10.101 dev enp0s8 weight 1
...- 클라이언트 → 서비스(External-IP) 접속 : 라우터 ECMP 분산 접속, 클라이언트의 IP가 보존!

💡 참고 : MetalLB 사용 시 가장 권장하는 방법은 BGP 모드에 externalTrafficPolicy: Local 설정을 하는 것
이상으로 CoreDNS와 Service에 대해서 알아보았다. 이번주에는 가장 마지막에 학습한 MetalLB와 관련된 실습이 가장 유익했다.
매번 MetalLB를 PoC 할 때에 가장 단순한 L2 모드로 설정하고 진행하였는데, 왜? 그리고 어떻게? 하면 더욱 효율적으로 사용할 수 있을지도 깨닳을 수 있는 시간이었다.
다음 글에서는 좀 더 자세한 패킷 분석 및 iptalbes 룰에 대해서 분석해볼 예정이다.
